-
 alexisscipioFollowed the instructions to create a unique ID with 4 didgits and Prefix "BOW". For some reason the system keeps genrating a longer ID like this "ID#: 6499059730427993578" How can I fix this?
 Page URL: https://form.jotform.com/260537495804161
 -
 Kris Ann JotForm Support
Hi Alexis,
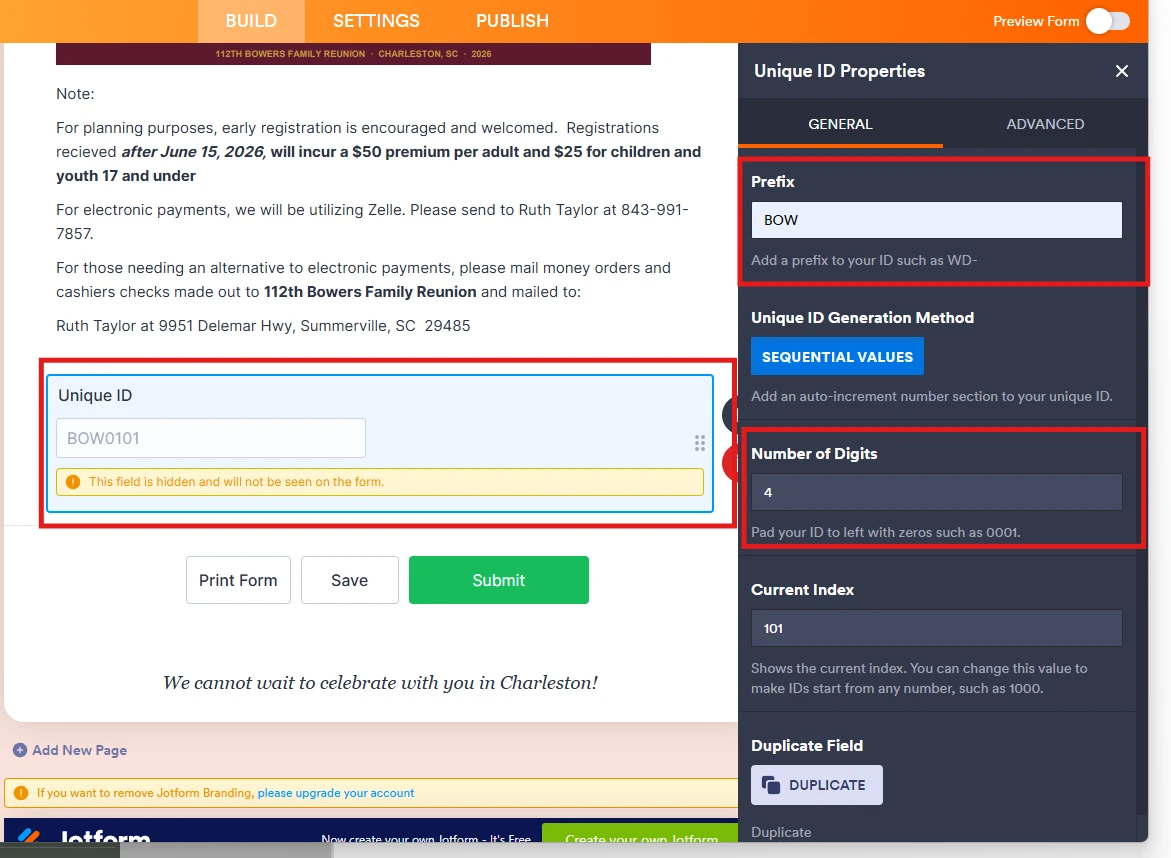
Thanks for reaching out to Jotform Support. When I cloned and tested your form, everything worked the way it was supposed to. Take a look at the screenshot below to see my results:
Since the form is in another account, Let us take a look at this for you. To do that, we’ll need your permission to access that account. Don’t worry, you can turn it off again once we’re done. Let me show you how to do it:1. In the top-right corner of your Workspace page, click on your Avatar/Profile Image icon.
2. Then, in the Dropdown menu that opens, click on Settings.
3. Next, in the panel on the left, click on the Security tab.
4. If you haven’t opened your Security page in a while, it’ll ask you to verify. To do that, click on Send Verification Code.
5. Then, enter the Verification Code you receive in your email.
6. Finally, at the bottom of the page, toggle on Jotform Support Access.
After we hear back from you, we’ll have a better idea of what’s going on and how to help. -
alexisscipioHello and thank you for the speedy response. Jotform support access is now
enabled! appreciate it
... -
 John JotForm Support
Hi Alexis,
When I checked the form, I saw that it belongs to a different account, so we can’t access it yet. The Jotform Support Access setting needs to be turned on in that account. If you have access, you can enable it there. If not, you can share this ticket with the account owner so they can turn it on. They can also reply here if they have any questions.
Also, where do you see the unique ID shown in the format you mentioned? Is it from the email or from the form’s Jotform Tables? A screenshot or recording of what’s happening would help us figure this out. You can use Loom or upload to Google Drive or Dropbox, then send us the link. We’ve also got a guide explaining how to send us a screenshot.
After we hear back from you, we’ll have a better idea of what’s going on and how to help.
-
alexisscipioAlso how can I link this form to my workspace? I dont see it visible.
All the best
Alexis
... -
John JotForm Support
Hi Alexis,
As mentioned in my previous reply, the form belongs to a different account, which is why it’s not showing on your Workspace page. Do you also have access to that account? You can log into it to view and update the form, or move the form to the account you’re currently logged into if you prefer.
Transferring Your Forms and Data to Another Account is easy. When you transfer a form, all its submission data moves with it, and the receiving account becomes the new owner. There are a few things you need to be aware of:
- If you're using a custom URL, it’ll automatically update from https://form.jotform.com/{yourUsername}/{your-custom-url-slug} to https://form.jotform.com/{New_Owner_Username}/{your-custom-url-slug}.
- The transfer can’t be undone unless the new owner agrees to send the forms back.
- It's not possible to transfer forms to or from HIPAA-friendly accounts.
Now, let me show you how to do it:
1. On your Workspace page, click on your Avatar/Profile Image in the top-right corner of the screen.
2. In the window that opens, click on Settings.
3. Then, click on the Data tab on the left.
4. In the Transfer Form section, click on Transfer Form.
5. Next, enter the Authentication Code that is sent to your email address, and click on Verify.
6. In the window that opens, tick the box next to the name of the form you want to transfer.
7. In the New Email Owner’s Email Address field, enter the email address of the account that you want the forms to be transferred to.
8. Now, click on Transfer Form.
Keep in mind that you can only send one form transfer at a time. You can also cancel the current transfer request. Let me show you how:1. While you are still on the Data page, click on the View Details button in the Pending Transfer section.
2. Then, click on Cancel Request.
3. Finally, click on Yes, Cancel.
Once the forms are transferred, the owner of the account receiving the forms will get an email notification. From that email, they can click on the View Transfer button, then click on Accept to complete the transfer. Check out the screencast below:Reach out again if you have any other questions.
-
alexisscipiois there anyway to take ownership of this form?
Alexis
... -
 Christian Ice JotForm Support
Hi Alexis,
To take ownership of a form, you need to transfer it from the current owner's account to your own account. You can follow the guide provided by my colleague here. If you do not have access to the account where the form you want to transfer is, you will need to ask the form owner to initiate the transfer.
Let us know if you have any other questions.
-
alexisscipioHello! Is there a way to "duplicate" this exact form and place on my
ownership so I can manipulate the form. The form owner did share it with me
(I can show evidence of this via email) but she is non reachable at the
moment due to a personal event.
Is there a way to make a "copy" of this form?
Thank you so much!
Alexis
... -
 Lorenz JotForm Support
Hi Alexis,
If the form is not restricted, you can clone the form to your account using the form URL. Cloning an Existing Form From a URL is easy. Let me walk you through it:
1. On your Workspace page, click on Create on the top-left side of the page.
2. Select Form from the assets, and then click on Import Form.
3. In the next window, click on From a Web Page.
4. Paste the form link into the Enter URL field and click on Create Form.
Give it a try and let us know if you need any other help.
-
alexisscipioThank you!
Now that I have the clone document (https://form.jotform.com/260813214715047)
I am still having issues with the Unique ID. It is not generating ID memo
#. Please see screenshot below.
... -
alexisscipioHello! Please allow me to clarify. I can now see the Unique ID on my side
but I need to the person submitting the form to have the number as well
upon submission so they can note it for their records and connect it to an
invoice payment. Is there any way the Identifier can be seen by both
parties?
... -
 Sheena JotForm Support
Hi Alexis,
The Unique ID widget generates a custom ID after each submission, so it cannot be not visible to the person filling out the form by default. It can only appear in the submission table, email notifications, and any connected integrations.
As a workaround, you can use the Random Value Generator widget, which generates a value as soon as the user opens the form. Let me show you how:
- In Form Builder, click on the + Add Form Element button, then go to the Widgets tab.
- Search for Random Value Generator, then add it to the form.
- Then, configure the Random Value Generator, then click on Update.
Give it a try and let us know if you need any help.
-
alexisscipioHow can I get the memo number to show to the person submitting the
form. They will need this memo number as reference. Is there a way for the
Unique ID to show externally? Alternatively does the ID# shown below show
in our form records?
... -
Kris Ann JotForm Support
Hi Alexis,
As what my colleague Sheena mentioned, the form fillers will see the Unique ID on the Autoresponder Email that they will receive after they submit the form. Looks like the screenshot didn’t come through on my end. Can you send it again? Our guide on How to Post Screenshots to Our Help Center shows you how to do that.
Once we hear back from you, we can help you sort this out.
-
Sheena JotForm Support
Hi Alexis,
Instead of showing the Unique ID on the live form, you can display a Form Field such as Unique ID element on the Thank you Page in just a few clicks. Let me show you an example of how to do that:
- In Form Builder, in the orange navigation bar at the top of the page, click on Settings.
- Then, in the menu on the left side of the page, click on Thank You Page.
- Next, click on the area where you want to add the field, and then click on Add Field.
- Now, in the menu that opens on the right side of the page, select the Fields tab, and then click on the Plus icon next to the field you want to add.
 Since the form is in another account, Let us take a look at this for you. To do that, we’ll need your permission to access that account. Don’t worry, you can turn it off again once we’re done. Let me show you how to do it:


 After we hear back from you, we’ll have a better idea of what’s going on and how to help.


 Keep in mind that you can only send one form transfer at a time. You can also cancel the current transfer request. Let me show you how:

 Once the forms are transferred, the owner of the account receiving the forms will get an email notification. From that email, they can click on the View Transfer button, then click on Accept to complete the transfer. Check out the screencast below:
