With Jotform, you can easily add an Appointment element to your form so users can pick available dates and time slots without back-and-forth emails. This helps you manage bookings more efficiently while giving users a convenient way to schedule.
Here are a few ways to use it:
- Let users book appointments directly from your form.
- Manage availability with predefined time slots.
- Reduce scheduling conflicts.
- Streamline bookings for services, consultations, or meetings.
Adding the Appointment Element
Whether you’re creating a new form or updating an existing one, you can add and set up the Appointment element in a few easy steps. Here’s how to do it:
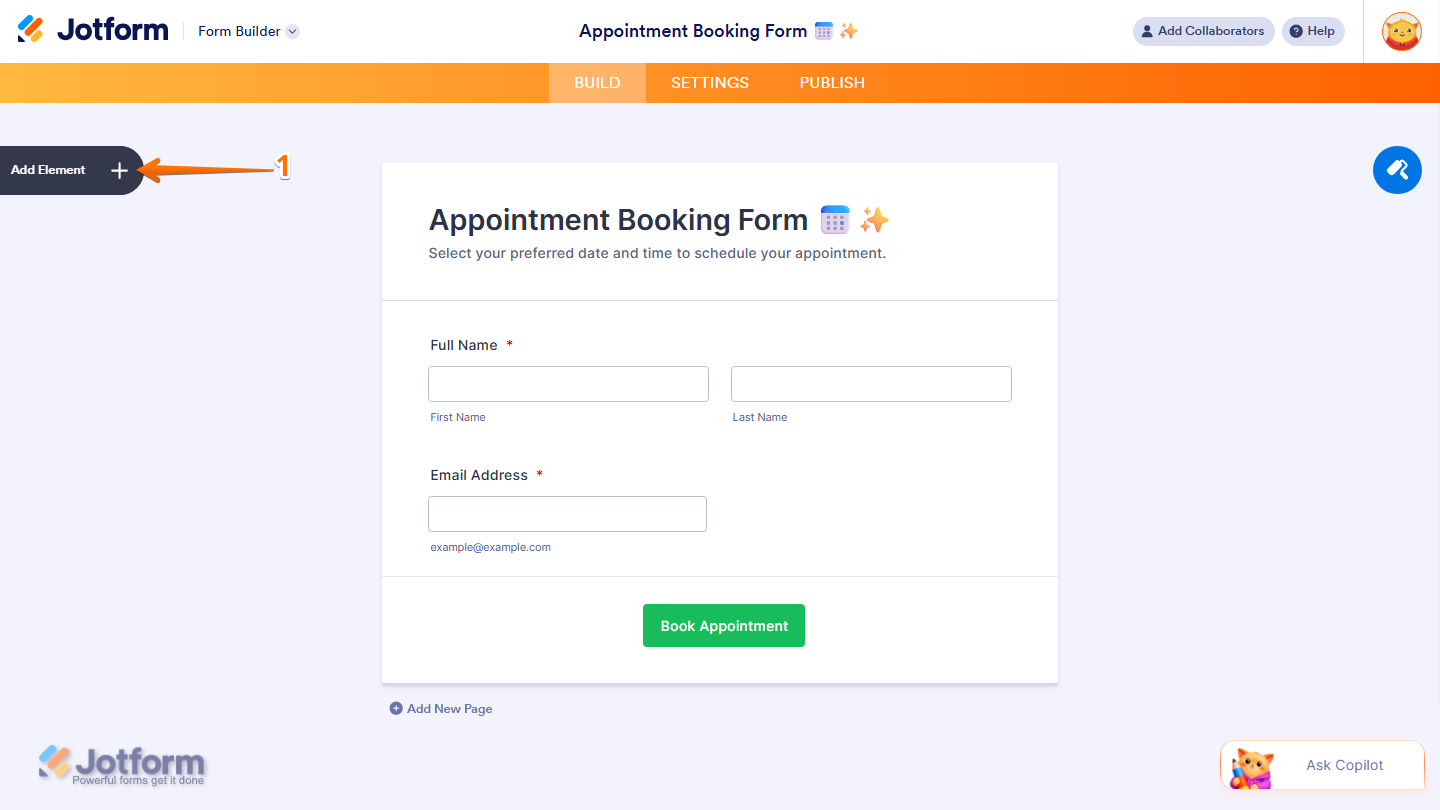
- In Form Builder, click on Add Element on the left side of the page.
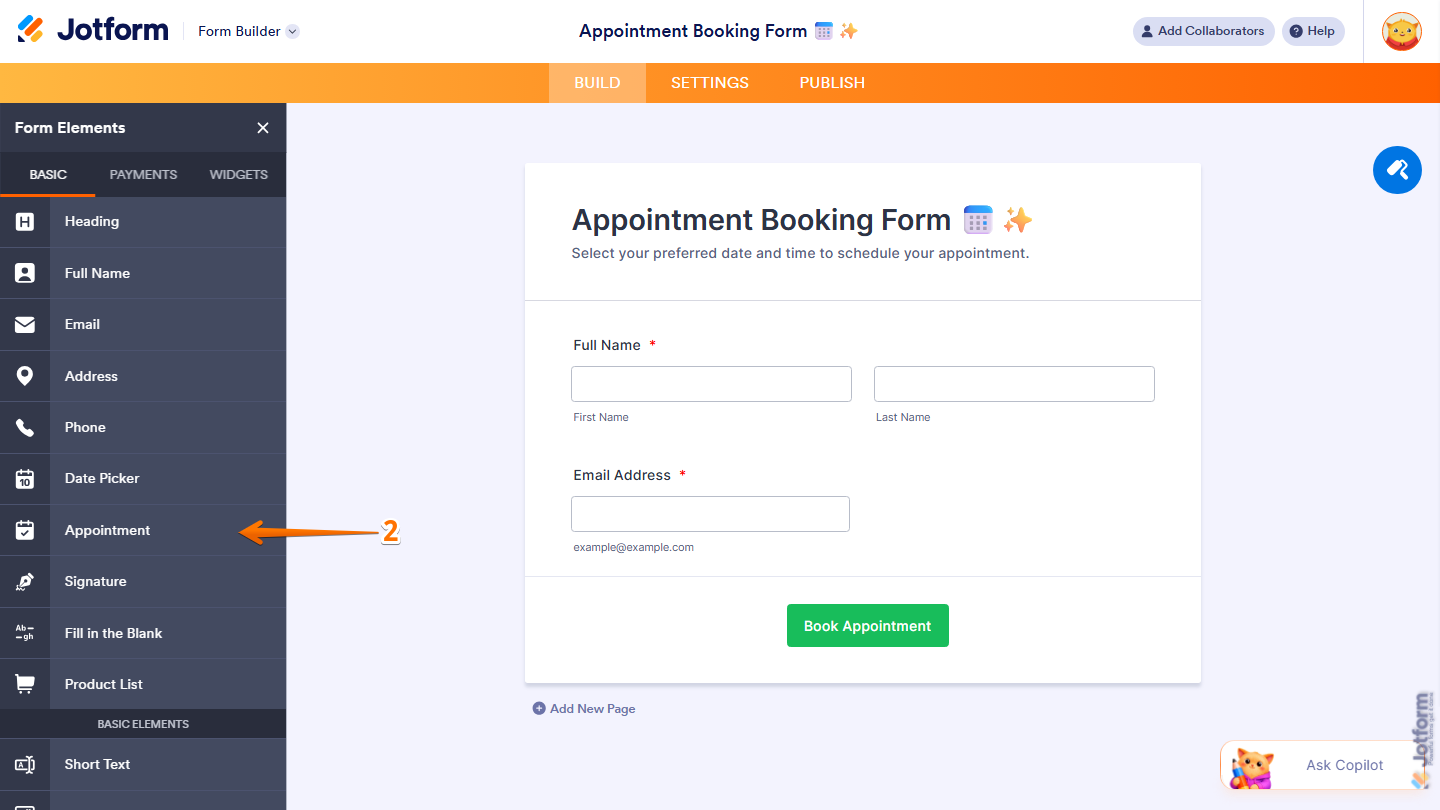
- Now, in the Form Elements menu, under the Basic tab, click on Appointment Element. Or, just drag and drop it to where you want it to be on your form.
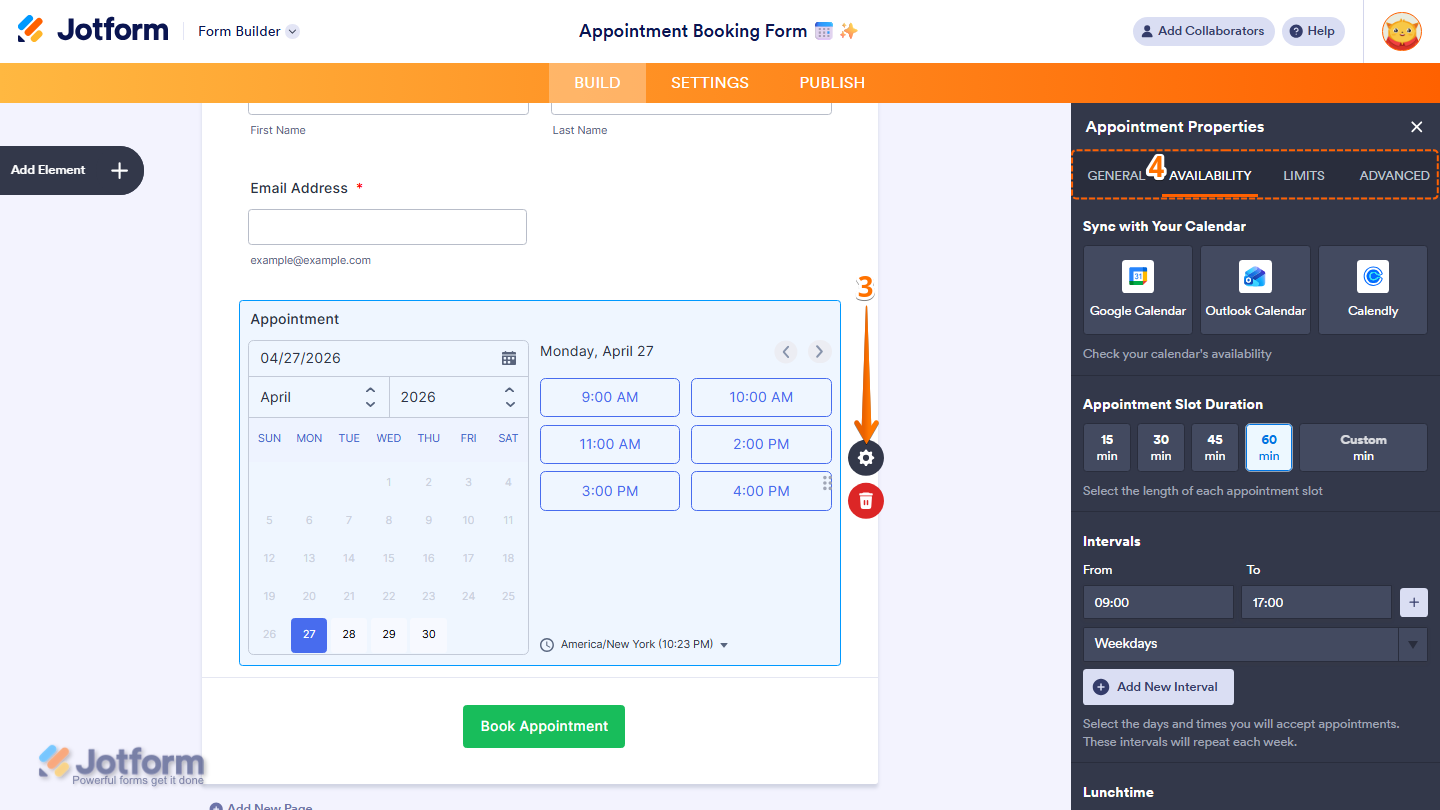
- Next, click on the Gear icon to open the Appointment Properties menu on the right side of the page.
- Now, you’ll see the following tabs where you can configure the Appointment properties element:
Let’s discuss in detail each tab below:
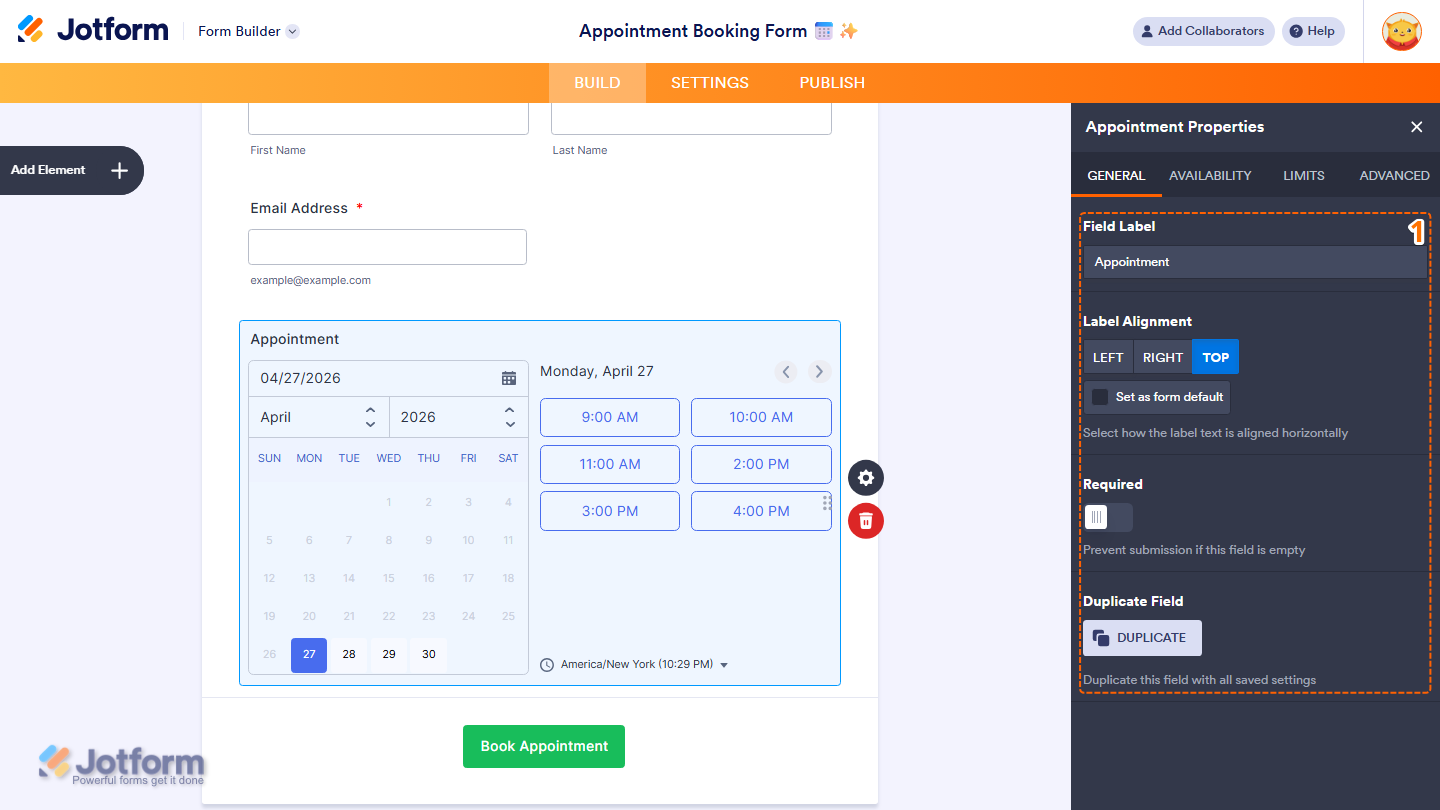
General Tab
The General tab includes the basic settings for the Appointment element, such as the field label, alignment, and required options. Here’s what to do:
- Under the General tab, set up these things:
- Field Label — Enter the label that will appear above the appointment field on your form.
- Label Alignment — Choose how the label is aligned. Options include Left, Right, and Top. Check on Set as Form Default to apply this alignment to all fields on your form.
- Required — Toggle this on to prevent form submission if this field is left empty.
- Duplicate Field — Click on Duplicate to create a copy of this field with all its saved settings.
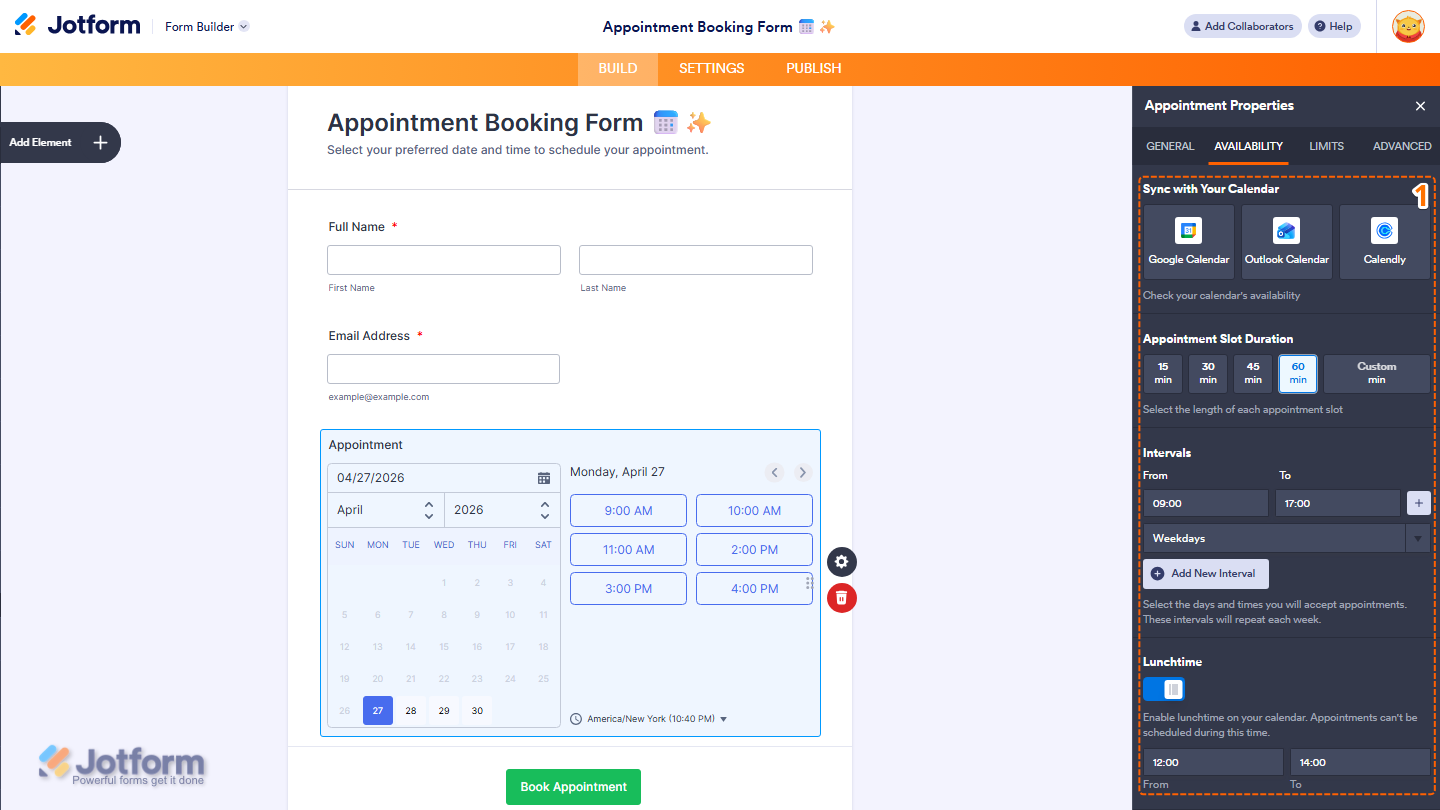
Availability Tab
The Availability tab lets you control when appointments can be booked. You can set your working hours, sync with your calendar, and configure appointment slot durations. Here’s what to do next:
- Under the Availability tab, configure these things:
- Sync with Your Calendar — Connect your calendar to enable two-way sync with your appointment field. This means appointments booked through your form will automatically appear on your calendar, and your existing calendar events will block out those time slots on your form so they can’t be double-booked. Options include Google Calendar, Outlook Calendar, and Calendly. Check out our guide on How to Enable Two-Way Sync in Appointment Fields to learn more about it.
- Appointment Slot Duration — Select the length of each appointment slot. Options include 15 min, 30 min, 45 min, 60 min, and Custom.
- Intervals — Set the days and times you will accept appointments. Enter the From and To times, then select the days from the dropdown. Click on Add New Interval to add more time slots. These intervals will repeat each week.
- Lunchtime — Toggle this on to block out a lunch break so appointments can’t be scheduled during that time. Set the From and To times for your lunch break.
If you want to explore more features about the Sync with Your Calendar feature, here are some helpful guides:
- How to Integrate Your Form with Google Calendar
- How to Integrate Your Form with Calendly
- How to Integrate your Jotform Appointments with Microsoft Outlook Calendar
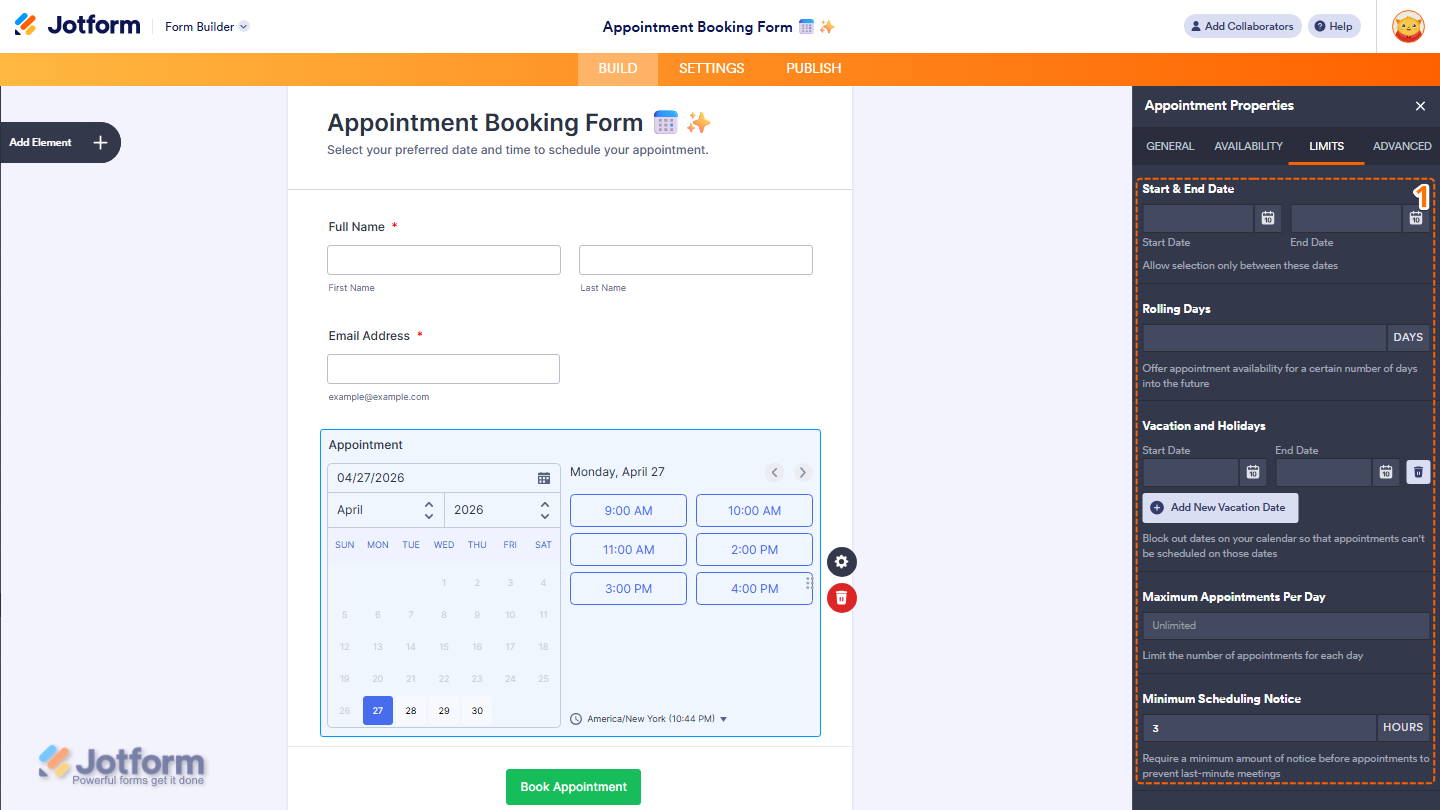
Limits Tab
The Limits tab includes options to restrict appointment availability. You can set date ranges, block out holidays, and limit the number of appointments per day. Here’s what to set up:
- Under the Limits tab, set things up like this:
- Start & End Date — Set a date range to allow bookings only between specific dates.
- Rolling Days — Enter the number of days into the future you want to offer appointment availability.
- Vacation and Holidays — Block out specific dates so appointments can’t be scheduled on those days. Click on Add New Vacation Date to add more dates.
- Maximum Appointments Per Day — Set the maximum number of appointments that can be booked each day. Leave it as Unlimited to allow any number of bookings.
- Minimum Scheduling Notice — Set the minimum amount of notice required before an appointment can be booked. This helps prevent last-minute bookings.
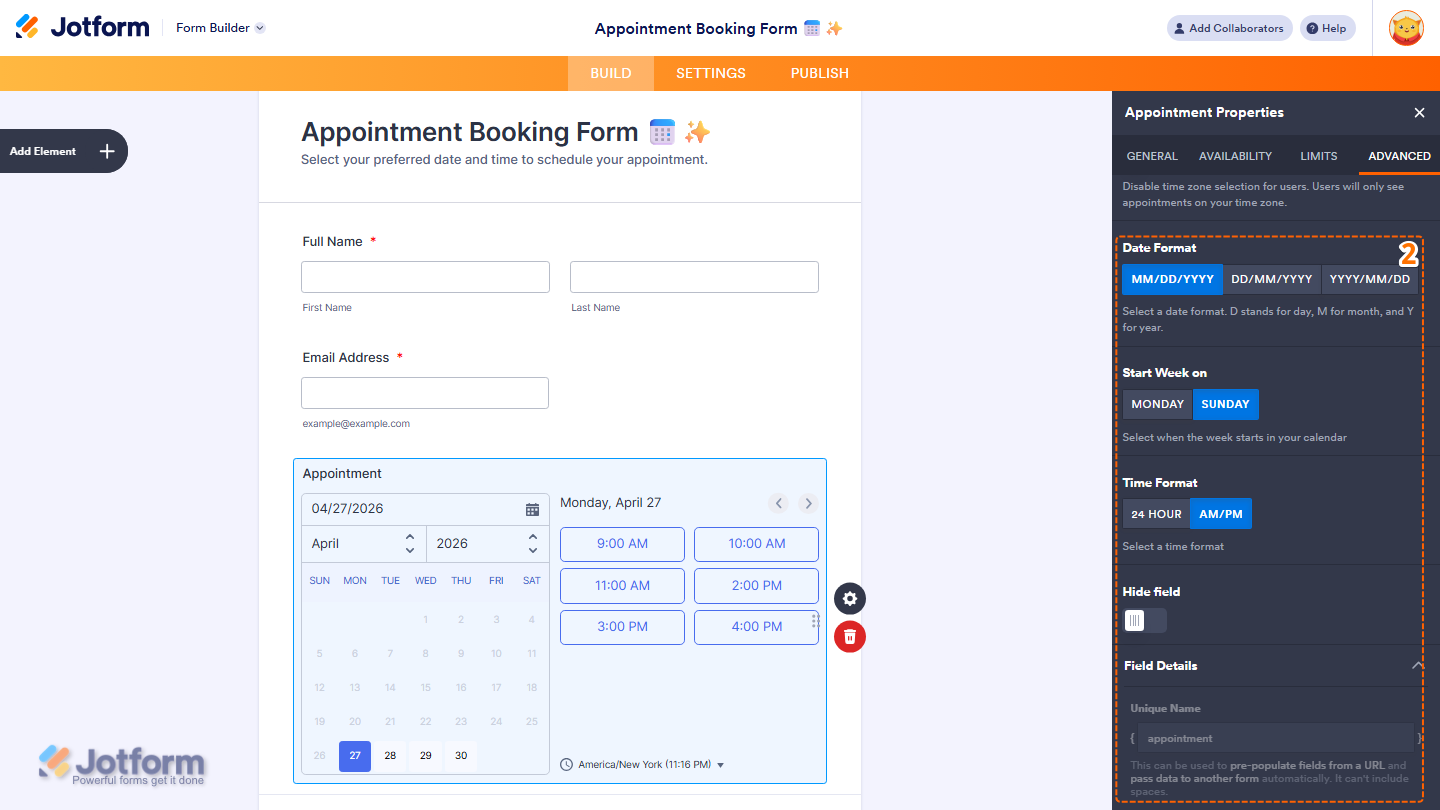
Advanced Tab
The Advanced tab provides additional customization options, such as appointment type, reminder emails, time zone settings, and display preferences. Here’s what to fill in:
- Under the Advanced tab, fill in these details:
- Appointment Type — Choose whether each appointment slot is available to one person or multiple people:
- One-on-one — Each slot can only be booked by one person.
- Group — Each slot can be booked by multiple people.
- Send Reminder Emails — Toggle this on to automatically send reminder emails to all attendees before the appointment time.
- Default Time Zone — Select the time zone for your appointments. Your attendees will see your availability in their local time zone.
- Lock the Time Zone — Toggle this on to disable time zone selection for users, so they only see appointments in your time zone.
- Appointment Type — Choose whether each appointment slot is available to one person or multiple people:

- Then, scroll down to finish setting up these things:
- Date Format — Choose how the date is displayed. Options include MM/DD/YYYY, DD/MM/YYYY, and YYYY/MM/DD.
- Start Week on — Choose whether the calendar week starts on Monday or Sunday.
- Time Format — Choose how the time is displayed. Options include 24 Hour and AM/PM.
- Hide Field — Toggle this on to hide the field from form fillers.
- Field Details — View additional technical information about the field:
- Unique Name — The unique identifier for the field, which can be used to pre-populate it from a URL or pass data to another form automatically.
That’s it! You’ve successfully added and set up the Appointment element on your form. Once configured, your form is ready to accept appointment bookings based on your availability. You can always revisit the settings to adjust your schedule, limits, or display options as your needs change.

Send Comment:
1 Comment:
May 20, 2026
Maximum Appointments Per Day — Set the maximum number of appointments that can be booked each day. Leave it as Unlimited to allow any number of bookings.
I want to be able to put different maximum for each intervals - how can I do this??