
Integrating Mailchimp with Jotform
- To connect with Mailchimp, click Settings.
- Select the Integrations tab.
- Find Mailchimp integration and authenticate.
- Configure your settings and click Complete Integration.
- To connect with Stripe, click on the + Add Form Element button.
- Click on the Payment tab.
- Find and select the Stripe form element.
- Add the integration to the form.
- Click the Gear button and select your preferred mode.
- Click Connect.
- Set up the other settings.
- Make adjustments to optional settings.
- Select the payment type and set up your product options.
- Click on Save.
Collecting payment and communicating with potential customers are central pillars of any business, regardless of size. For many companies, these functions are performed through digital solutions designed specifically for payment and marketing purposes. Two top examples include Stripe, a leading payment platform, and Mailchimp, a marketing automation software.
However, you must connect your solutions to maximize the return on your investment in these programs. By learning how to integrate Stripe with Mailchimp — and other powerful solutions like Jotform — you can optimize your workflow automation, enhance the usefulness of your data, and streamline your business processes.
What Mailchimp Stripe integration options are available?
When it comes to connecting Mailchimp and Stripe, there are various options to choose from. Many third-party products offer integrations that can connect these two programs and create more value for your business, such as
Using these third-party solutions, you can easily connect Mailchimp and Stripe to maximize the effectiveness of your workflows. However, some third-party solutions, like Jotform, will save even more time by automatically triggering actions in both Mailchimp and Stripe simultaneously.
How to integrate Mailchimp and Stripe with Jotform
To create a seamless connection between your online forms, marketing efforts, and payment gateways, you can easily connect Mailchimp and Stripe with Jotform. Jotform offers dedicated Stripe and Mailchimp integrations that simplify this process.
Integrating Mailchimp with Jotform
Learn how to integrate Mailchimp with Jotform by following these easy steps:
- Open the Jotform Form Builder and click the Settings button at the top.
- Select the Integrations tab on the left-hand menu.
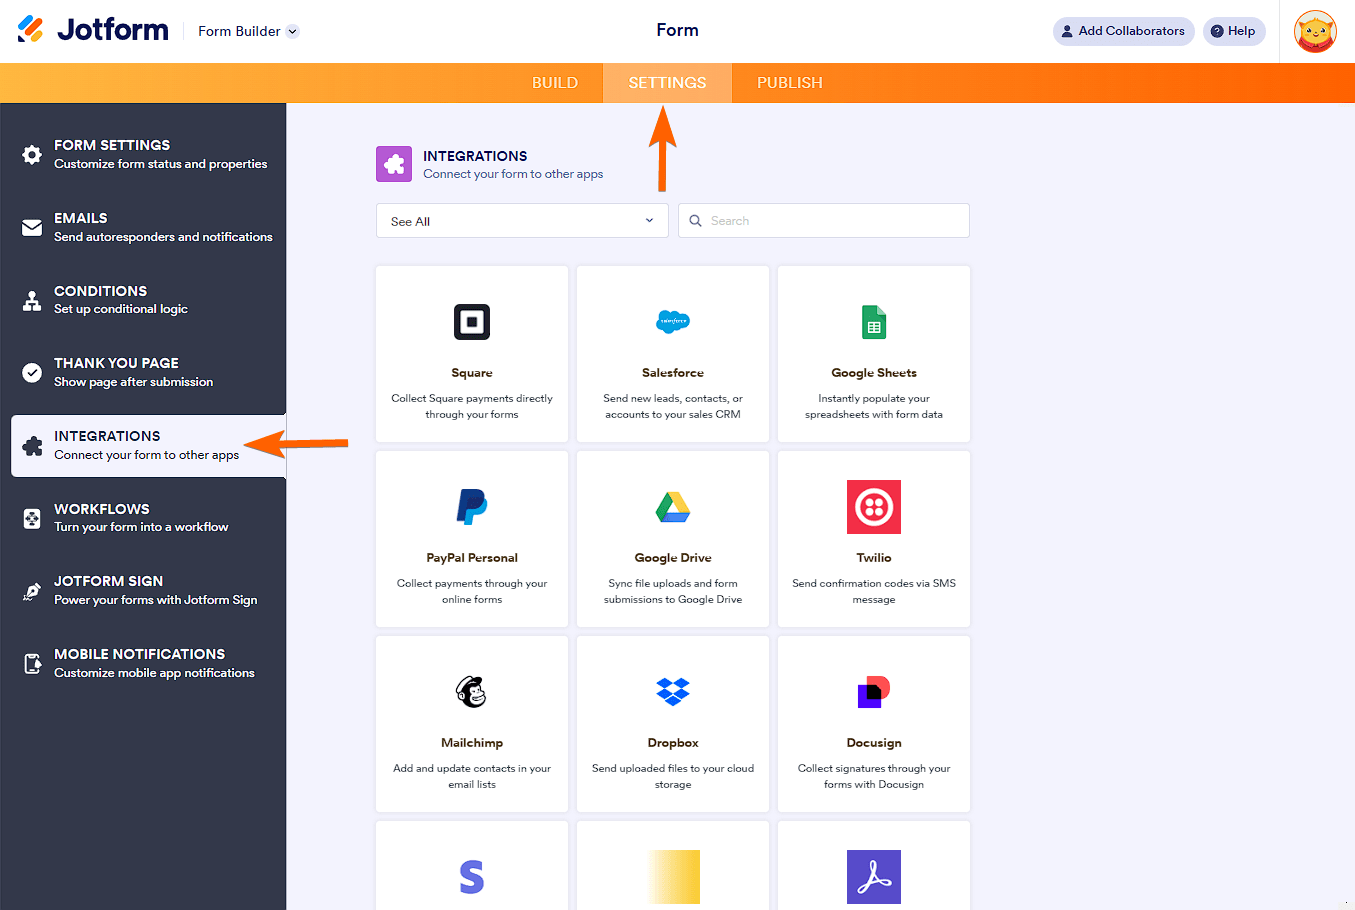
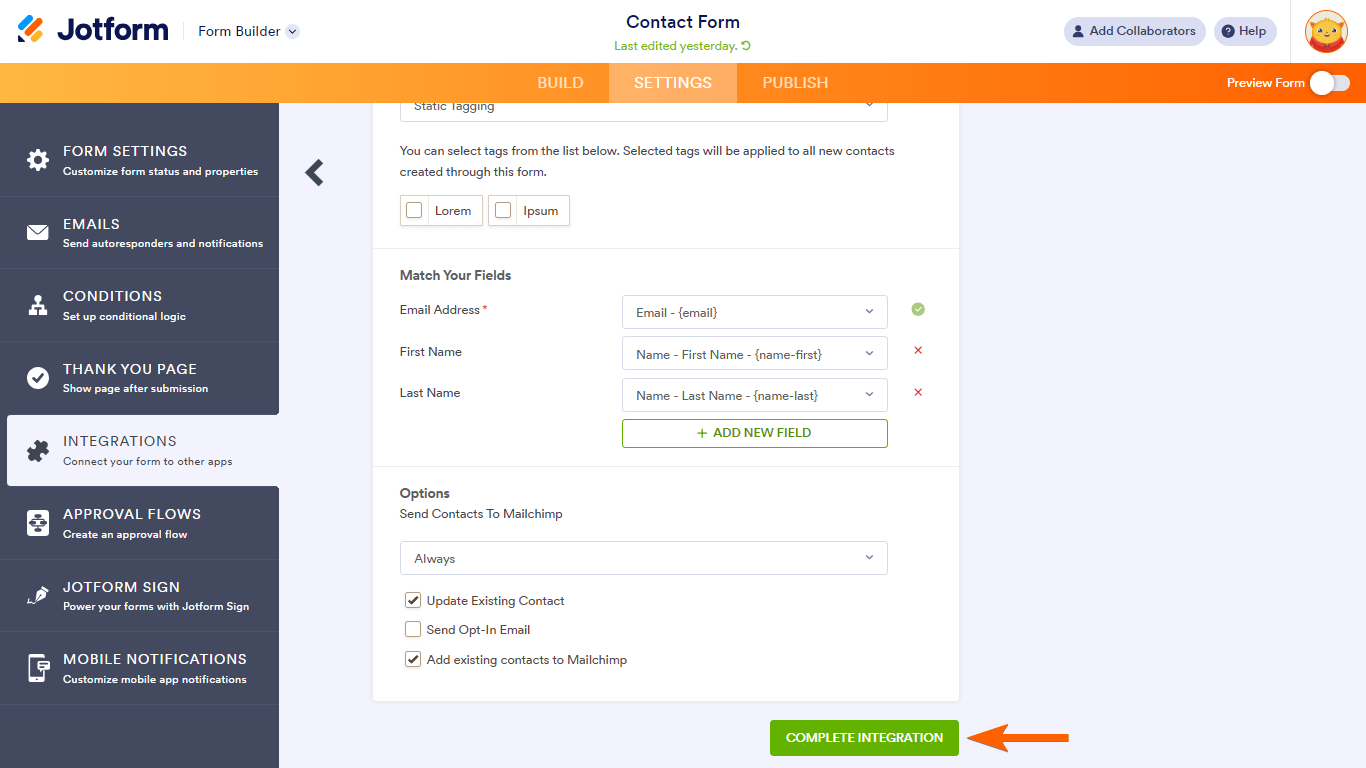
- Use the search bar to find the Mailchimp integration, then select the integration and authenticate your account.

- Once your integration is authenticated, you can configure your settings and click the Complete Integration button at the bottom to finalize your choices.
Integrating Stripe with Jotform
Discover how to integrate Stripe with Jotform on either a new or existing form with this quick walkthrough:
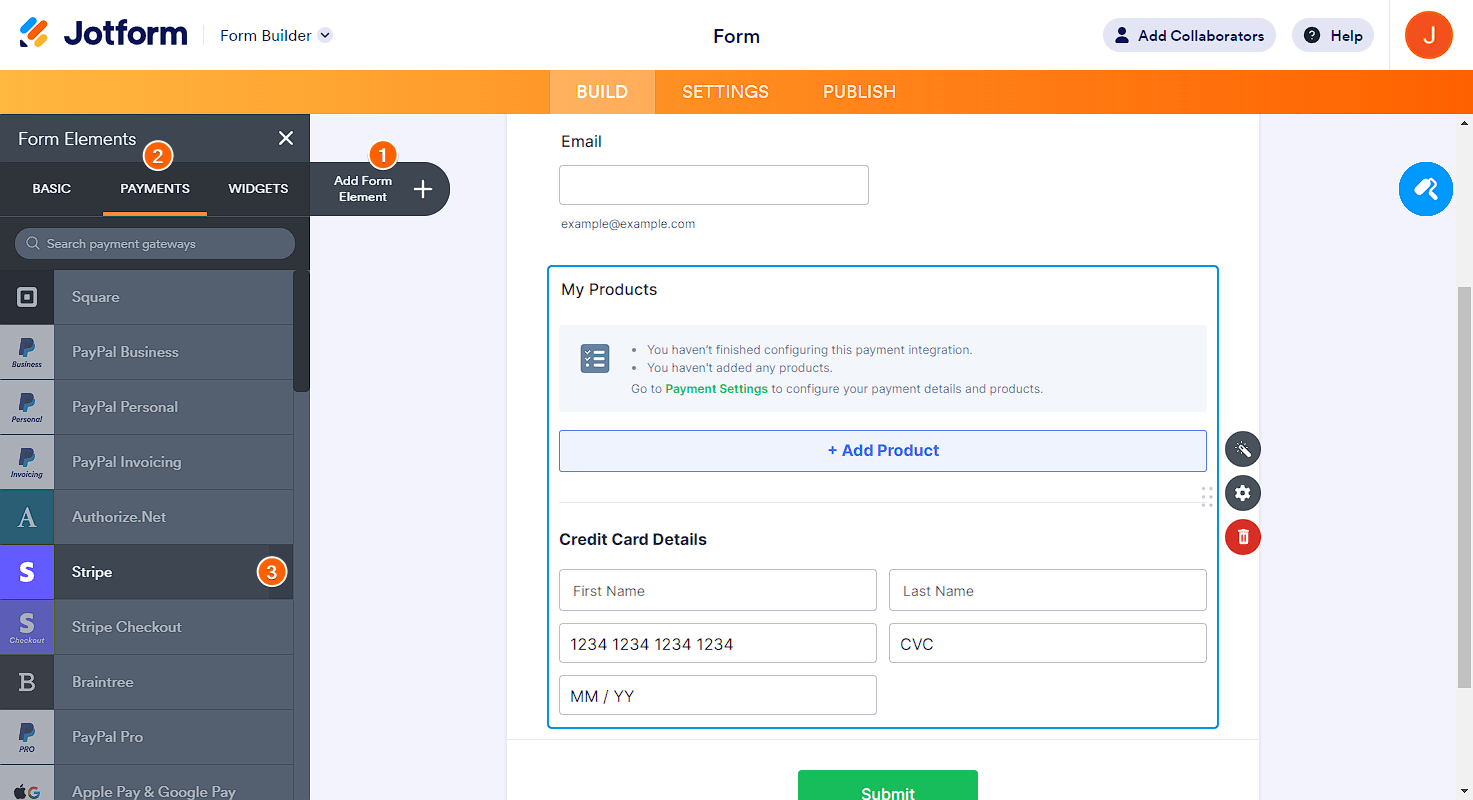
- Open the Jotform Form Builder and click on the + Add Form Element button on the left-hand side.
- Click on the Payment tab at the top of the Form Elements menu.
- Use the search bar or scroll down to find and select the Stripe form element. Add it to your form by clicking on it or dragging and dropping it into position.
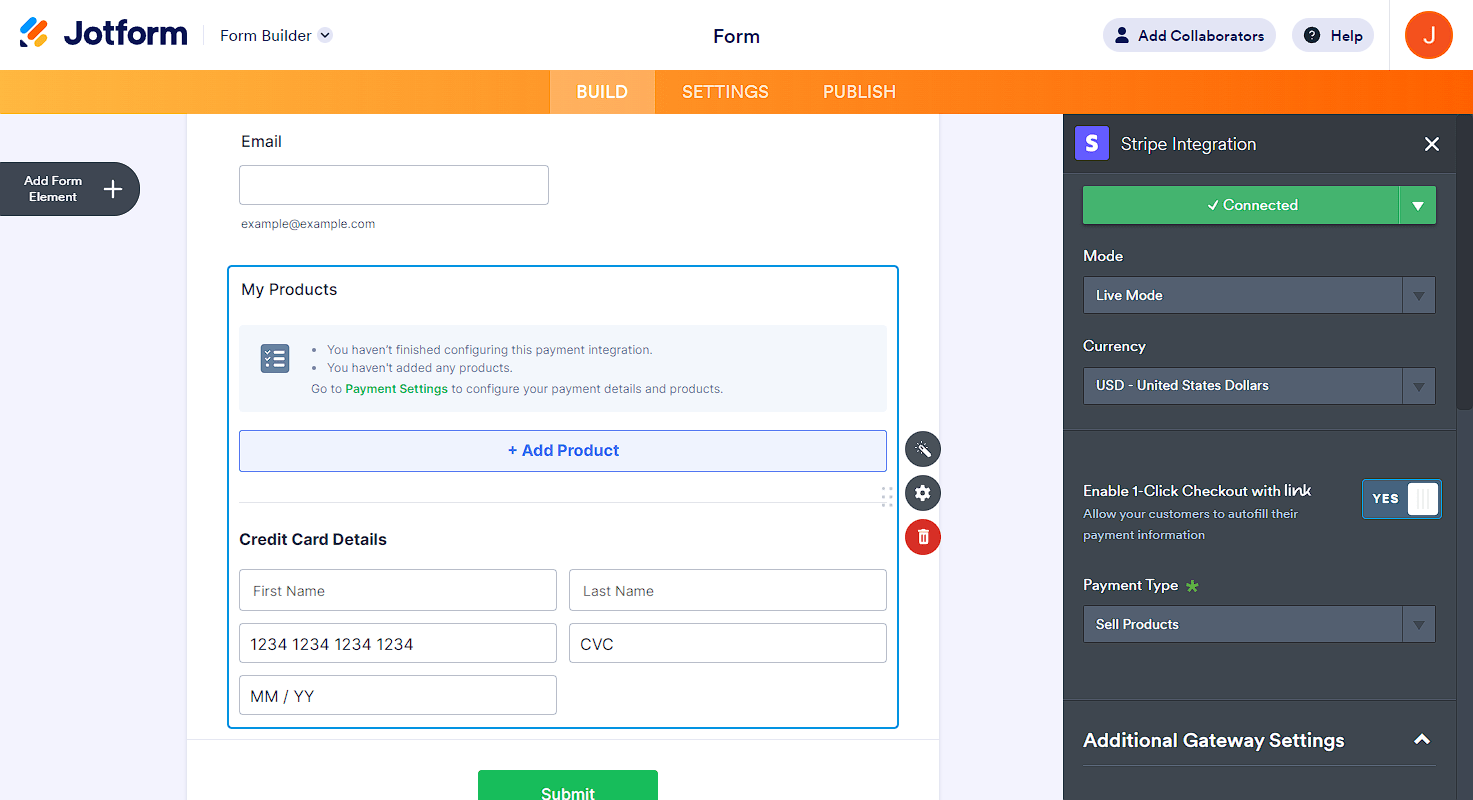
- Click the Gear button to open the Payment Settings menu and select your preferred mode in the Mode field. The mode you select will determine the Stripe account linked to the integration. “Live mode” connects this integration to your active Stripe account, while “Test” allows you to use your Stripe sandbox account. If you choose to switch modes, you’ll need to reconnect your account.
- Once you’ve selected your preferred mode, click the Connect button to integrate your Stripe account into your form. If everything is set up correctly, the button will then show up as connected.
- Set up your other settings, such as Currency, Enable 1-Click Checkout with Link, and Payment Type.
- If applicable, make adjustments to optional settings under the Additional Gateway Settings menu. This includes settings such as Ask Billing Information to Customer, Send Email to Customer, Create Stripe Customer Record, and Charge Customer Immediately.
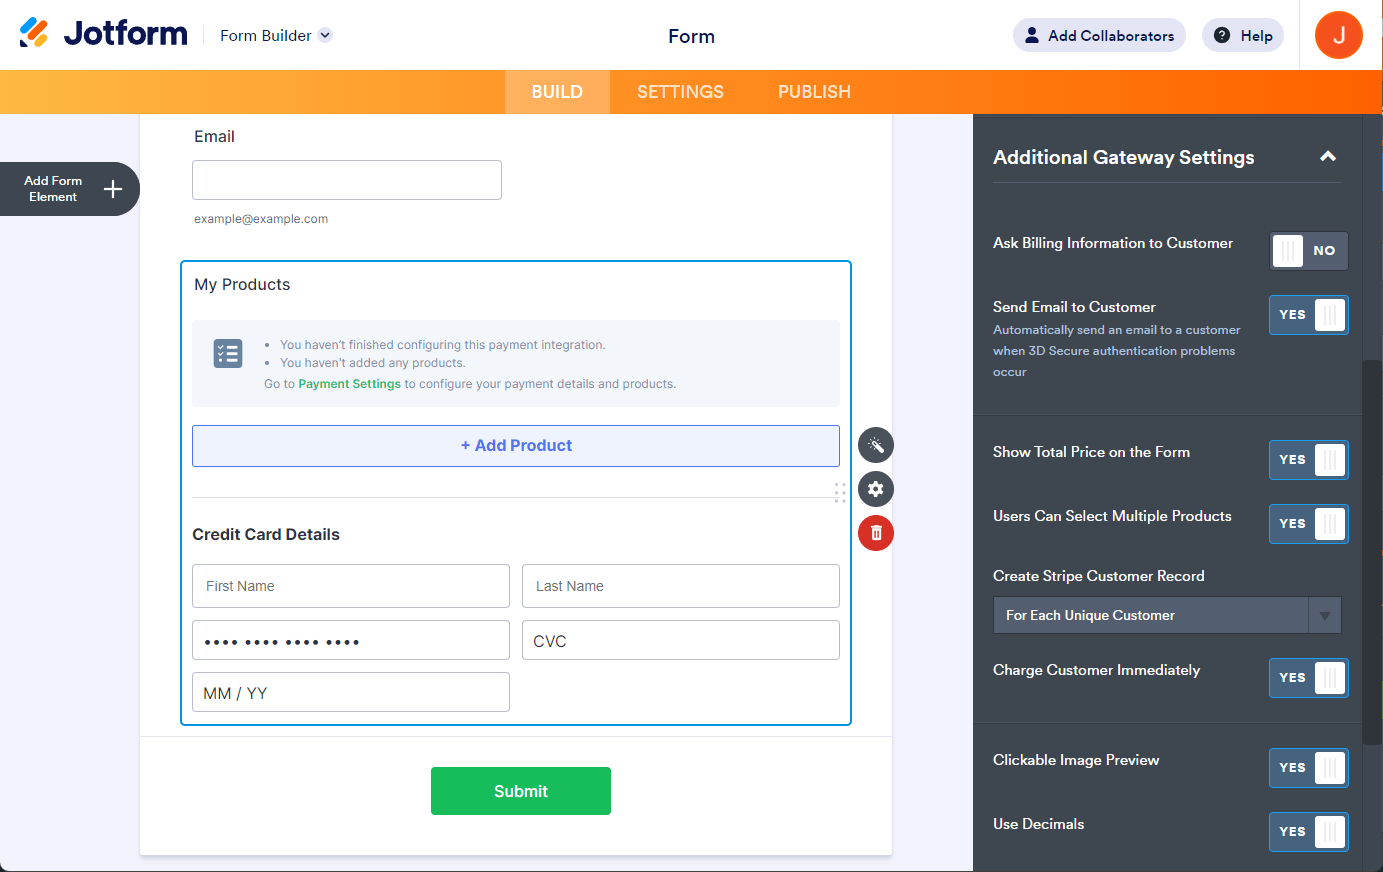
- If your payment type has been set to Sell Products or Sell Subscriptions, scroll down and click the Continue button to set up your product options. If not, click Save to finalize your integration.
Once you’ve connected your integrations, you can start automating your workflows and getting the most benefit possible out of this trio of solutions.
How your business can benefit from integrating Mailchimp and Stripe with Jotform
Combining the capabilities of these business solutions allows your team to further harness the benefits of simplicity, efficiency, and automation.
For example, if you use Stripe as your payment gateway, customers can easily process purchases and donations through an online Stripe form powered by Jotform. If you’ve integrated Mailchimp into this same form, you can then automatically funnel sales leads, new customer information, and potential subscribers into your mailing list database.
How to use Mailchimp and Stripe integrations
While Mailchimp and Stripe may be capable of connecting without Jotform, the efficiency you gain by combining these solutions for free is significant. By connecting Mailchimp and Stripe through a single form, you can bypass the need for paid third-party applications like Zapier and automatically trigger multiple separate actions through a single submission.
There are many different ways to use Mailchimp, Stripe, and Jotform together to create a more effective business workflow overall. How you choose to use these solutions will ultimately depend on your needs, but here are a few examples of how you can use these integrations to your advantage:
1. Automated purchase confirmations
When customers make purchases using your Stripe integration, you can set up Mailchimp to automatically send out a confirmation email when your form is complete. This boosts your perceived professionalism, attention to detail, and overall timeliness — building customer trust and loyalty.
2. Targeted communications
If a customer uses your Stripe form to purchase a subscription, your Mailchimp integration can add them to targeted communications lists related to that selection. This helps you curate and deliver personalized, relevant content to maintain subscriber engagement.
3. Contact creation and updates
Using invoice forms, you can create and update Mailchimp contacts to generate follow-up campaigns and thank you notes. This improves your payment follow-up processes and customer experience.
4. Upsell opportunity identification
Through the payment processing information captured in the Stripe integration, Mailchimp funnels potential upsell opportunities and product recommendations to relevant customers. Your sales team can then follow up on these opportunities — boosting sales and improving customer satisfaction.
5. Subscriber communications
As users sign up for subscriptions using the Jotform Stripe integration, you can manage communications to these subscribers in Mailchimp. You can set up welcome emails, renewal reminders, and win-back campaigns using regular and timely communication triggered by form data.
6. Nonprofit donations
If you use Stripe as your donation collection method, you can use Jotform to collect donations and donor information so you can send out newsletters, thank you notes, and updates through Mailchimp. This streamlines your nonprofit communications and simplifies online fundraising.
7. Optimized forms
While you may be able to create a signup form in Mailchimp or create an opt-in form in Mailchimp, having a powerful, unified solution enhances your forms’ utility. Not only does Jotform act as a conduit between Stripe and Mailchimp, but it also allows you to collect signatures, organize data, and automate workflows.
Although you may be able to integrate Stripe with Mailchimp, it’s easier to use Jotform as the middleman. Through Jotform, you can streamline your workflows and optimize the value of these digital business solutions. Try building your own form today, and connect your Stripe and Mailchimp accounts to get started.
Photo by Photo By: Kaboompics.com


")


Send Comment: