Jotform makes it easy to personalize your AI-powered presentation to match your brand’s style, tone, and message. Whether you generated your slides with AI or uploaded your own, you can customize every part of your Presentation Agent—from the voice and navigation settings to the slides, script narration, and avatar design. In this guide, you’ll learn how to:
- Changing the AI Agent’s Voice
- Customizing the Presentation Navigation and Interaction
- Customizing Slides for AI-Generated Presentations
- Editing the Narration Scripts for the Presentation Agent
- Customizing the Presentation Agent’s Avatar
Changing the AI Agent’s Voice
With Jotform, you can fine-tune your Presentation Agent’s voice directly from the Presentation Agent Builder. Whether you’re aiming for something warm and conversational or formal and authoritative, adjusting the voice’s tone, pace, and style helps you better connect with your audience. Here’s how to do it:
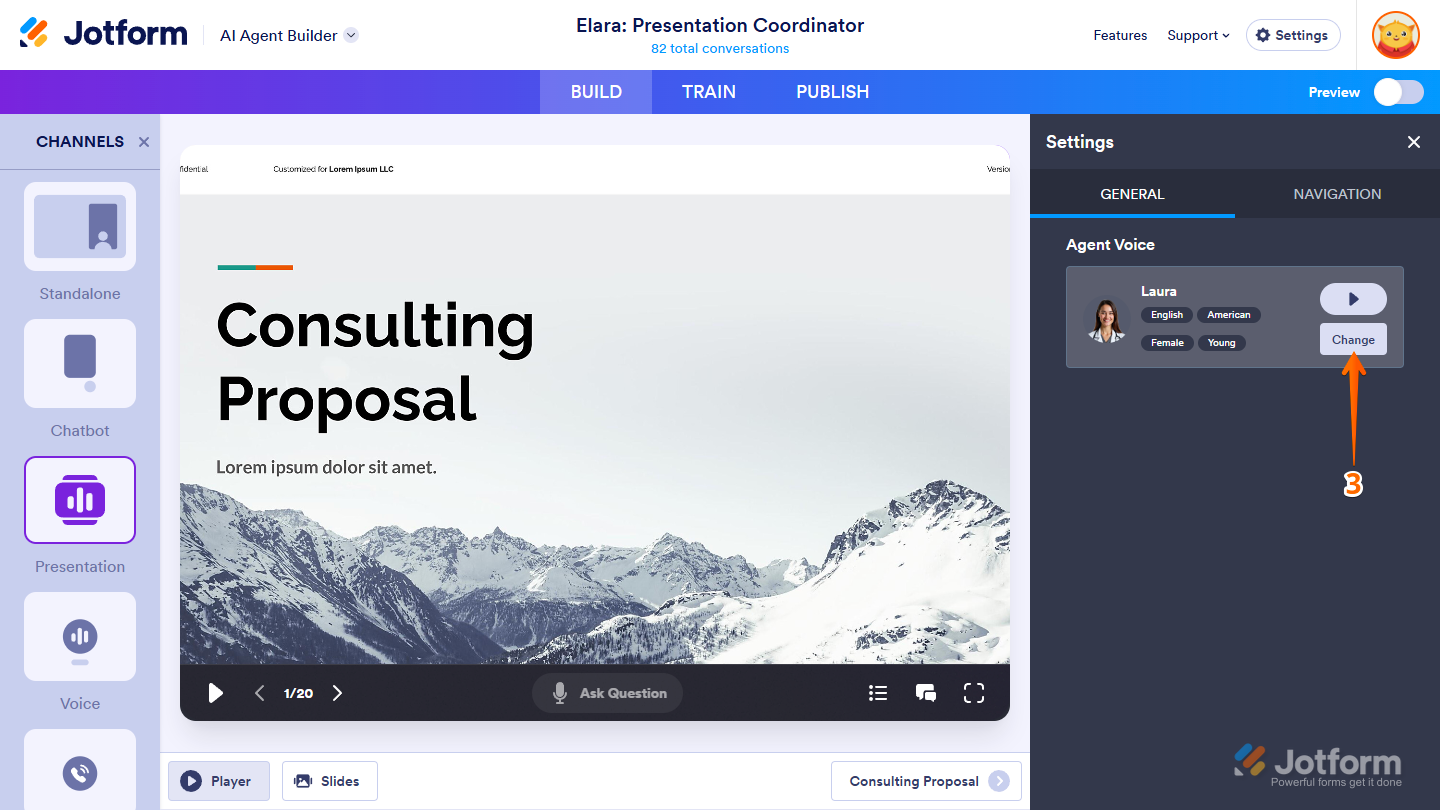
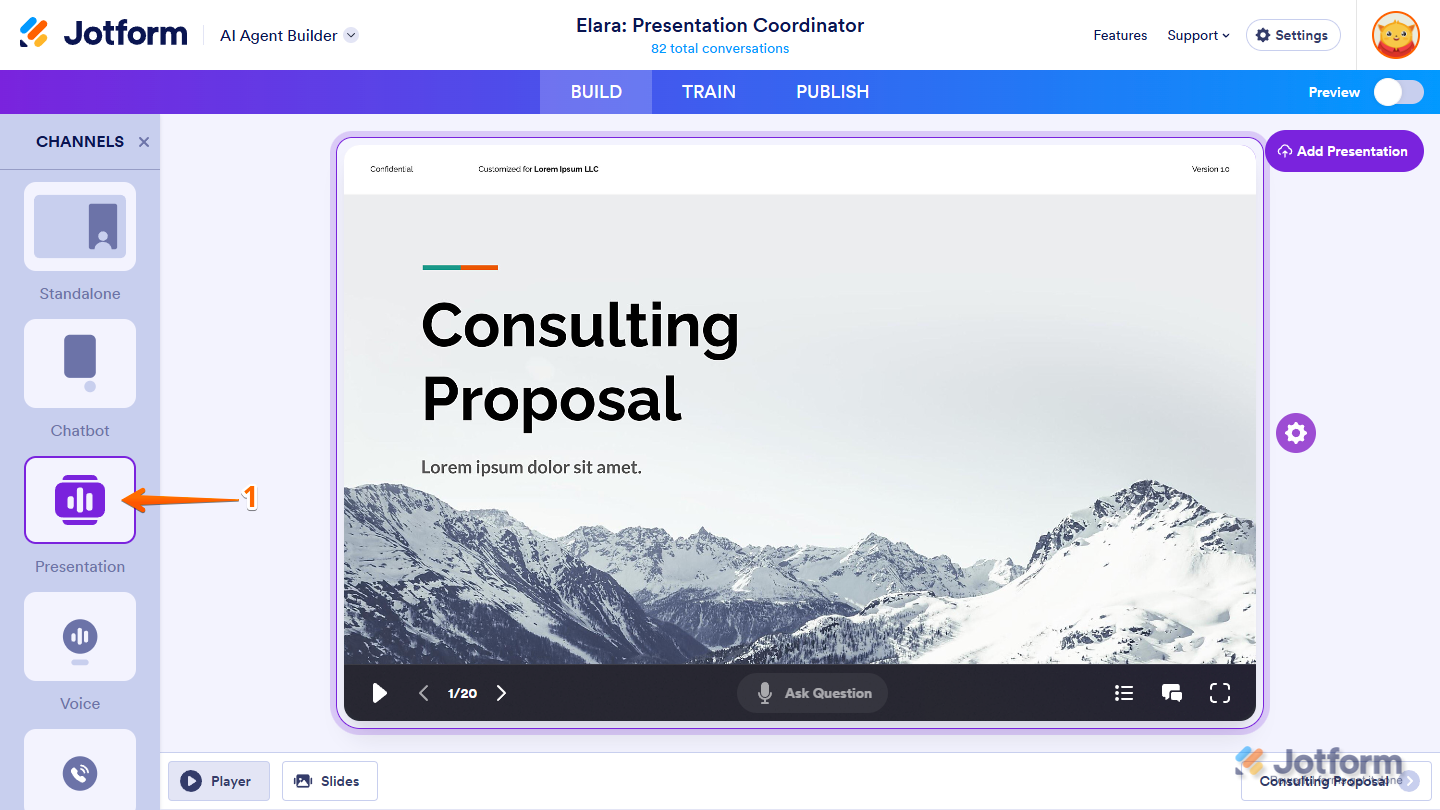
- In AI Agent Builder, in the Channels menu on the left side of the page, click on Presentation.
- Now, on the Player page, click on the Gear icon on the right side of the first slide in your presentation.
- Then, in the Settings window that opens on the right side of the page, under the General tab, click on Change.
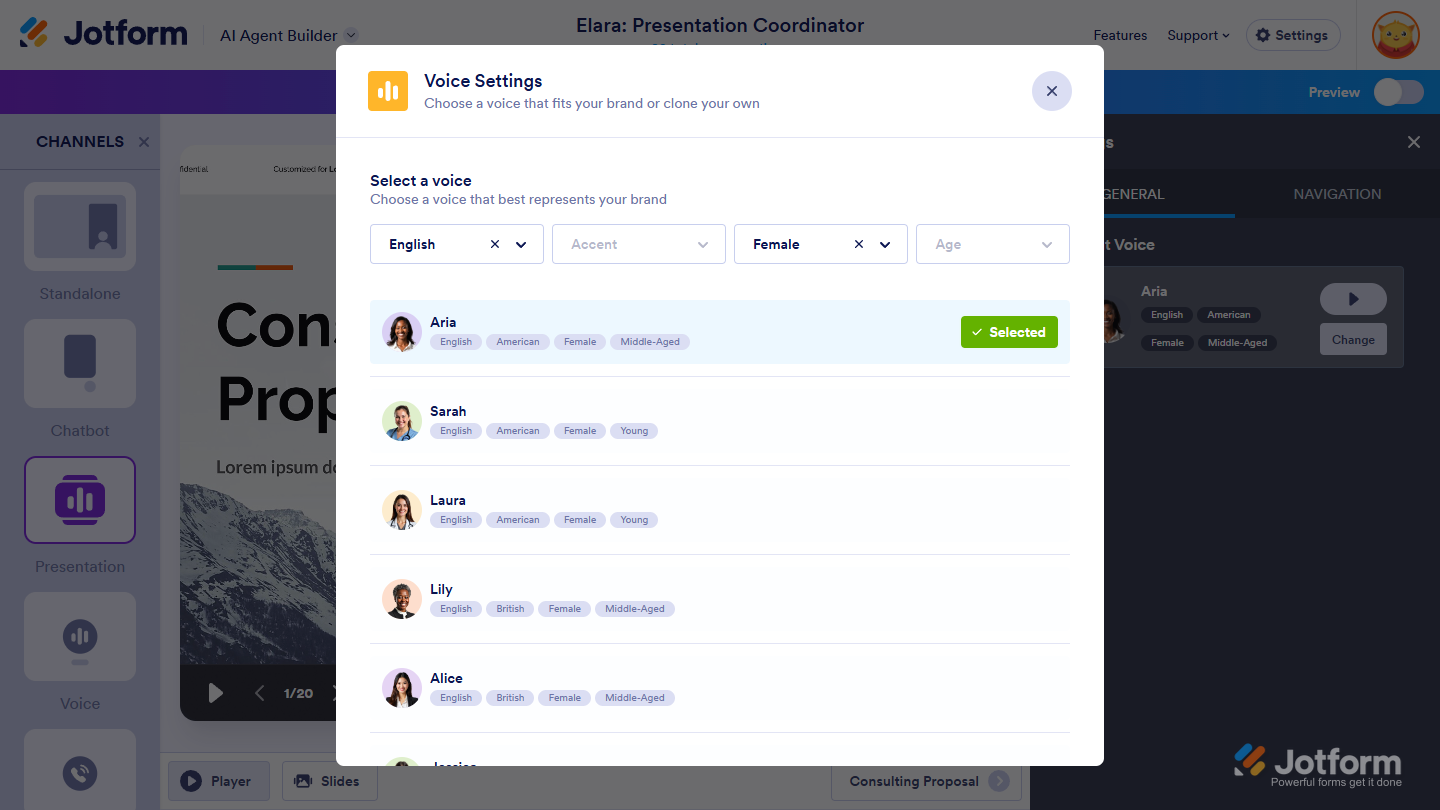
- Now, in the Voice Settings window, hover your mouse over the voice you want for your AI Agent, and then click on Use on the right side.
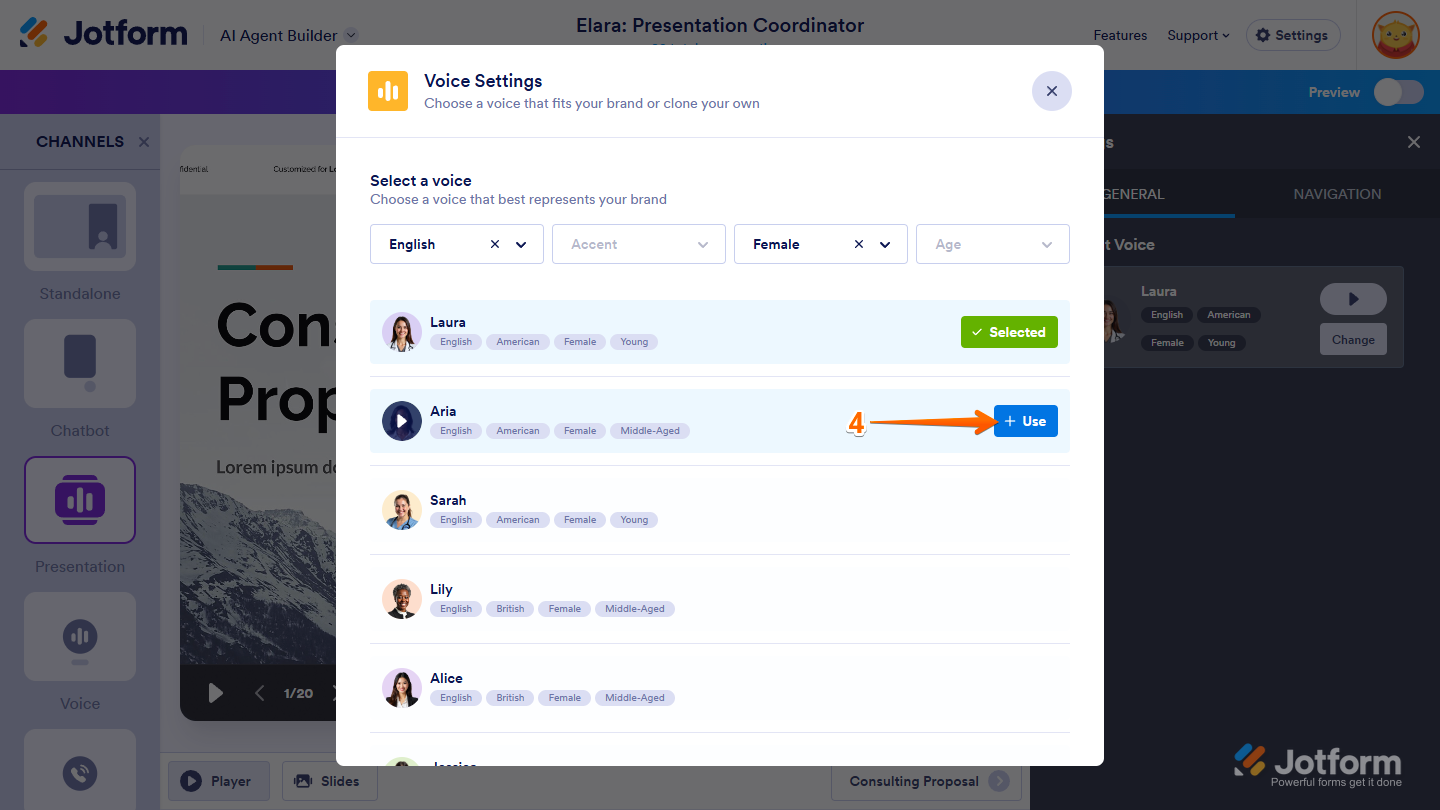
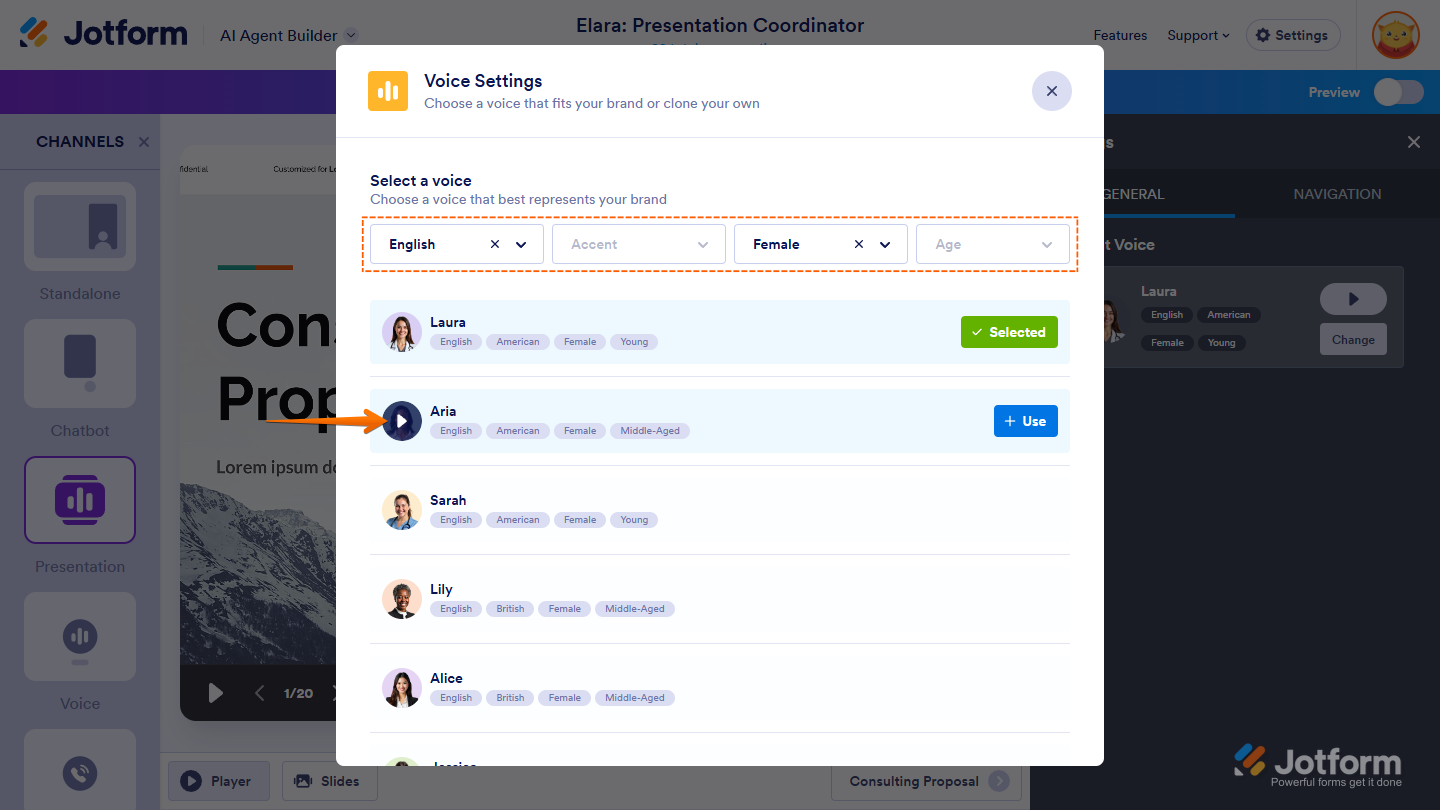
You can also filter the available voices by language, accent, gender, or age using the Dropdown menus at the top. To preview them, hover your mouse over the AI Agent’s avatar and click on Play on the left side.
That’s it. Now, you’ve successfully updated your AI Agent’s voice to better match your brand and connect with your audience.
You can also check out these guides about How to Change Your AI Agent’s Voice and How to Customize the Tone and Voice of Your AI Agent for more details.
Note
Changing your AI Agent’s voice will apply across all channels, including the Voice Agent, Phone Agent, and Presentation Agent.
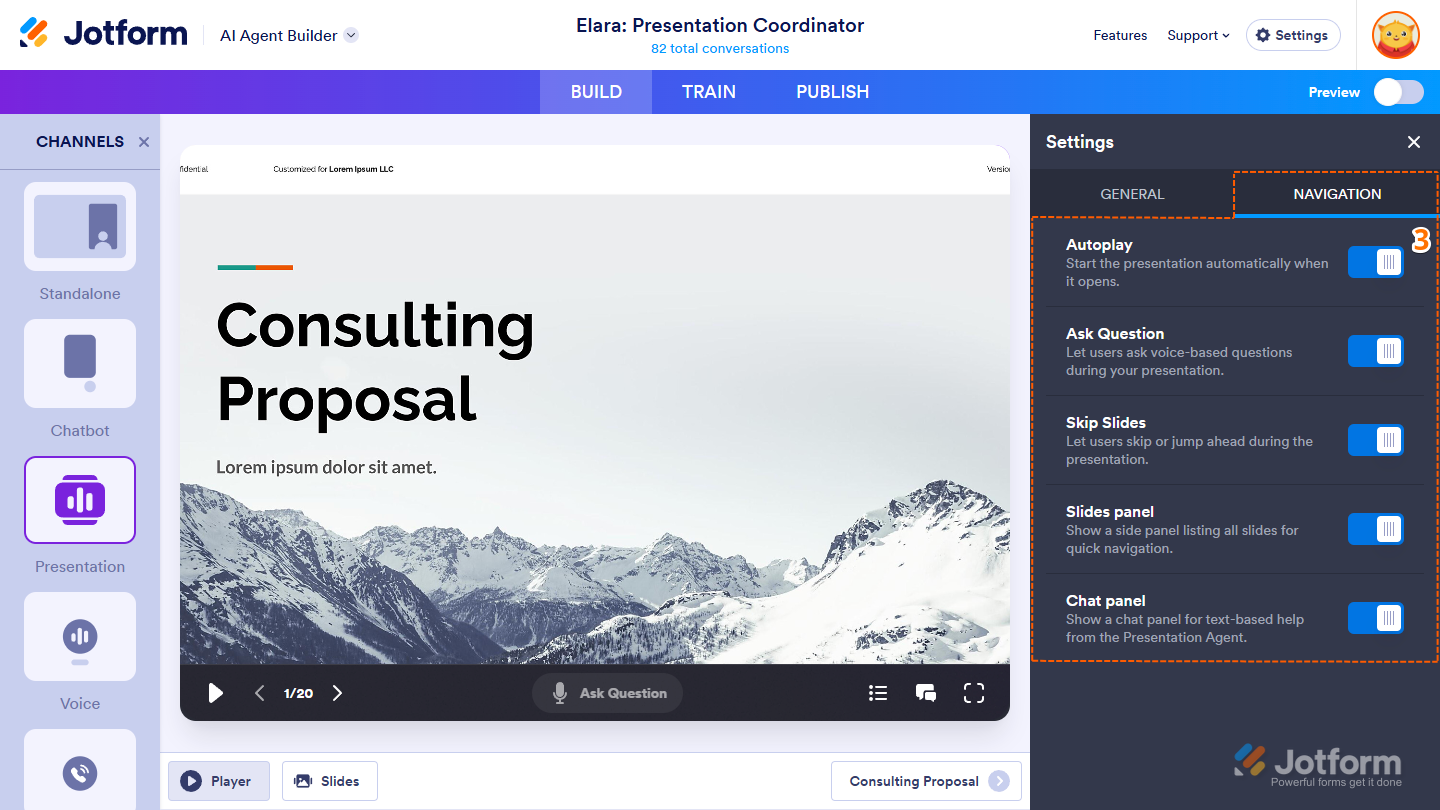
Customizing the Presentation Navigation and Interaction
Jotform gives you control over how your audience interacts with your AI-powered presentation. From enabling autoplay to letting users ask questions or skip slides, you can create a dynamic and engaging experience that fits your presentation style. Here’s how to find and customize these settings:
- In AI Agent Builder, in the Channels menu on the left side of the page, click on Presentation.
- Now, on the Player page, click on the Gear icon on the right side of the first slide in your presentation.
- Then, in the Settings window that opens on the right side of the page, under the Navigation tab, Toggle the available interaction features On or Off, as needed:
- Autoplay — Start the presentation automatically when it opens.
- Ask Question — Let users ask voice-based questions during the presentation.
- Skip Slides — Let users skip or jump ahead during the presentation.
- Slides Panel — Show a side panel listing all slides for quick navigation.
- Chat Panel — Show a chat panel for text-based help from the Presentation Agent.
That’s it! Now you know how to control how users navigate and interact with your presentation.
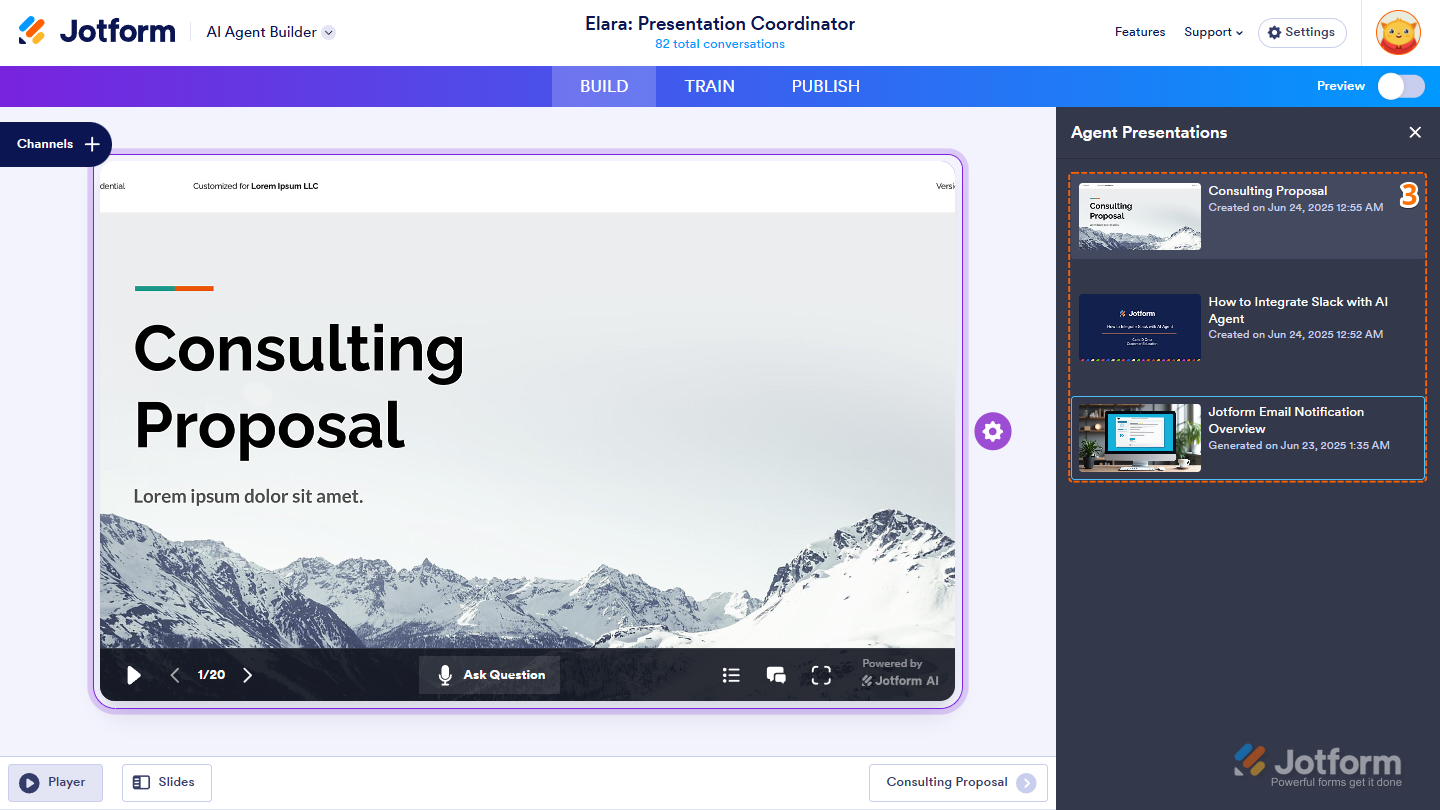
Customizing Slides for AI-Generated Presentations
If you created your Presentation using AI, you can use Presentation Builder to fully customize each slide. Easily update images, adjust colors, and edit text to ensure your presentation matches your brand and delivers your message effectively. First, we’ll just select an AI-generated presentation, and then we’ll start customizing the slides. Here’s how to do it:
- In AI Agent Builder, click on Presentation in the Channels menu on the left side of the page.
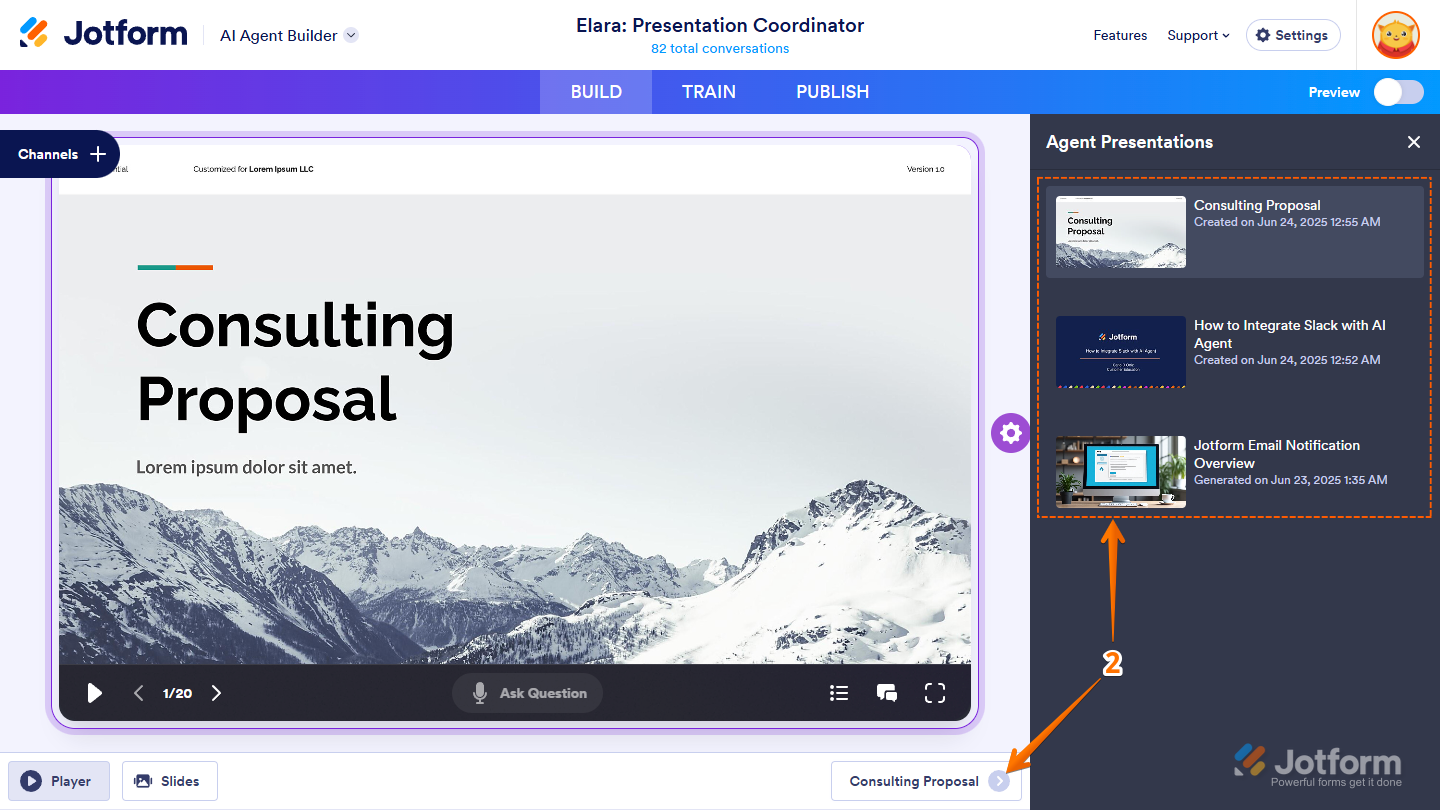
- Then, click on the Rightward Arrow icon in the bottom-right corner of your page.
- Now, in the Agent Presentations window that opens on the right side of the page, select an AI-generated presentation.
- Next, on the bottom-left side of the page, click on Slides.
- Then, in the Slides section, click on the Paint Roller icon on the right side of the page.
- Now, in the Designer Window that opens, select a Preset Color Scheme from the available options, and you’re all set.
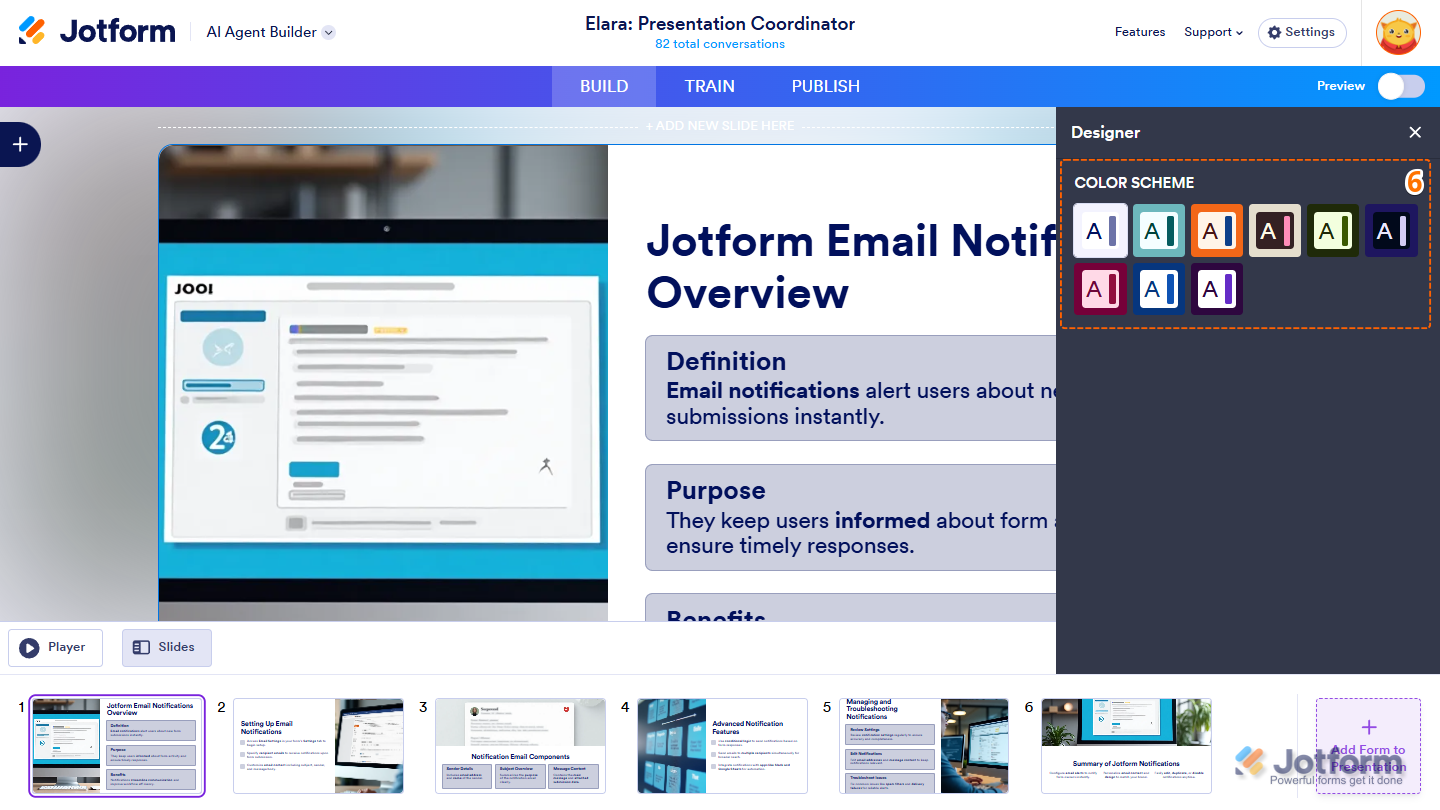
Note
When you apply a preset color scheme, it’ll automatically update the design color of all the slides in your presentation to match the selected theme.
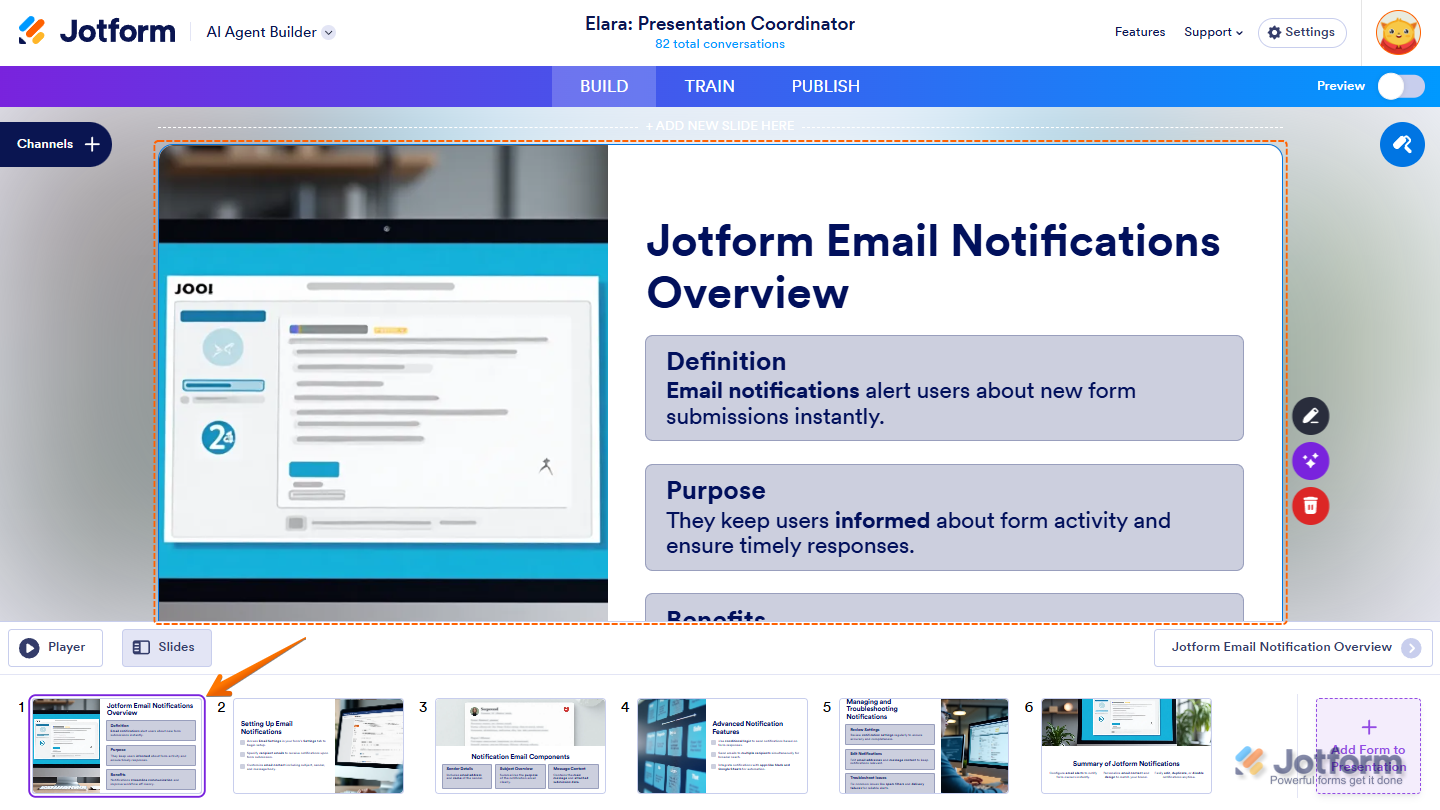
While you’re still in Presentation Builder, in the Slides section at the bottom of the page, click on the one you want to update. Then, click directly on the part you want to change—for example, click on the Title to edit the text, or click on the Image to regenerate a new one. Here are the customization options you can use:
- Edit the Image
- Edit the Title
- Edit the Description
- Change the Slide Layout
- Regenerate the Slide with AI
Want a step-by-step walkthrough? Our guide on How to Edit the Narration Scripts for the Presentation Agent has you covered.
Editing the Narration Scripts for the Presentation Agent
Whether you uploaded a PowerPoint (PPTX) or PDF file, imported slides from Google Slides, or generated your presentation using AI, you can easily update the narration your Presentation Agent will use to better match your message and tone. There are two ways to edit the narration scripts, either from the Publish tab or directly from the Build tab.
Editing the Narration Scripts from the Publish Tab
Editing your Narration scripts from the Publish tab is quick and straightforward. Here’s how to do it:
- In AI Agent Builder, in the blue navigation bar at the top of the page, click on Publish.
- Then, in the menu on the left side of the page, click on Presentation Agent.
- Next, select the presentation you want to edit the script for.
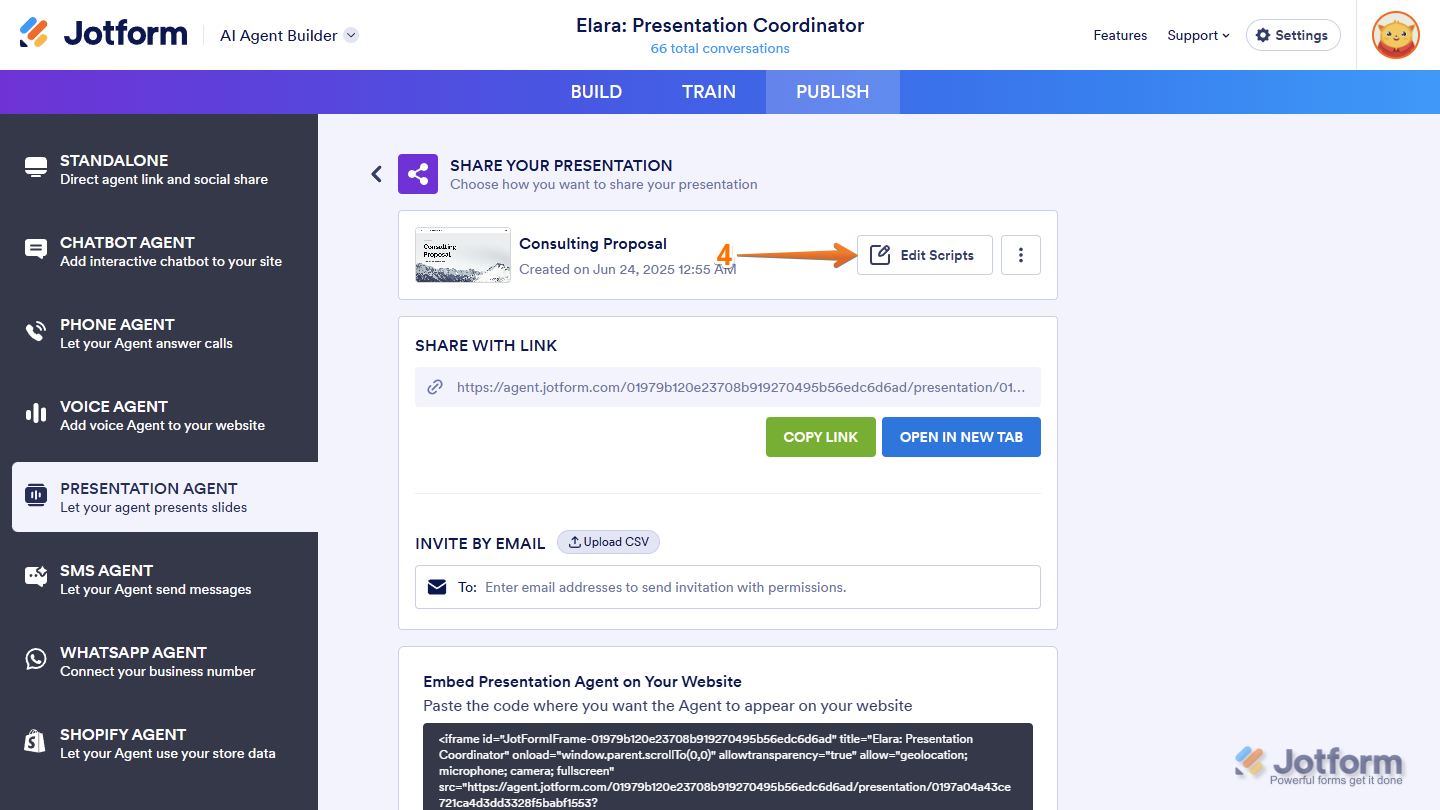
If you created your presentation by uploading a PPTX or PDF file or importing it from Google Slides:
- In the Share Your Presentation section, click on Edit Scripts.

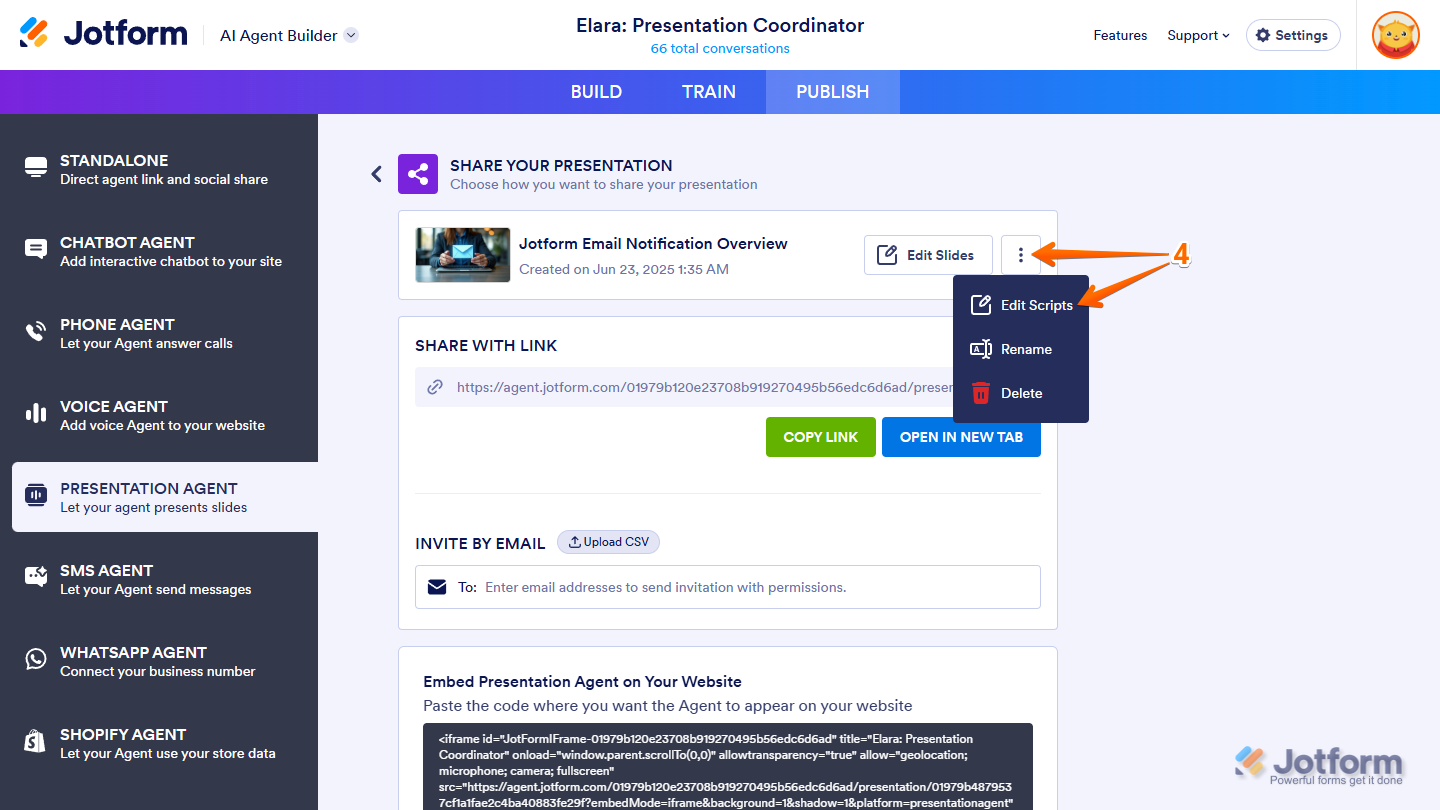
If you generated your presentation with AI:
- Next to Edit Slides, click on the Three Dots icon, and then in the Dropdown menu, select Edit Scripts.
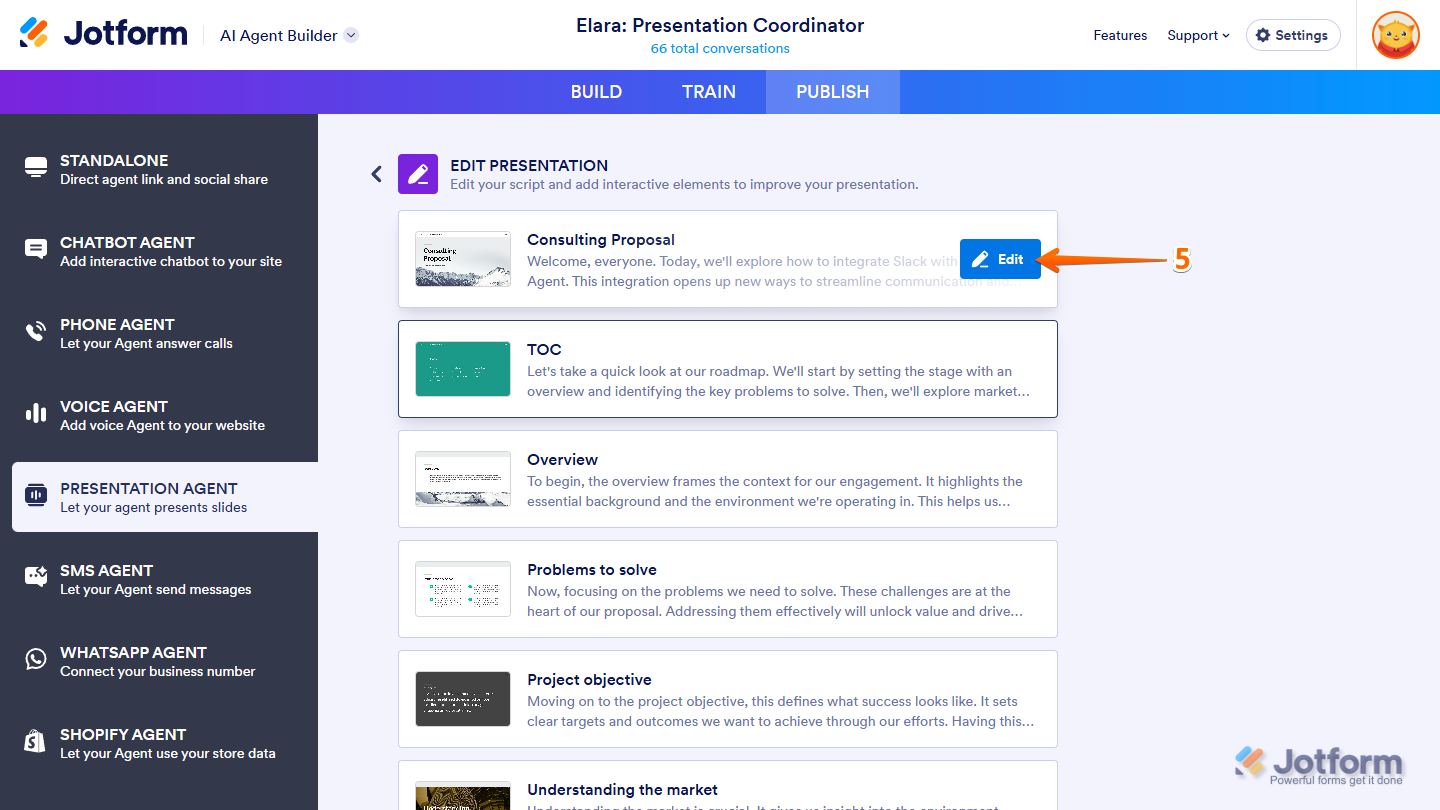
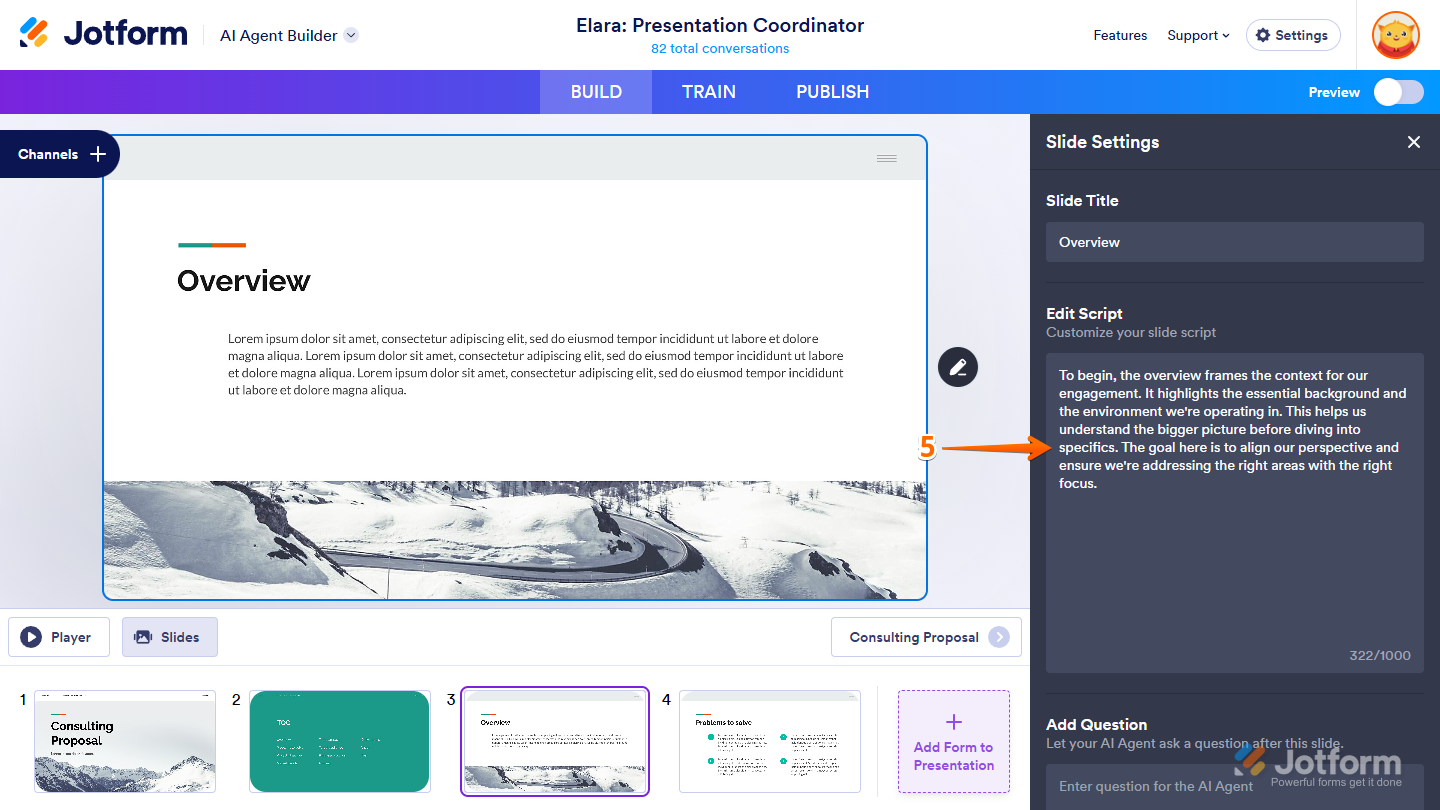
- Then, in the Edit Presentation tab, hover your mouse over the slide you want to edit the script for, and click on Edit.
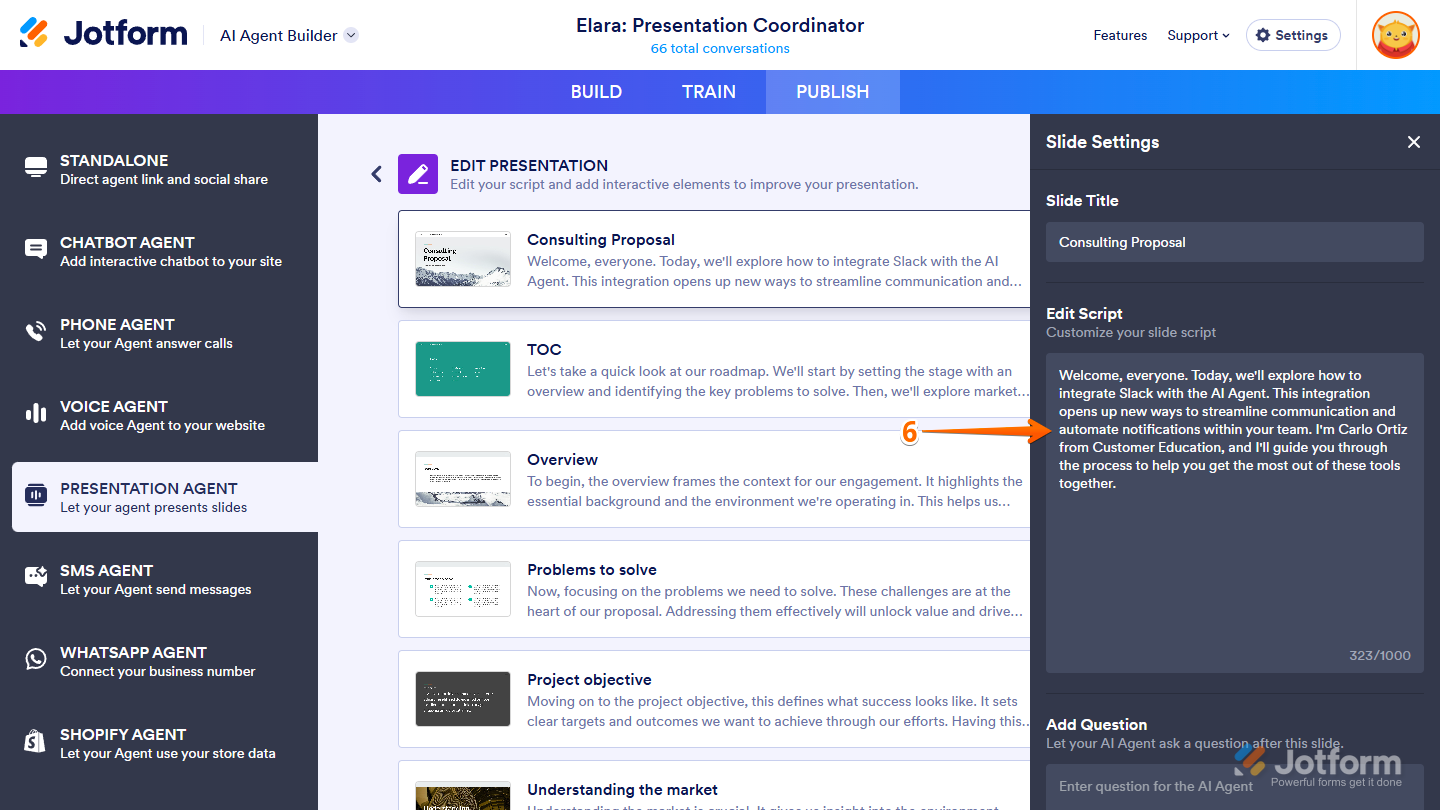
- Now, in the Slide Settings menu that opens on the right-side of the page, in the Edit Script box, update your script, and you’re all set.
And that’s it! You’ve now successfully updated your narration script from the Publish tab.
Editing Narration Scripts from the Build Tab
You can also easily edit your presentation narration scripts from the Build tab. Here’s how to do it:
- In AI Agent Builder, in the Channels menu on the left side of the page, click on Presentation.
- Now, click on the Rightward Arrow icon to open the Agent Presentations menu on the right side of the page, and then select the presentation you want to edit the script for.
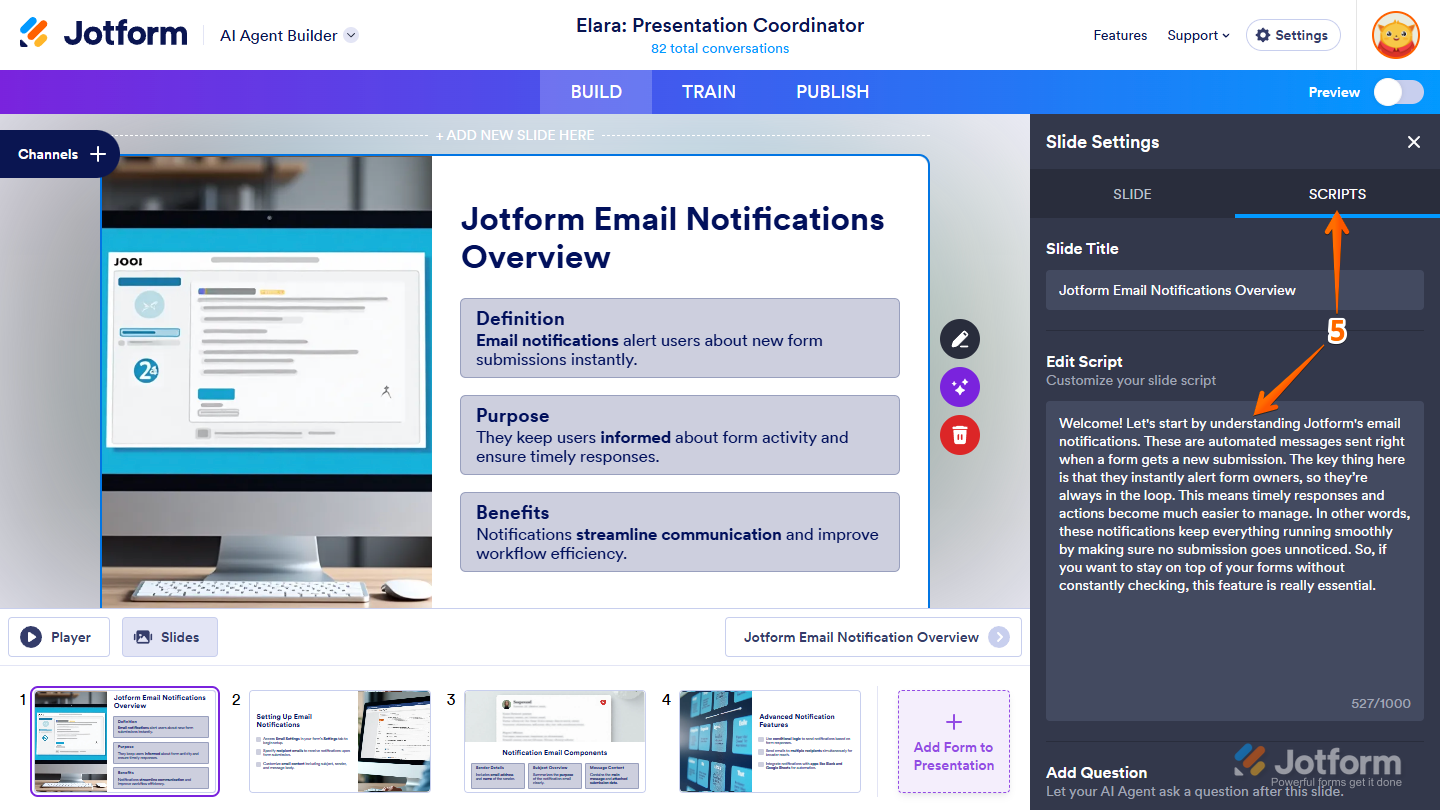
- Next, in the Slides section at the bottom of the page, click on the slide you want to update the script for.
- Then, on the right side of the slide you selected, click on the Pencil icon.
If you created your presentation by uploading a PPTX or PDF file or importing it from Google Slides:
- In the Slide Settings menu on the right side of the page, in the Edit Script box, update your script.
If you generated your presentation with AI:
- In the Slide Settings menu on the right, under the Scripts tab, in the Edit Script box, update your script.
And you’re all set. You’ve now successfully updated your narration script from the Build tab. You’ll find more info in our guide on How to Edit the Scripts for the Presentation Agent.
Customizing the Presentation Agent’s Avatar
Your Presentation Agent’s avatar is a visual representation of your message, making it essential to match its appearance with your presentation’s tone and style. Whether you want a professional, friendly, or creative look, you can personalize the avatar’s facial features, outfit, hairstyle, and more to align with your brand. Here’s how to do it:
- In AI Agent Builder, click on the Paint Roller icon on the right side of the page to open Designer.
- Under the Avatar tab, and then under the Gallery, Generate, and Upload tabs, you’ll find many options to customize your avatar.
For a full breakdown of how to do it, head over to our guide on How to Customize Your Jotform AI Agent’s Avatar.

Send Comment: