Jotform’s Zoom integration lets you automatically schedule virtual meetings or register attendees the minute someone submits your form. Whether it’s for client appointments, online classes, interviews, or webinars, this setup eliminates the back-and-forth and keeps everything running smoothly. It’s a simple way to save time, stay organized, and make sure everyone gets the details they need—all without leaving your form. Meeting links, dates, and confirmation emails are handled behind the scenes, so you can focus on what matters most.
Prefer to watch? Head to the end of this guide to see the video tutorial.
Connecting a Zoom Account
Whether you’re setting up a new form or updating an existing one, connecting your Zoom account takes no time at all—here’s how:
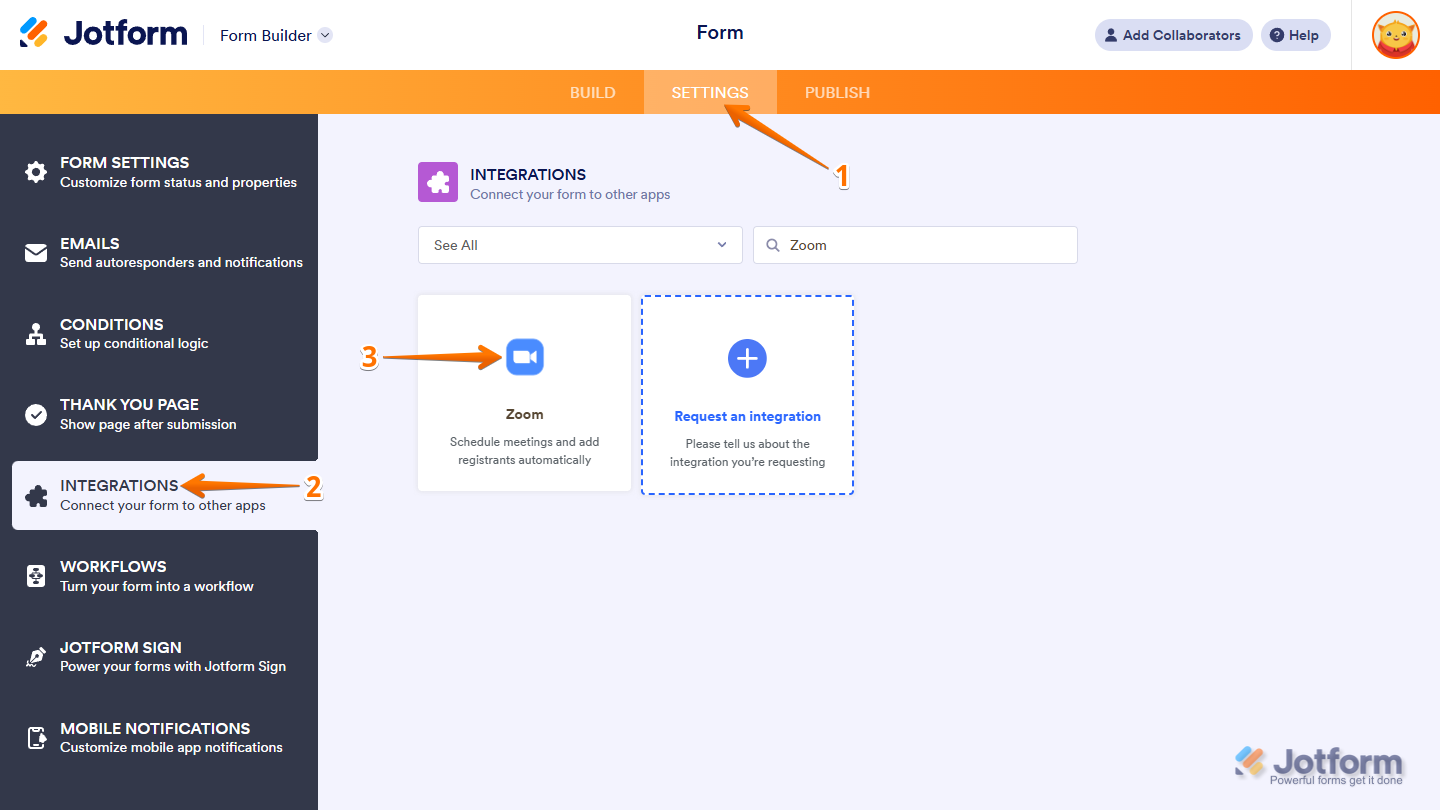
- In Form Builder, in the orange navigation bar at the top of the page, click on Settings.
- In the menu on the left, click on Integrations.
- Then, search for Zoom and click on it.
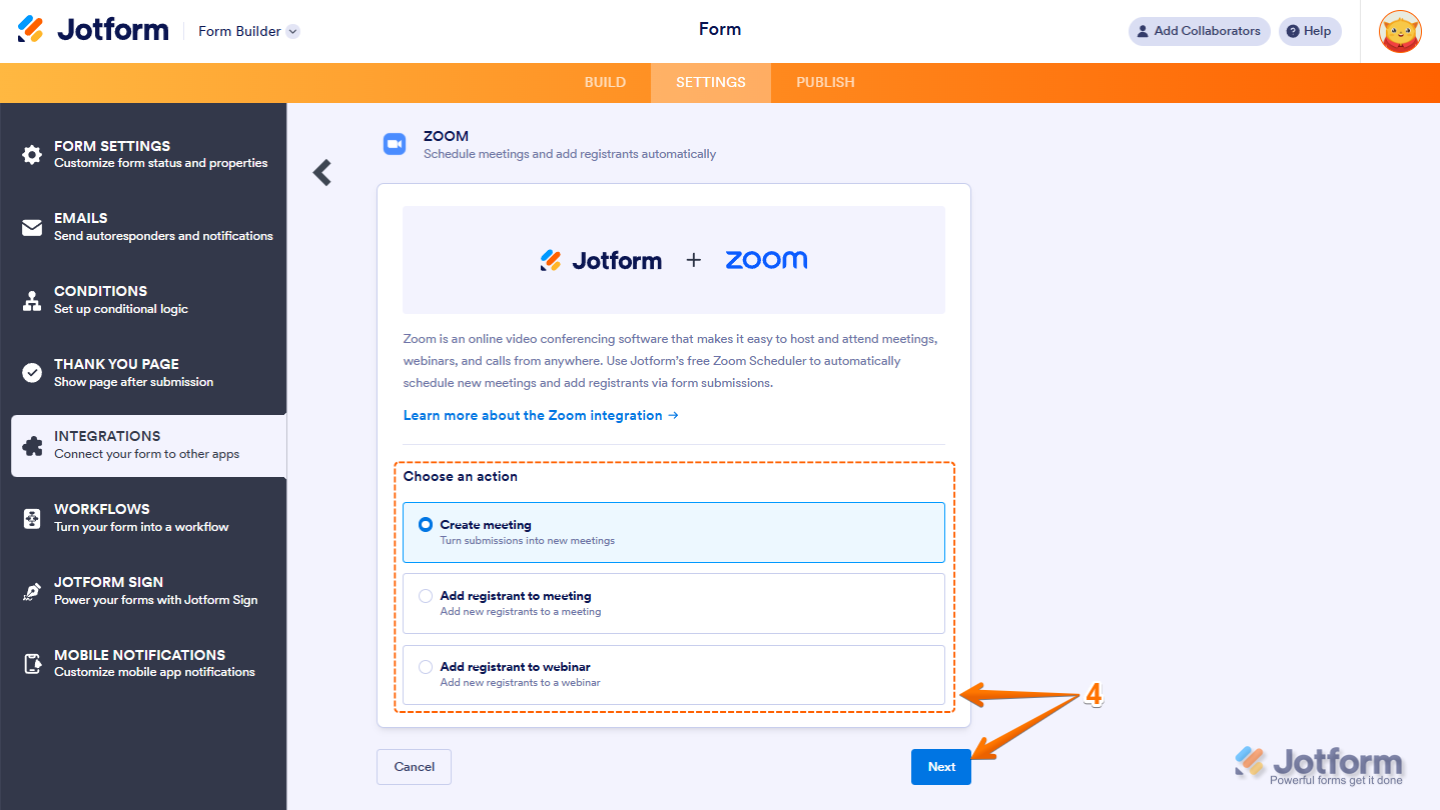
- Now, under the Choose an Action section on the right, select what you want to do, and then click on Next.
- Create Meeting — Automatically schedule a new Zoom meeting for each form submission.
- Add Registrant to Meeting — Add anyone who fills out your form as a registrant to an existing Zoom meeting.
- Add Registrant to Webinar — Automatically register form respondents for a Zoom webinar.
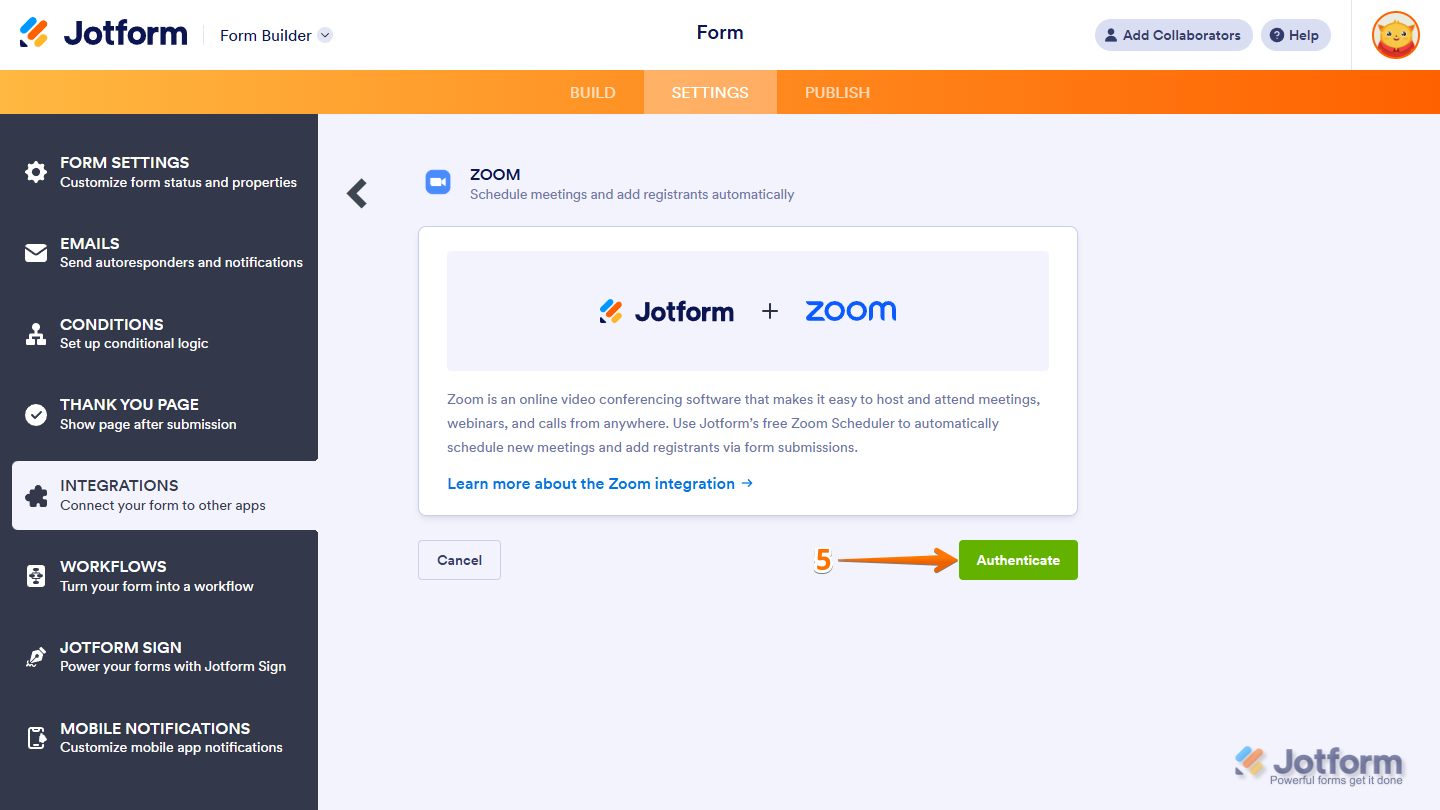
- Next, click on Authenticate and log in to your Zoom account.
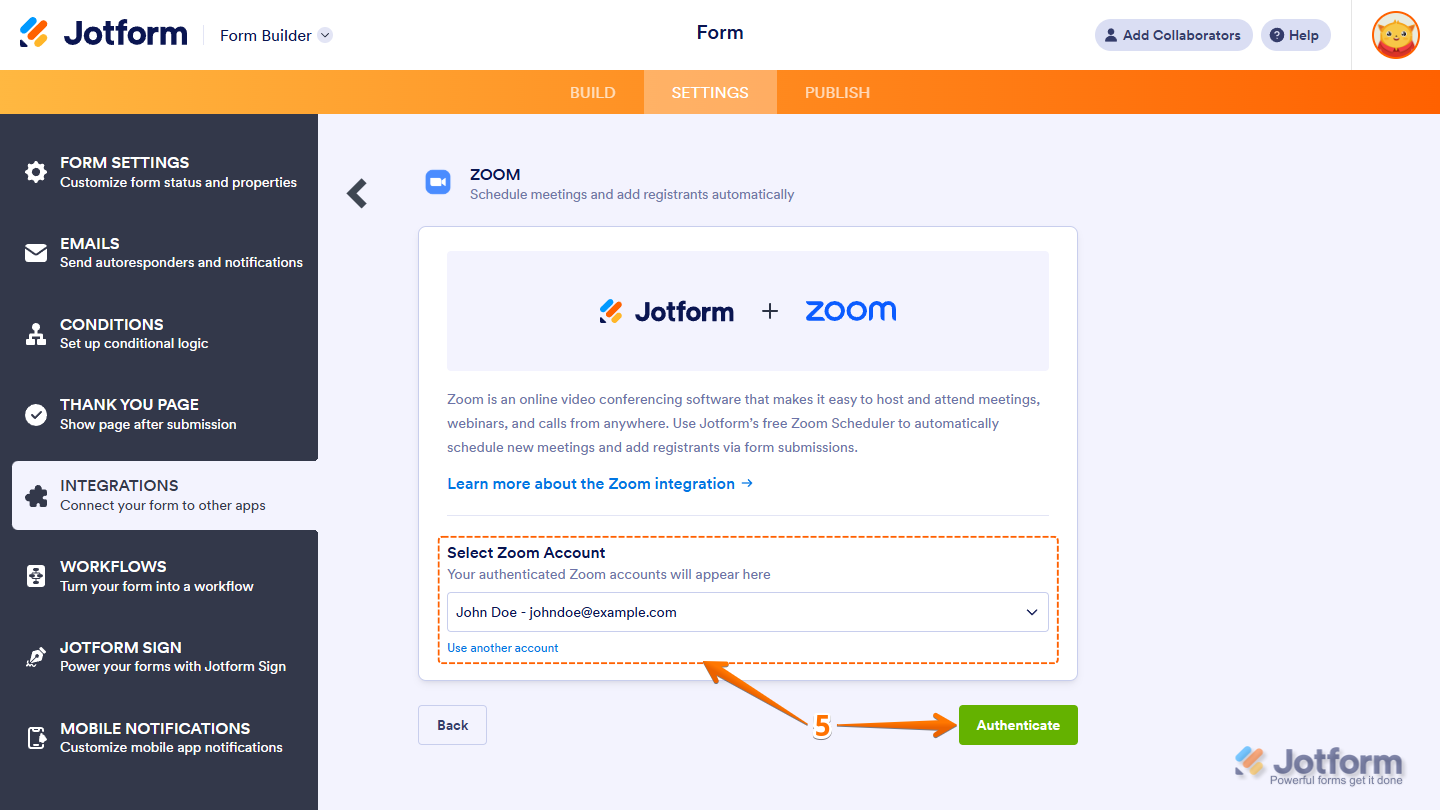
- If you’ve logged in before, just pick your Zoom account from the Dropdown menu, and click on Authenticate. To use a different one, click on Use Another Account Link.
Creating a Meeting
The Create Meeting option lets you automatically schedule Zoom meetings as soon as someone submits your form. To get going, here’s what you’ll do:
- In the next screen, after authenticating your account, set up the Customize Your Meeting Title box. You can click on the Form Fields menu on the right to personalize it with form values.
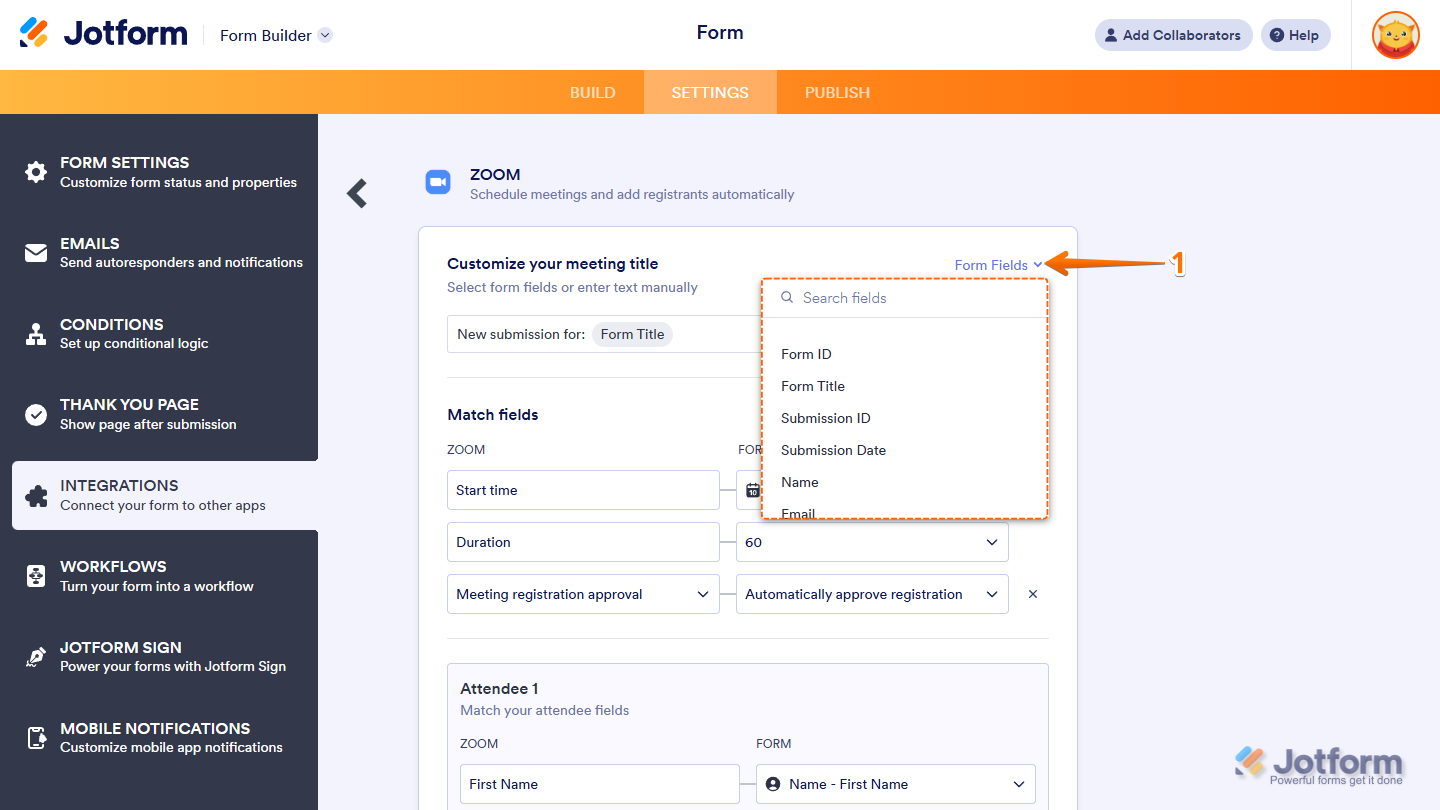
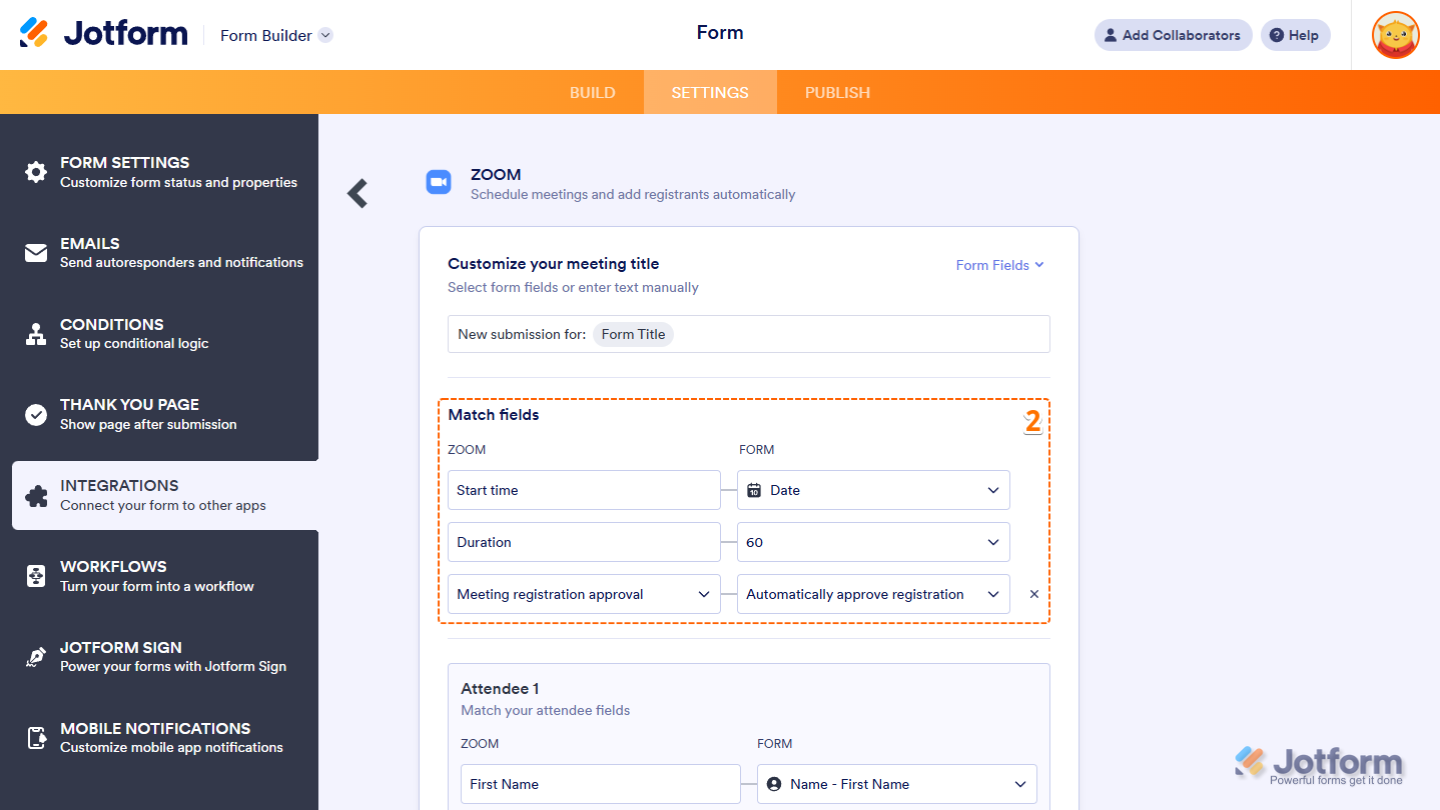
- Now, in the Match Fields section on the right, match the following fields:
- Start Time — Pick a date or time field from your form to set when the meeting begins.
- Duration — Choose a set duration or link it to a field on your form.
- Meeting Registration Approval — Decide whether to approve registrations automatically, manually, or based on a form field’s value.
Note
You’ll need a paid Zoom account to use the Meeting Registration Approval feature.
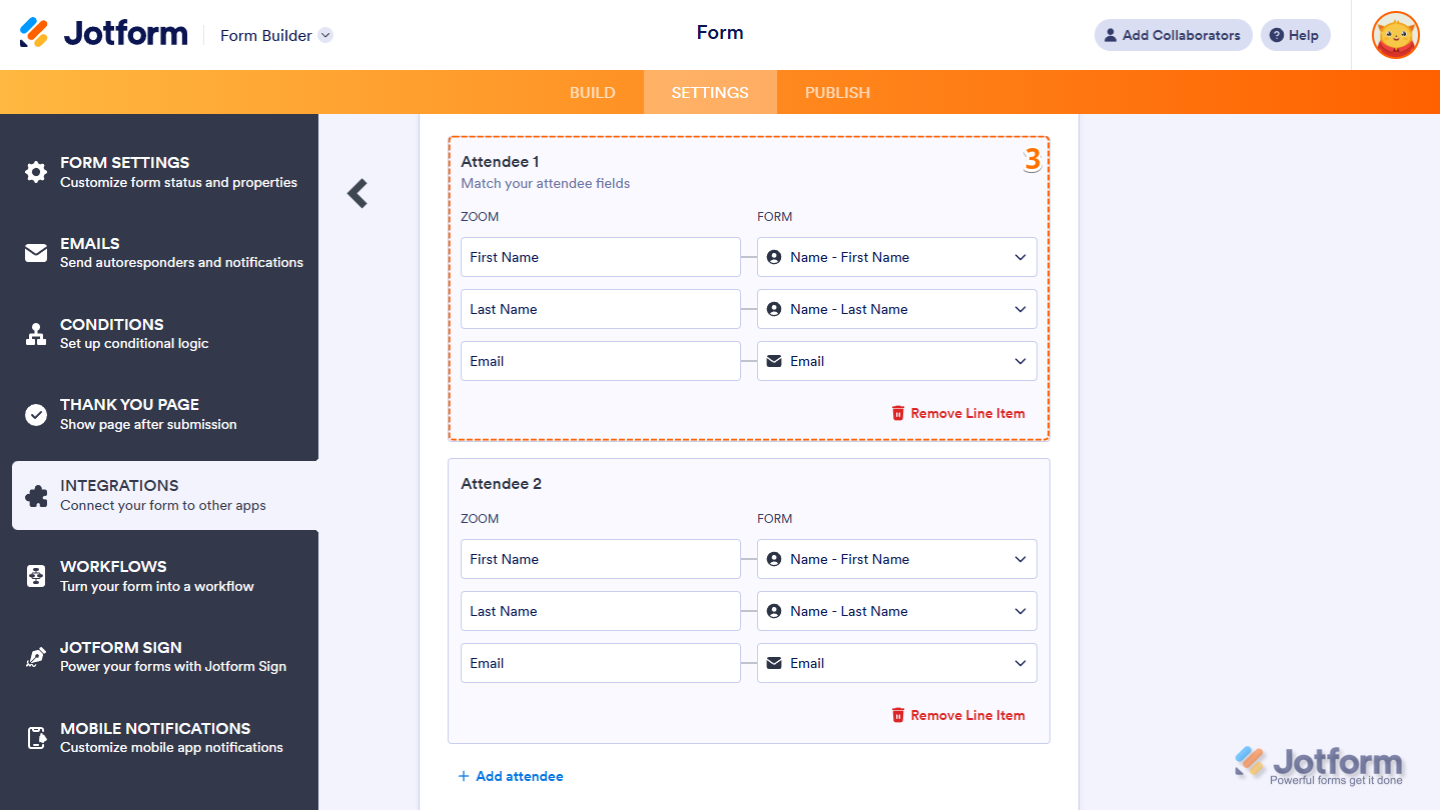
- Next, in the Attendee section, match Zoom’s First Name, Last Name, and Email fields to the corresponding fields on your form.
Note
To add more attendees, click on + Add Attendee at the bottom of the section. To remove one, just click Remove Line Item next to the mapped fields on the right.
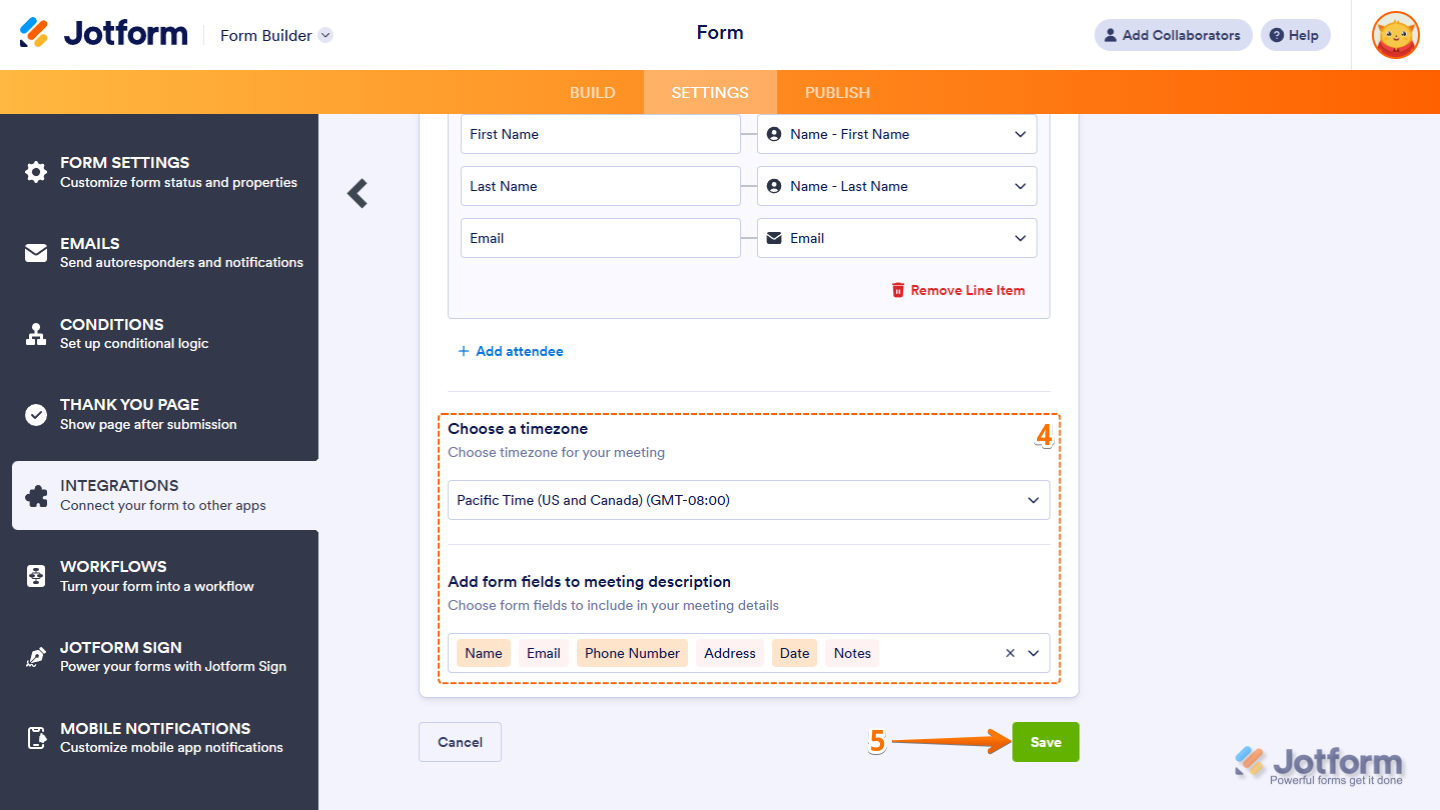
- Then, scroll down to the bottom and continue to set up these options:
- Choose a Timezone — Set the timezone for the meeting.
- Add Form Fields to Meeting Description — Include details from your form in the meeting description.
- Once you’re done, click on Save.
Adding a Registrant to a Meeting
The Add Registrant to Meeting option automatically registers anyone who submits your form for an existing Zoom meeting, making it easy to manage signups and send out join links. Setting it up is quick—here’s how:
- In the next screen, after authenticating your account, select a meeting from the Select Your Meeting Dropdown menu.
- Now, in the Match Fields section, match Zoom’s First Name, Last Name, and Email fields to the corresponding fields on your form.
- Once you’re done, click on Save.

Notes
- You’ll need to have a paid Zoom account to add a registrant to a meeting.
- Make sure registration is enabled for the meeting in your Zoom settings. You can check out Zoom’s guide on How to Enable Registration for a Meeting to learn more.
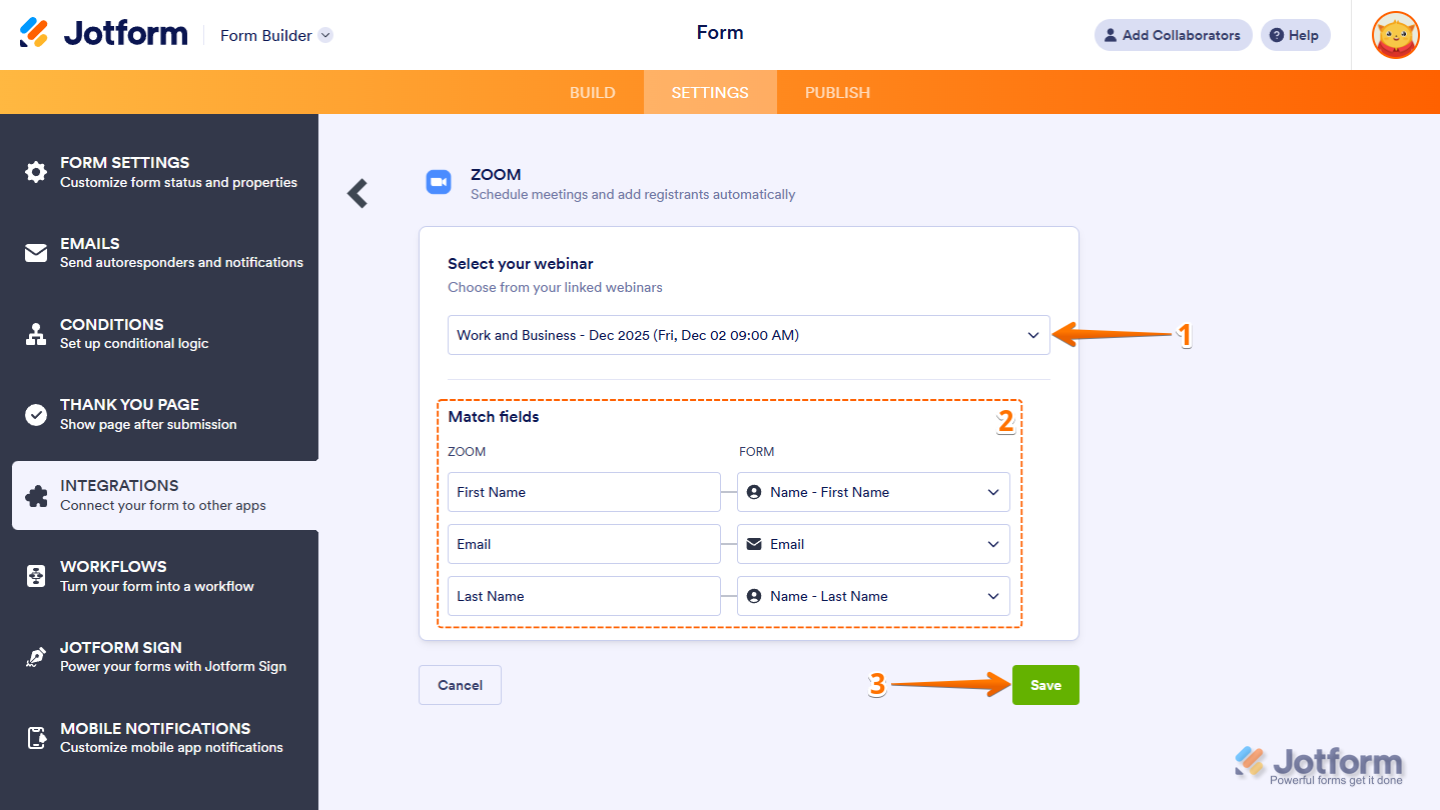
Adding a Registrant to a Webinar
The Add Registrant to Webinar option automatically registers form respondents for a Zoom webinar, helping you manage signups and send confirmation details without any extra steps. Here’s what to do next:
- In the next screen, after authenticating your account, select a webinar from the Select Your Webinar Dropdown menu.
- Now, in the Match fields section, match Zoom’s First Name, Last Name, and Email fields to the corresponding fields on your form.
- Once you’re done, click on Save.
Note
You’ll need an active Zoom Webinar add-on to use the Add Registrant to Webinar option.
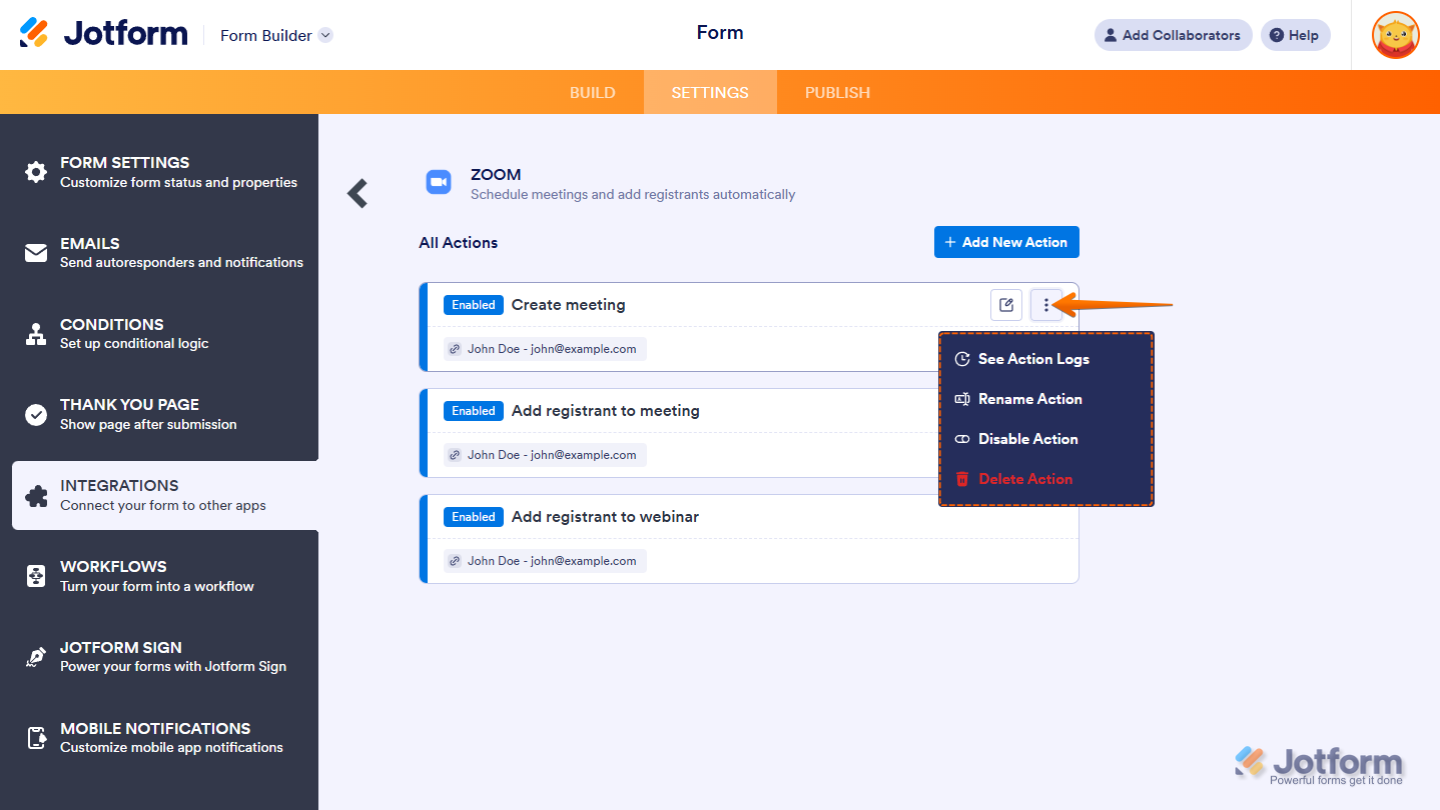
Managing Zoom Actions
After saving the integration, you’ll see a list of the Zoom actions you’ve set up and the Add New Action button on the main page. Hover your mouse over an action and click on the Three Dots icon on the right side of it to access these options:
- See Action Logs — View successful and failed runs, helpful for troubleshooting.
- Rename Action — Change the action’s title.
- Disable Action — Temporarily stop the integration from sending data.
- Delete Action — Remove the action from your form.


Send Comment:
4 Comments:
271 days ago
Is there a way to have the scheduler check availability against my calendar? I wont remember to go in and manually change availability every time I schedule a meeting. Right now I just have the submitted form redirecting to my Zoom scheduler app, but they then have to fill out those fields as well, it would be nice to fully integrate it!
More than a year ago
le système zoom mis en place est si complique donc non pratique pour permettre aux participants d'assister à l'assemblée. il faut créer un lien facile et simple pour faciliter tous les membres de participer
More than a year ago
How can I notify a user that the meeting is created and send thmen the url for the meeting?
More than a year ago
Hello, may I know are they going to receive the Zoom link after they register via Jotform? Is it Zoom itself sending the link to the participants?