PayU makes online payments easier for everyone, from small businesses to large enterprises, with smart, innovative technology built in-house and through trusted partnerships. Whether you’re selling products, offering services, or collecting donations, connecting PayU to your form lets you collect payments smoothly and securely, giving both you and your customers peace of mind.
Note
To connect PayU with Jotform, you’ll need a few credentials from your PayU account settings. If you’re not sure where to find them, just reach out to PayU Support, and they’ll help you get what you need.
Adding and Setting Up PayU
Adding PayU to your form is a simple and secure way to start accepting payments online. It’s a great tool to help your business get paid quickly and easily. To get going, here’s what you’ll do:
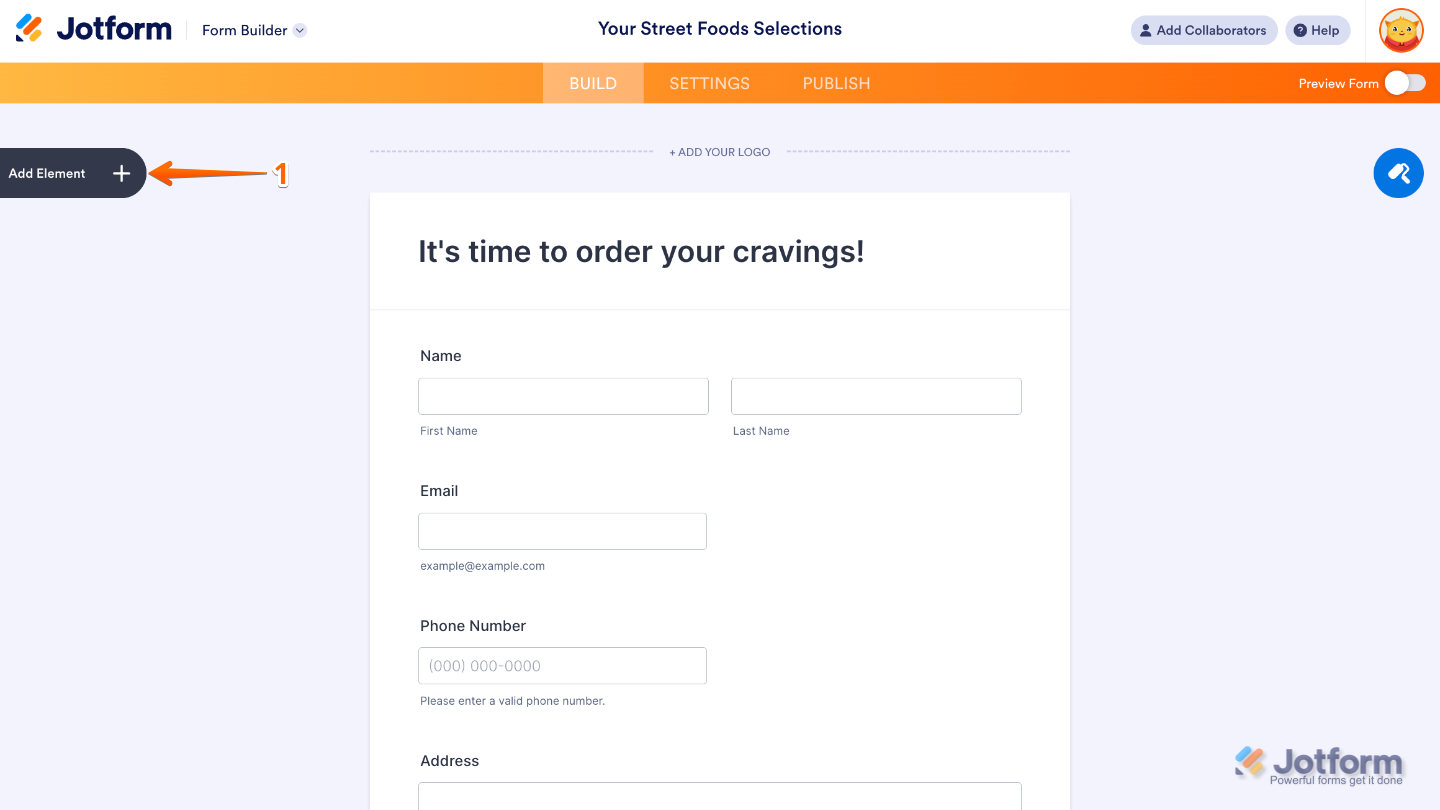
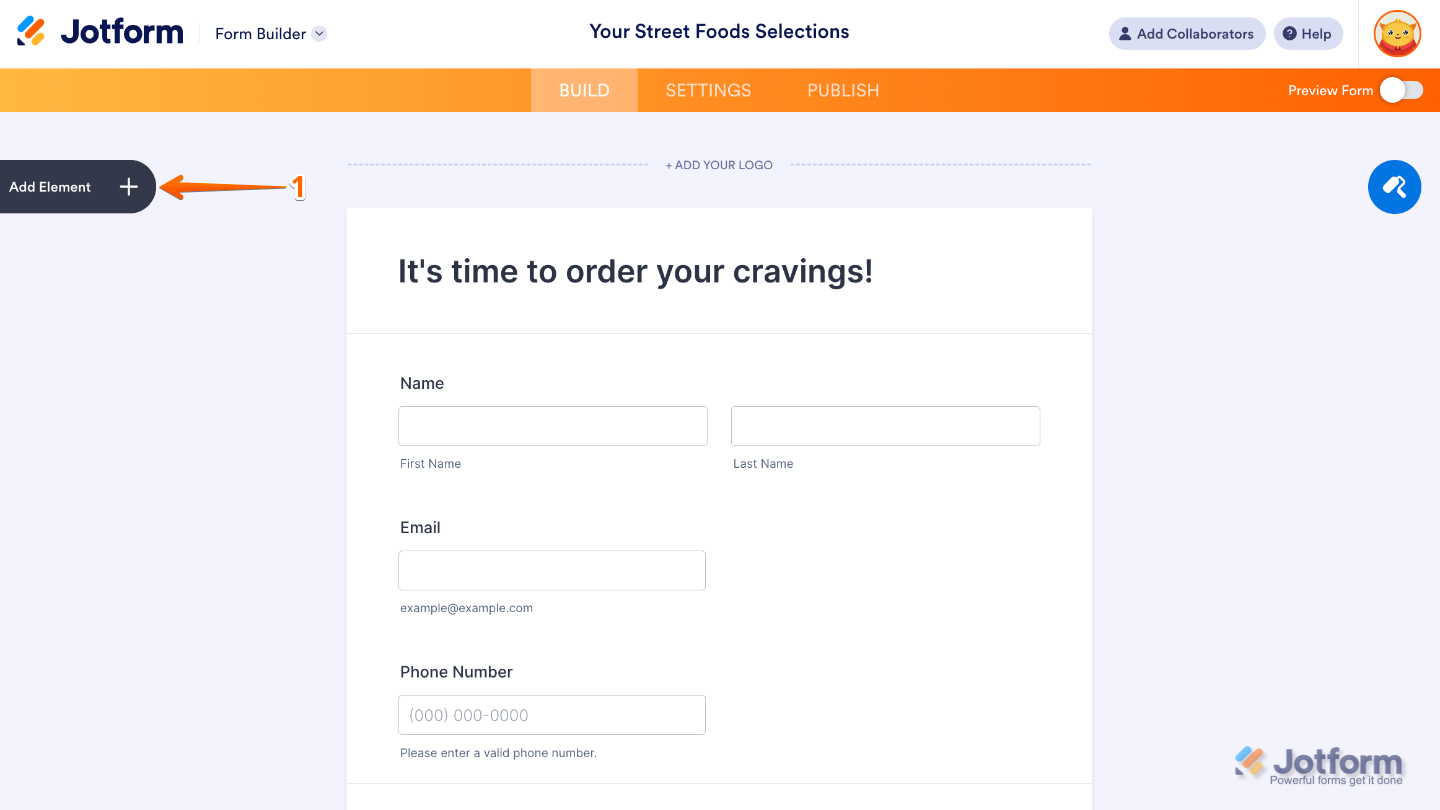
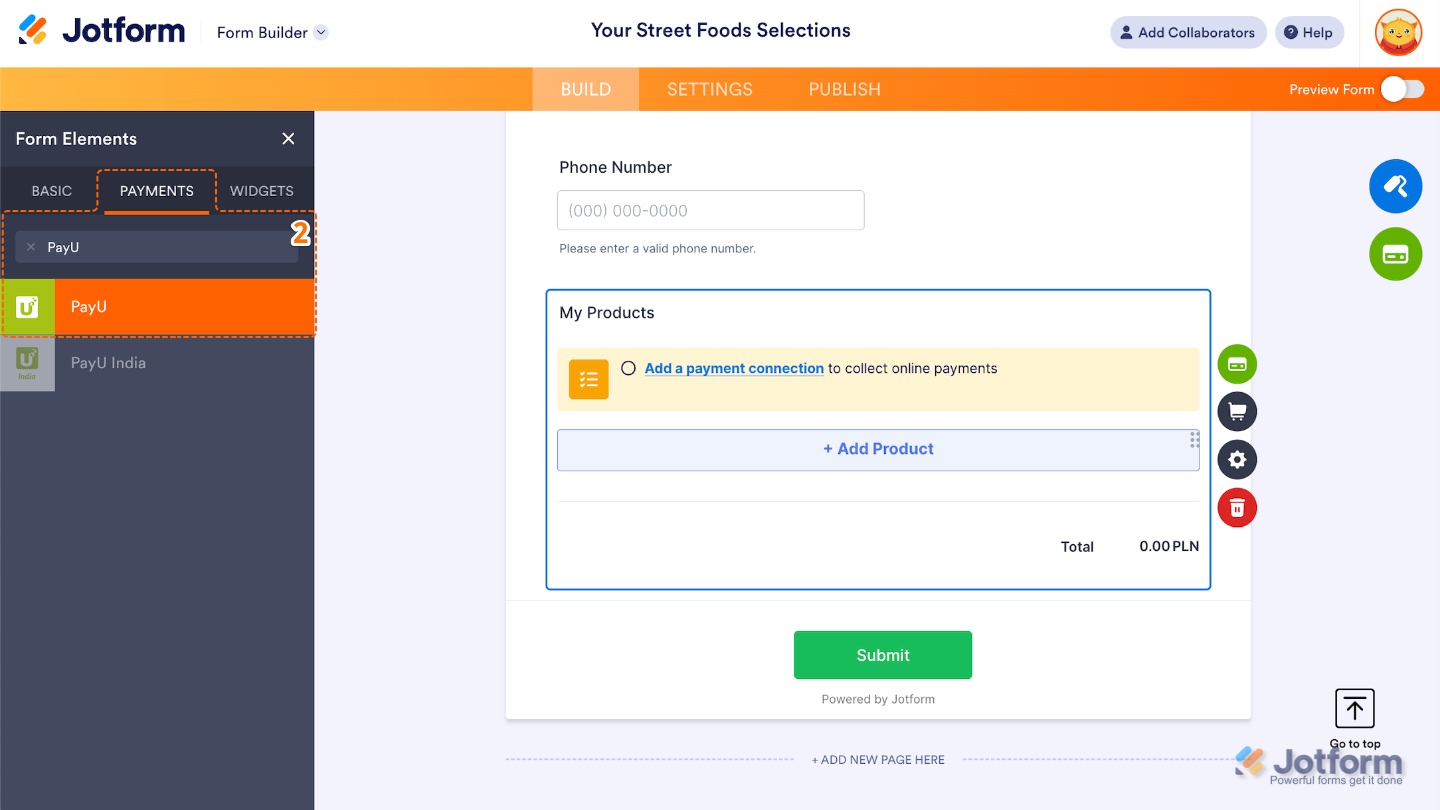
- In Form Builder, click on Add Element menu on the left side of the page.
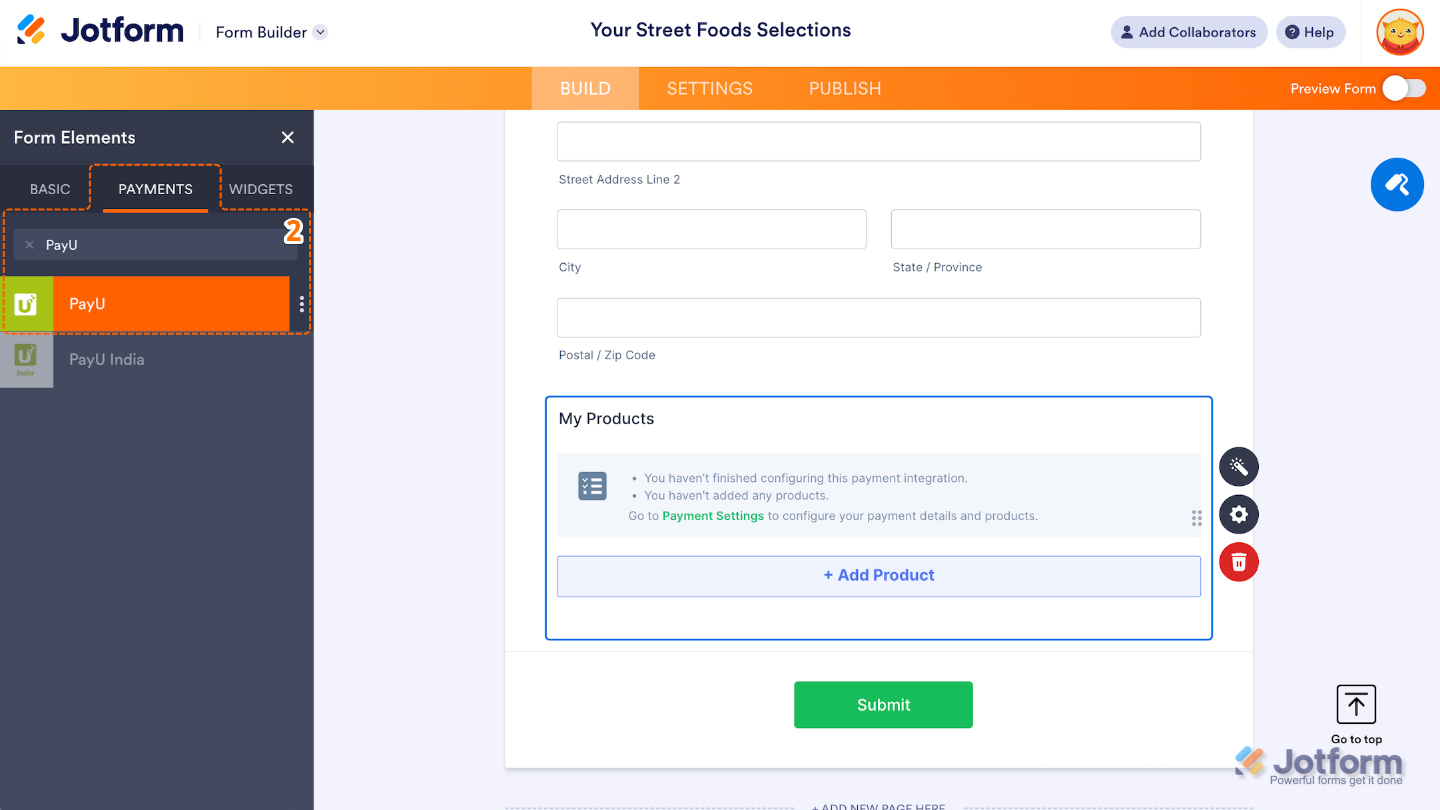
- Now, in the Form Elements menu, under the Payments tab, search for the PayU and then click on it. Or, just drag and then drop it to where you want it to be on your form.
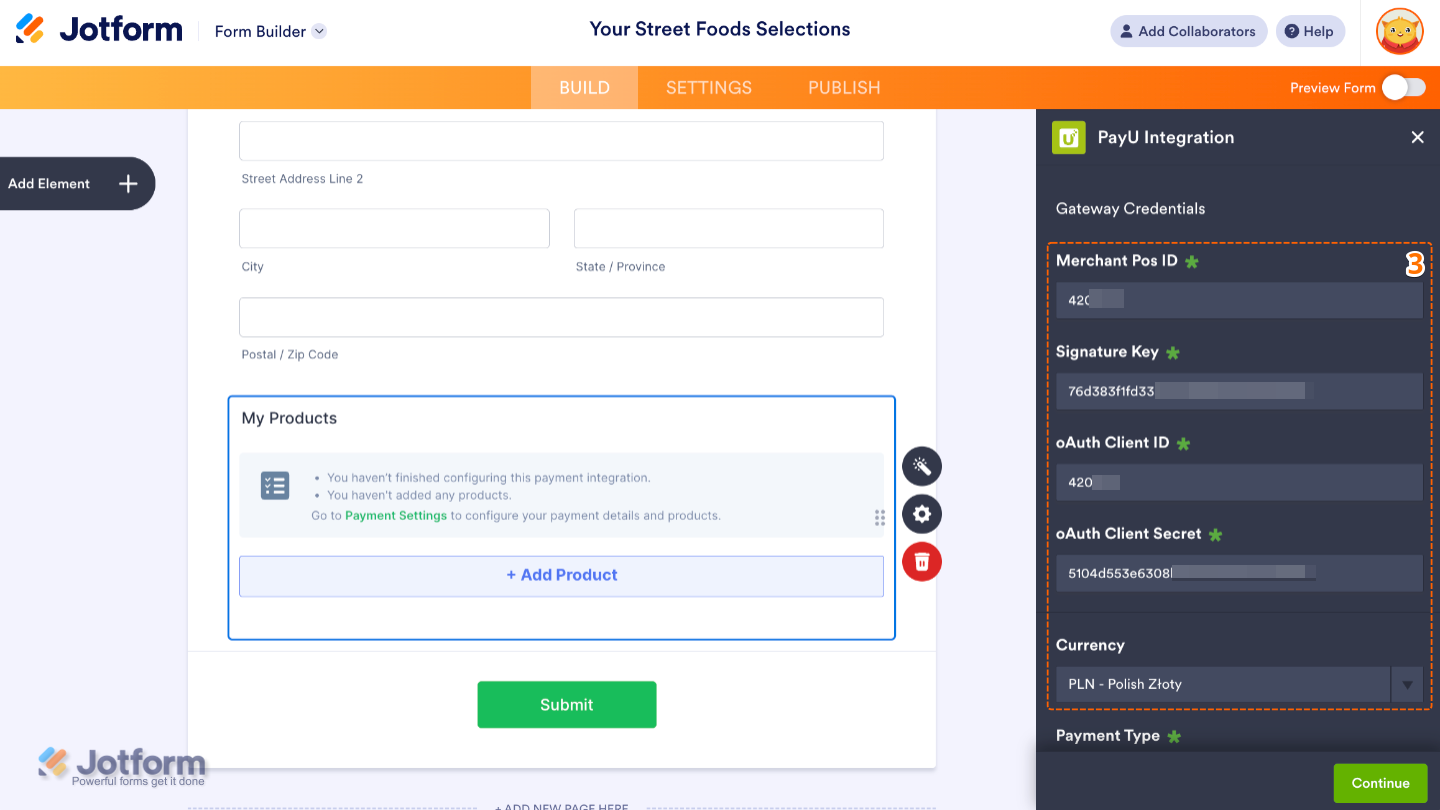
- Next, in the PayU Integration window that opens on the right side of the page, enter the Merchant Pos ID in the input box at the top from your Signature Key and the oAuth Client ID and oAuth Client Secret associated with it in the Gateway Credentials section. If you’re not sure how to get those, check out these support articles from PayU on Get Client ID and Secret from Dashboard to learn more about them.
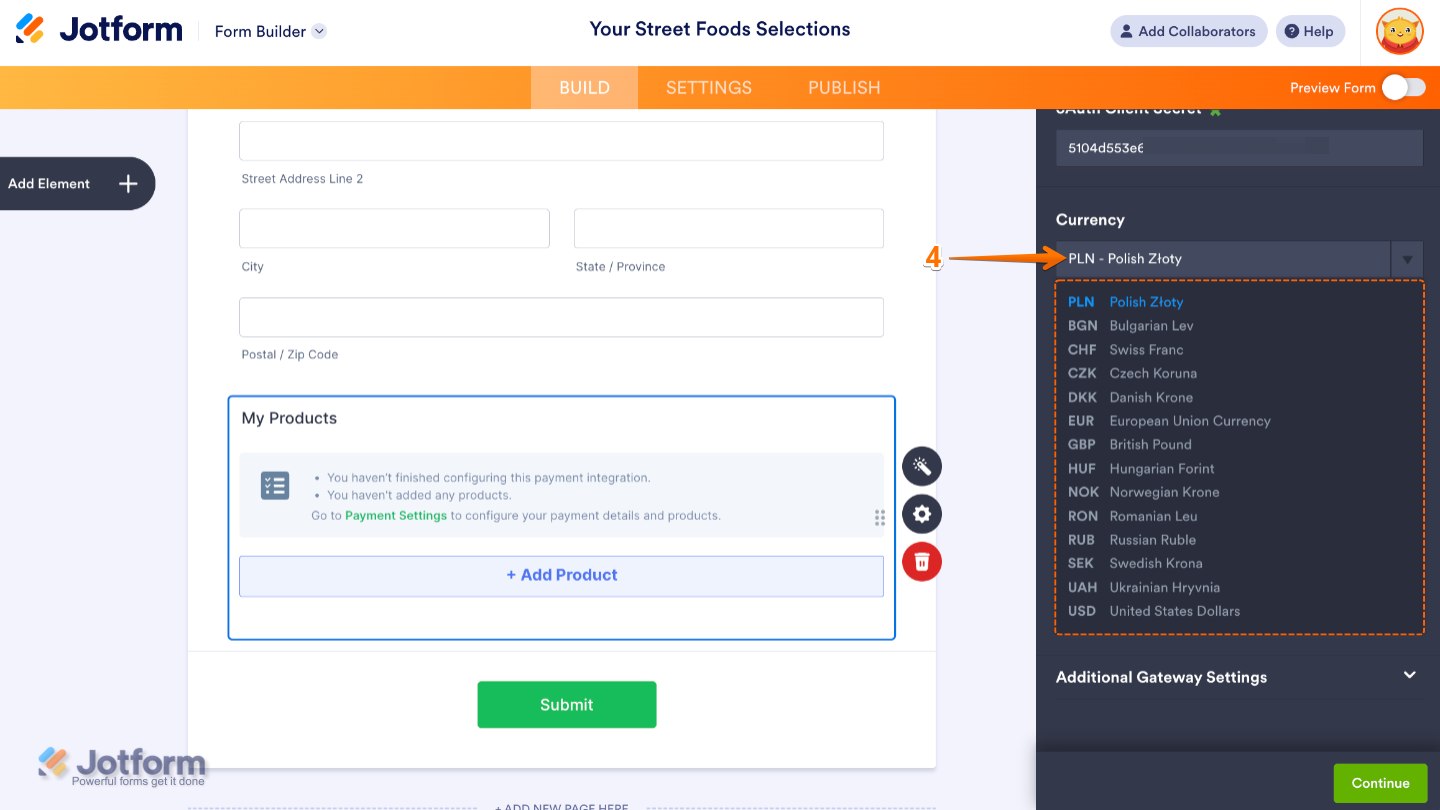
- Then, in the Currency Dropdown menu, select one of the currencies available with the integration:
- PLN – Polish Złoty
- BGN – Bulgarian Lev
- CHF – Swiss Franc
- CZK – Czech Koruna
- DKK – Danish Krone
- EUR – European Union Currency
- GBP – British Pound
- HUF – Hungarian Forint
- NOK – Norwegian Krone
- RON – Romanian Leu
- RUB – Russian Ruble
- SEK – Swedish Krona
- UAH – Ukrainian Hryvnia
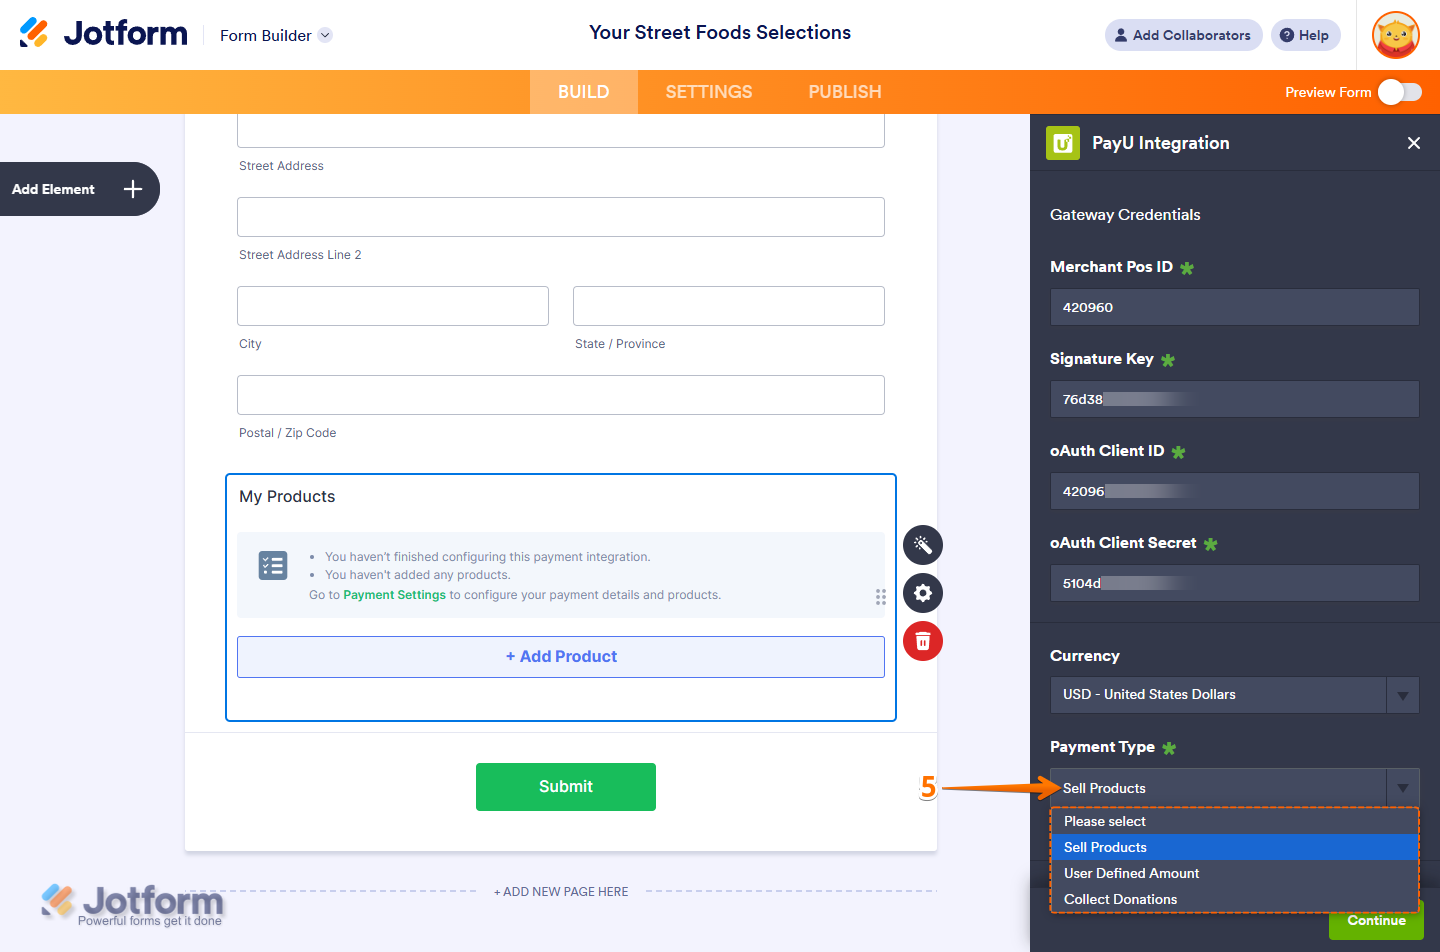
- Next, in the Payment Type Dropdown menu, select what you’d like the payment to be processed for:
- Sell Products — This is selected by default. Use this to sell physical or digital goods at a fixed price, allowing customers to make a one-time purchase.
- User-Defined Amount — Choose this if you want to let customers enter the amount they want to pay. It’s useful for tipping, custom amount pricing, or flexible payments.
- Collect Donations — Select this to accept voluntary contributions, commonly used for fundraising, nonprofit support, or charitable causes.
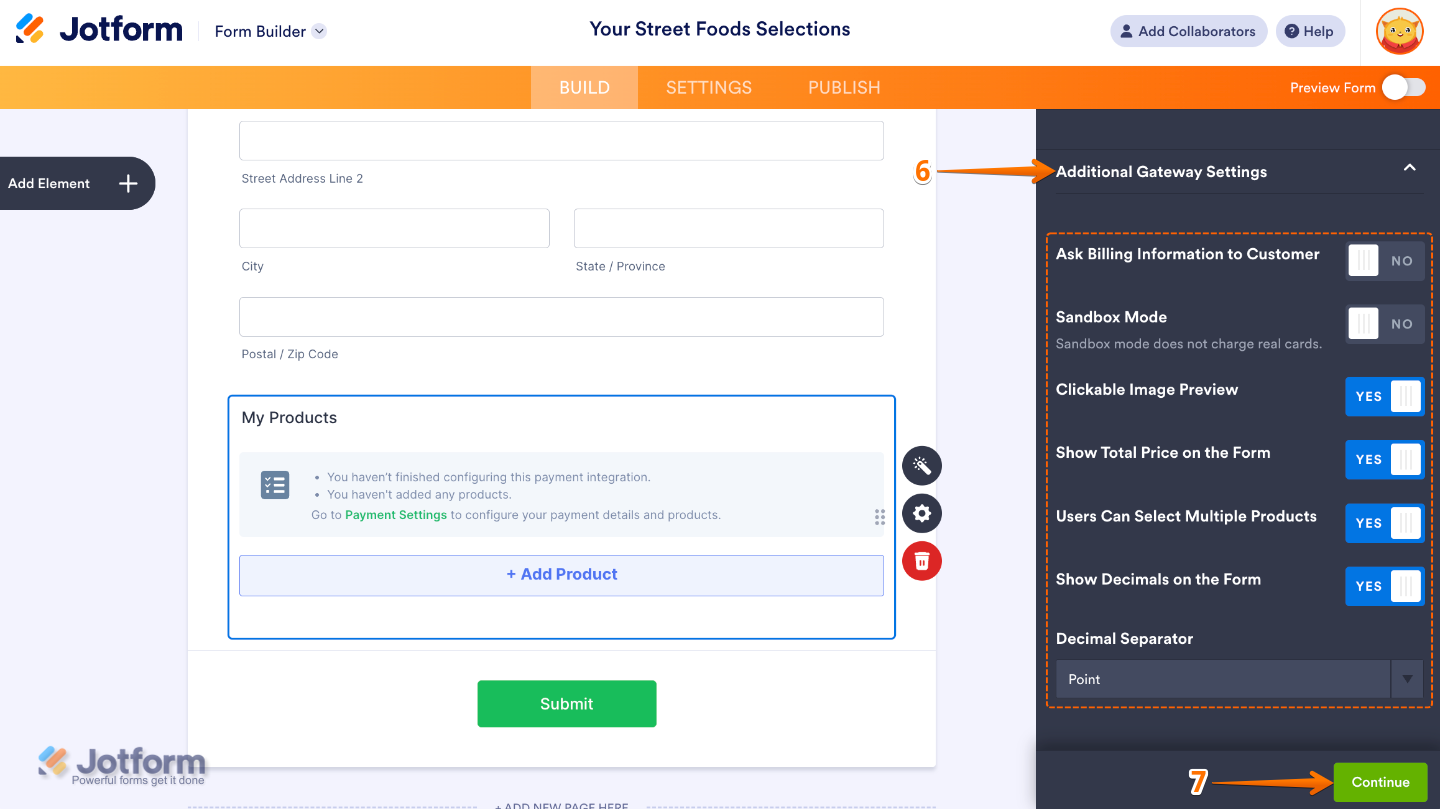
- Once you’re done, click on the Additional Gateway Settings to set up these options:
- Ask Billing Information to Customer — Enabling this will give you other fields to set up, like the Customer Email Field, Use Field as Billing Address, Use Field as Billing Address, Use Field as Shipping Address, Customer Phone Field, and Customer Date Field. Check out our guide about How to Enable Payment Authorization to learn more.
- Sandbox Mode — This enables testing transactions without processing real payments. You can check this PayU page to learn how to get your PayU Sandbox credentials.
- Clickable Image Preview — If you added images to your products, turning this On will give customers the option to click to Zoom In on them.
- Show Total Price on Form — This is only available with the Sell Products payment type and is enabled by default. You can toggle this Off if you want to hide the total price of selected products on your form.
- Users Can Select Multiple Product — Toggle this Off if you only want customers to select one subscription.
- Decimal Separator — If you enable the Show Decimals on The Form feature, you can use this field to select the kind of decimal separator to use. You either use a Period or a Comma.
- Once everything is set for the Sell Products payment type, click on Continue to start creating products and subscriptions for your payment field. For the User Defined Amount and Collect Donations payment types, just click on Save at the bottom.
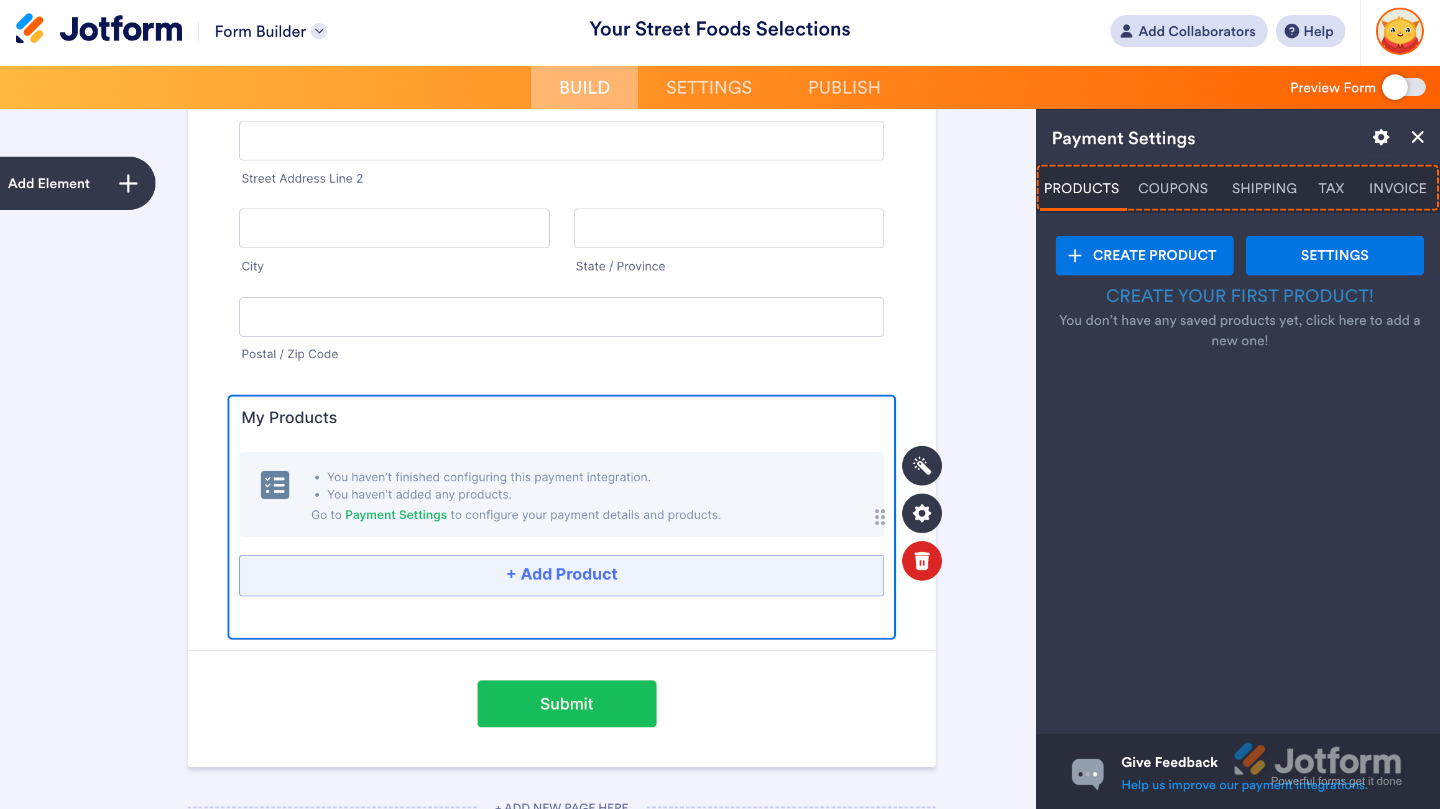
- From there, you’ll head over to the Payment Settings menu, where you can easily set up everything you need, like:
- Products — This is where you add and manage the items or services you’re selling on your form. You can include product names, descriptions, prices, images, quantity options, and more. Our guide on Setting Up Your First Order Form walks you through everything.
- Coupons — Here, you can create discount codes for your products. You can set percentage-based or fixed-amount discounts, usage limits, and expiration dates. For a quick how-to, check out our guide on How to Add a Coupon Code to Payment Forms.
- Shipping — This allows you to set up shipping fees based on your needs. You can offer flat-rate shipping, location-based rates, or set shipping costs per product. To learn how it’s done, see our guide on How to Add Shipping Costs to Payment Forms.
- Tax — Add sales tax rules for your products here. You can set tax percentages and apply them to all or specific products depending on your location or business needs. Take a look at our guide on How to Apply Sales Tax to Products on Your Payment Form for more details.
- Invoices — Enable this to automatically generate invoices for each submission. You can customize the layout, add your logo, and send a copy to the customer and yourself. You’ll find more info in our guide on How to Generate an Invoice for Your Payment Form.
As you set up your products, you might also find these helpful guides handy along the way:
- Setting Up Your First Order Form
- How to Set Up a Recurring Payment Option
- How to Add Options to Payment Forms
- How to Add Coupon Code to Payment Forms
- How to Add Tax to Your Payment Form
- How to Add Shipping Cost to Payment Forms
- How to Generate an Invoice for Your Payment Form
- How to Enable and Manage Product Stocks in Payment Fields
Adding and Setting Up PayU Using a Reusable Payment Connection
Integrating your form with Jotform’s Reusable Payment Connections lets you streamline your PayU setup. Once connected, you can use the same configuration across other forms or apps—no need to set it up again from scratch. Here’s a quick how-to:
- In Form Builder, click on Add Element on the left side of the page.
- Now, in the Form Elements menu, under the Payments tab, search for the PayU and then click on it. Or, just drag and drop it to where you want it to be on your form.
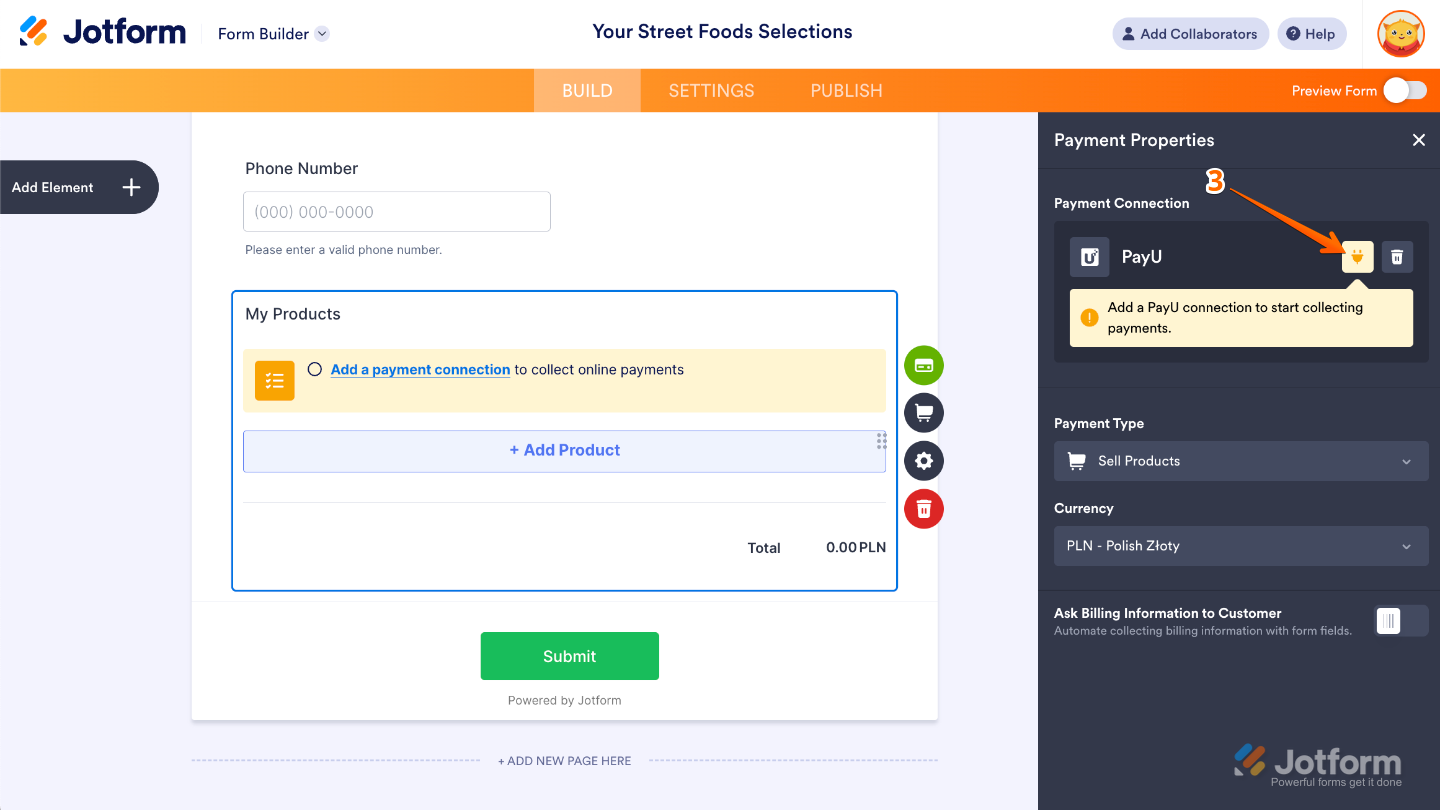
- Then, in the Payment Properties menu on the left side of the page, click on the Plug icon.
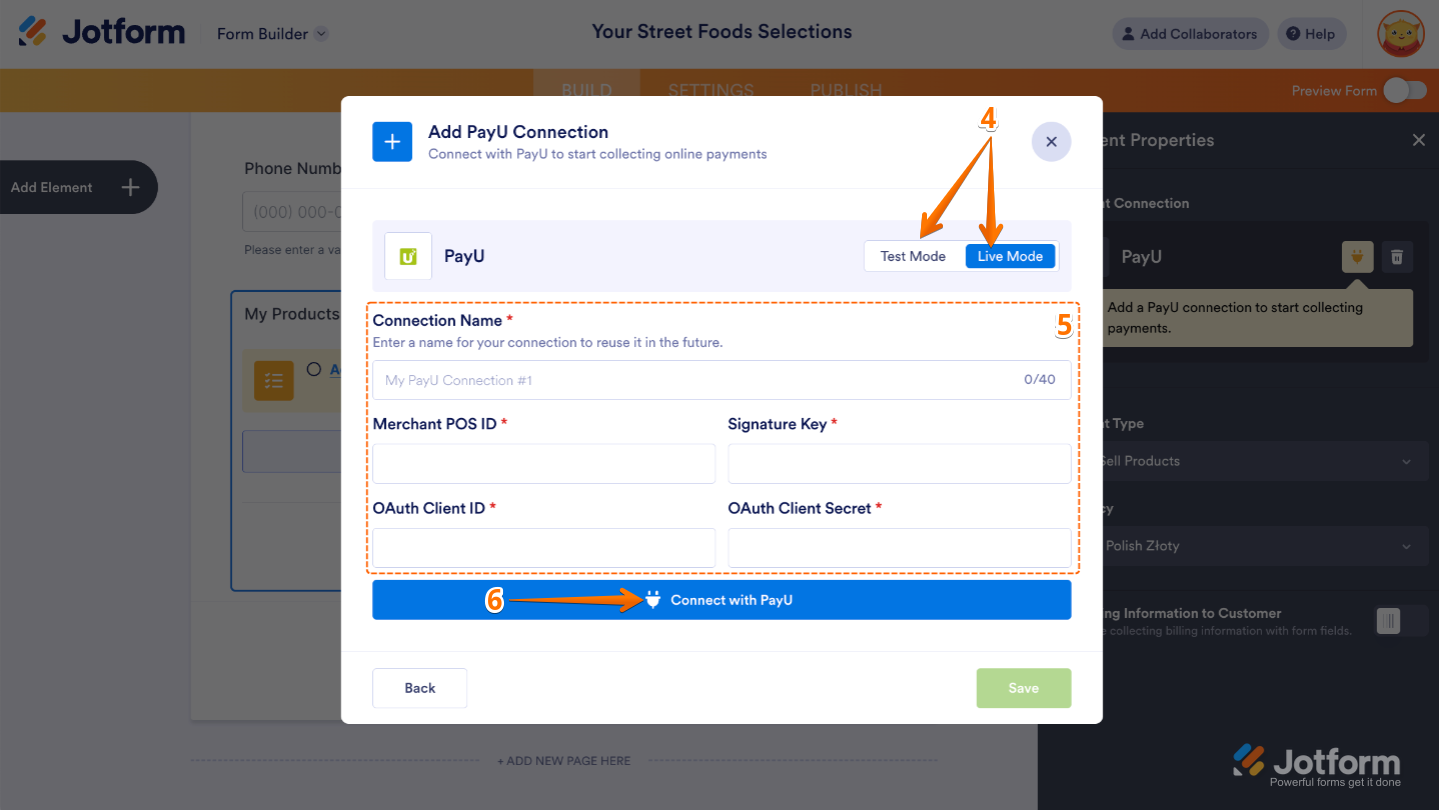
- Now, in the Add PayU Connection window, click on either Test Mode or Live Mode at the top to select the environment for your payment connection.
- Next, set up these options:
- Connection Name — Give your connection a name so it’s easy to recognize from your PayU dashboard. You can reuse it for other form integrations too.
- Merchant POS ID — This is your Point of Sale (POS) ID, which uniquely identifies your store or account in the PayU system. It tells PayU which business is receiving the payment.
- Signature Key — This is used for data validation and security. It helps confirm that the data being sent between Jotform and PayU hasn’t been tampered with, keeping your transactions safe.
- OAuth Client ID — This identifies your application (in this case, Jotform) and allows it to request access to PayU’s services on your behalf.
- OAuth Client Secret — Paired with the Client ID, the Client Secret acts like a password. It should be kept private, as it helps securely authenticate your connection with PayU.
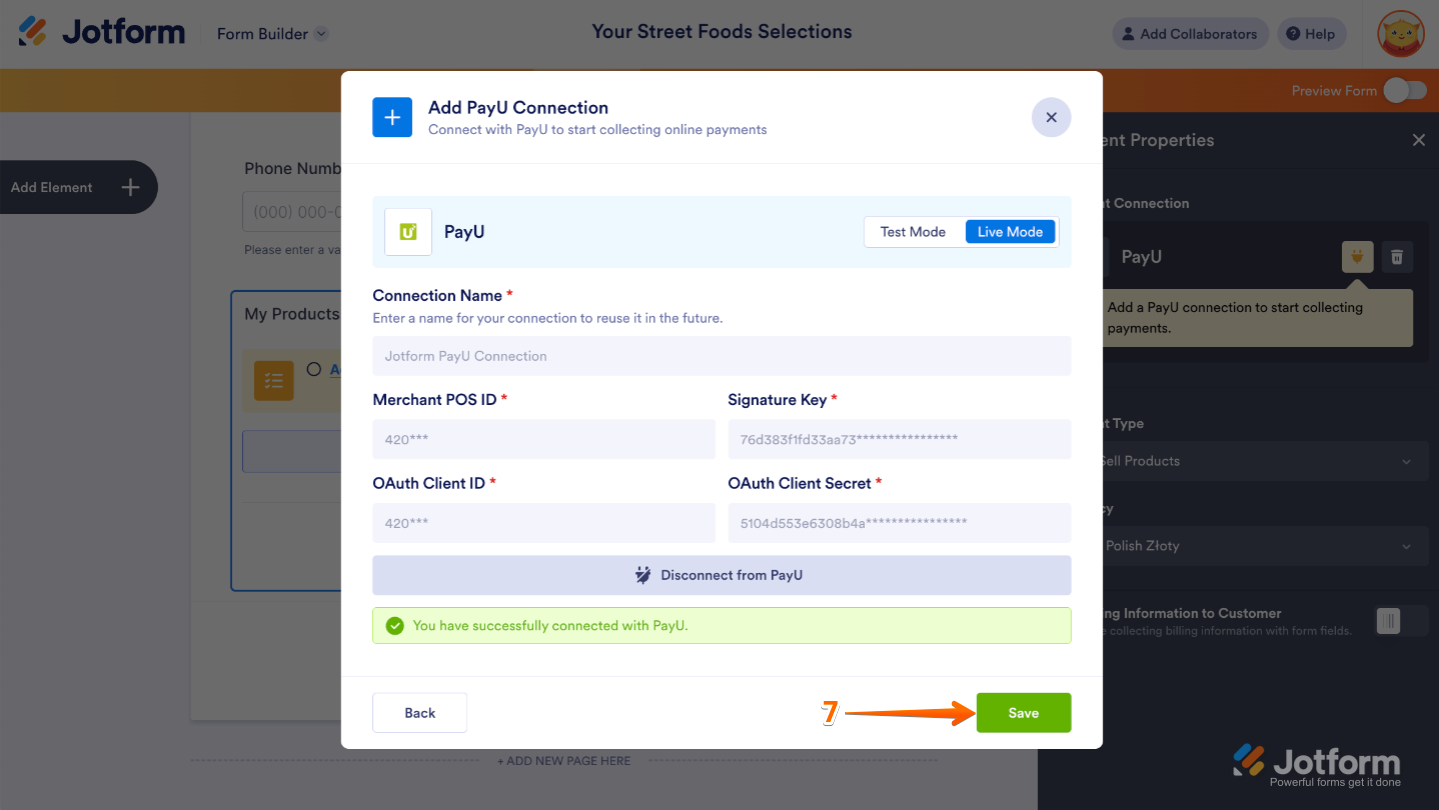
- After that, click on Connect with PayU.
- Once connected, click on Save.
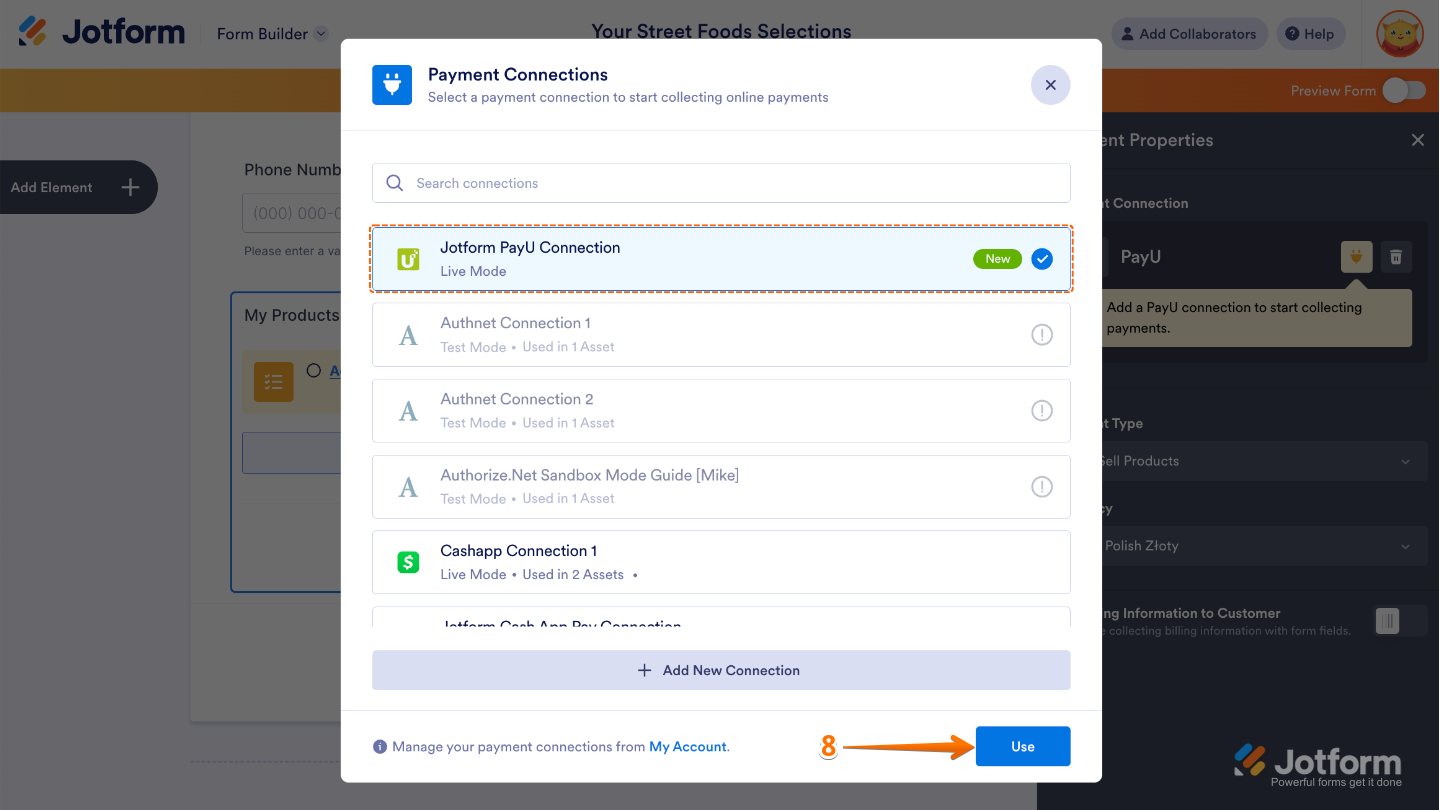
- In the Payment Connections window that pops up, select a connection and then click on Use.
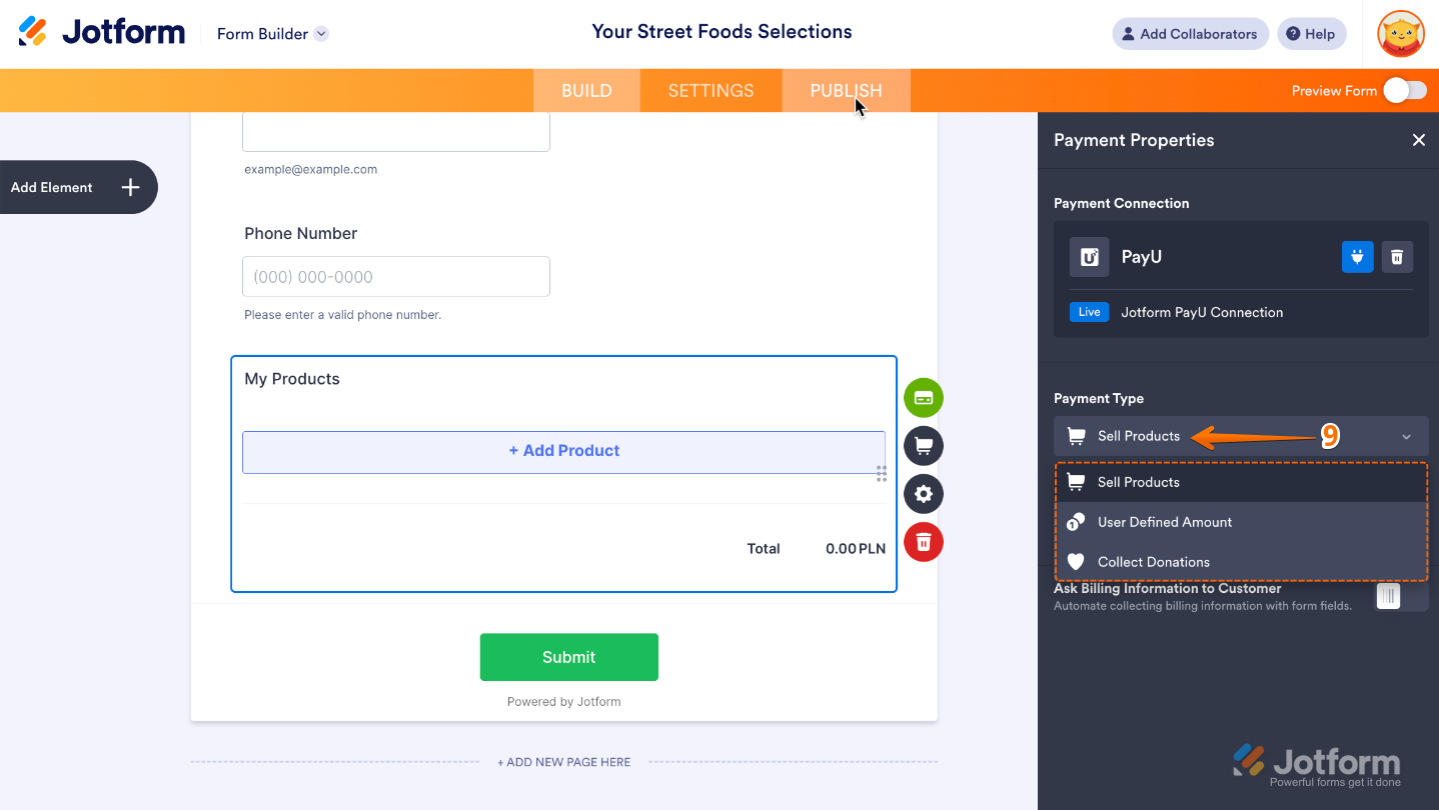
- Now, in the Payment Type Dropdown menu, select what you’d like the payment to be processed for:
- Sell Products — It’s selected by default. Use this to sell physical or digital goods at a fixed price, allowing customers to make a one-time purchase.
- User-Defined Amount — This lets customers enter the amount they want to pay. It’s useful for tipping, custom amount pricing, or flexible payments.
- Collect Donations — Select this to accept voluntary contributions. It’s commonly used for fundraising, nonprofit support, or charitable causes.
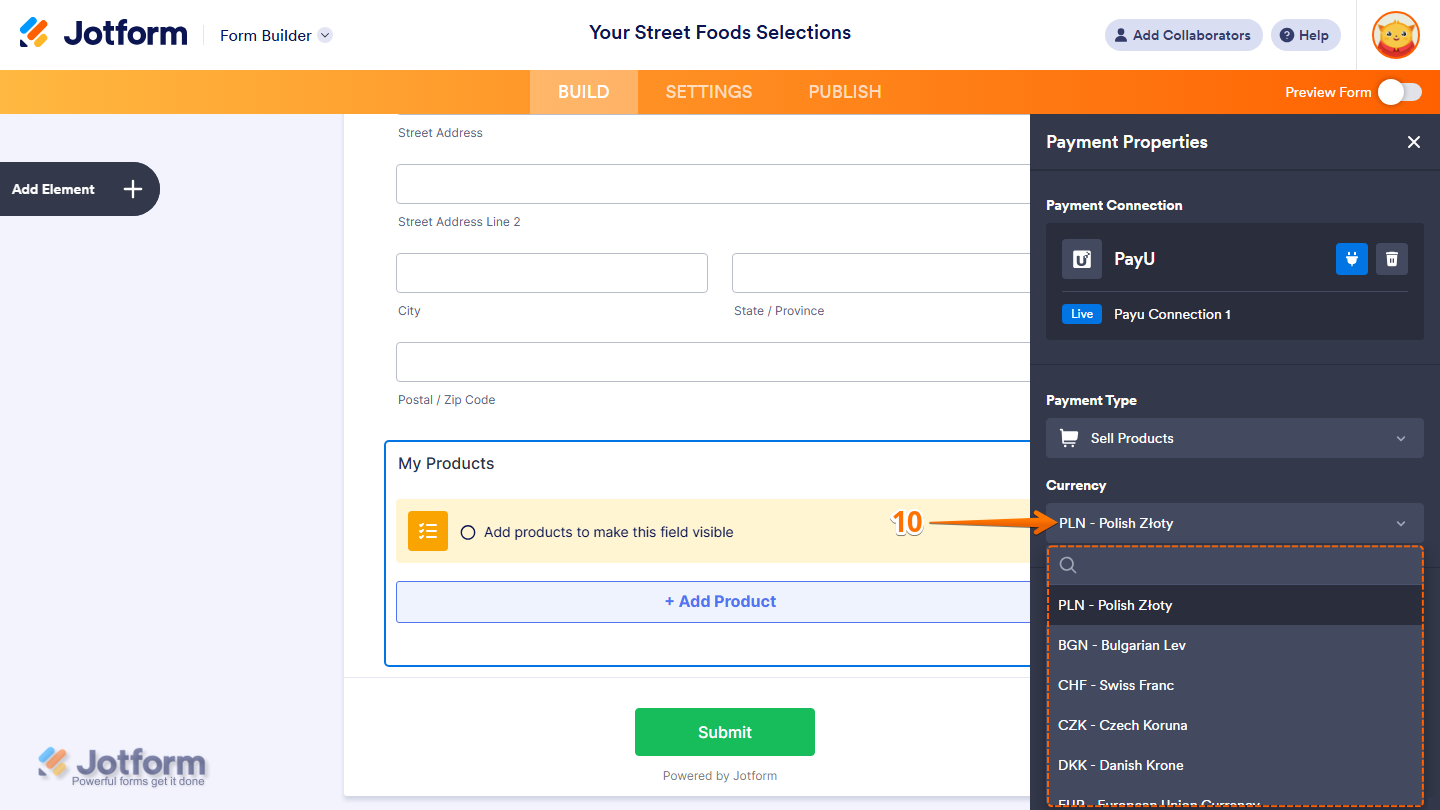
- In the Currency Dropdown menu, select one of the currencies available with the integration. You can find a complete list of supported currencies here.
If you want to enable the Ask Billing Information to Customer option, make sure you’ve added an Address Field, Name field, Email field, and Phone Number field to your form to set up these options:
- Billing Address
- Shipping Address
- Billing Name
- Customer Email Field
- Customer Phone Field

That’s it. To explore more features for your payment form, check out our helpful Payment Forms section of Jotform’s User Guides. They’re a great resource to have on hand.
Note
PayU is an off-page payment gateway, so when someone submits your form, they’ll be redirected to PayU’s secure payment page to complete the transaction.

Send Comment:
7 Comments:
103 days ago
Please let me know if the Payu configuration can be used in Colombian pesos (COP). I've been requesting this since 2019, and I've always been told that they're very busy and will do it soon.
341 days ago
Hi, is the payment service available for India?
More than a year ago
La integracion con COP no esta habilitada ??
More than a year ago
Hola, al integrar con payu no veo la opción de moneda pesos colombianos (COP) me puedes orientar como agregarla. Gracias
More than a year ago
Buenos días se puede integrar a Payu Colombia
More than a year ago
Hi, is the payment service available for Nigeria?
More than a year ago
Does not seem to work with PayU South Africa. South African currency ZAR not listed as an option for receiving payment. Local South Africans will not pay for local goods in any other currency other than ZAR.
Please can you enlighten us ....