Jotform’s Coupon Codes feature lets you create custom discounts that customers can apply directly to your payment form. You can auto-generate discount codes or enter your own, set expiration dates, and limit how many times each one can be used. Discounts can be applied to individual products, shipping, or the total amount—and for subscriptions, you can choose to apply them only to the first payment. It’s a simple way to run promotions, offer exclusive deals, or even let someone place an order for free.
Adding and Setting Up a Coupon Code
Whether you’re creating a new payment form or updating an existing one, you can easily set it up to accept discount coupons once you’ve added your products or subscriptions. Here’s how to do it:
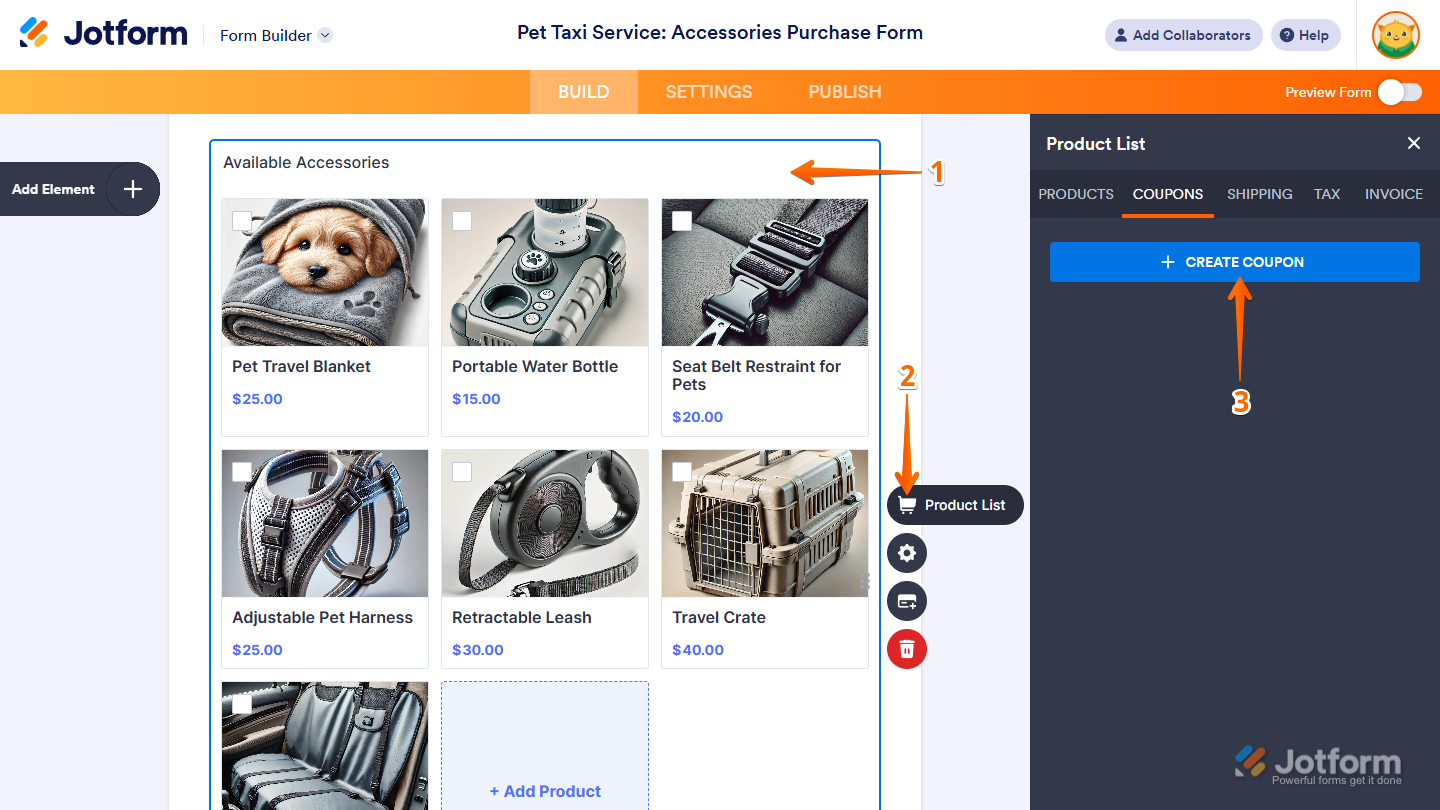
- Open your form in Form Builder, and click on the Payment field.
- Now, on the right side of it, and depending on the method you used to set it up:
- Click on the Wand icon to open the Payment Settings section.
- Click on the Shopping Cart icon to open the Product List section.
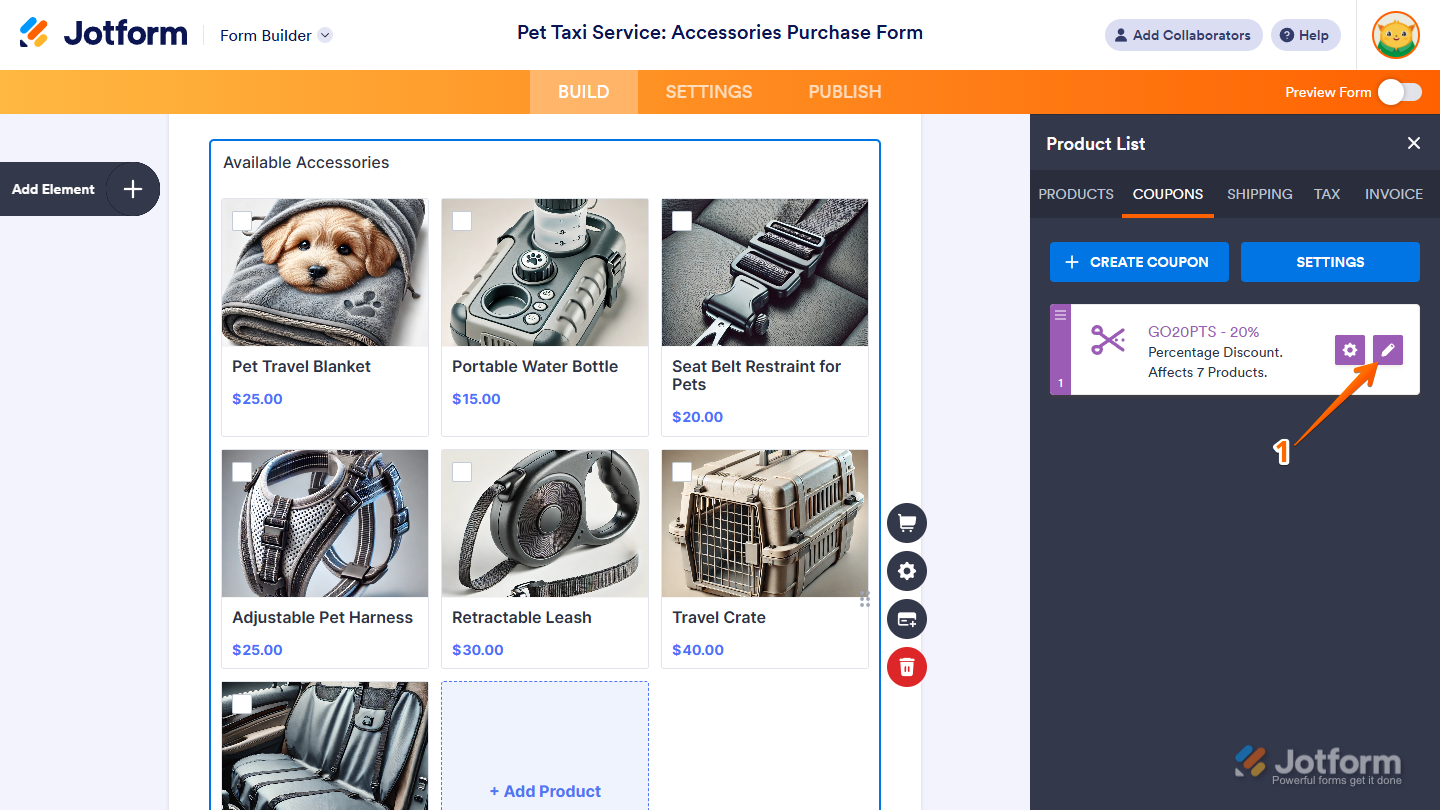
- Then, under the Coupons tab in the Payment Settings section or Product List section on the right side of the page, click on Create Coupon.
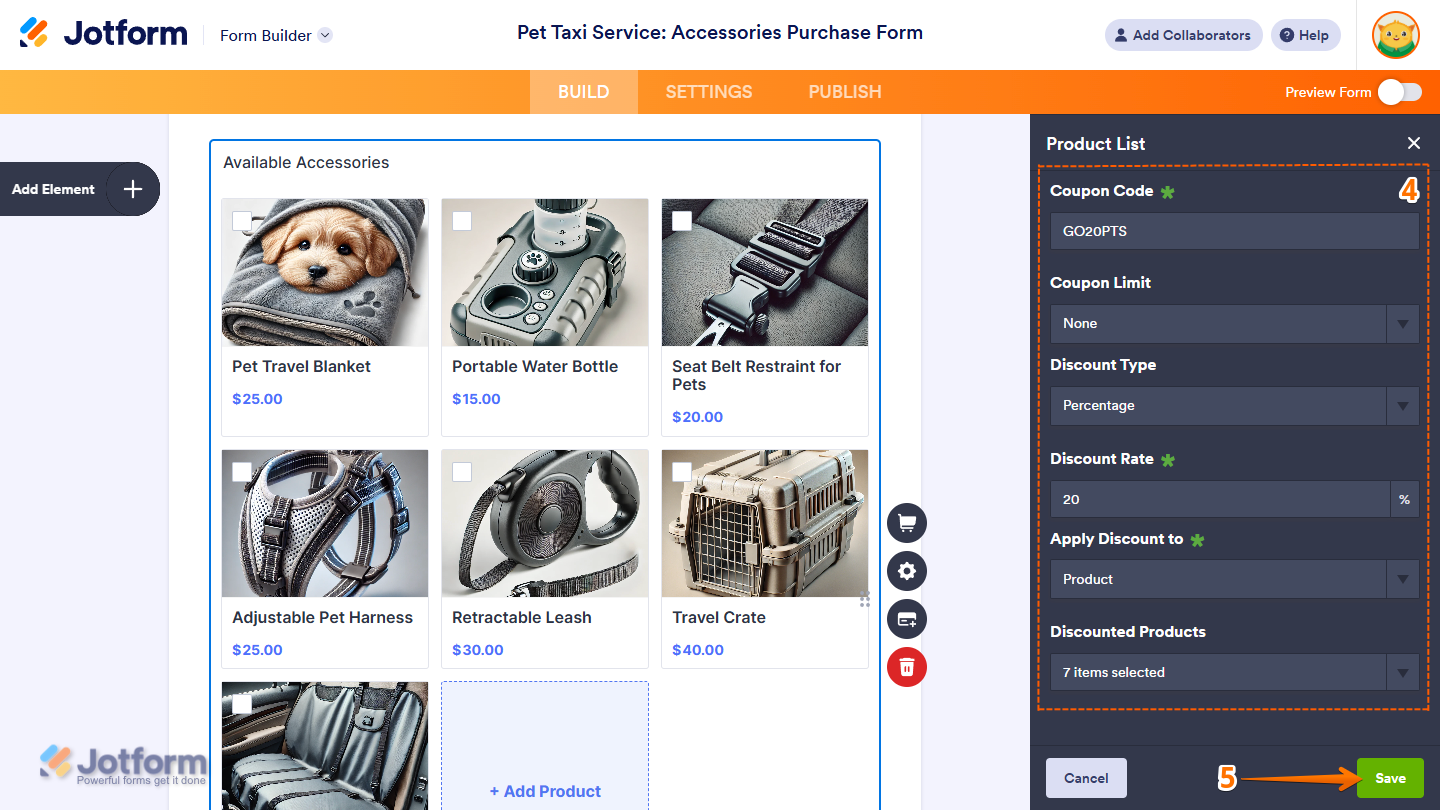
- Next, configure the following options:
- Coupon Code — You can use the auto-generated discount code here, or enter one that customers will use on the form.
- Coupon Limit — You can choose how to restrict the discount using one of the following options:
- None — This default option keeps your code active with no expiration or usage limit.
- By Expiration Date — You can set the code to expire automatically after a specific date.
- By Number of Use — You can limit the code to a specific number of uses.
- Expiration Date — This is only shown if you select By Expiration Date above. You can pick the expiration date using the calendar that shows up when you click on the input box.
- Coupon Limit Use Count — This is only shown if you select By Number of Use above. You can define how many times the code can be used.
- Discount Type — You can choose how to apply the discount using one of the following options:
- Percentage — This default option applies a percentage-based discount to the amount the discount is set to be applied to.
- Fixed Amount — You can apply a specific fixed discount amount to the amount the discount is set to be applied to, based on the currency you set for your Payment field.
- Discount Rate — This is only shown if you select Percentage above. You can enter the percent to deduct from the amount the discount is set to be applied to.
- Discount Amount — This is only shown if you select Fixed Amount above. You can enter the specific value to deduct from the amount the discount is set to be applied to.
- Apply Discount To — You can choose where to apply the discount using the following options:
- Product — If you’re selling products, this applies the discount to the total amount after tax but before the shipping charge. It doesn’t require a minimum subtotal, and it’s selected by default.
- Shipping — If you’re selling products, this applies the discount to shipping costs, but only if the minimum subtotal is met.
- Subtotal — If you’re selling products, this applies the discount to the subtotal before tax or shipping, but only if the minimum subtotal is met.
- All payments — If you’re selling subscriptions, this applies the discount to every recurring subscription payment.
- First payment — If you’re selling subscriptions, this applies the discount only to the first subscription payment.
- Discounted Products — This is only shown if the discount applies to the product price, or you’re selling subscriptions. By default, all the products or subscriptions are selected, but you can limit the discount to specific items by selecting them in the menu.
- Minimum Subtotal Amount — This is only shown if you select Shipping or Subtotal above. You can set the minimum subtotal your customer needs to meet for the coupon to apply.
- Once everything’s set, click on Save.
That’s it. Your coupon code is now set up and ready to use on your form. Click on Create Coupon again if you want to set up another one.
Notes
- Extra spaces in a coupon code, whether at the beginning, middle, or end, will make it invalid. So be sure to remove all spaces before saving or applying the code.
- The Coupon Code feature is available on the Product List field and Payment Processing Fields that support the Sell Products payment type—such as Square, PayPal, Authorize.Net, Stripe, and others, except for iyzico, and the GoCardless payment field that only offers the Sell Subscription payment type.
Changing the Coupon Labels and Warning Messages
You can configure the Coupon Labels and Warning Messages. It’s easy to do, here’s how:
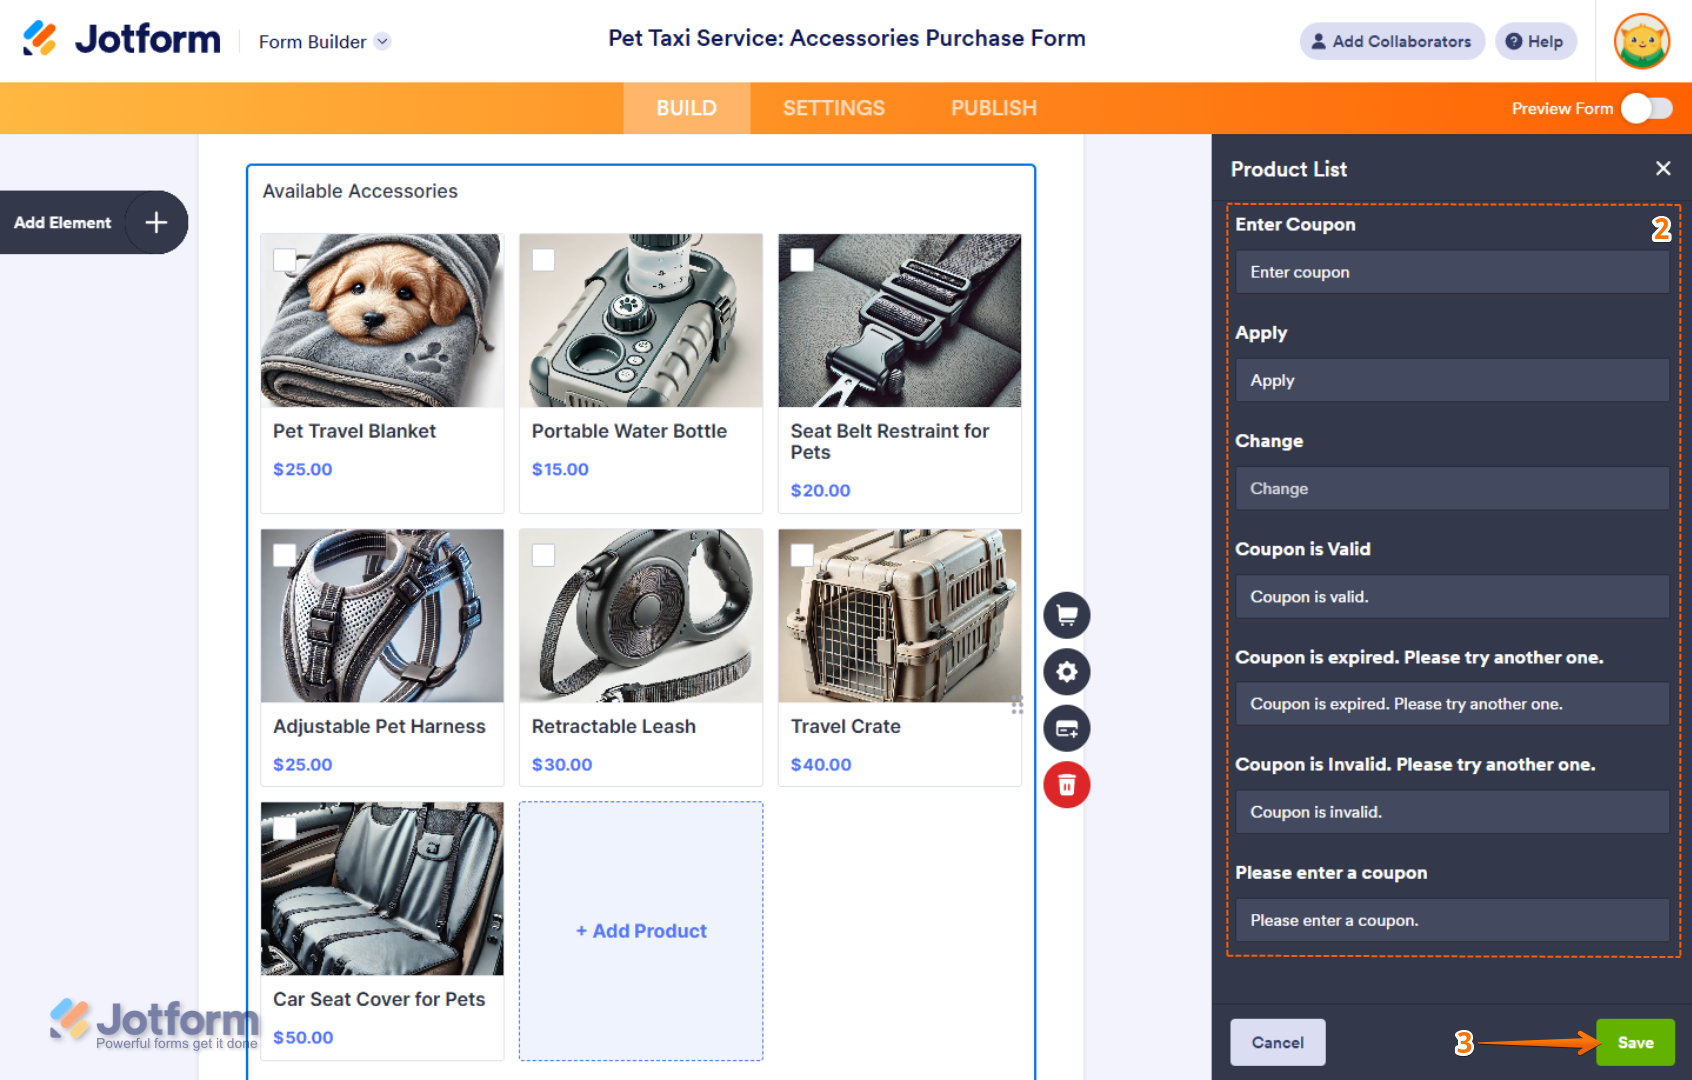
- While still in the Payment Settings section, click on Settings under the Coupons tab.

- Now, configure the coupon code labels and warning messages:
- Enter Coupon — This lets you change the label of the Coupon Code field on your form.
- Apply — This lets you change the label of the Apply button that customers use to validate a coupon code.
- Change — This lets you change the label of the Change button that comes up after customers apply a valid coupon code.
- Coupon is Valid — This lets you change the message that comes up when customers apply a valid coupon code.
- Coupon is Expired — This lets you change the message that comes up when customers try to apply a coupon code that’s already expired or reached its usage limit.
- Coupon is Invalid — This lets you change the message that comes up when customers enter a coupon code that doesn’t exist or was disabled.
- Please Enter a Coupon — This lets you change the message that comes up when customers click on the Apply button without entering a coupon code.
- Then, click on Save at the bottom of the page.
Notes
- There’s no limit to the number of coupon codes you can create.
- The Settings button is shown only after you’ve created at least one coupon.
- Coupon codes aren’t case-sensitive—customers can enter them in any letter case.
- Flat rate discounts won’t reduce the amount being discounted below zero.
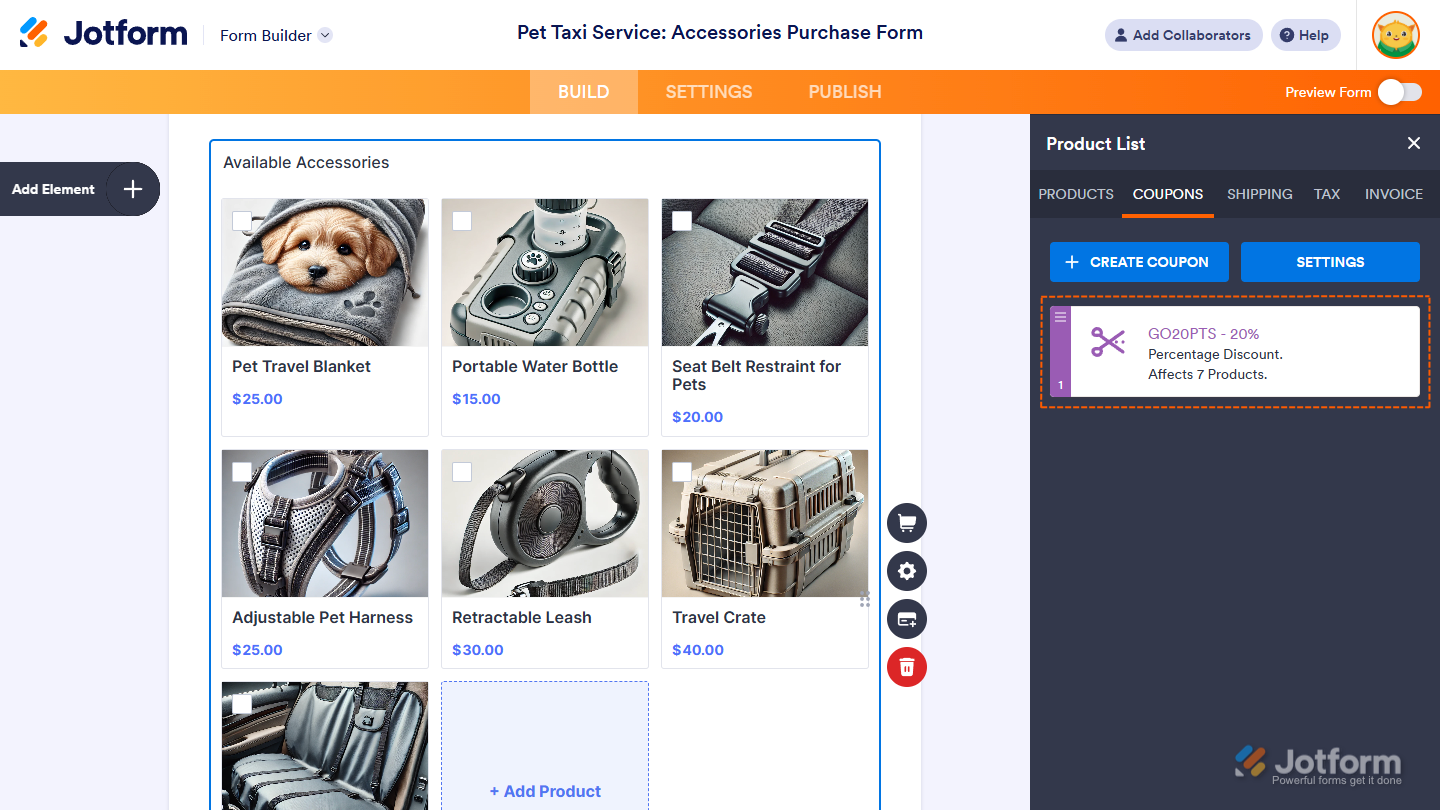
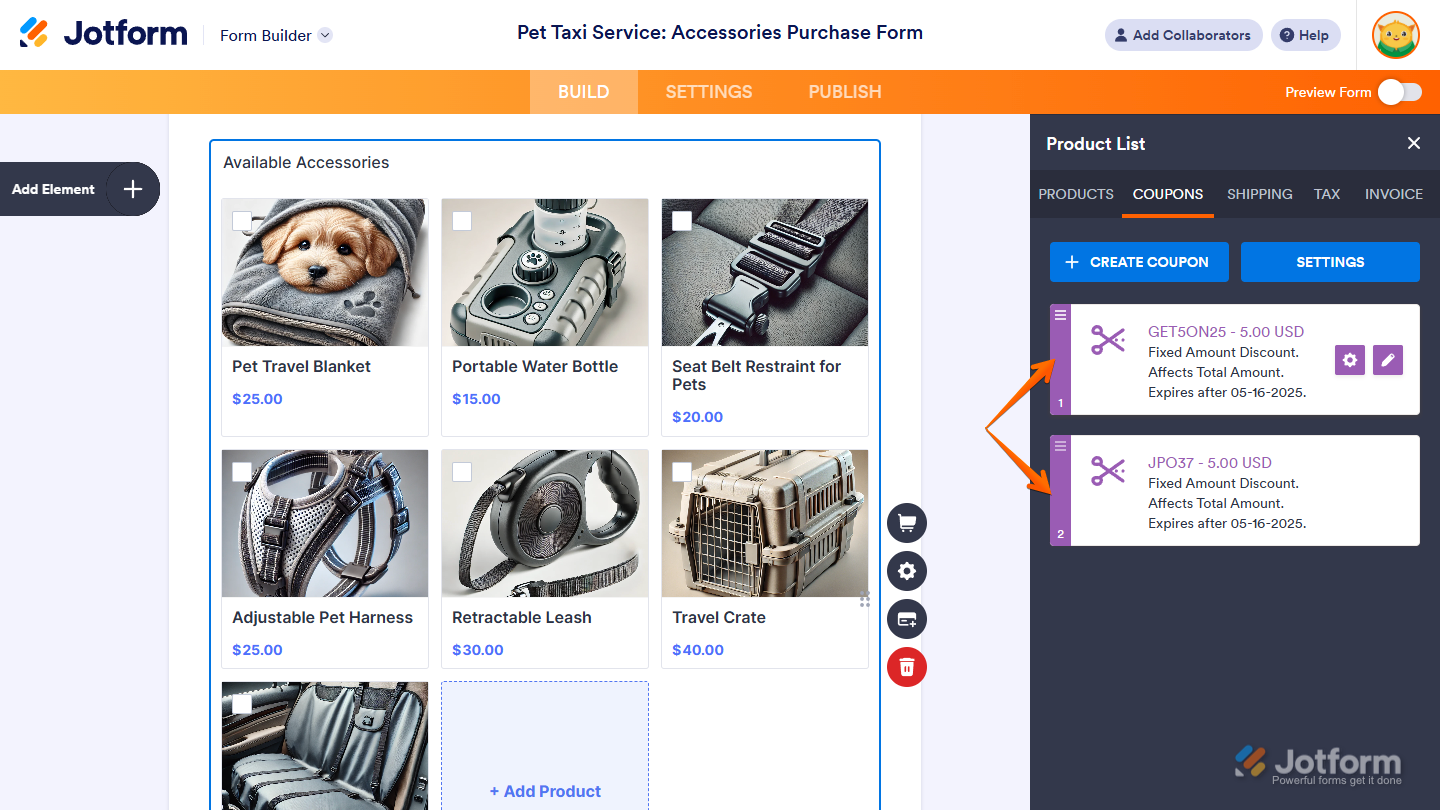
Managing your Coupon Code
Once you’ve saved a coupon code, you’ll find it listed under the Coupons tab in the Payment Settings or Product List sections. From there, you can delete any codes you no longer need, enable or disable them as required, edit existing codes, or create duplicates to set up similar coupons quickly.
Editing the Coupon Code Settings
You can edit a coupon if you need to adjust a promotion, update an exclusive deal, or change a free order setup. Here’s how to do it:
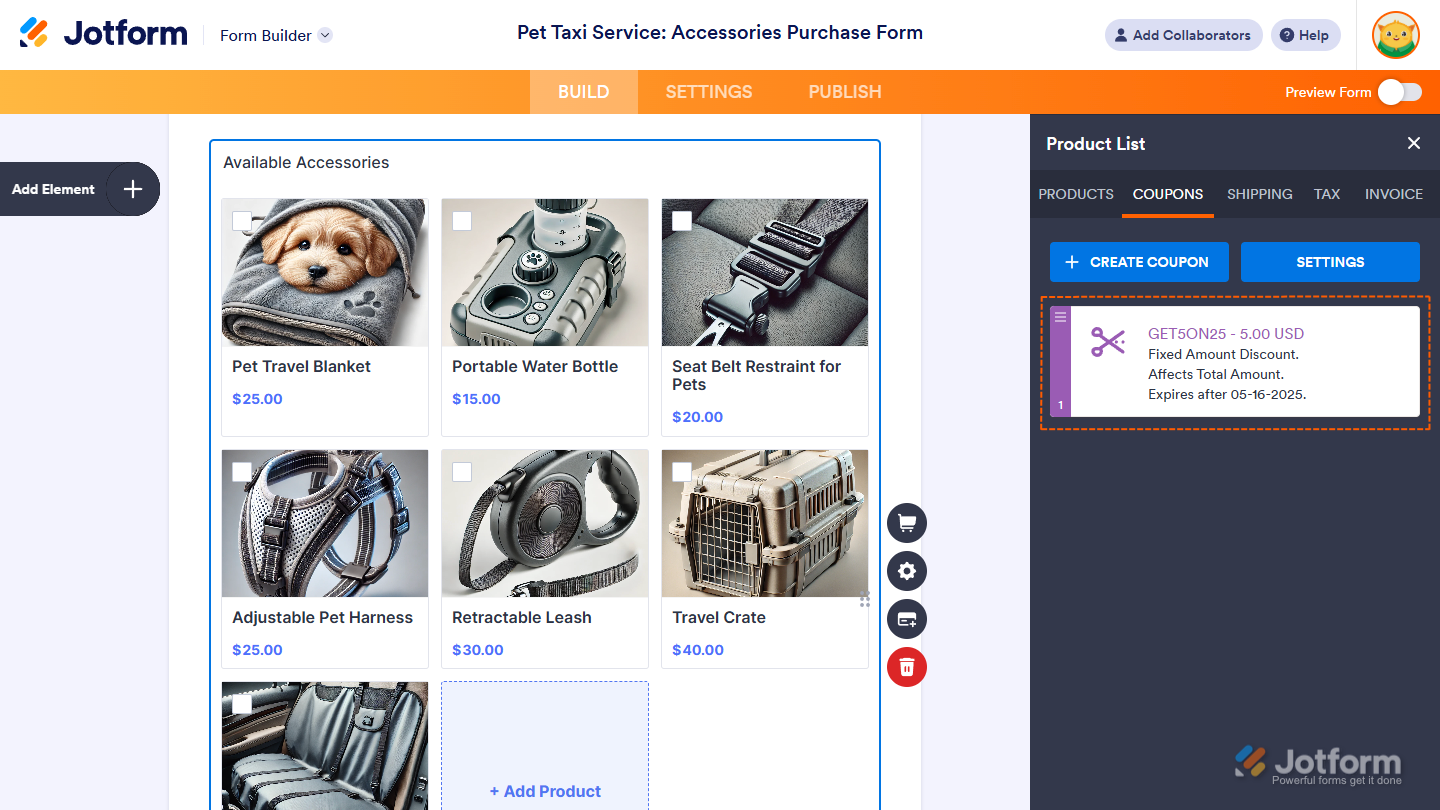
- While under the Coupons tab of the Payment Settings section or Product List section, hover your mouse over a coupon and then click on the Pencil icon.
- Next, modify the coupon’s settings and once you’re done, click on Save.

That’s it. The changes to your coupon have now been applied.
Note
When changes to coupons are saved, they’re automatically applied to your form.
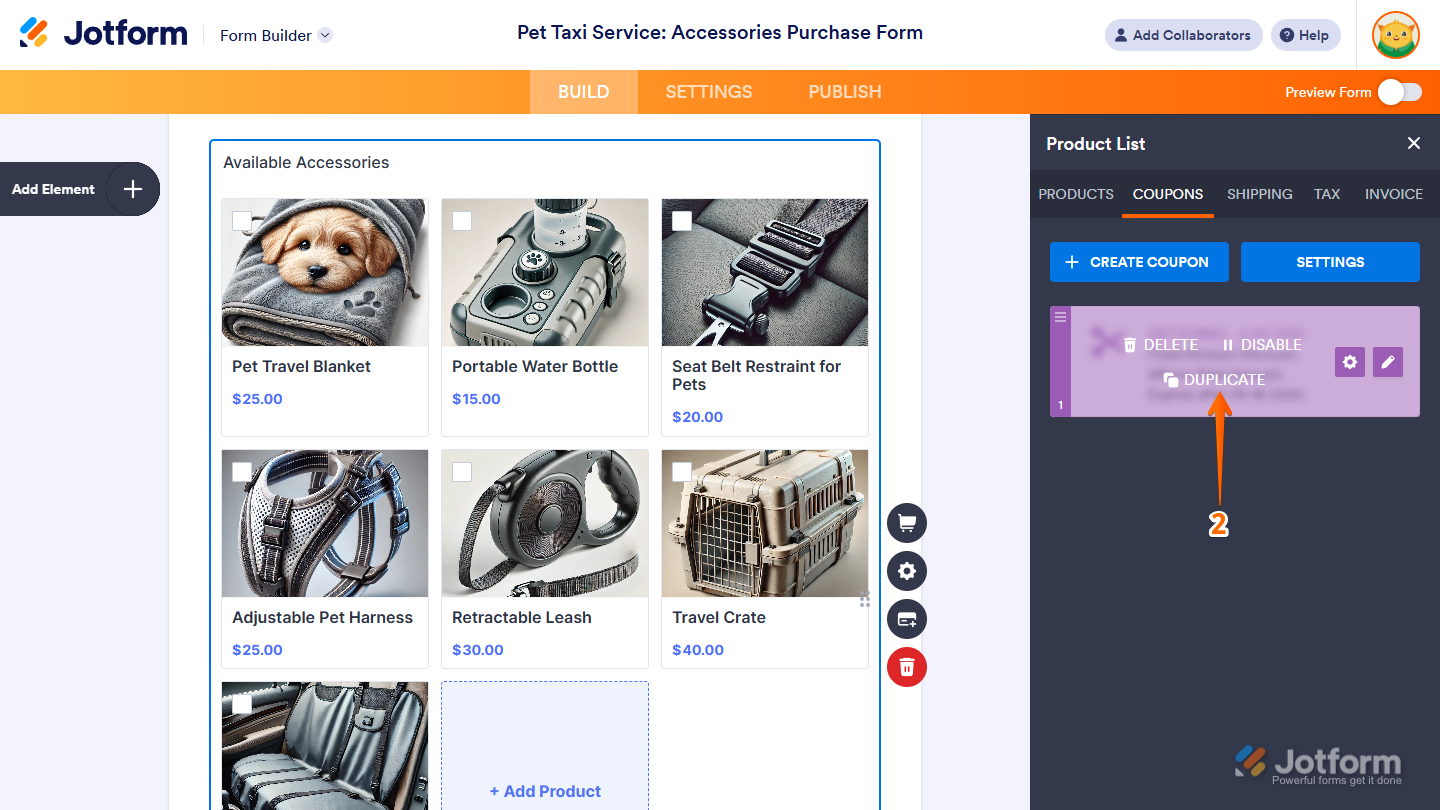
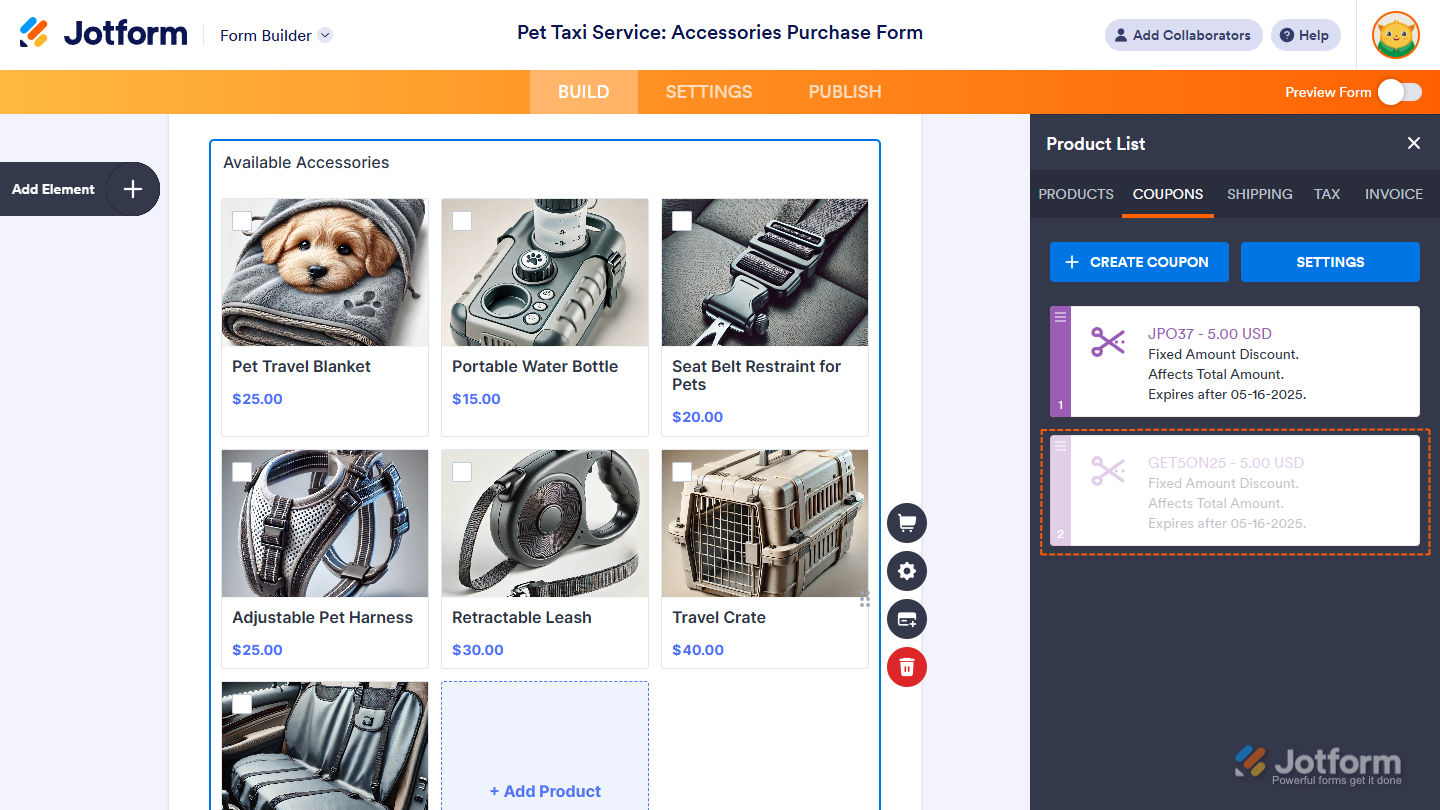
Duplicating a Coupon
Duplicating a coupon makes it easy to reuse the same settings for a new deal. Here’s how to do it:
- While under the Coupons tab in the Payment Settings section or Product List section, hover your mouse over a coupon and then click on the Gear icon.
- In the menu that opens, click on Duplicate.
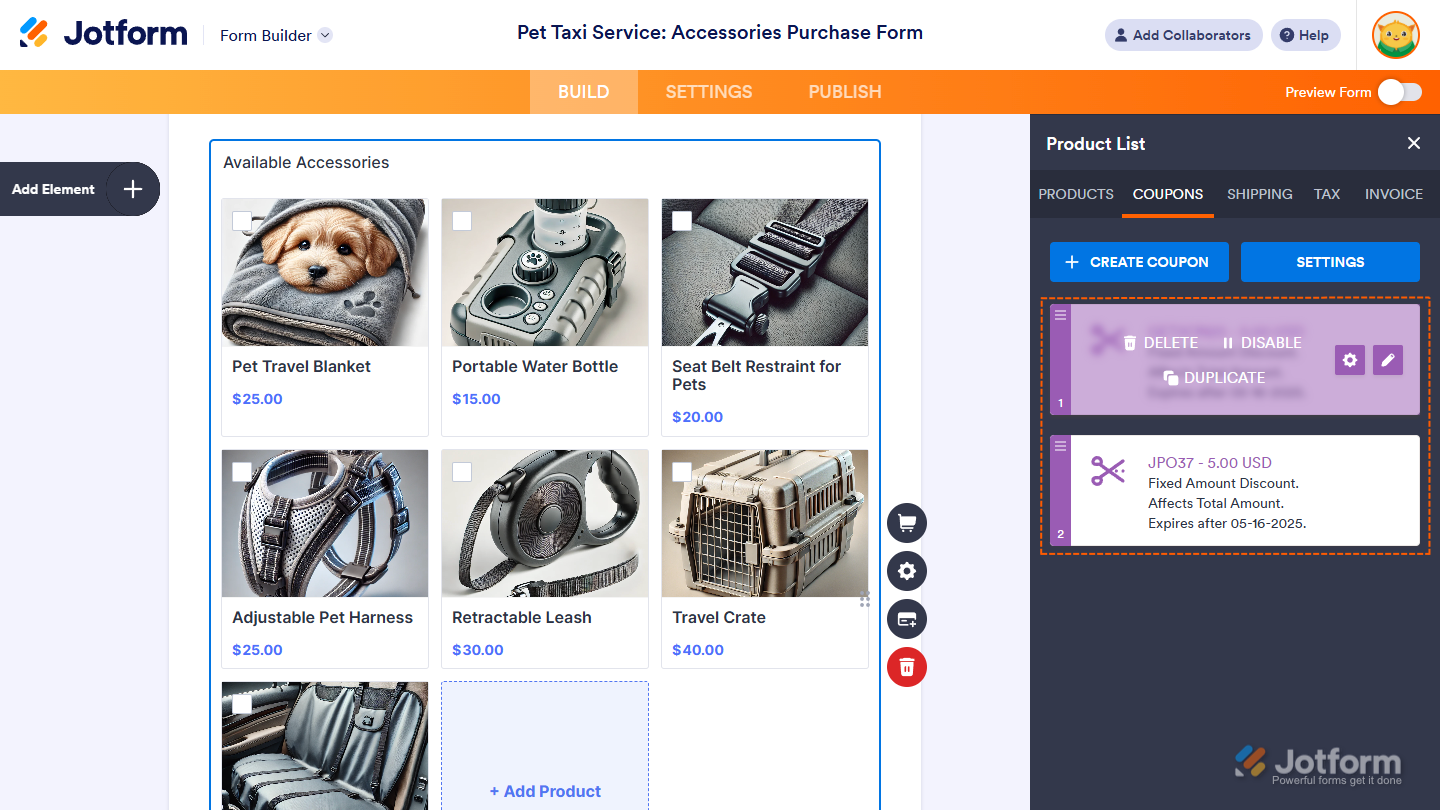
That’s it. A new coupon’s been created with a different code but the same settings. You can edit it as needed.
If you’ve got more than one coupon, you can rearrange the list to control which ones appear first. This helps keep your most important or frequently used codes easy to find. While you’re in the Coupons tab of the Payment Settings section or Product List section, click on and hold the purple area on the left side of a coupon to grab it. Then move it to where you want it to be.
Note
When you duplicate a coupon, the setup is copied but a new code is generated—each coupon must have a unique code.
Disabling and Enabling Coupons
If you’d like to pause a discount without deleting it, you can disable the coupon. Then, you can reactivate it later if needed. Here’s how to do it:
- While under the Coupons tab in the Payment Settings section or Product List section, hover your mouse over a coupon and then click on the Gear icon.
- In the menu that opens, click on Disable or Enable.
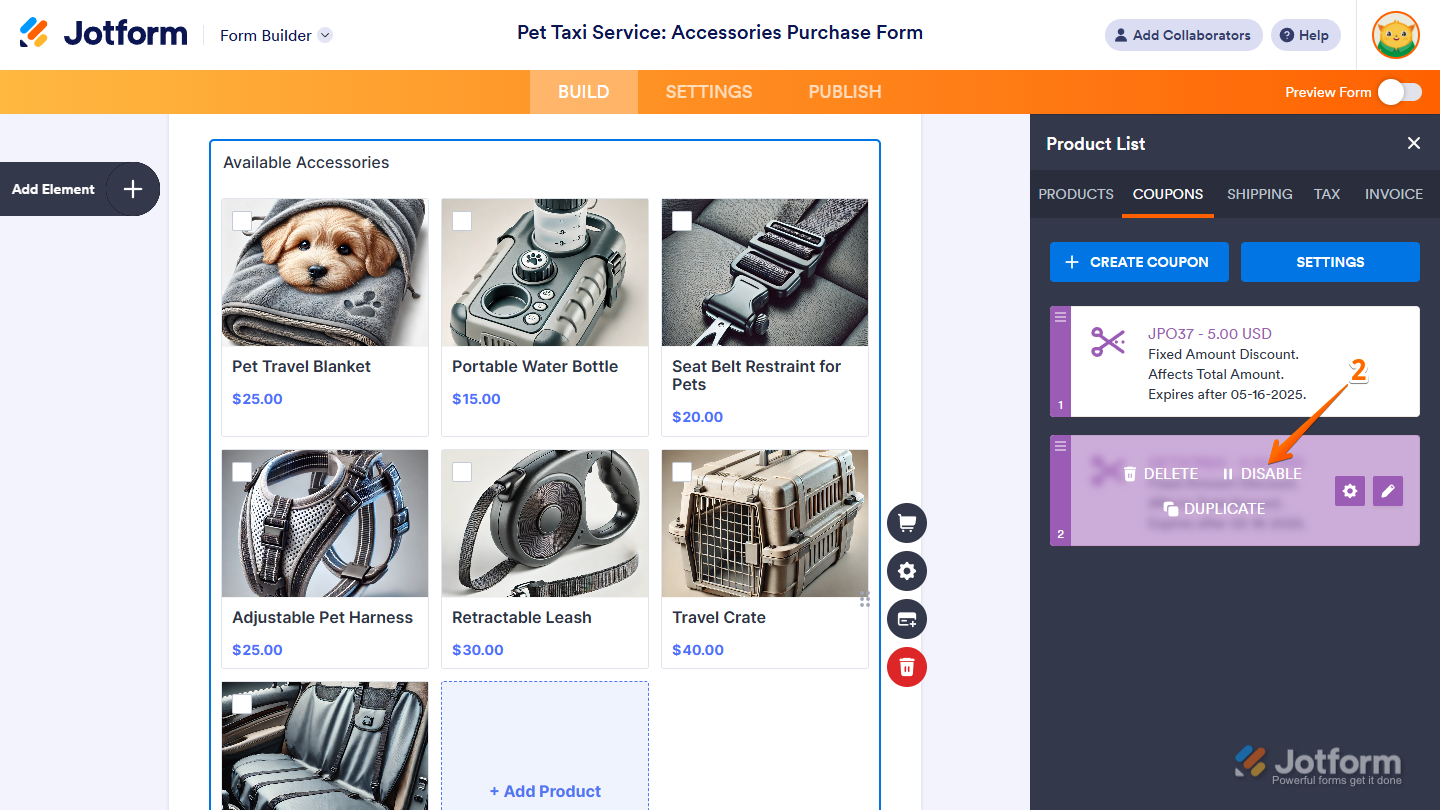
That’s it! You’ve successfully disabled or enabled your coupon.
Note
A coupon becomes invalid if you disable or delete it.
Deleting a Coupon
You might want to remove a coupon that’s no longer needed or was created mistakenly. Here’s how to do it:
- While under the Coupons tab in the Payment Settings section or Product List section, hover your mouse over a coupon and then click on the Gear icon.
- In the menu that opens, click on Delete.
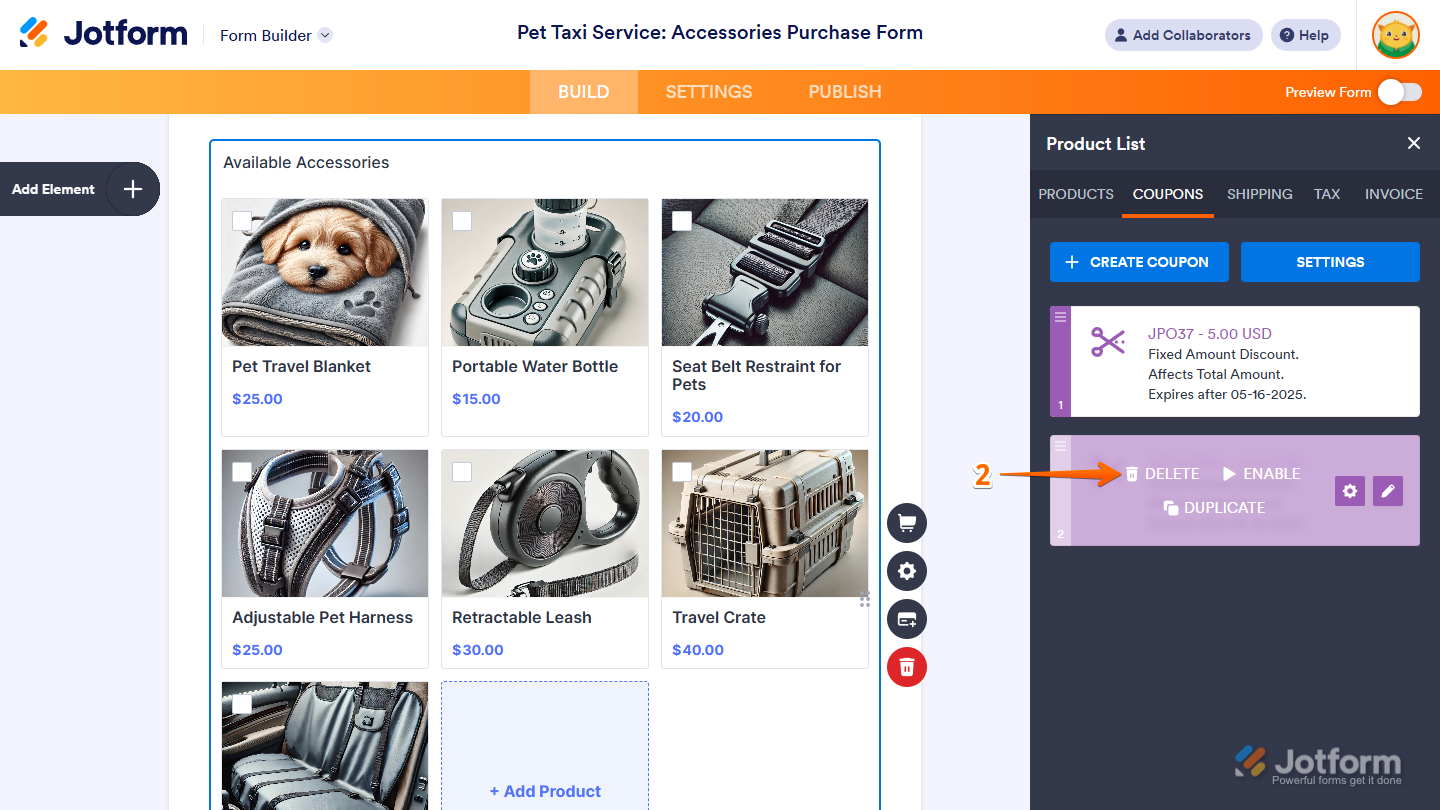
That’s it. You’ve now deleted your coupon.


Send Comment:
22 Comments:
202 days ago
You cannot read the word apply on our coupon code box. It’s white and blends in with the background color. How do I change this?
More than a year ago
I would like to offer a 100% discount to certain customers and not ask for their credit cared details - we have had some customers kick back on this - how can I do this please?
More than a year ago
Hi. I 'm an after school manager. I create a back to school discount to parents.
First class is full price. But if you choose second class. Use code "SECOND10", your second class (less money one) will get extra 10%off. Does jotform can do that?
More than a year ago
クーポンコードを「1回限りの使用」で設定しているにも関わらず、クーポンコードを入力してもらうと「有効期限切れ」になり適応されません。
More than a year ago
Is it possible yet tp add a coupon code to a product in app builder?
More than a year ago
Because I needed conditional logic to ask for attendee names, I built each product as a number element and used a formula to add for total due. It appears that when Payment Type is a User Defined Amount, the options at the top for Coupon are not available. Is that true? Is there another way to use a discount code?
More than a year ago
They sent me a coupon code to calculatevthe payment but i haven't got the idea
More than a year ago
I created a discount code which seemed to work fine, the customer saw the message saying "code valid" however they were still charged the full price, is there a reason for this?
More than a year ago
Is it possible to make a coupon that gives a 100% discount so the user does not have to pay anything? I get an error message that the total must be at least $1
camp@laforet.org
More than a year ago
Is is possible to apply a discount to the total, rather than the subtotal. It would be great to offer gift vouchers
More than a year ago
creat coupons don't appear to me using stripe checkout, when I chick on it gives a black menu
More than a year ago
Awesome! We have a list of coupon codes that want to invalidate after used. Each code may have a different discount amount. Is there a way that Jotform can apply discount based on the code entered by checking our list? I don't expect Jotform to invalidate the code once used but this would be a good start for us.
More than a year ago
How would you do this in the app builder section since the form builder and app builder has different settings
More than a year ago
Re: jotform + Square integration... since coupon codes created in Jotform don't sync to Square, is it possible in Jotform to disable coupon codes (turn on / turn off) temporarily, rather than just deleting them?
Thanks!
More than a year ago
1. Can I create my own coupon code and upload it,
2. Can I give different coupon code to different users
More than a year ago
How can I get the discount code used and the amount discounted in different columns?
More than a year ago
As personalization becomes more integral to marketing to customers, your businesses are looking at ways to apply this approach to coupons and other discounts the excitement of redeeming a coupon You can find more offers of Freecharge Coupons here.
More than a year ago
Your work has always been a great source of inspiration for me. I refer you blog to many of my friends as well.
More than a year ago
How to allow user to use two coupons on the same order?
More than a year ago
Nice information about coupons and discounts.Thank you for sharing such a valuable information .Keep sharing
More than a year ago
OK but they don’t have the option to choose between shipping pick up and delivery I have three options there I have shipping pick up and delivery so they should be able to choose from one like I don’t get why is it showing shipping for everything if they pick pick up is showing shipping if they showing delivery is showing the shipping cost
More than a year ago
Can you also make 1 coupon for both the products and shipping? or multiple coupons