Jotform lets you add options to the product items on your payment forms, so customers can choose the exact variations they need before checking out. Whether it’s selecting a size, color, or quantity, adding options helps you offer more flexibility and a better shopping experience.
You can add two types of product options: Quantity Selectors, which let customers choose how many of a certain product they want to order, and Custom Product Options, which allow them to select variations like size, color, or material. You can also set special pricing for each option or turn Custom Product Options into sub-products with their own pricing and details.
Setting Up a Quantity Selector Dropdown
You can add a quantity selector, so customers can select how many items to order. This is useful if you want to control order limits or offer price variations based on quantity.
Whether you’re setting up a new payment form or updating an existing one, setting this up is simple and can be done in a few easy steps. Here’s how to do it:
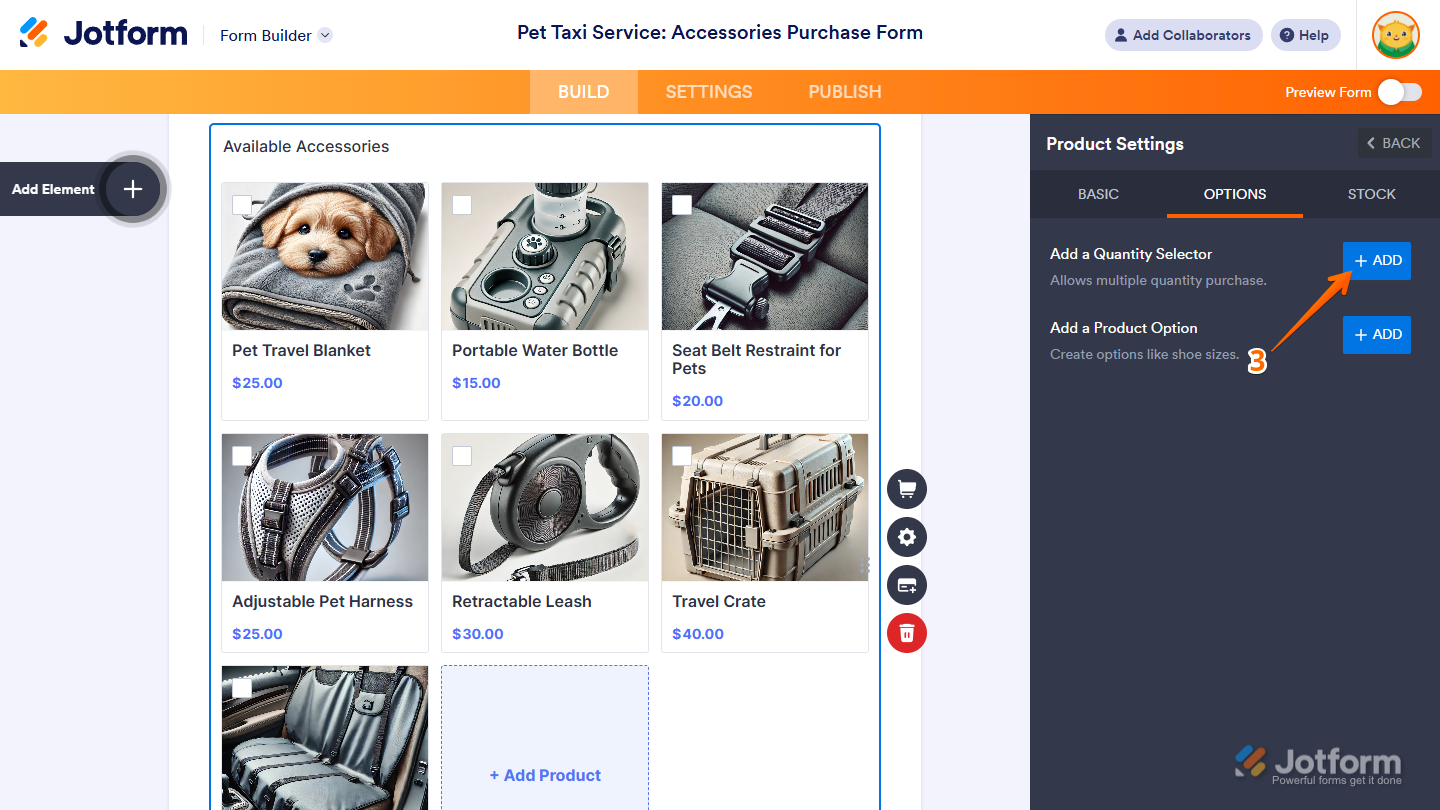
- In Form Builder, click on your Product List field and then click on the Shopping Cart icon on the right side of it.
- Now, in the Product List window on the right side of the page, hover your mouse over the product you want to add a Quantity Selector to, and then click on the Pencil icon on the right side of it.

- Then, in the Product Settings window, under the Options tab, click on Add on the right side of Add a Quantity Selector.
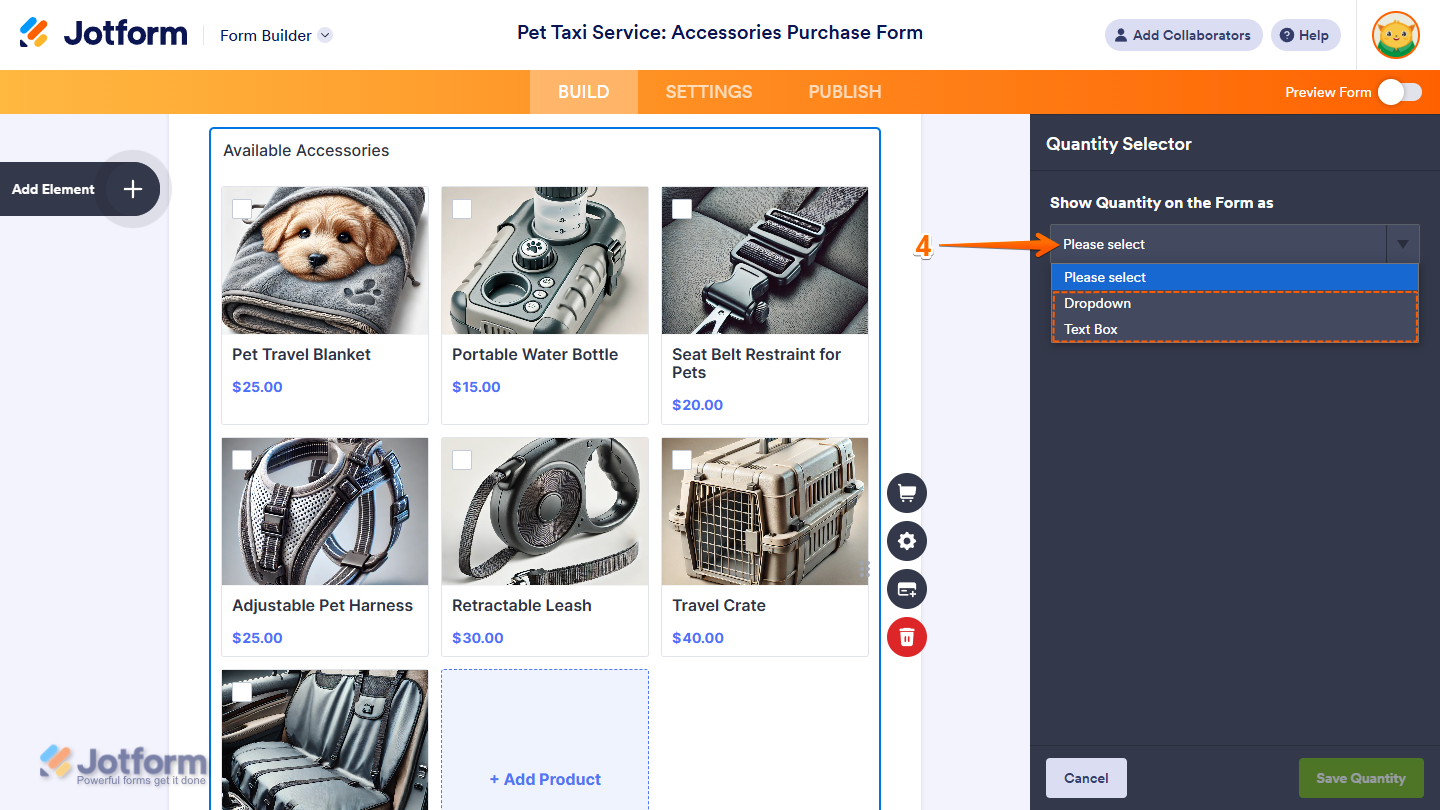
- Next, in the Quantity Selector section, click on the Show Quantity On the Form As Dropdown menu and select one of the following options:
- Dropdown — Choose this if you want to limit how many items a customer can order per submission. It’s a good choice for items with limited stock.
- Text Box — Choose this if you’d like to let customers enter any quantity they need. This works well when you have lots of stock or don’t need to set a limit.
- Then, set or enable the available settings based on the option you chose:
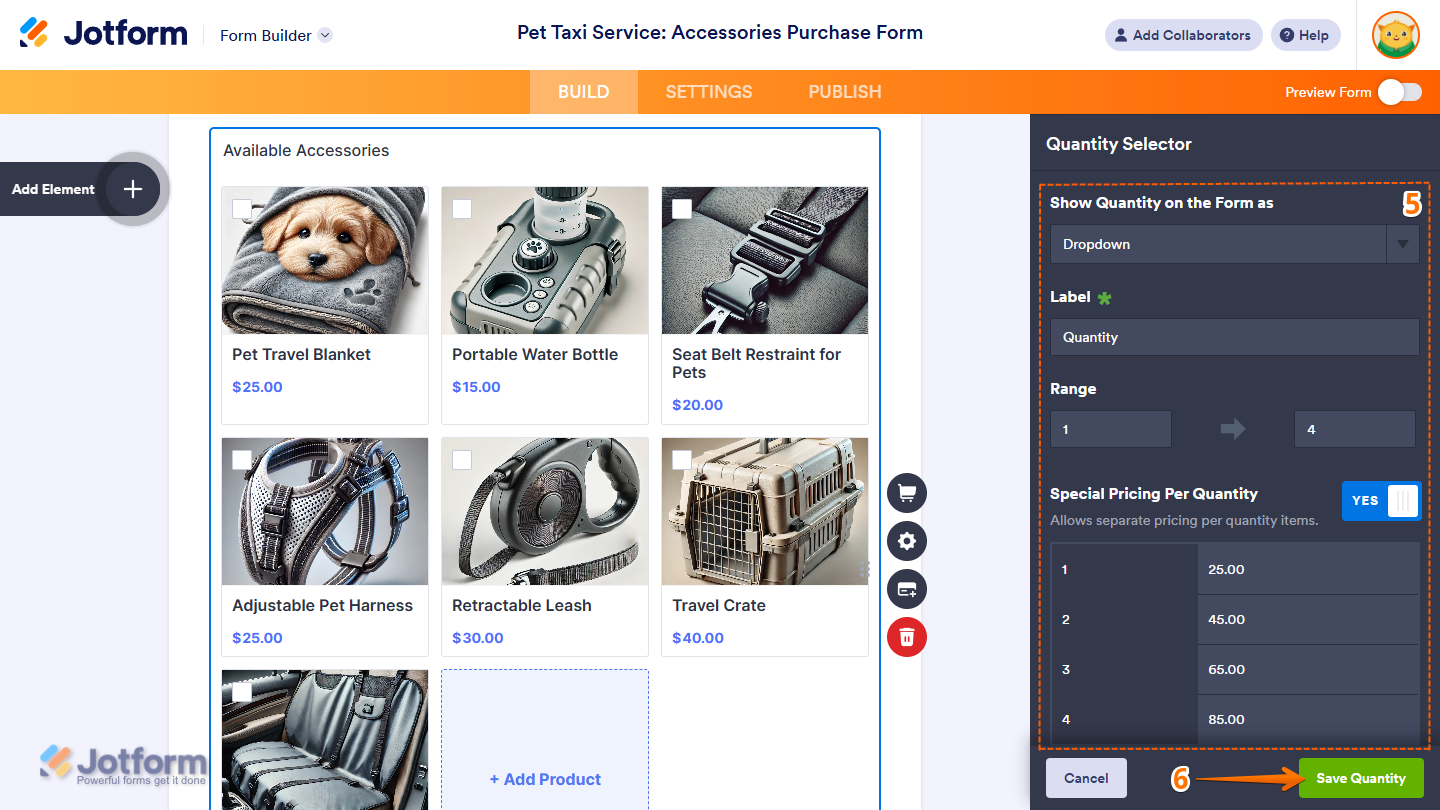
- Label — This is the text shown with the Quantity Selector for your product item. The default is Quantity, but you can change it to something more specific, like Number of T-shirts, to help clarify what the selector refers to for your customers.
- Default Quantity — This is only available when Text Box is selected as the Quantity Selector. It sets the initial quantity value that will be shown in the box when the form loads. Customers can still change this value to whatever quantity they want to.
- Range — This is only available when Dropdown is selected. It defines the set of numbers that will show up in the dropdown menu. By default, the minimum quantity is set to 1 and the maximum to 10, but you can change these values as needed. Both fields only accept numerical entries.
- Special Pricing Per Quantity — This is also only available when Dropdown is selected and is disabled by default. Enabling this opens a table below that lists the Quantity Options in the range you’ve configured and lets you enter an amount next to each one of them to set their custom price. For example, you can offer a discount for bulk orders or set specific pricing for certain quantity ranges. Check out this guide on How to Set Up Special Pricing for Payment Form Product Options to learn more about it.
- Once everything’s set, click on Save Quantity at the bottom.
Notes
- Special Pricing Per Quantity overrides the main product price. When set up, the Price box under the Basic tab of the Product Settings section will be disabled.
- Once Special Pricing Per Quantity is enabled for one Product Option or a Quantity Selector, it will be disabled for the others.
Setting Up a Product Option Dropdown
You can add a dropdown that lets customers choose from product variations like size, color, or material. This helps you offer multiple options under a single product item, each with its custom price if needed.
Setting it up is quick and easy. Here’s how to do it:
- In Form Builder, click on your Product List field and then click on the Shopping Cart icon on the right side of it.
- Now, in the Product List window on the right side of the page, hover your mouse over the product you want to add a Product Option Dropdown to, and then click on the Pencil icon on the right side of it.
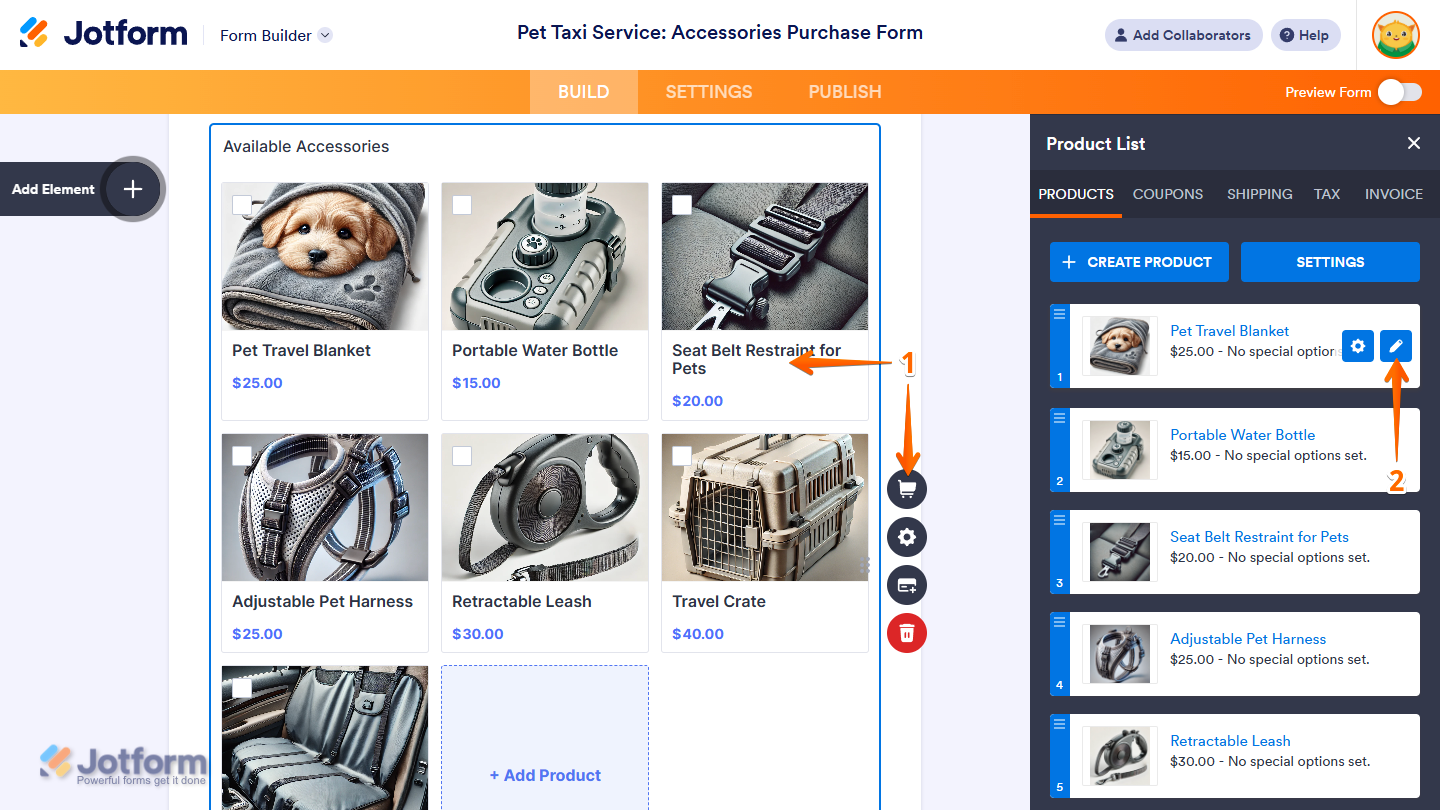
- Then, in the Product Settings window, under the Options tab, click on Add on the right side of Add a Product Option.
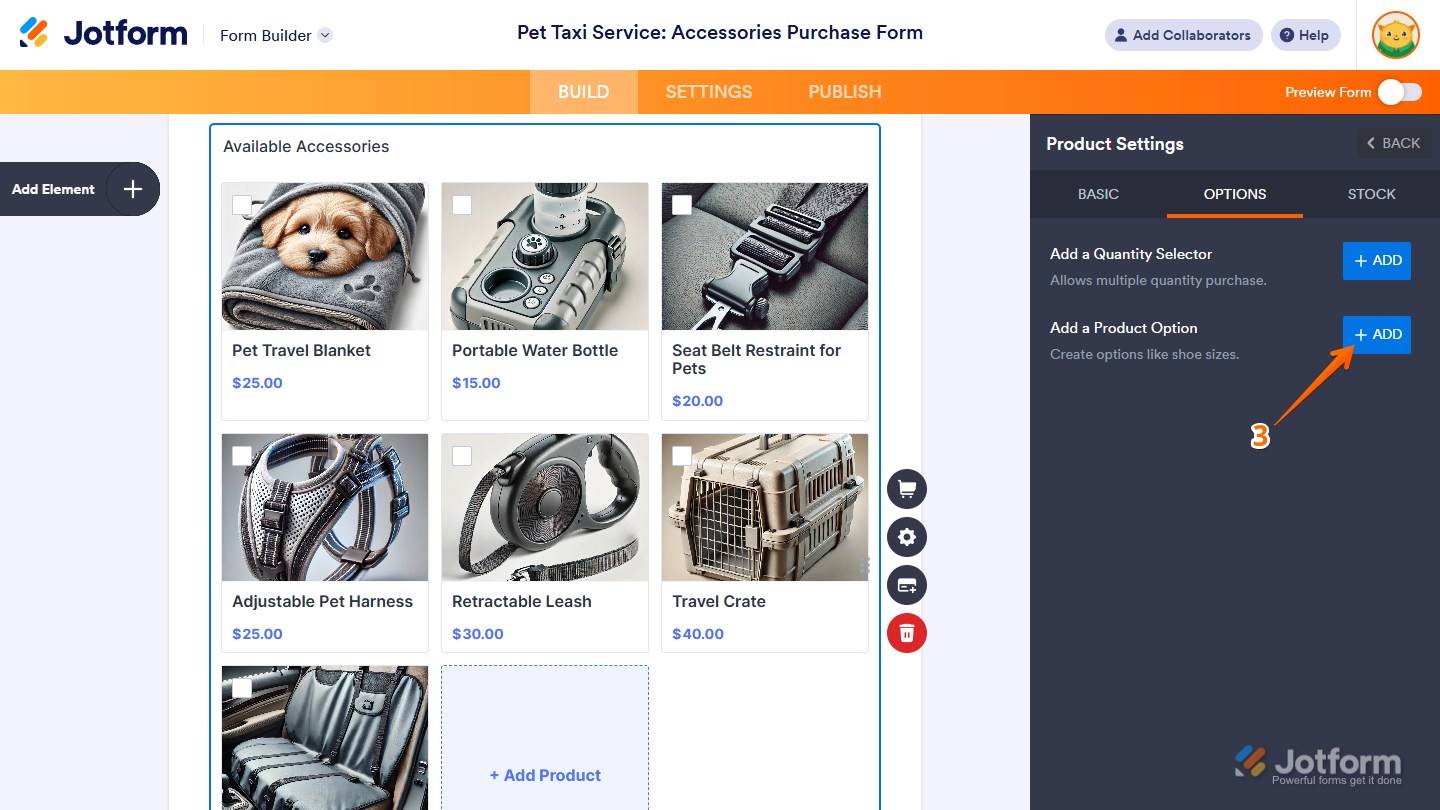
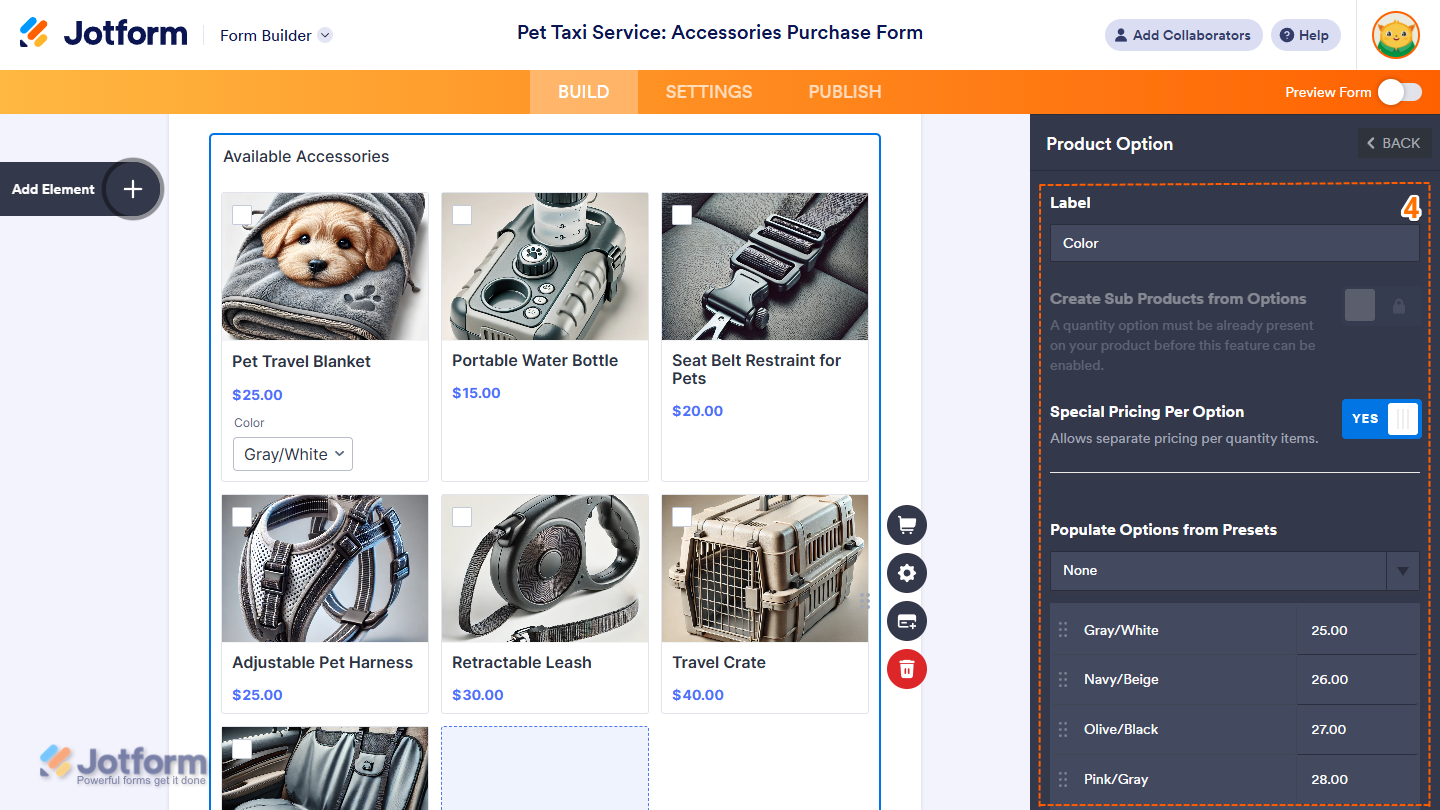
- Next, in the Product Option section, set or enable the following options:
- Label — You can set this to show text that describes what the Product Option Dropdown for your product item is for. It helps customers understand what they’re selecting.
- Create Sub-Products from Options — This turns your product options into sub-products of your product item. You can toggle this to the On position after you’ve set up a Quantity Selector. You can check out our guide on How to Turn Product Options into Sub-Products to learn more.
- Special Pricing Per Option — Enabling this adds a new column in the table below, where you can enter a custom price for each product option. This is useful when your product options have different costs—for example, charging more for premium materials or larger sizes. You can check out this guide on How to Set Up Special Pricing for Payment Form Product Options for more details.
- Populate Options from Presets — None is selected by default, and you can enter custom product options in the table at the bottom. You can also select the Color, T-Shirt Size, Print Size, Screen Resolution, or Shoe Size in the Populate Options from Presets Dropdown menu, which will automatically populate the table with predefined options you can modify later as needed.
Notes
- Any changes you make in the Product Option section are saved automatically.
- Each option in the Product Option Dropdown must be named differently.
- Unlike the Quantity Selector, you can add multiple Product Options with no limit—but only one can have Create Sub Products from Options enabled.

Send Comment:
15 Comments:
159 days ago
This option is not shown on my form. When I click the Product list, then click the pencil for the product, then go to Options, then click the pencil next to one of the Options, I don't have "Create Sub Products from Options" or "Special Pricing per Option". It says PRODUCT OPTION on top, then the field for the Label, then Populate Options from Presets, then the actual option fields I've added, then an "Enter new option" field, then the blue "Go Back" button. I need to be able to set up different prices for different options, but I don't have this in my form. Is this because I'm not a paid user?
273 days ago
My quantity options are showing 1-10. How can I put 0 as a default and then allow folks to select the quantity they wish.
More than a year ago
How do we set it up to support a credit card payment, which inevitably will be deposited in our school account?
More than a year ago
Is it possible to add a required checkbox that the buyer must click to agree to terms before making a purchase
More than a year ago
Hi, is it possible to integrate Single Choice option selected by user to auto select Product Option under payments? We need it in this way as Single Choice option need to recrod user selection on the form.
If there is better way to achieve similar or same results please do advise.
More than a year ago
Is it possible to have 2 Product Options that both have Special Pricing Enabled?
For example, a tablet with
Memory Option: $100 for 64GB or $200 for 128 GB
and then
Connectivity Option: - $0 for WiFi or $100 for WiFi and 5G
More than a year ago
how can i use payment form and give the option for customer to pay when form is submitted? i want them to be able to submit form with or without pyament.
More than a year ago
Can I make the quantity for a full list of products total? Not the price as there's no cost (Free) listed, but can I get quantity selected over several products for 1 combined total?
More than a year ago
My payment settings section currently shows all products selected when I view form? A couple are required but not all and the preference is for it to allow the person purchasing to select the option.
How do I fix that situation?
More than a year ago
I'm wanting to give my clients the option of paying with a Credit Card or ACH. How can add multiple payment options?
More than a year ago
on my latest form, i need to remove the payment cc option at the bottom and just say "You will be contacted for payment at a later date"
how do i change this?
More than a year ago
I want to submit the form to a spreadsheet without a Paypal option. How do I have a submit button that is NOT Paypal ?
More than a year ago
Hello! Can we add 3rd party payment options?
More than a year ago
I want to add a product called Federal Excise Tax, but I want the customer to manually place the amount in the amount field so that it calculates this amount into the total. The reason is the customer has to calculate 1% of the sticker price of a 2021/22 vehicle and place that amount into this new product field. Thanks!
More than a year ago
Can you let me know how I can edit the cost $ amount & have it save it? The SAVE prompt is not coming up when I edit under POPULATION OPTIONS FROM PRESETS.
Thank you,