Jotform’s Stripe Checkout integration provides a seamless way to accept payments through your form. You can easily collect payments, donations, or subscription fees using a secure and user-friendly interface. Stripe Checkout offers a modern, mobile-optimized experience that supports various payment methods, including credit cards, Apple Pay, and Google Pay.
Notes
- Stripe Checkout supports Google Pay and Apple Pay, but you’ll need to enable these two in your payment settings within Stripe. For more details, you can visit the page about Stripe – Activate a new payment method.
- Google Pay will only work on Google Chrome, Mozilla Firefox, Apple Safari, Microsoft Edge, Opera, and UCWeb UC Browser, while Apple Pay only works with Safari.
- As the form owner, it’s important to let users know that Google Pay and Apple Pay will only appear if they’ve already added a payment method to their Google Pay or Apple Pay accounts. Otherwise, Stripe Checkout won’t display these as payment options.
Integrating Stripe Checkout with your form, allows you to start processing payments quickly and confidently. It’s easy, here’s how:
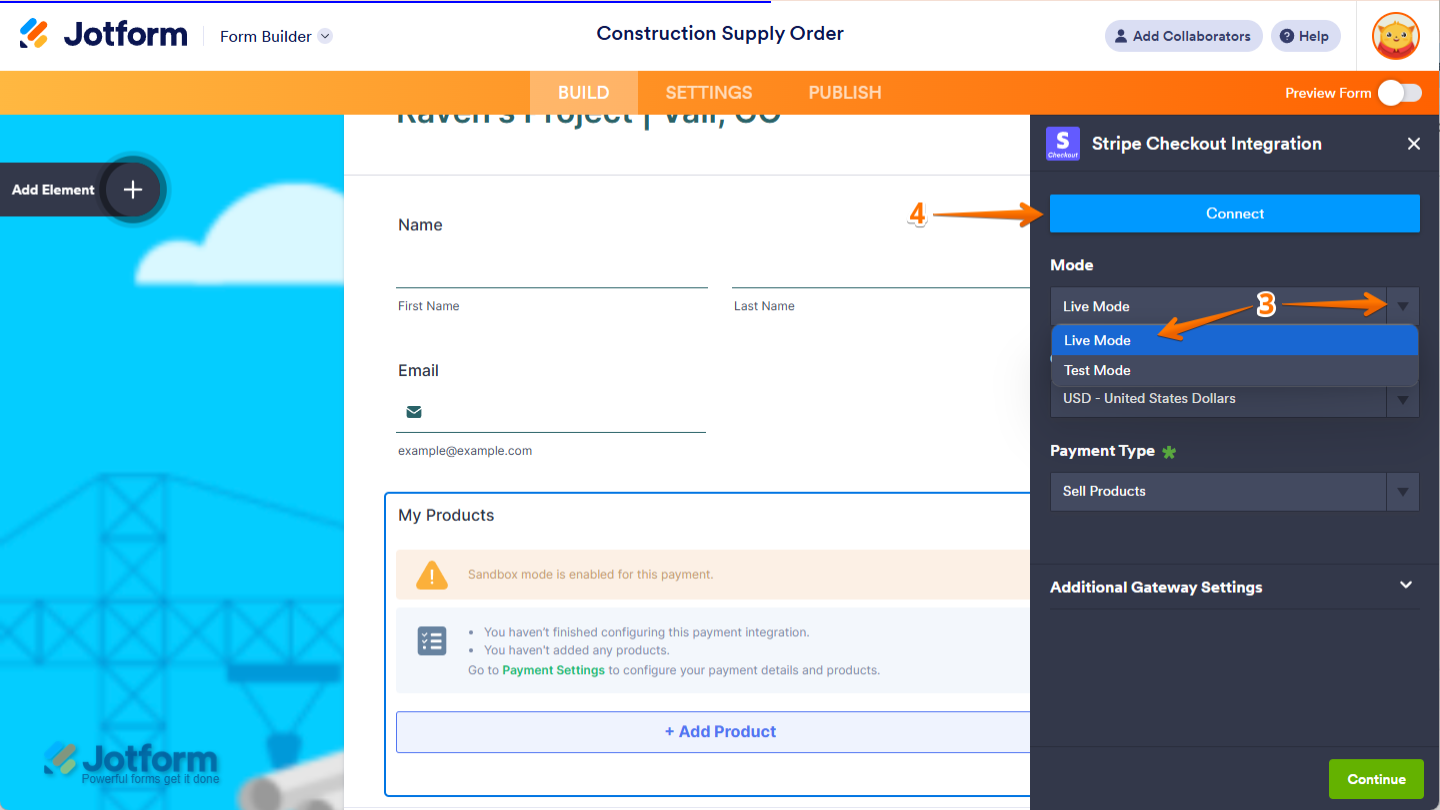
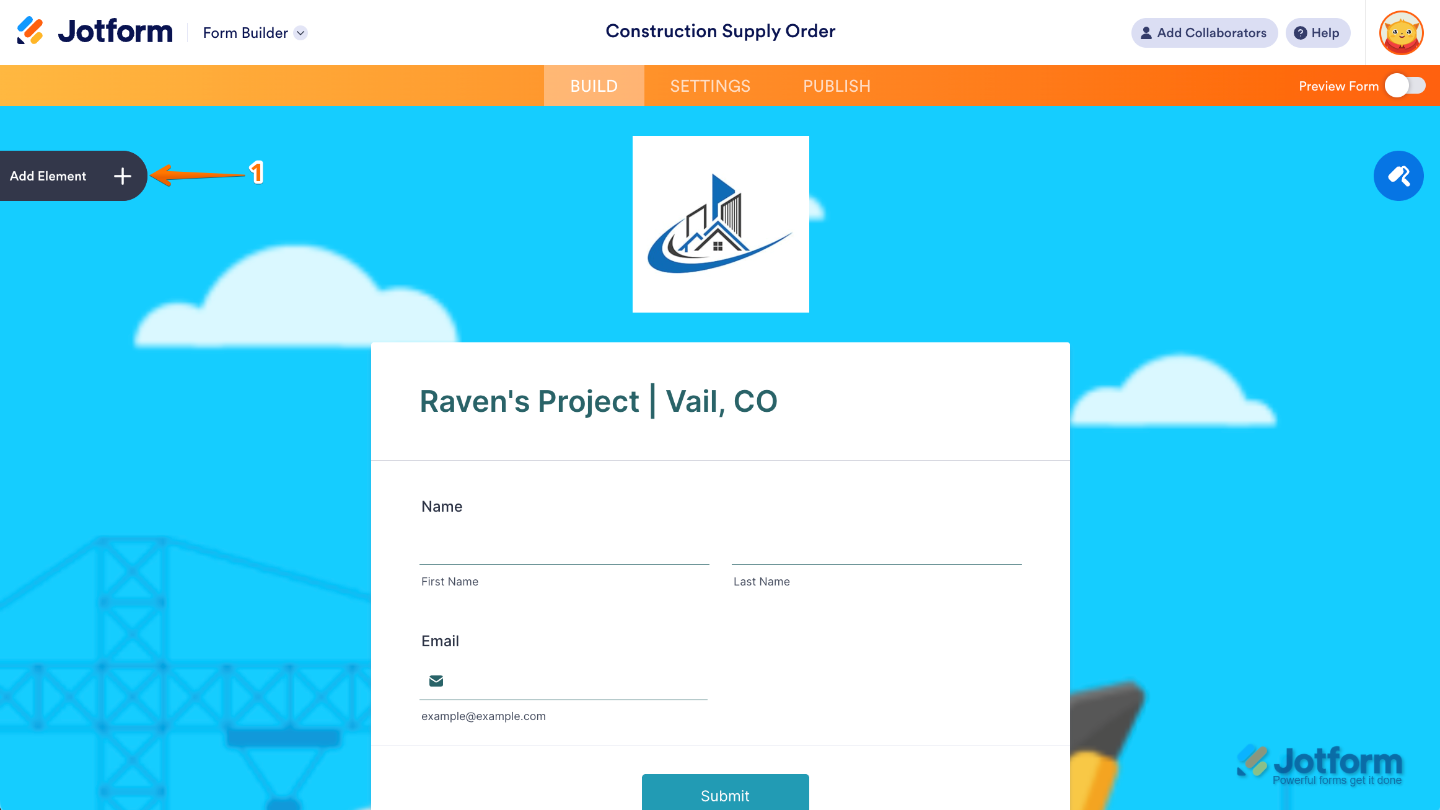
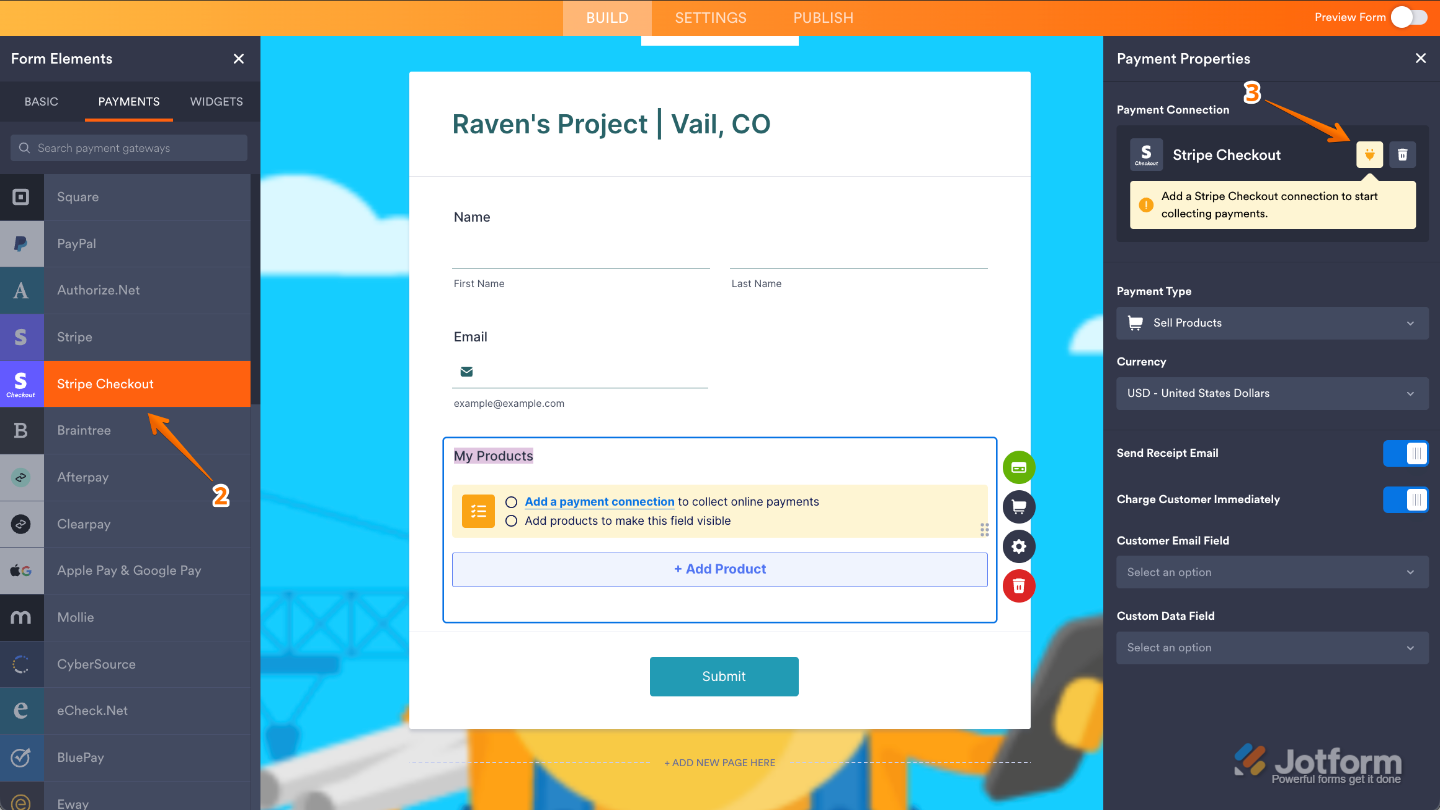
- In Form Builder, click on Add Element on the left side of the page.

- Under the Payments tab, drag and drop the Stripe Checkout Gateway to your form.

- Next, in the Stripe Checkout Integration window that opens on the right side of the page, select a mode from the Mode Dropdown menu:
- Live Mode – Connects to your registered Stripe Checkout account.
- Test Mode – Uses your Stripe Checkout Sandbox account for testing transactions.
- Then, click on Connect.
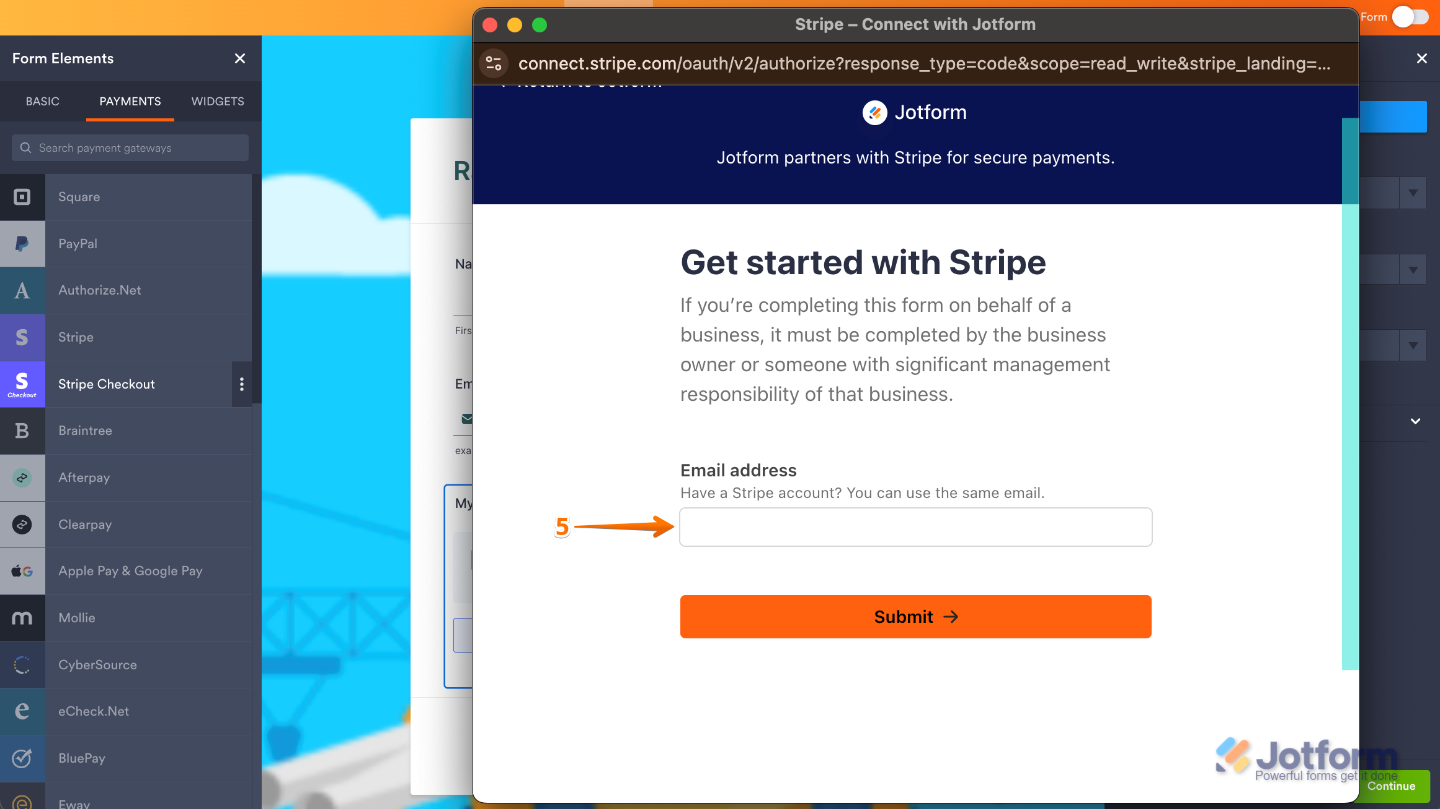
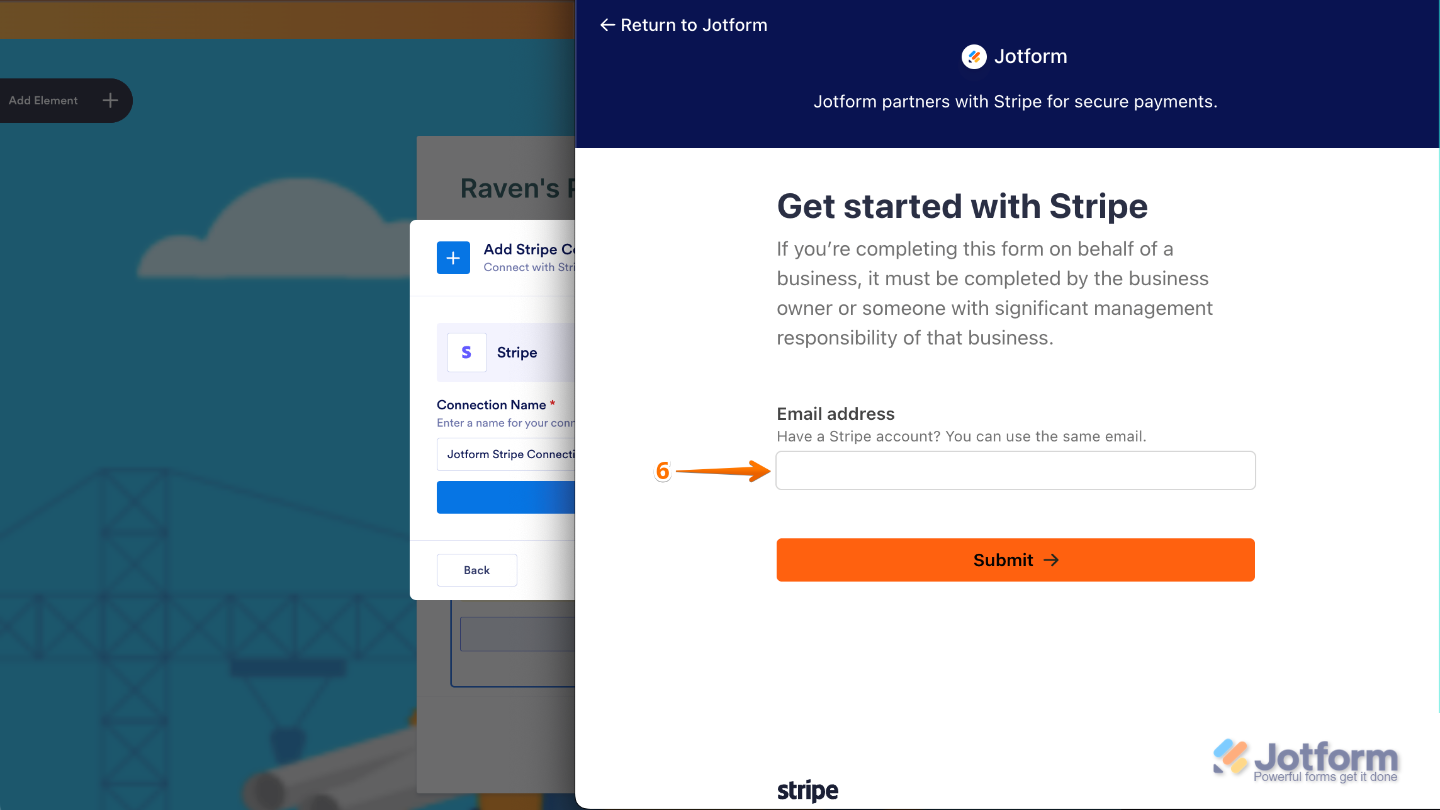
- Now, you’ll be redirected to the Stripe Login page. Enter your email address to log in to your Stripe account, and then follow the steps to authenticate it.
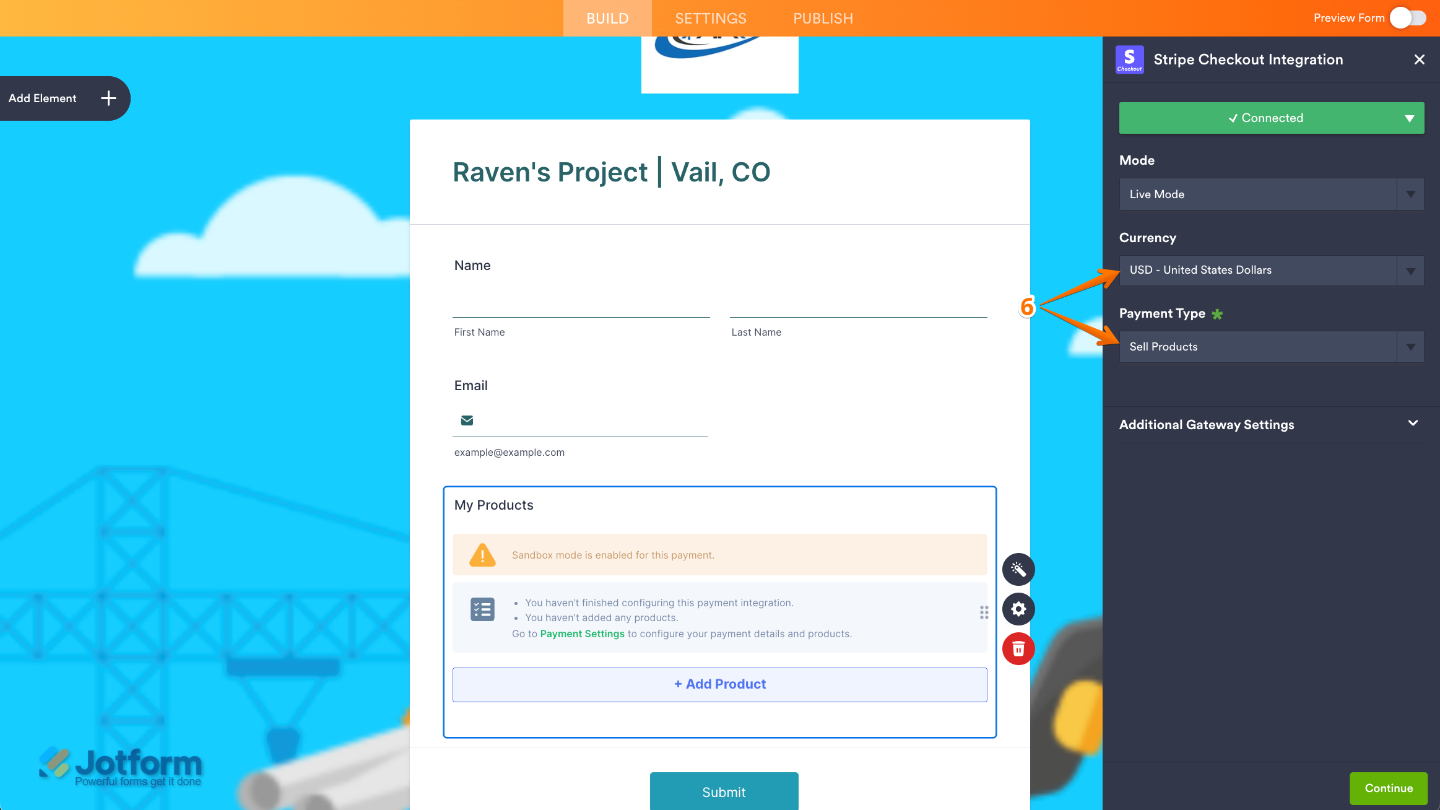
- Once connected, set up these other Stripe options:
- Currency — Choose the currency you want to use. There are 100+ supported currencies to choose from.
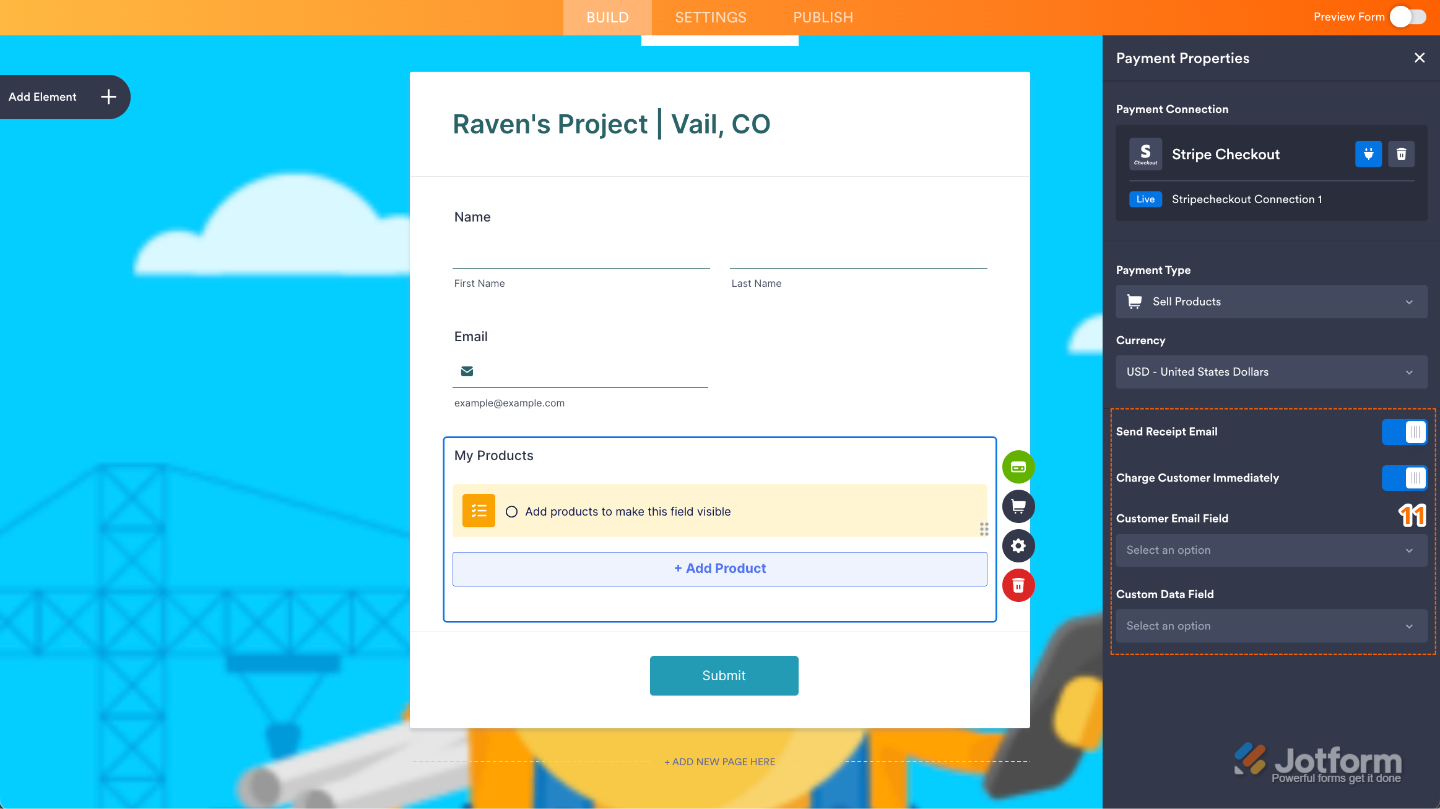
- Payment Type — Choose the type of payment you want to collect: Sell Products, Sell Subscriptions, User-Defined Amount, or Collect Donations
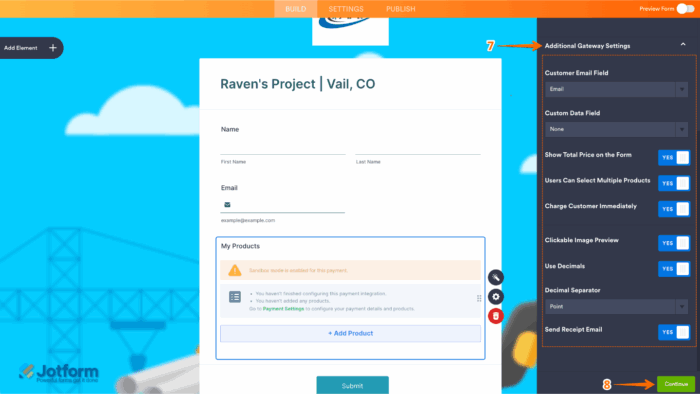
- Next, click on the Additional Gateway Settings to set up these options:
- Customer Email Field — This maps an email address from your form and sends it to the Stripe Dashboard, particularly to the customer’s record.
- Custom Data Field — Send text field information to Stripe using the Custom Data Field. Check out our user guide on How to Send Custom Data to Stripe Payment to learn more about it.
- Charge Customer Immediately — Toggle this Off if you want to charge customers at a later date. Check out our guide on How to Enable Payment Authorization to learn more.
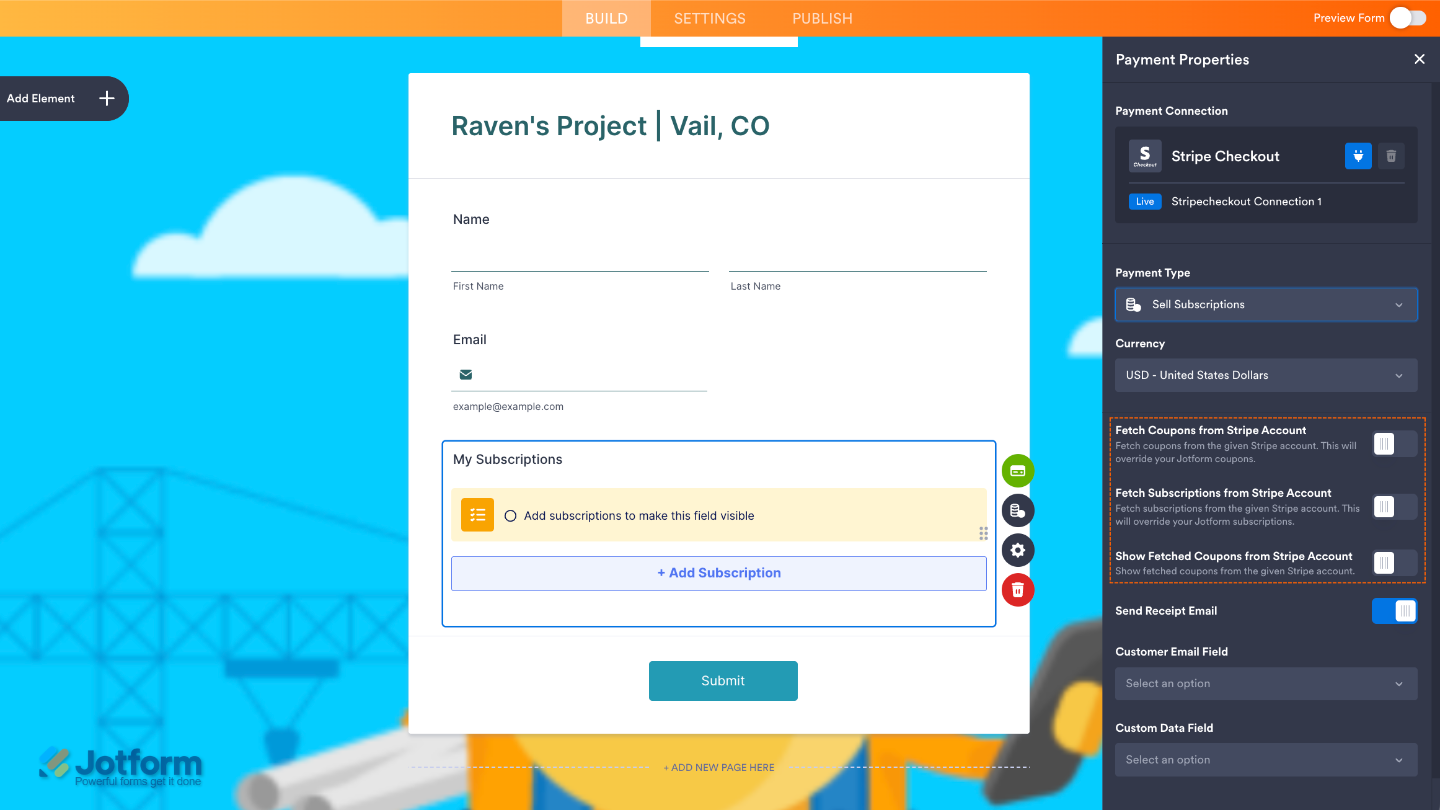
- Fetch Coupons from Stripe Account — You’ll see this toggle when you select the Sell Subscription payment Type. When toggled On, it’ll fetch and display all the coupons from the connected Stripe account. This overrides the current coupons created through Jotform. For more information, check our guide on How to Fetch Coupon Codes From Stripe.
- Fetch Subscriptions from Stripe Account — When selling subscriptions, toggle this On to fetch your subscription items from your Stripe account.
- Show Fetched Coupons from Stripe Account — Choose whether to display the coupons when you opt to Fetch Coupons from your Stripe account.
- Send Receipt Email — We highly recommend enabling this, so the integration will send the customer a copy of the receipt for each payment.
- If you’ve selected Sell Products or Sell Subscriptions as the Payment Type, click on Continue to add your product or subscription items. Otherwise, click on Save to complete the integration.
We also have related guides that’ll help you correctly set up the integration based on what you need:
- Setting Up Your First Order Form
- How to Set Up a Recurring Payment Option
- How to Add a Coupon Code to Payment Forms
- How to Add Shipping Cost to Payment Forms
- How to Add Tax to Your Payment Form
- How to Add Options to Payment Forms
- How to Generate an Invoice for Your Payment Form
Setting up Stripe Checkout with Reusable Payment Connections
Jotform’s Reusable Payment Connections allow you to set up payment integrations like Stripe Checkout and reuse the same configuration on other forms or apps you create, without setting it up again. Here’s how to do it:
- In Form Builder, click on Add Element on the left side of the page.
- Under the Payments tab, drag and drop the Stripe Checkout Gateway to your form.
- Then, in the Payment Properties menu on the left side of the page, click on the Plug icon.
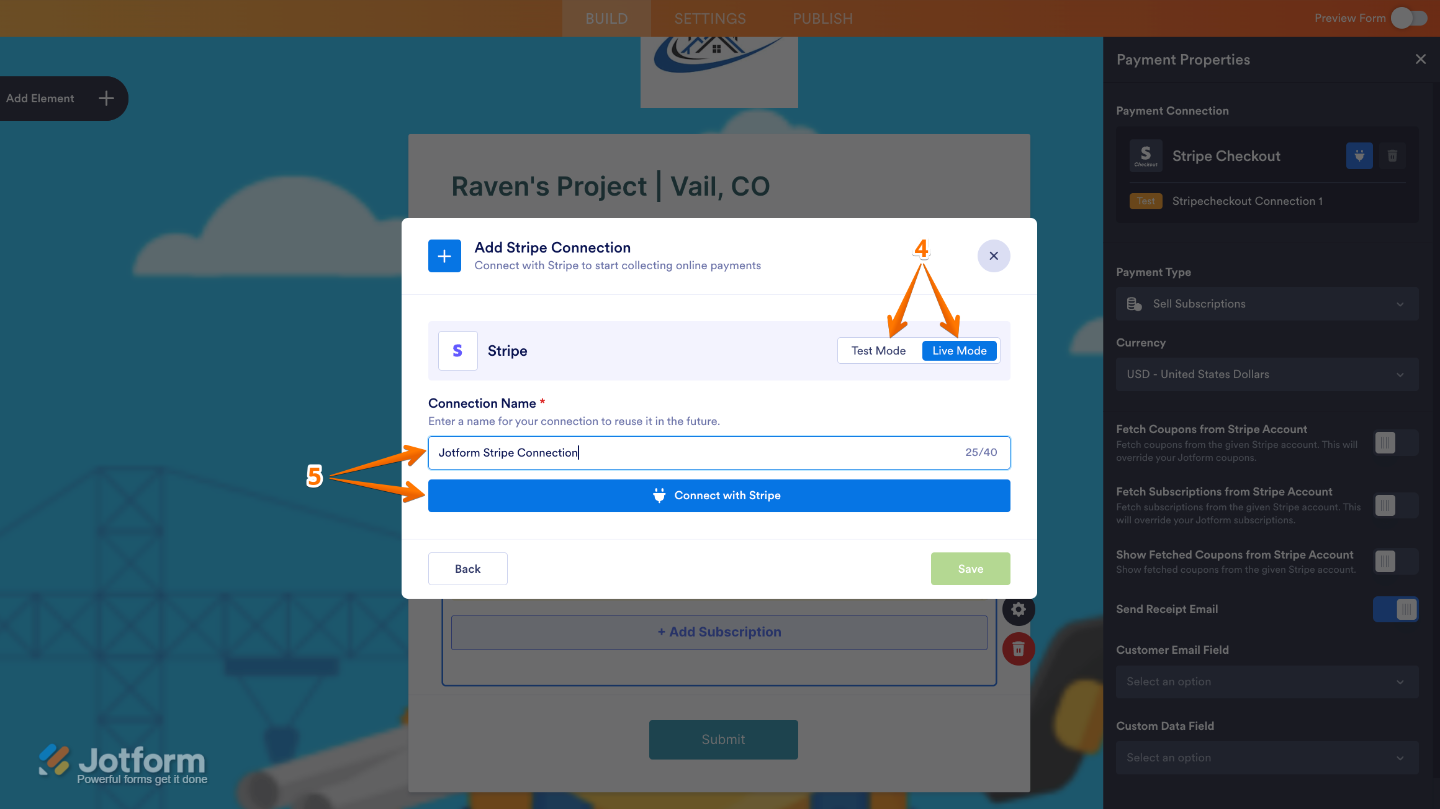
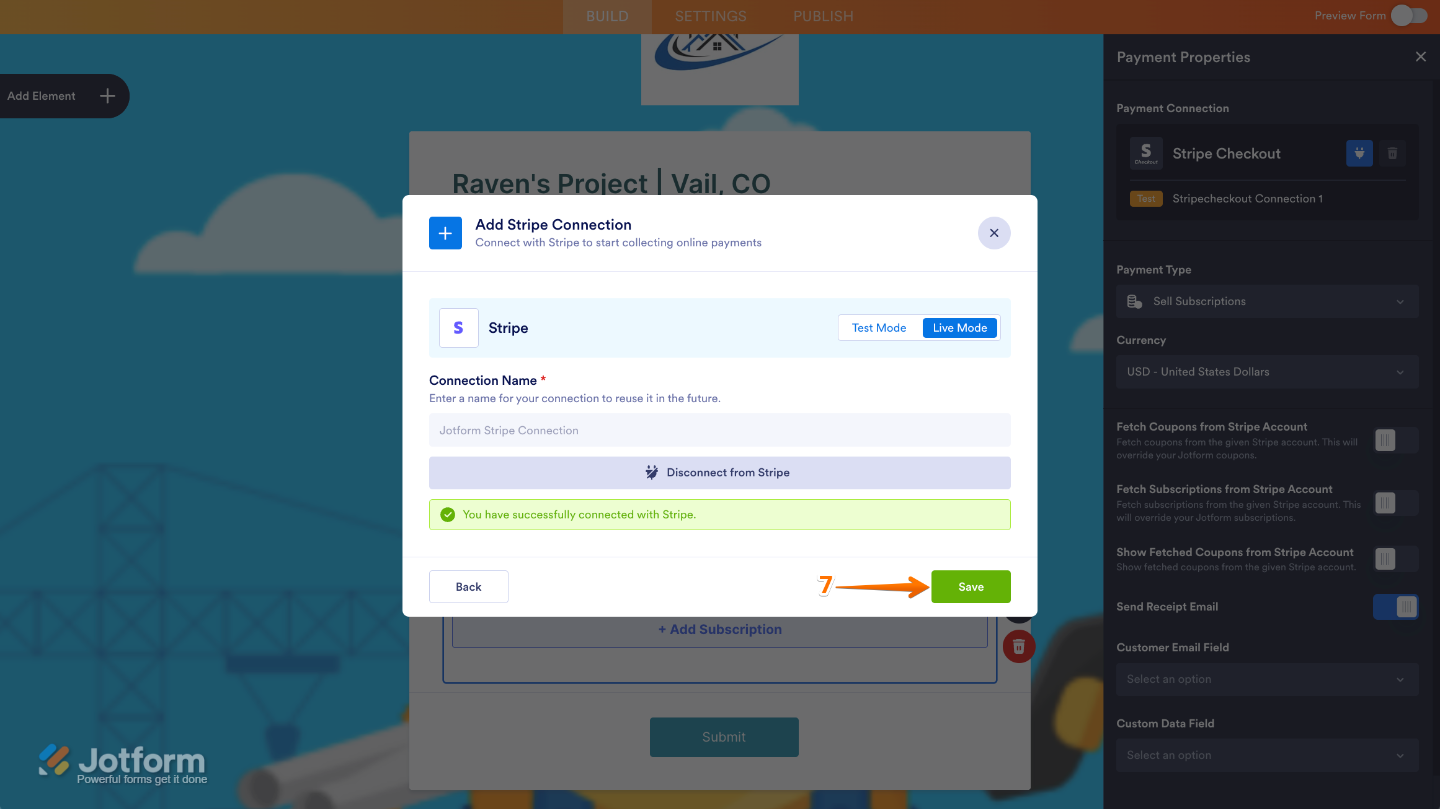
- Now, in the Add Stripe Connection window, click on either Test Mode or Live Mode at the top to select the environment for your payment connection.
- In the Connection Name section, enter a name you haven’t used in other reusable payment connections in your account, if there are any. And then click on Connect With Stripe.
- After that, you’ll be redirected to the Stripe Login page. Enter your email address to log in to your Stripe account, and then follow the steps to authenticate it.
- Once it’s connected, click on Save at the bottom to add the reusable payment connection to your form.
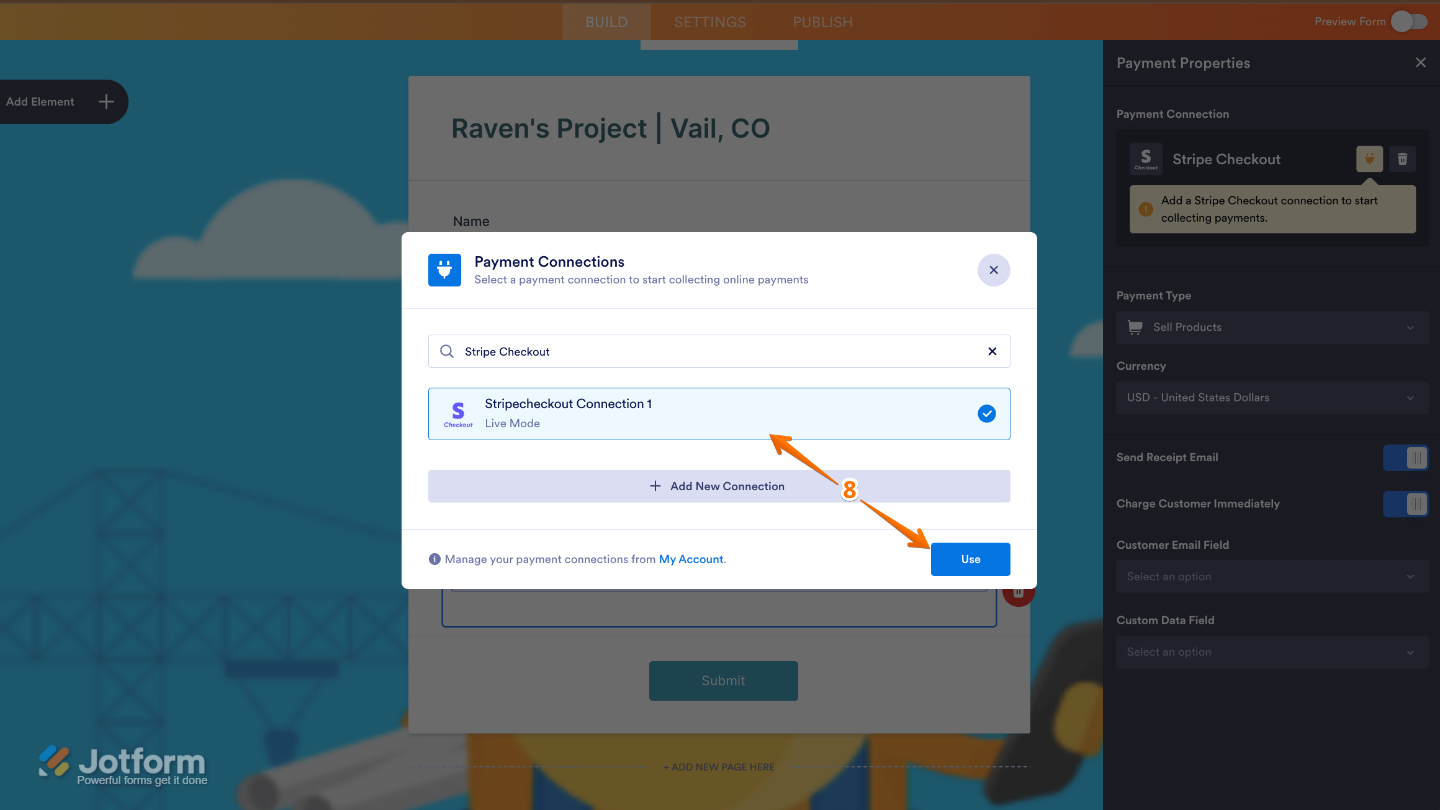
- Then, in the Payment Connections window that pops up, select a connection and then click on Use.
- Now, in the Payment Type Dropdown menu, select what you’d like the payment to be processed for:
- Sell Products — This is selected by default. Use this to sell physical or digital goods at a fixed price, allowing customers to make a one-time purchase.
- Sell Subscriptions — Choose this to charge customers on a recurring basis for services, memberships, or other ongoing access.
- User-Defined Amount — This lets customers enter the amount they want to pay. It’s useful for tipping, custom amount pricing, or flexible payments.
- Collect Donations — Select this to accept voluntary contributions. It’s commonly used for fundraising, nonprofit support, or charitable causes.

- Then, in the Currency Dropdown menu, select one of the currencies available with the integration. You can find a complete list of supported currencies here.

- Now, in the Payment Type Dropdown menu, select what you’d like the payment to be processed for:
- Sell Products — This is selected by default. Use this to sell physical or digital goods at a fixed price, allowing customers to make a one-time purchase.
- Sell Subscriptions — Choose this to charge customers on a recurring basis for services, memberships, or other ongoing access.
- User-Defined Amount — This lets customers enter the amount they want to pay. It’s useful for tipping, custom amount pricing, or flexible payments.
- Collect Donations — Select this to accept voluntary contributions. It’s commonly used for fundraising, nonprofit support, or charitable causes.
If you select Sell Subscription as the Payment Type, you’ll see the following options:
- Fetch Coupons From Stripe Account – When enabled, this’ll fetch and display all the coupons from your Stripe account. This overrides the current coupons created through Jotform. For more information, check our guide on How to Fetch Coupon Codes From Stripe.
- Fetch Subscriptions From Stripe Account – Toggle this On to fetch your subscription items from your Stripe account.
- Show Fetched Coupons From Stripe Account – Choose whether to display the coupons when you opt to Fetch Coupons from your Stripe Account.
Note
The form builder automatically saves the changes after selecting the options from each Dropdown menu.

Send Comment:
3 Comments:
More than a year ago
Integrating Stripe Checkout with Jotform is a straightforward process that can be completed in a few simple steps:
Create a Stripe account: If you don't already have a Stripe account, you'll need to create one. Go to the Stripe website (stripe.com) and follow the instructions to sign up for an account.
Create a form in Jotform: Once you have a Stripe account, go to the Jotform website (jotform.com) and create a form. Make sure that your form includes a payment field and that you've enabled payment processing.
Connect your Stripe account to Jotform: In Jotform, go to the settings for your payment field and select "Stripe" as the payment gateway. Then, enter your Stripe account information and click "Connect to Stripe."
Customize your payment settings: In Jotform, you can customize various payment settings, such as the currency, payment amount, and payment description.
Test your integration: Before you publish your form, test your Stripe integration to make sure that it's working correctly. You can do this by submitting a test payment and checking that the payment is processed correctly.
More than a year ago
Is it possible to pass products into the Stripe Checkout widget from another source? For example, if we raise an invoice in a different system for 2 products, and we want to pass these into the Jotform Stripe Checkout widget for payment?
Also, can you retrieve products directly from Stripe?
More than a year ago
Can we connect this payment path to a Stripe Terminal POS device? So, let's say we want to assemble the costs and collect other signatures on a form then use the POS system to collect final payment is it possible through Stripe Checkout, or is there another approach you would recommend?