Jotform’s Recurring Payment Options make it simple for your customers pay automatically on a schedule—whether that’s weekly, monthly, or yearly—having to fill out your form each time. It’s a great setup for things like memberships, subscriptions, or ongoing donations. For example, a gym can bill members each month without extra hassle, or a nonprofit can accept recurring donations with just a one-time sign-up.
You can build these kinds of forms without writing any code, connect them to over 20 payment gateways like PayPal, Stripe, or Square, and even customize things like billing intervals, trial periods, or the first payment amount to suit your needs.
The recurring payment option is supported in the following payment fields:
Adding and Setting up the Payment Field
Whether you’re creating a new payment form or updating an existing one, it only takes a minute to set up a recurring payment option. Here’s what to do:
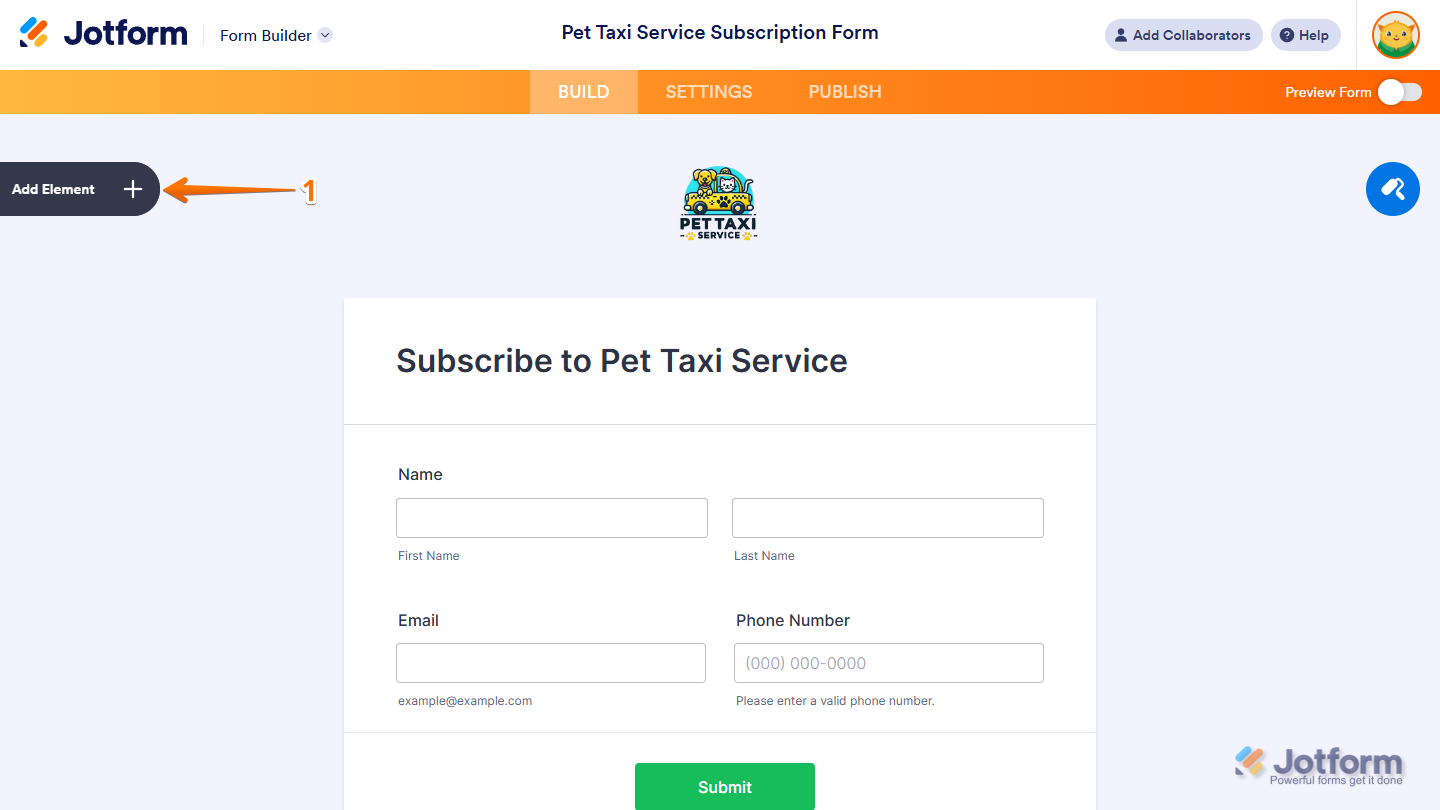
- In Form Builder, click on Add Element on the left side of the page.
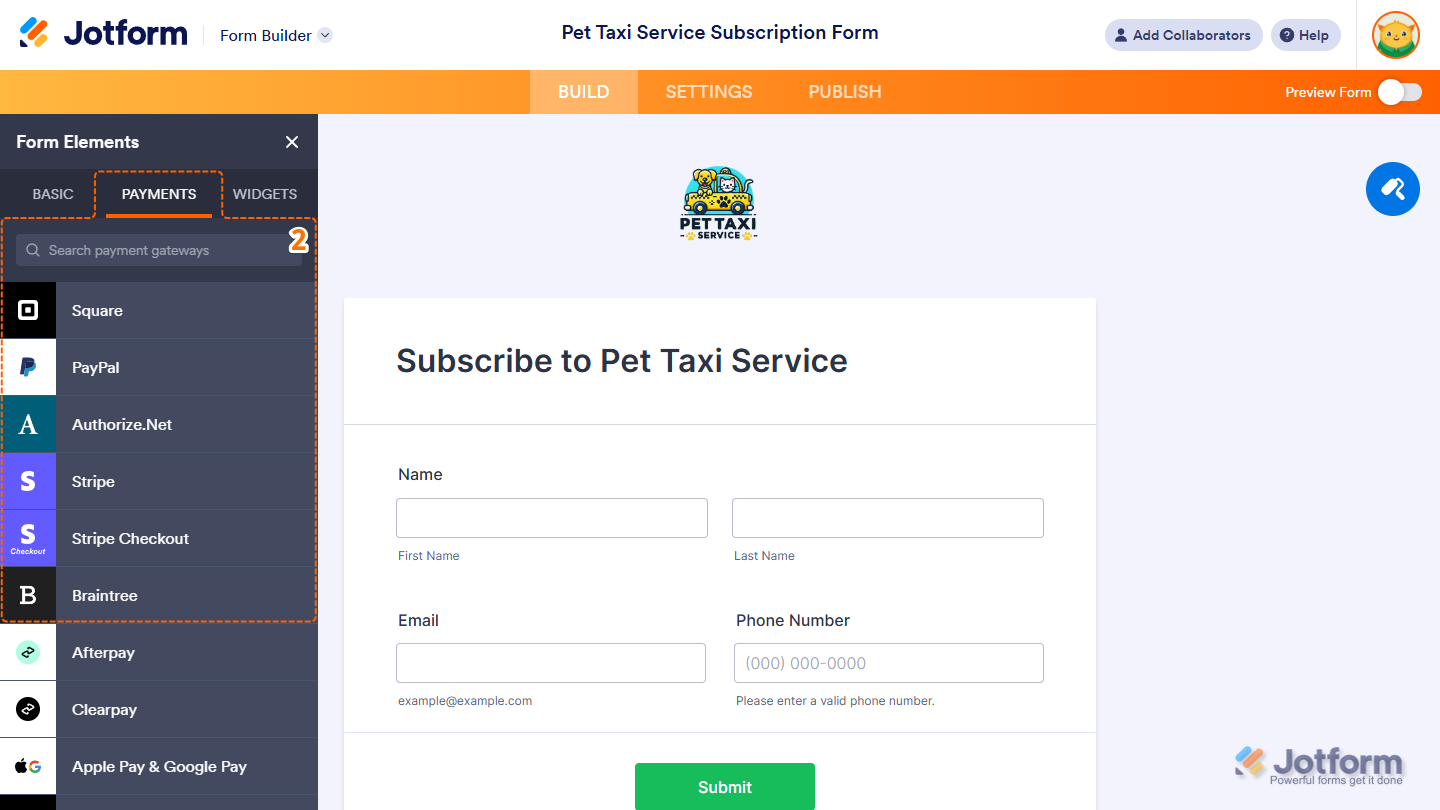
- Now, in the Form Elements menu, under the Payments tab, search for and click on a supported payment field. Or, just drag and then drop it to where you want it to be on your form.
- Next, in the Integration window that opens on the right side of the page, and depending on the payment gateway you chose:
- Click on the Connect button to log into your payment gateway’s account.
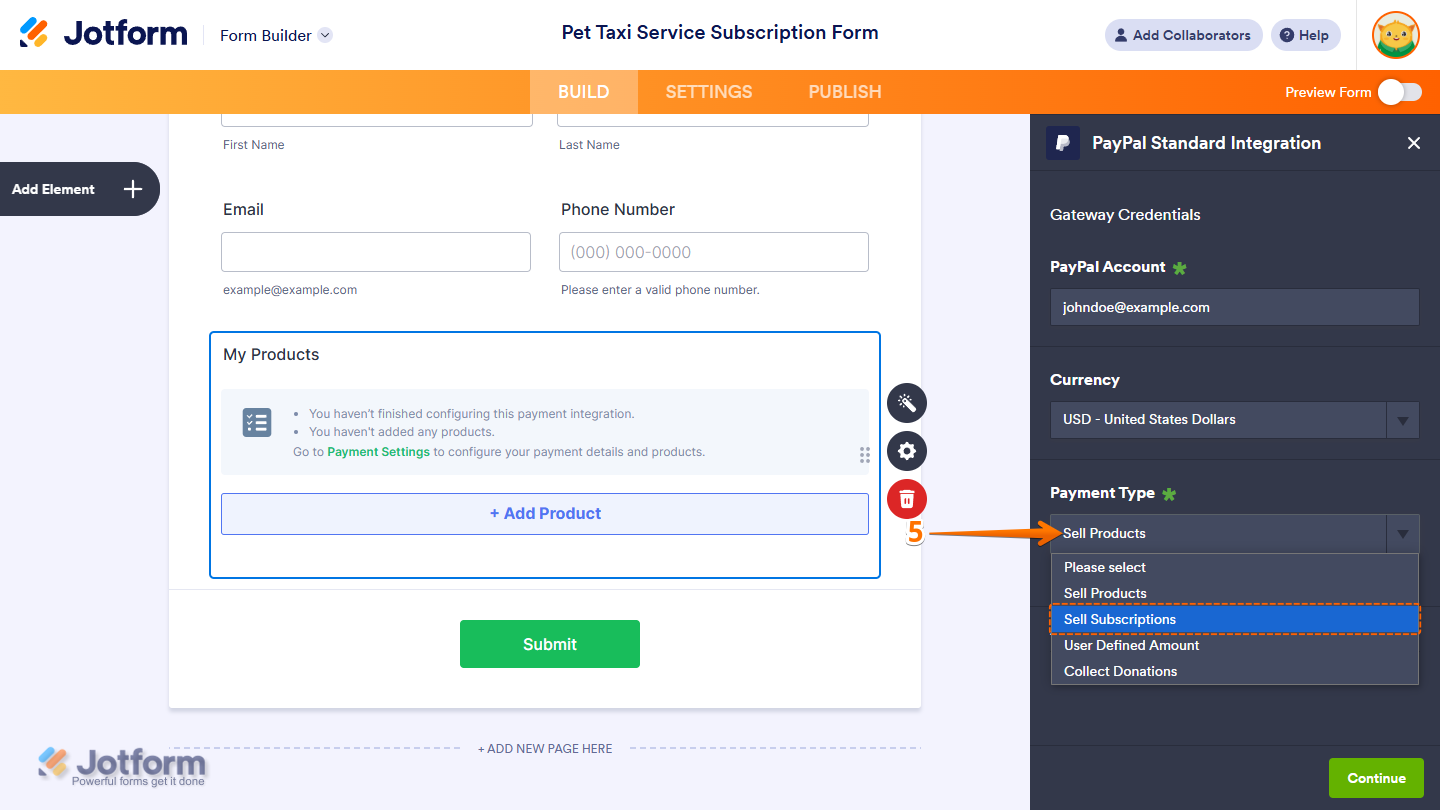
- Enter the Gateway Credentials from your payment gateway’s account.
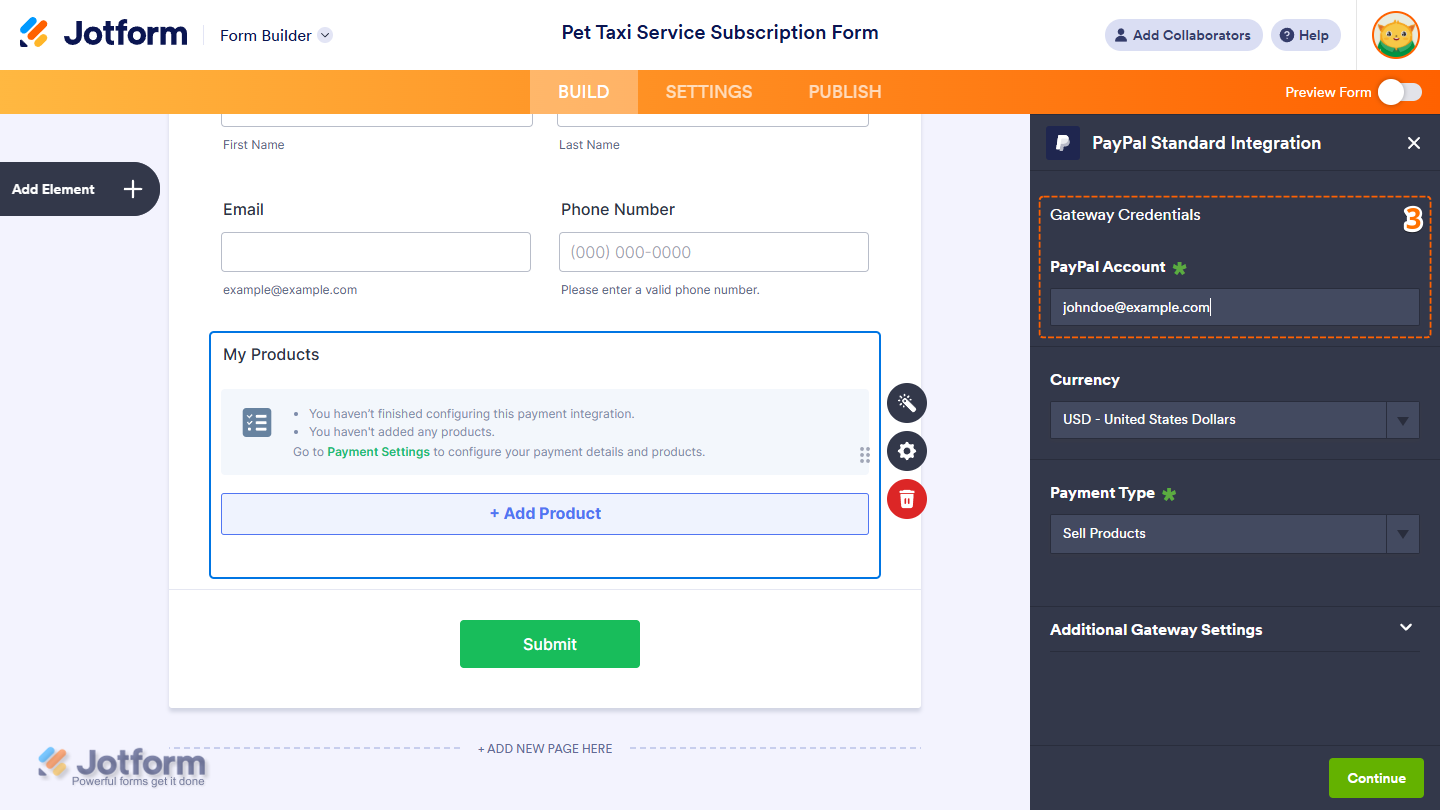
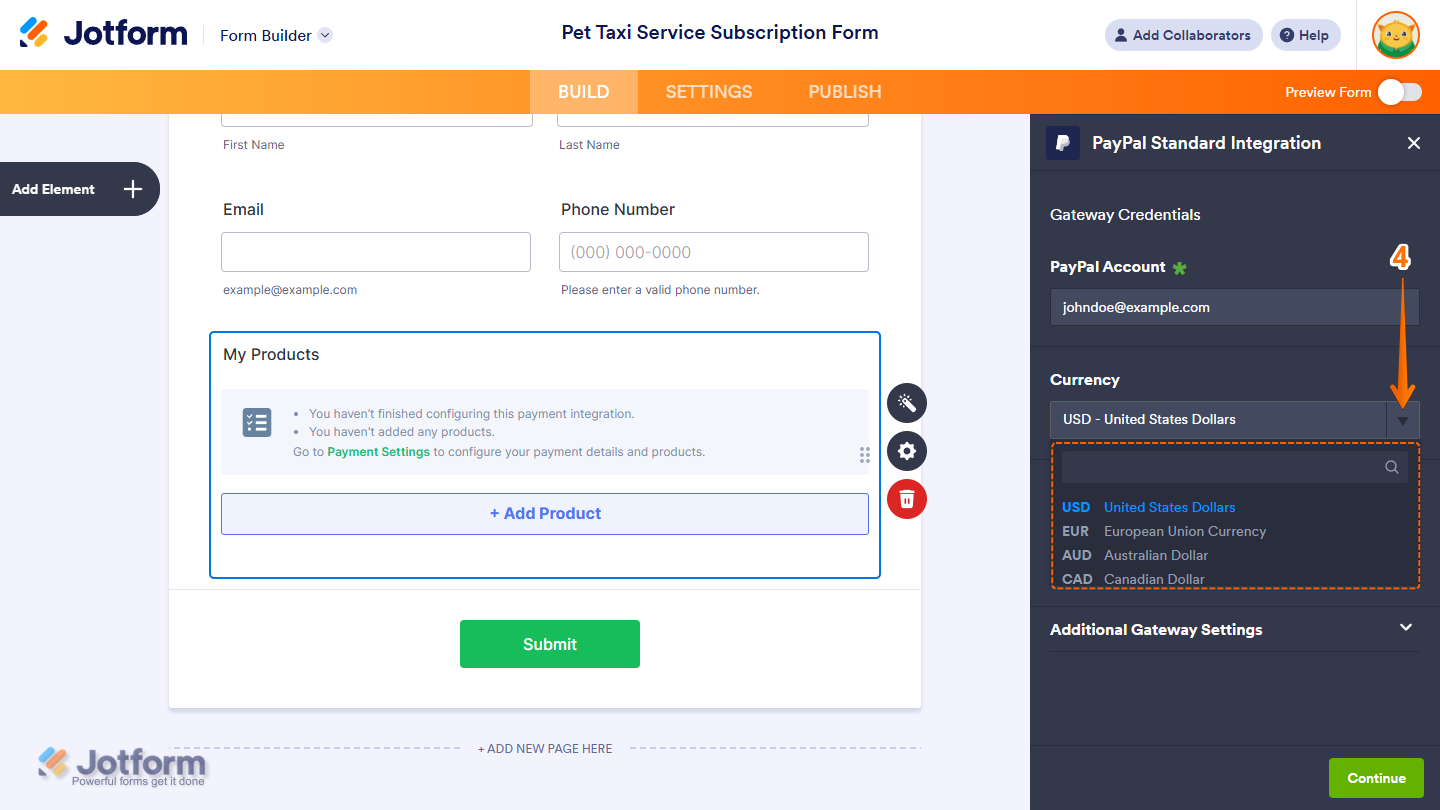
- Then, in the Currency Dropdown menu, select one of the currencies available with the integration. You can skip this step for payment gateways that only support one currency, or if the currency is based on your payment gateway’s account.
- After that, in the Payment Type Dropdown menu, select Sell Subscriptions.
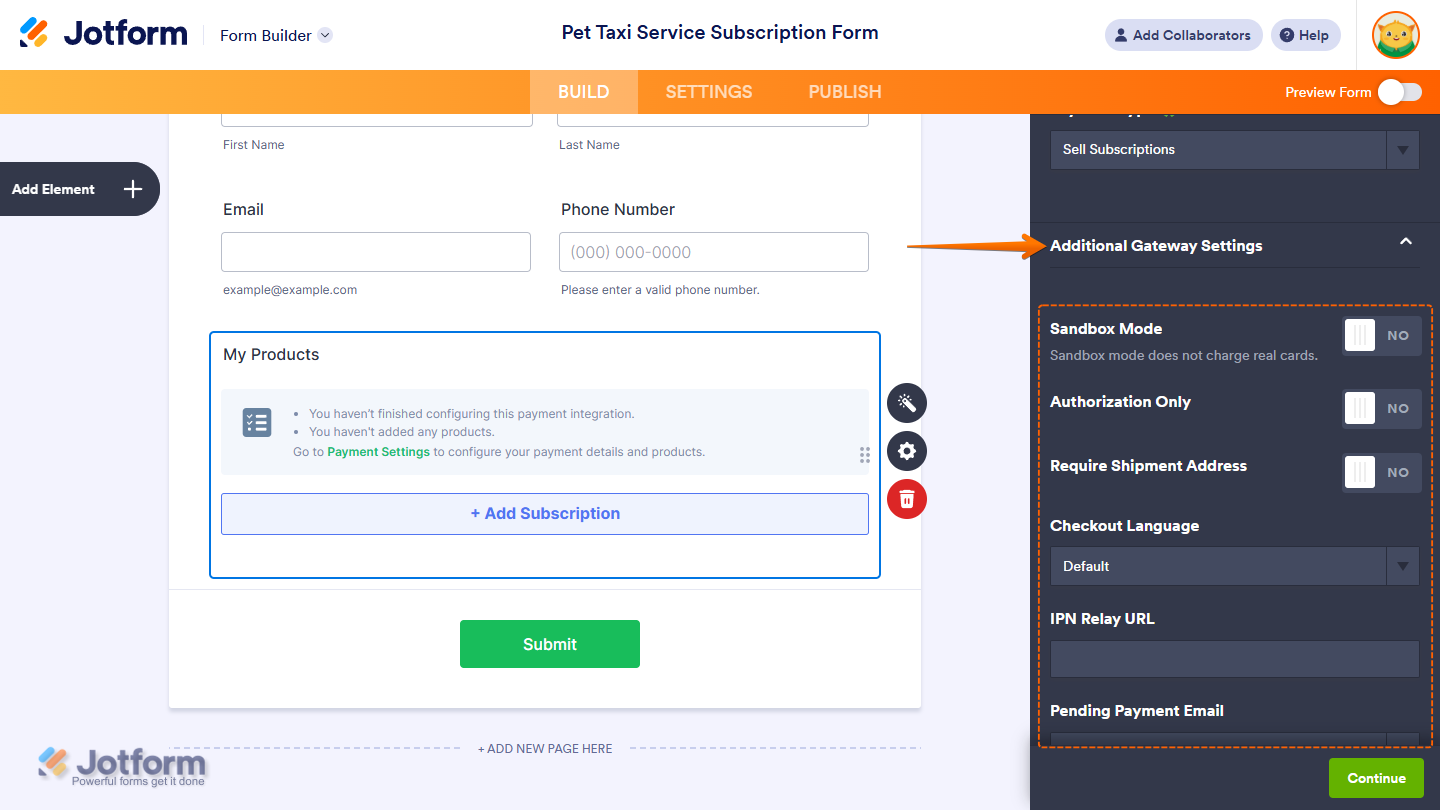
You can also expand the Additional Gateway Settings to access advanced options for the payment gateway you chose. These settings let you control how the form looks, enable extra features, and manage customer or billing details if needed.
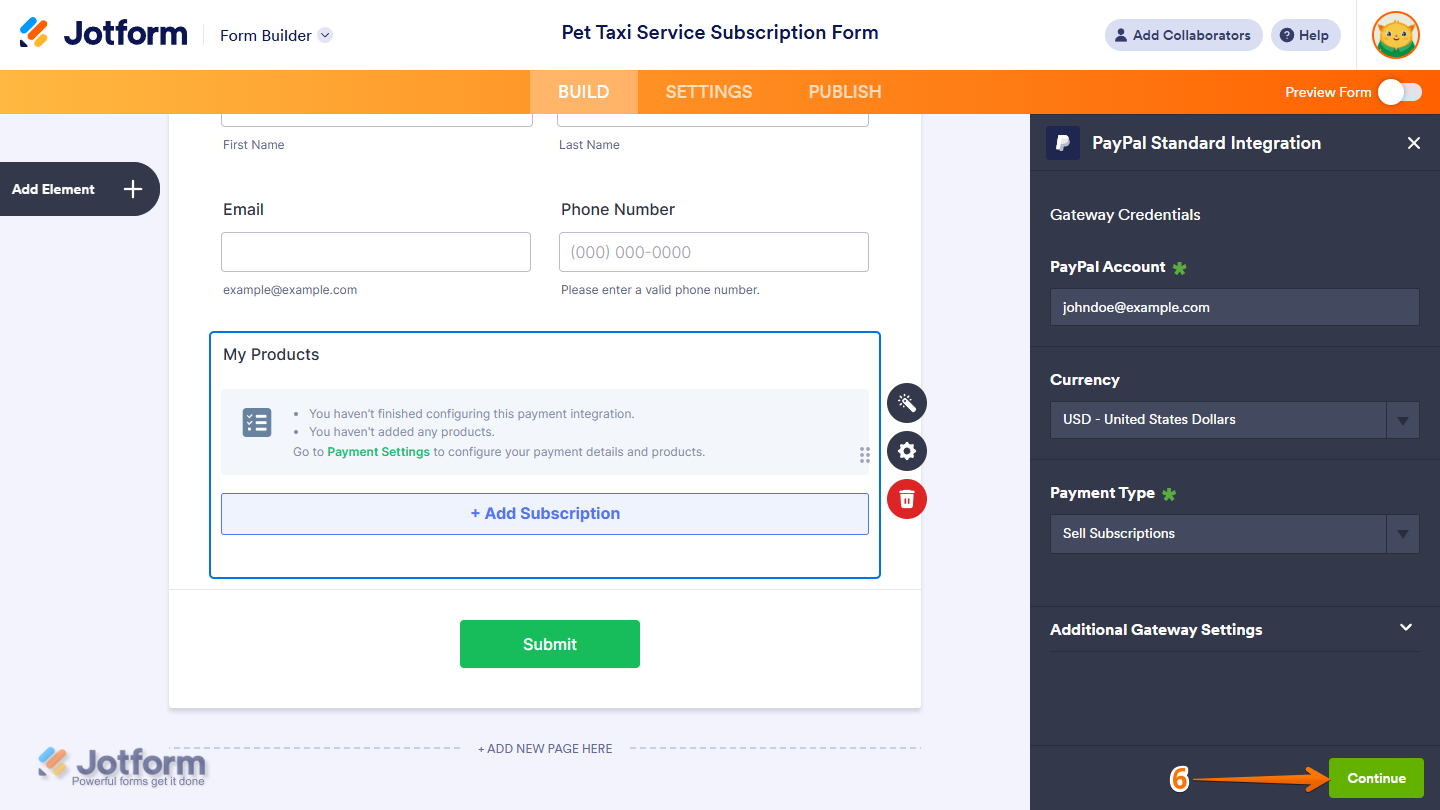
- Once everything is set, click on Continue to start creating subscriptions for your payment field.
Setting Up the Subscription Items
After configuring your payment field and clicking on Continue, you’re ready to set up subscription items with the gateway. Here’s how to do it:
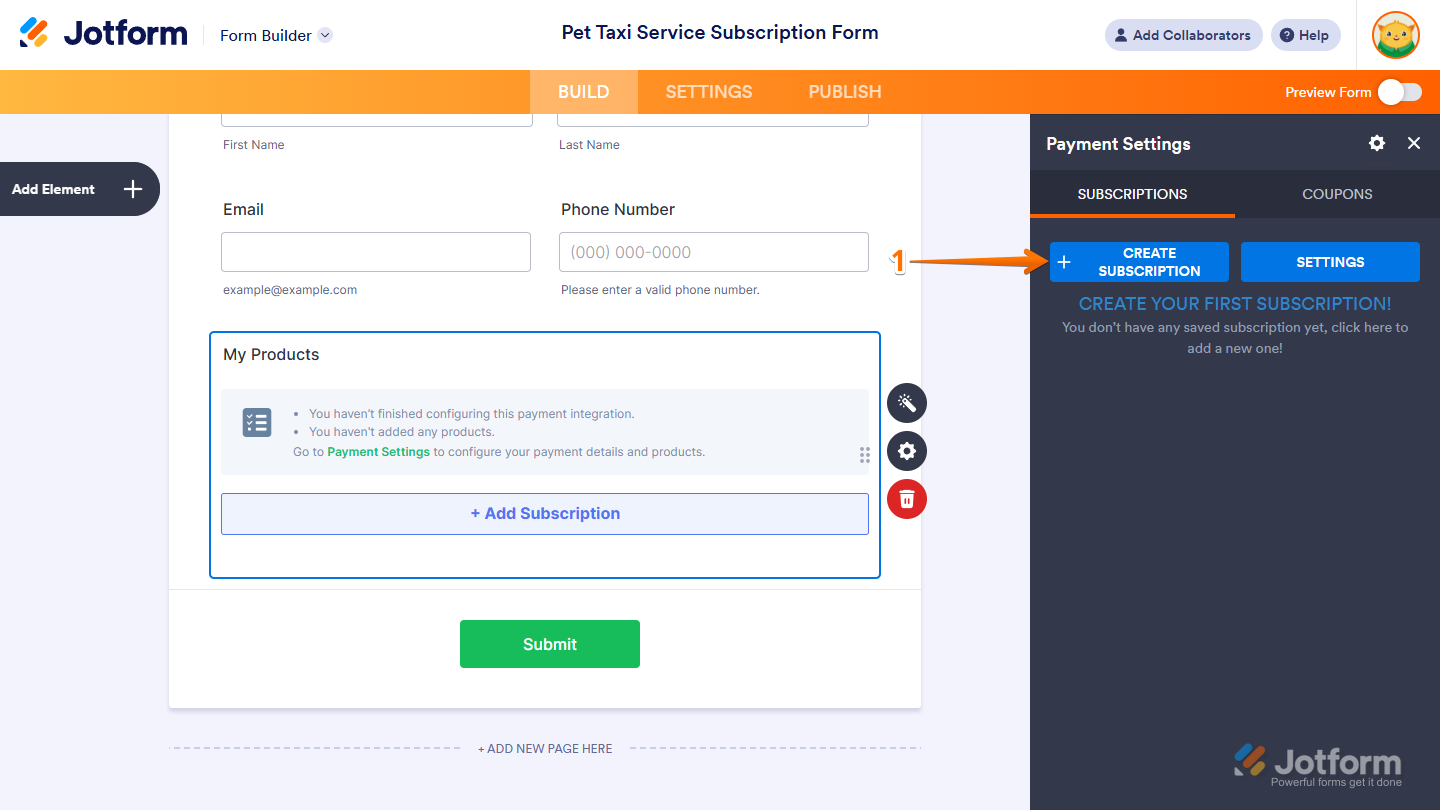
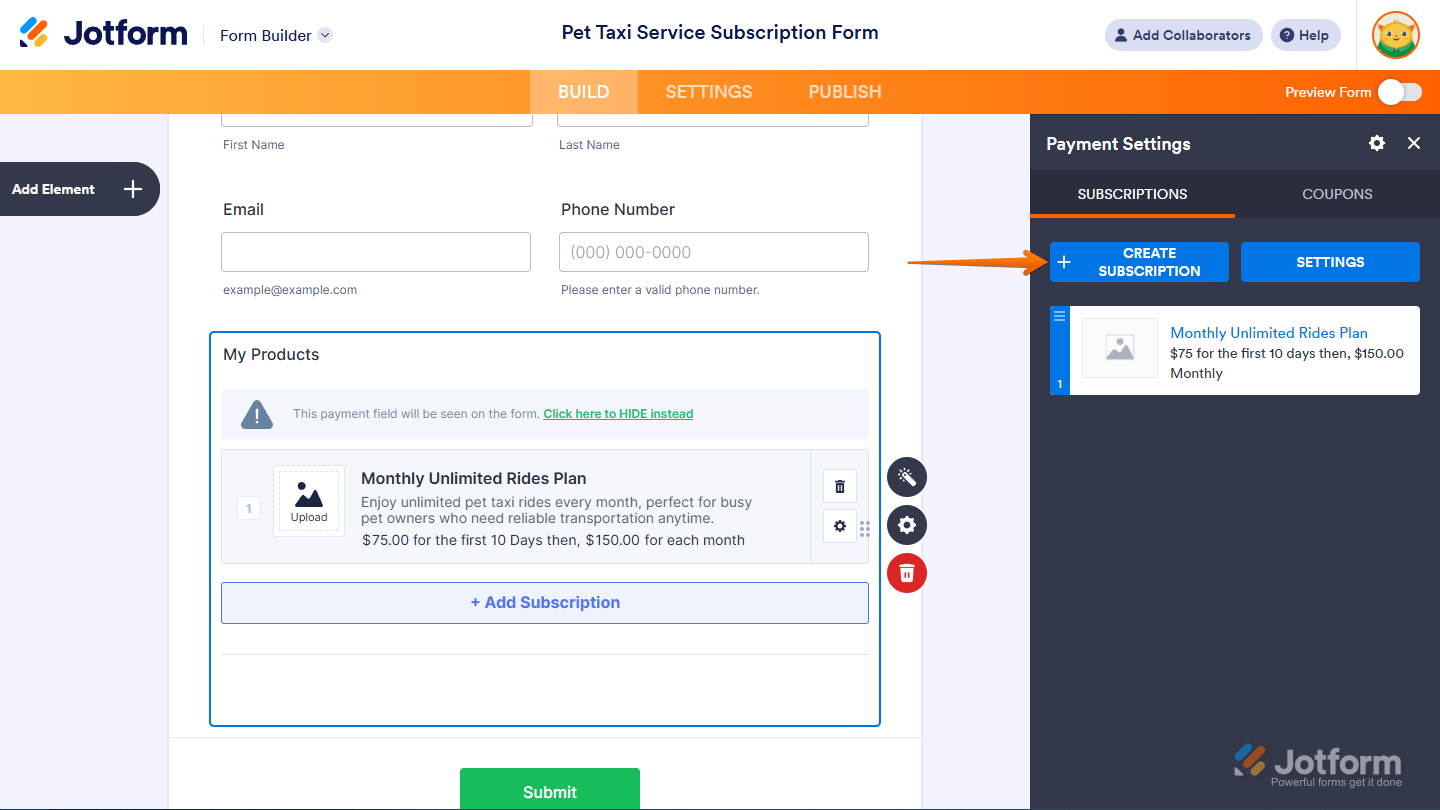
- In the Payment Settings window, under the Subscriptions tab, click on Create Subscription.
- Now, in the Subscription Setup section, you can adjust the following settings—what’s available may vary depending on the payment gateway you’re using:
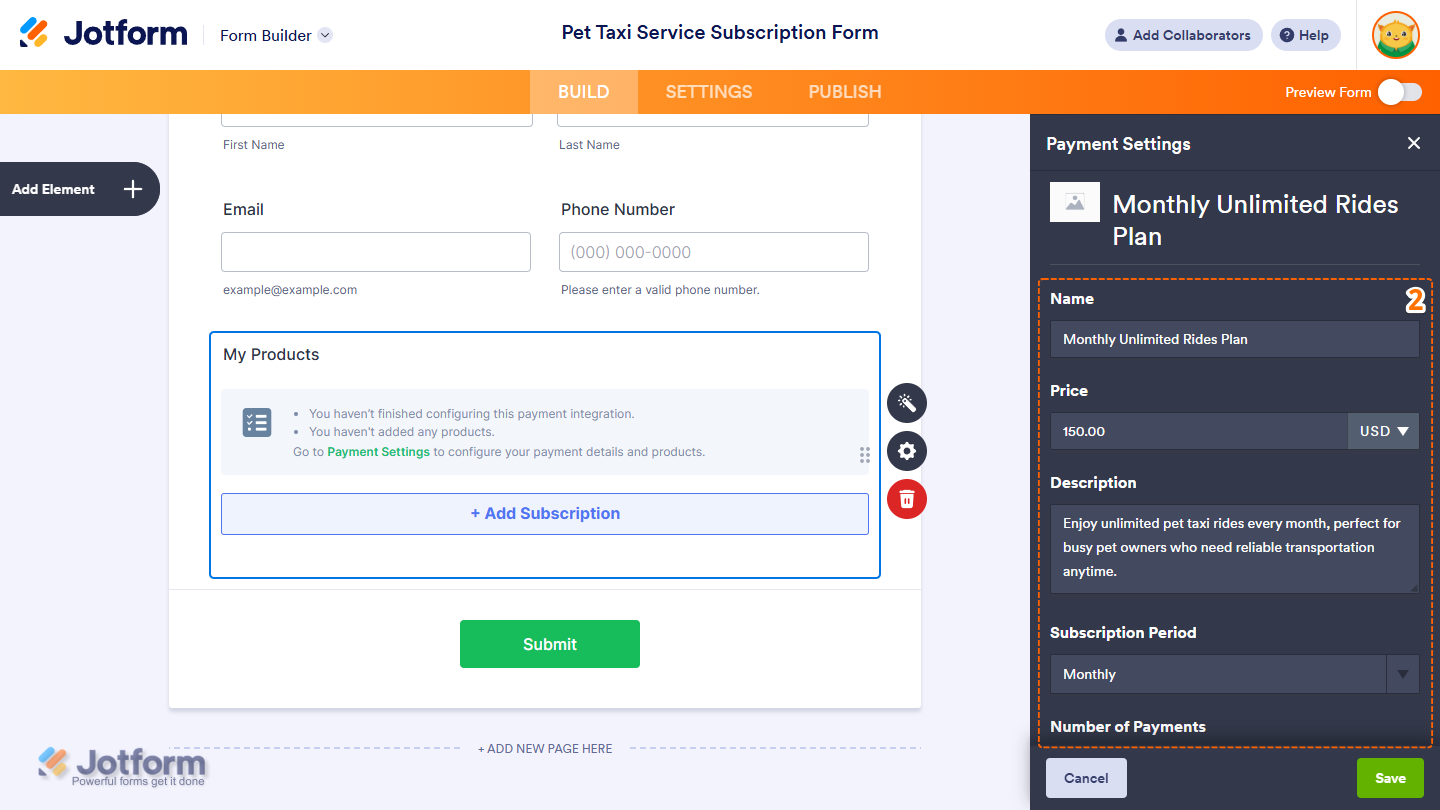
- Name — Enter the name of the subscription item as it will appear on the form.
- Price — Set the recurring amount to be charged. If left blank, the subscription will be free.
- Description — Add a short description to give users more context about the subscription.
- Subscription Period — Choose how often payments will recur, like daily, weekly, or monthly.
- Day of the Month — Select which day the payment should be charged. This is only available with GoCardless.
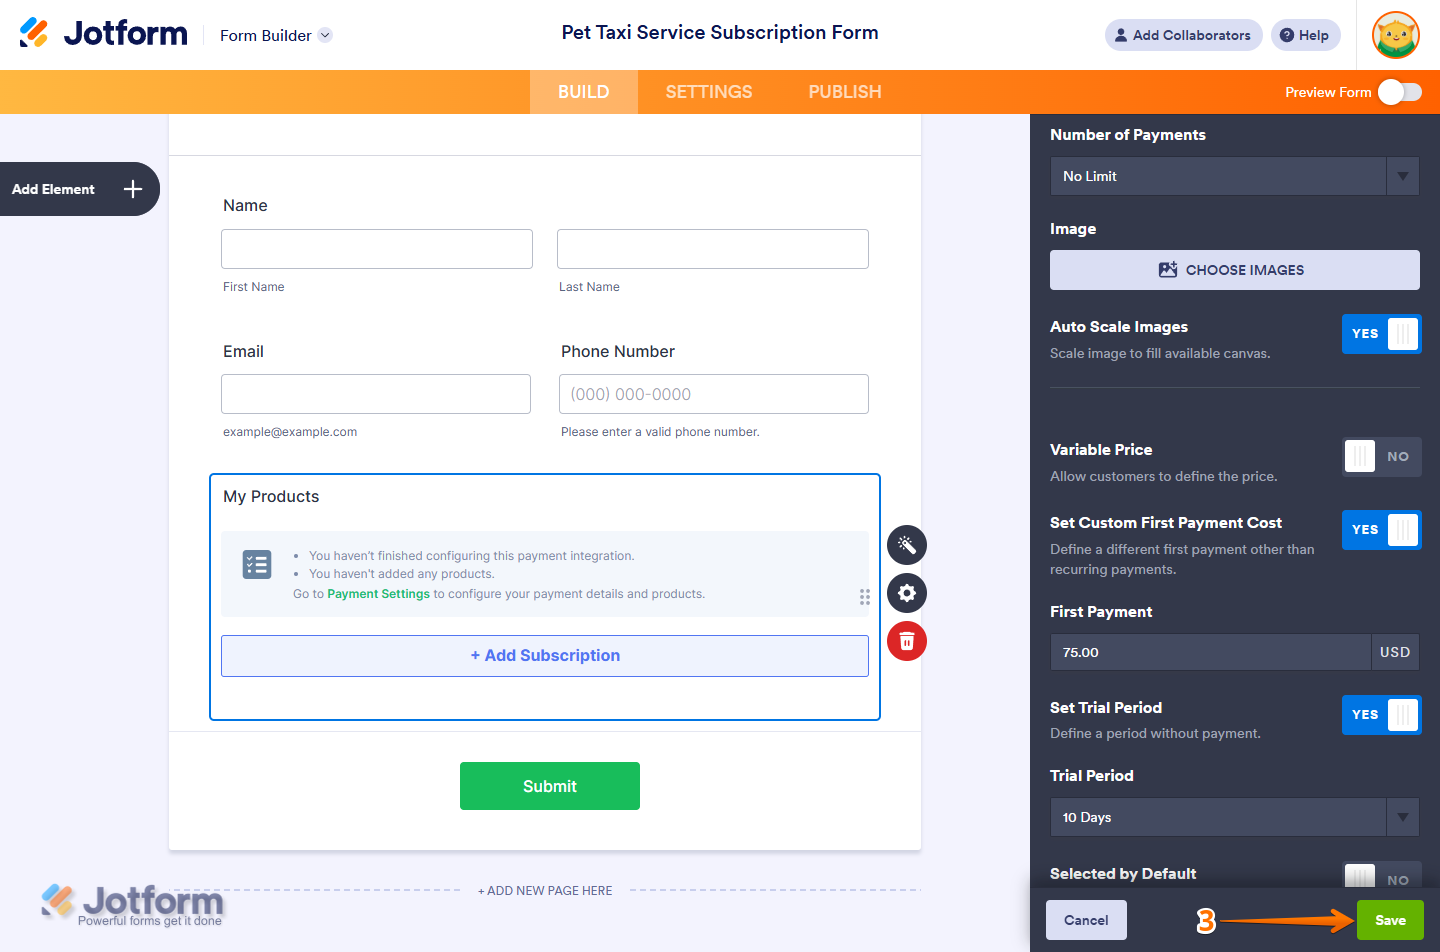
- Number of Payments — Set how many times the subscription will be billed. This isn’t supported in Worldpay UK, Stripe, Stripe Checkout, Stripe ACH Manual, SensePass, or Purchase Order.
- Image — Upload an image to visually represent the subscription.
- Auto Scale Images — Turn this on to automatically resize the image to fit the display area.
- Variable Price — Let customers define the subscription amount. This is useful for recurring donations or when using form-based pricing. Check out our guide on Setting up a Custom Recurring Donation Form to learn more about it.
- Get Price From — This appears when Variable Price is enabled. It’s set to None (Manual) by default, but you can choose a Form Calculation Widget to pass a calculated amount to the Subscription Amount field instead of asking customers to enter it manually.
- Set Trial Period — Enable a trial period during which no payment is collected. This is disabled when Variable Price is active, and it isn’t available in Mollie, BluePay, Stripe ACH Manual, GoCardless, Purchase Order, and 2Checkout.
- Trial Period — This appears when Set Trial Period is enabled. It defines how long the trial lasts before recurring payments begin (e.g., 1 day, 1 week, 1 month)
- Set Custom First Payment Cost — Let the first charge differ from the regular recurring amount. It’s useful for discounts or one-time setup fees. When enabled, the First Payment field becomes available. This option isn’t supported on Stripe Checkout, Mollie, GoCardless, or SensePass.
- First Payment — This is required when Set Custom First Payment Cost is enabled. Enter the amount to be charged for the first payment.
- Change First Payment Period — Adjust the time between form submission and the first charge. It appears when Set Custom First Payment Cost is enabled. This isn’t available in Authorize.Net, Stripe, BluePay, WorldPay UK, BlueSnap, Stripe ACH Manual, PayFast, Purchase Order, or 2Checkout.
- First Payment Period — This appears when Change First Payment Period is enabled. It defines the delay before the first payment is charged (e.g., 1 day, 1 week, 1 month).
- Variable First Payment Cost — This lets the first payment amount be manually entered or calculated. It’s only available in the Stripe payment field. And it automatically hides the First Payment setting.
- Get First Payment Price From — This appears when both Set Custom First Payment Cost and Variable First Payment Cost are enabled. It’s set to None (Manual) by default, but you can use a Form Calculation Widget to pass a calculated amount to the first payment field instead of requiring manual entry.
- Selected by Default — This’ll automatically select this subscription when the form loads.
- Once everything is set, click on Save at the bottom.
That’s it. You’ve successfully created a subscription for your payment field. If you want to add another one, click on Create Subscription, follow the same steps above, and customize it as you like.


Send Comment:
77 Comments:
More than a year ago
How does a user cancel their subscription? Would they need to ask the business to do it, or can they do it themselves?
More than a year ago
Is it possible for users to select a date when their subscription starts?
More than a year ago
Does it work with Enterprise Plan only ?
More than a year ago
I can't figure out to do payment
More than a year ago
Hi,
I am using SQUARE as my payment option for my clients, however, how can I set up recurring payments as I am an Independent Travel Agent? I don't want to keep sending them the CC Authorization form. Under the Payment Type drop-down, I chose USER DEFINED AMOUNT (the first payment will be processed on 3/15 and then the final payment will be processed on 4/12). I need additional assistance, please. Please view my CC AUTHORIZATION form for your reference. Kindly advise.
More than a year ago
Will I be able to tell if a CUSTOMER removes his/her credit card on file -- which would then mean his/her subscription is cancelled? Will I be notified come the day the subscription was supposed to be renewed that there is no card on file? Thanks!
More than a year ago
Is it possible to make the recurring payment optional? From what I'm seeing, it's an either/or situation. I would love to offer the option of either a one-time OR recurring payment.
More than a year ago
how do we select multiple subscription options in a form?
More than a year ago
I am receiving the following error message when trying to setup subscriptions with Paypal, "Things don't appear to be working at the moment. Please try again later."
Are subscriptions still possible with PayPal?
More than a year ago
You don't seem to be able to set up a subscription anymore with Paypal
More than a year ago
How do people cancel the subscription?
More than a year ago
Is there any update to the Stripe 'Number of Payments' feature? Any chance this is supported now?
More than a year ago
Hello! The steps show PayPal Personal but I have PayPal Business and have not been able to find anything in the setup about subscriptions like shown above. Please help. Where do I need to go?
More than a year ago
Is it possible to set the "Number of Payments" using a Form Calculation, Conditional calculation, or similar method?
More than a year ago
Hi - can you allow the user to enter the amount they wish to contribute every month? And then is it possible to update the amount? (say they want to increase their donation)
More than a year ago
I would like to know if its possible to have a subscription form like Hello Fresh. I would like for it to inform customer's that their meal options are ready and that they would need to choose them before time is up. If they dont make any options it would choose the default options available.
More than a year ago
Hello,
Does Stripe support the 'number of payments' feature for subscriptions? It is not showing up for me.
thanks
More than a year ago
Hi, I'd like to set up a form where they have a free week trial, then automatically charges their account after the first week with weekly recurring billing. Is that possible?
And if so what are the best payment processors with the most flexible options and good reporting features.
More than a year ago
As an admin i would like to manage the square recurring subscriptions, where can i see all the recurring payments submitted by my customers and where can i cancel the subscriptions if need be?
More than a year ago
i need recurring payments to happen on specifc days of the week or month not every month from the date customer entered the payment, how can i get that done for square, it is very lame to not have this functionality?
More than a year ago
Can I use in this way to Stripe as well? By the way what's PayPal pro? How can I also add 2 ways of payment PayPal and Stripe
More than a year ago
If the user wants to cancel his payment how can I do that?
More than a year ago
Can I use in this way to Stripe as well? By the way what's PayPal pro? How can I also add 2 ways of payment PayPal and Stripe
More than a year ago
If I set a trial period, what happens at the end of the trial period? Put another way, if I set a trial period for subscriptions, does that mean the card will automatically stop being charged when the trial period expires?
I'm using Stripe and don't seem to be able to set the number of payments (instalments), so am wondering if I can instead set a trial period and get the payments stopped at the end of the trial period.
More than a year ago
Hi,
Is recurring payment option available for CyberSource payment gateway?
Thanks!