Integrating your form with Salesforce is a smart way to make your sales process faster and more efficient. Salesforce is a powerful Customer Relationship Management (CRM) platform that helps you manage accounts, build stronger client relationships, and close deals more easily. It includes tools like contact management, sales forecasting, and workflow automation — everything you need to keep your sales pipeline moving smoothly.
By connecting your forms to Salesforce, you can automatically turn submissions into new leads or records—no need to copy and paste anything. It’s quick to set up and helps you save time, cut down on errors, and keep your team on the same page so you can focus on what really matters—growing your business.
Integrating Your Form with Salesforce
Whether you’re building a brand-new form or updating one you already have, connecting it to Salesforce is quick and easy—here’s how to get started:
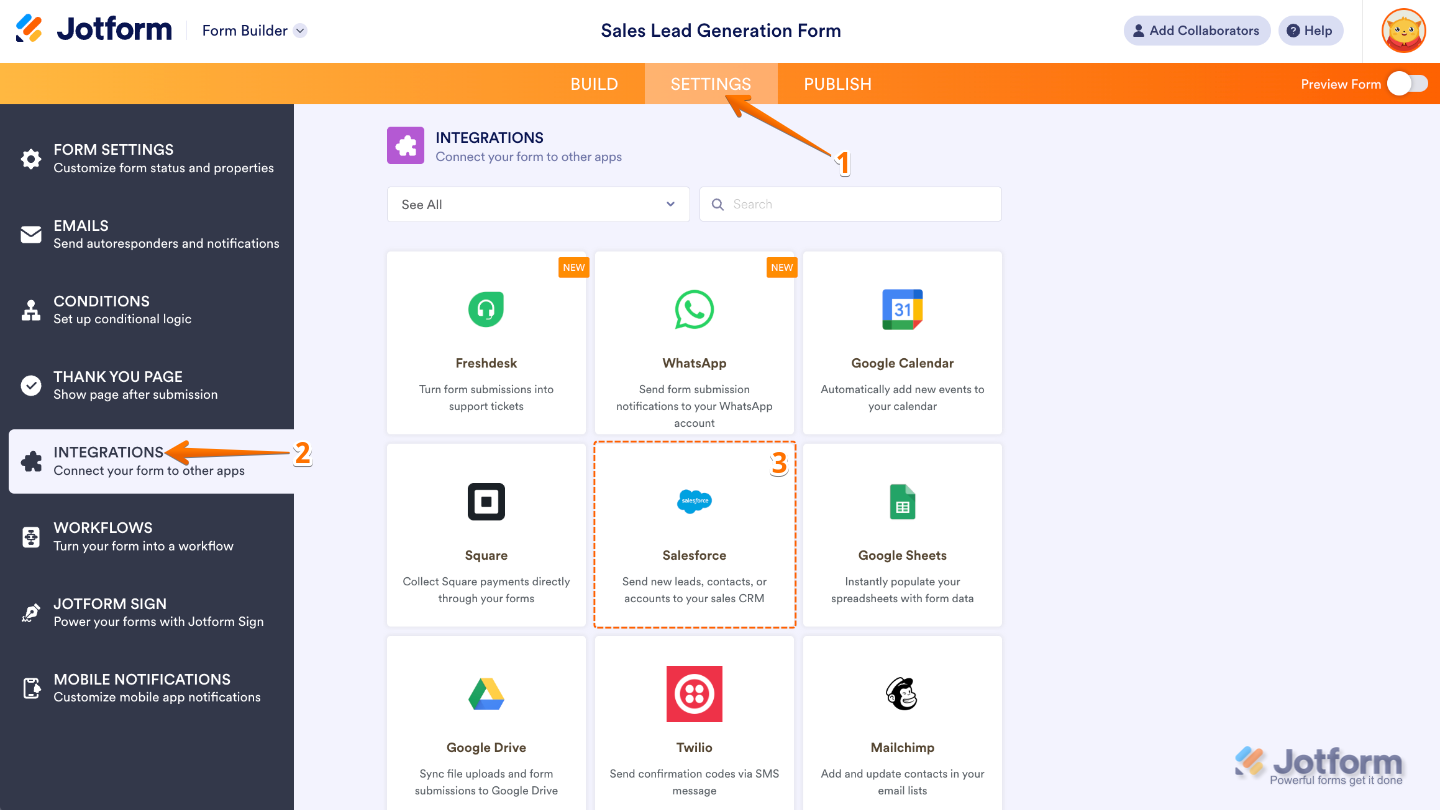
- In Form Builder, in the orange navigation bar at the top of the page, click on Settings.
- Now, in the menu on the left side of the page, click on Integrations.
- Then, click on Salesforce.
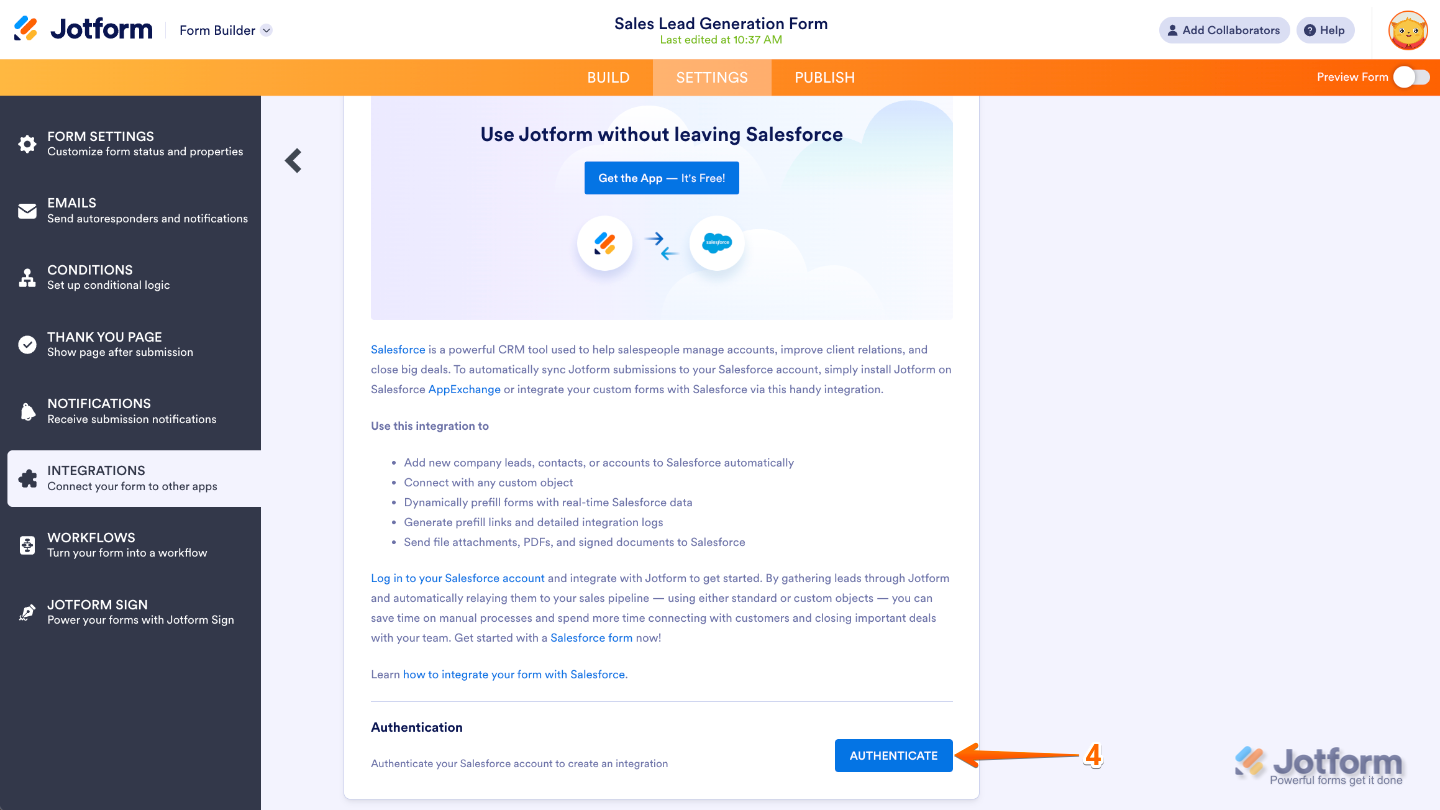
- Next, click on Authenticate.
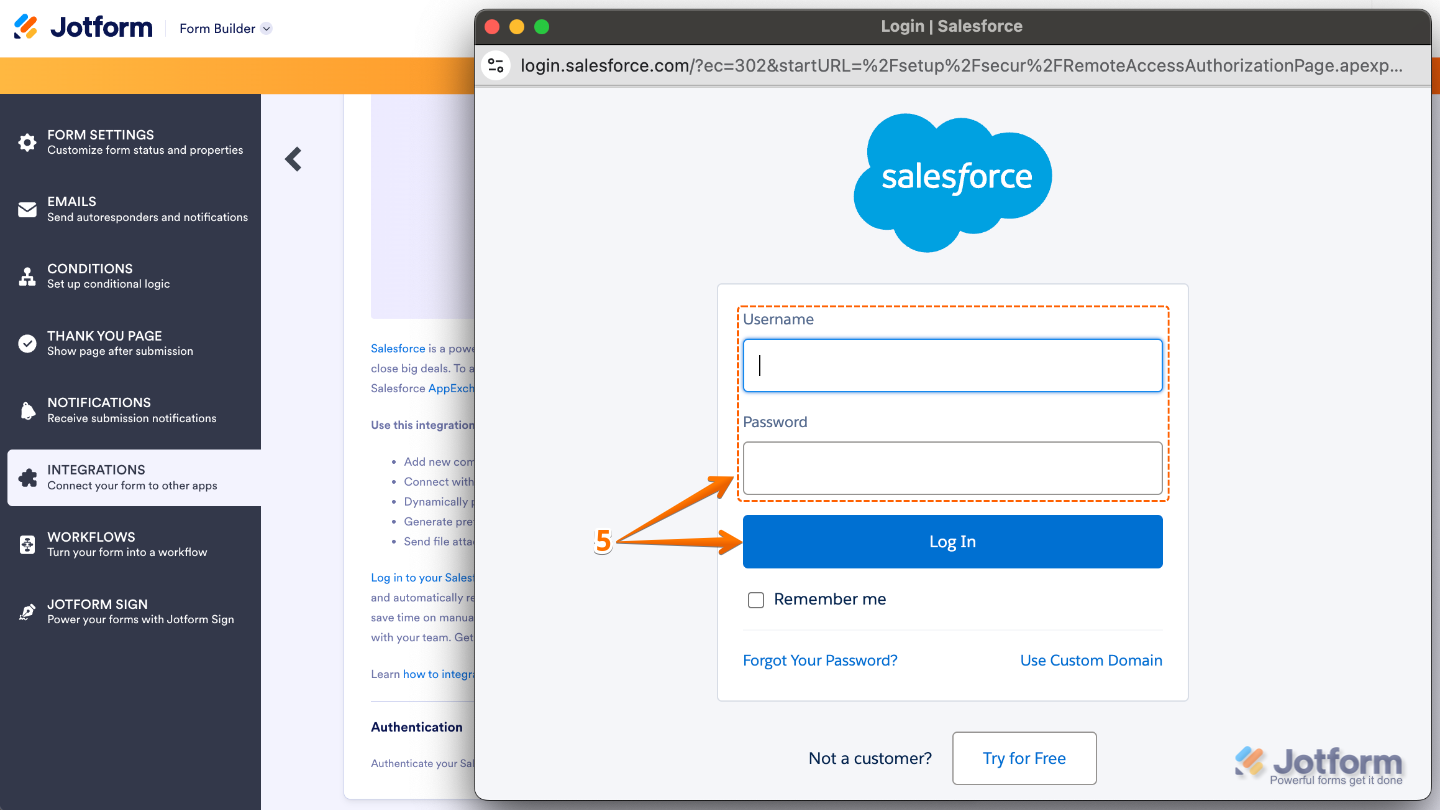
- In the window that comes up, enter your Salesforce Login Credentials, and then click on Log In.
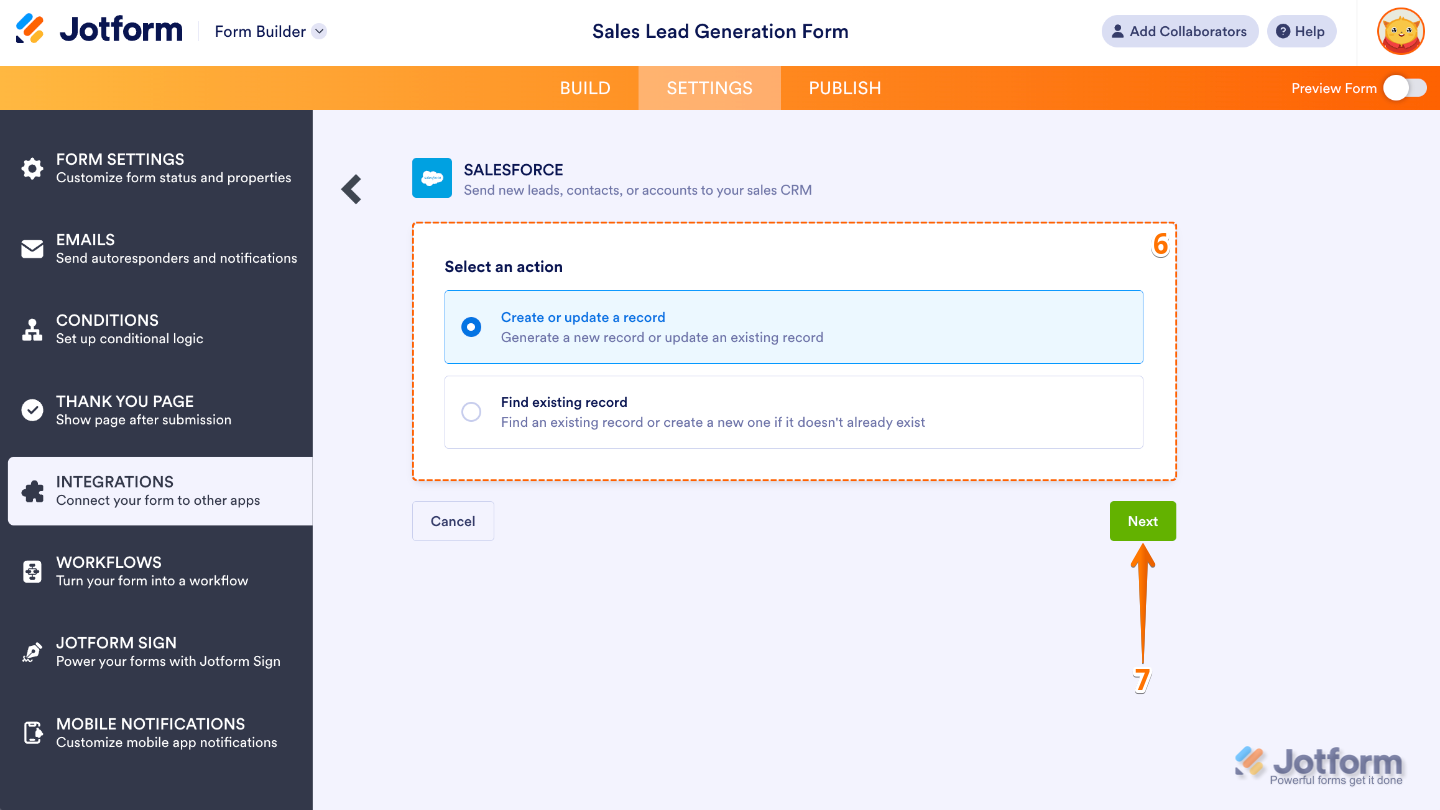
- Now, select your Salesforce Action:
- Create or Update a Record — Choose this if you want to create a new Salesforce record or update one that’s already in your account—it’s an easy way to keep your data fresh and up to date.
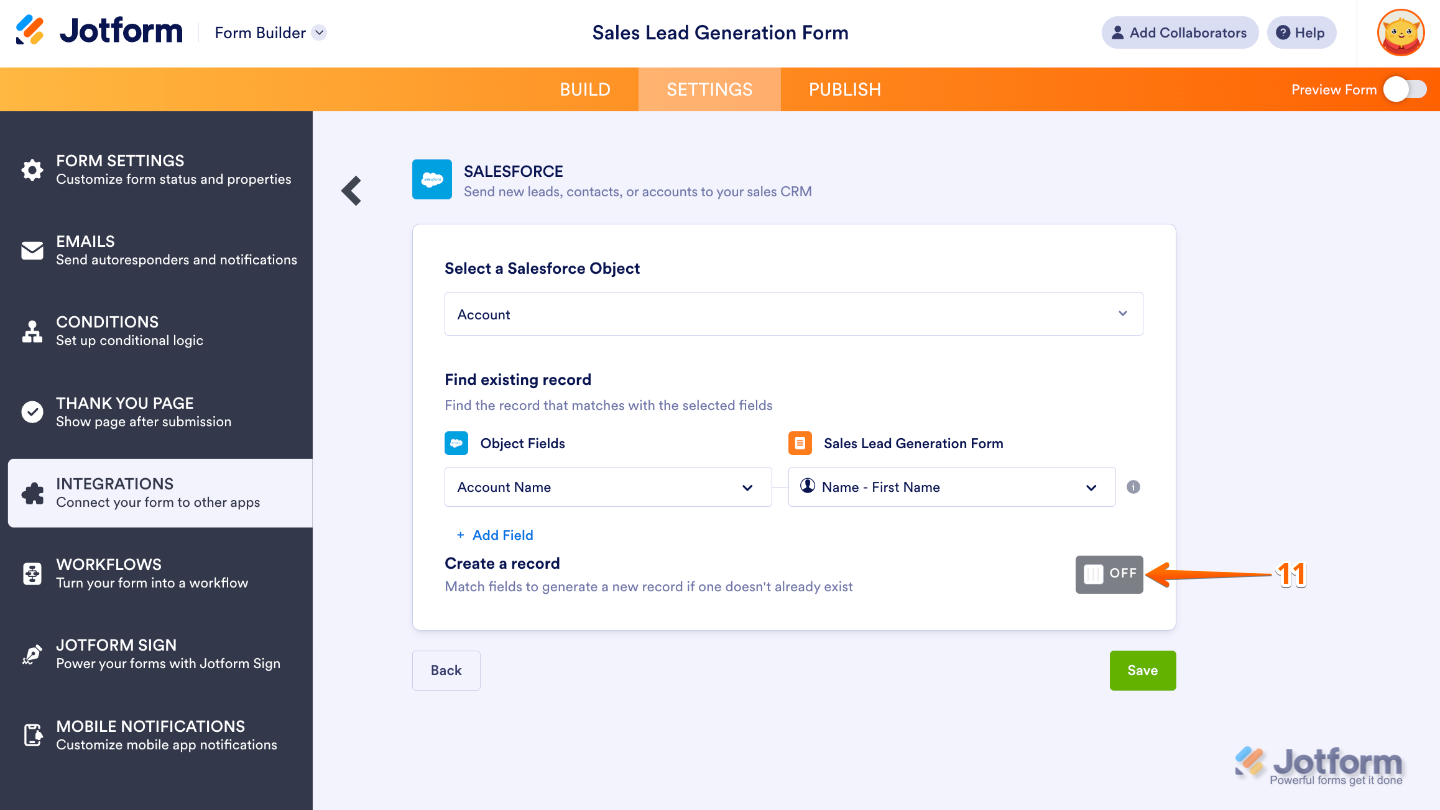
- Find Existing Record — Select this to look for an existing record or create a new one automatically if it’s not already in your Salesforce account.
- After that, click on Next.
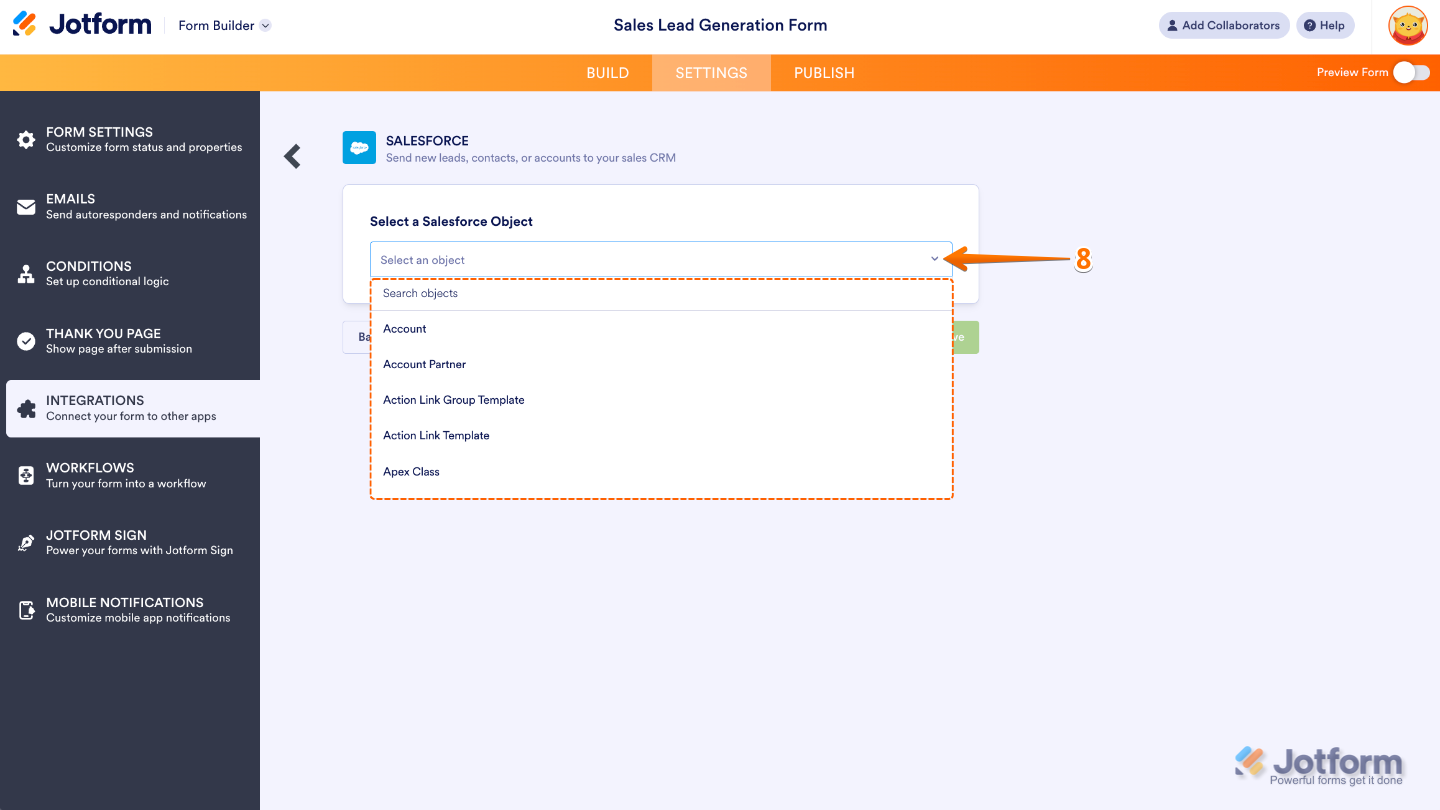
- Then, click on the Downward Arrow icon to select a Salesforce Object.
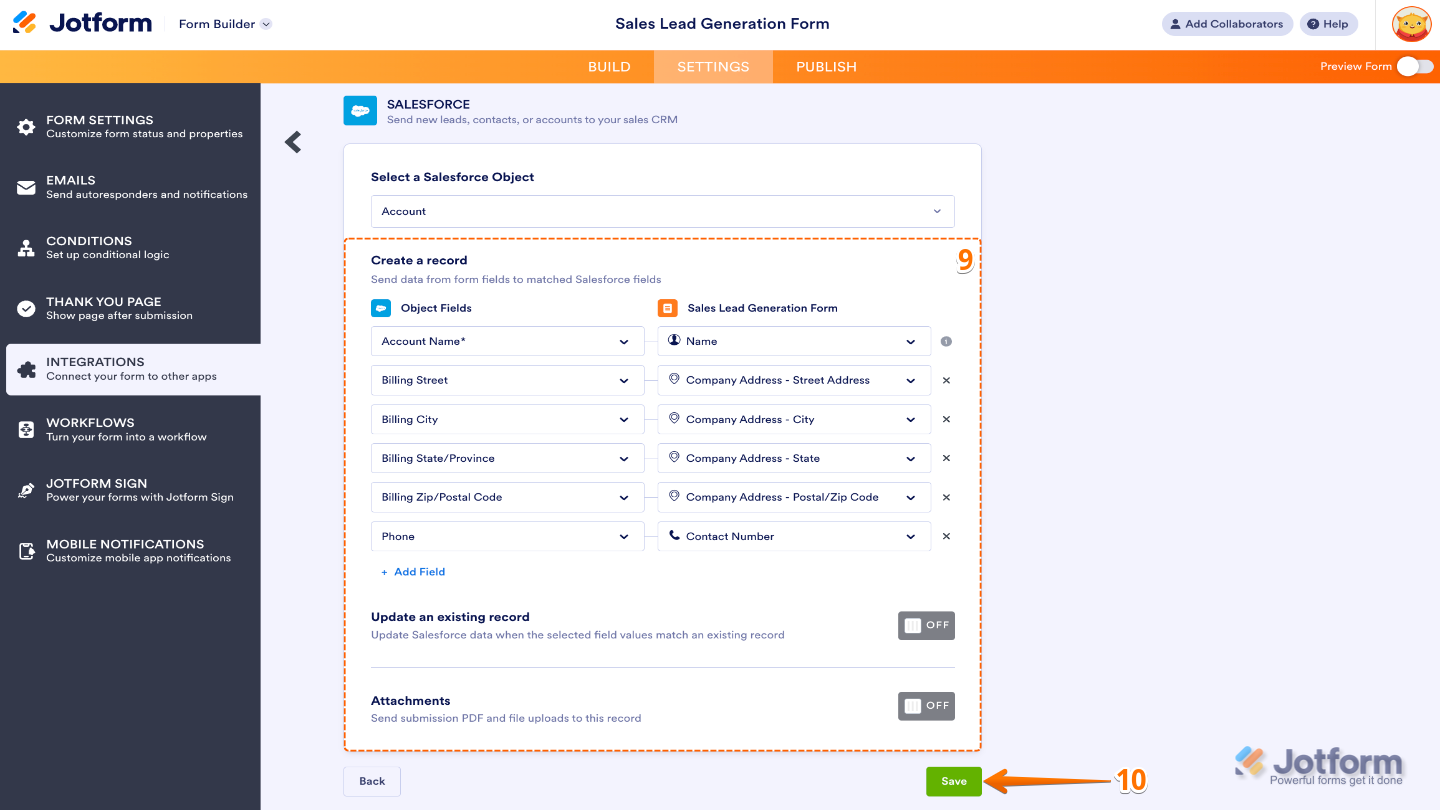
- Edit the Create Record to map the Salesforce Object fields to your form fields. Click on the Add Field link at the bottom of the fields if you want to add more fields. If needed, you can toggle on the following options:
- Update an Existing Record — Turn on this if you want Salesforce to update existing records automatically whenever the data in your selected fields matches what’s already in your database. You can click on Add Field to include more fields for duplicate checking.
- Attachments — Turn on Attachments if you want to send uploaded files and a PDF copy of the submission straight to Salesforce.
- Once you’re done, click on Save.
- If you selected Find Existing Record as your Salesforce Action, you can enable the Create a Record option to map the Salesforce Object fields to your form fields.
After saving it, you’ll see the actions you created, along with the Action Logs and Add New Action buttons.
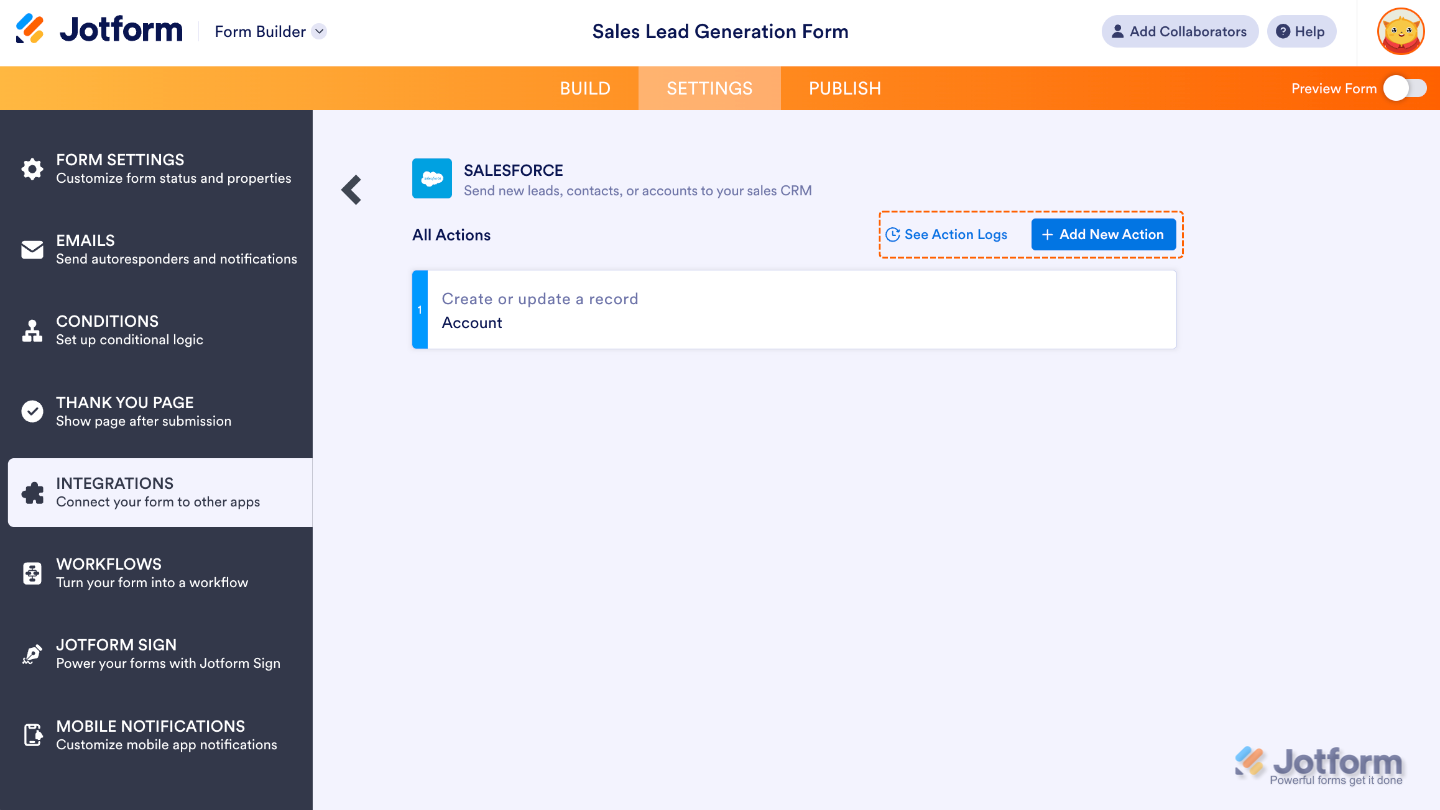
When you hover over an existing action, you’ll also notice the Gear (edit) and Trash Can (delete) icons, which are handy for making quick changes anytime.
Connecting Your Salesforce Agent
Jotform makes it simple to connect your Salesforce Agent and decide exactly what data it can access. You can easily link your agent to Salesforce, then choose a template with the object types or articles that best fit your customers’ questions. Want a step-by-step walkthrough? Our guide on How to Connect Your Salesforce Agent has you covered.
You can start adding actions that let your Salesforce Agent create, update, or display data from Salesforce right in a conversation. You can even train your agent to give smarter, context-based answers using Salesforce Knowledge Articles. For a full breakdown of how to do it, head over to our guides below to learn more.
- How to Connect Your Salesforce Agent to Salesforce
- How to Add Actions to Your Salesforce Agent
- Understanding Field Fill Options in Salesforce Agent
- How to Train Your Agent to Use Salesforce Knowledge Articles
Update
Jotform is also available with Salesforce AppExchange. By adding Jotform from Salesforce AppExchange, you’ll have a Salesforce button directly on your forms, allowing you to map object fields to form fields in seconds.


Send Comment:
35 Comments:
126 days ago
How to connect to salesforce sandbox org?
173 days ago
What is the cost of adding Jotform to SFDC? Is it User based in terms of costing? Thank you
307 days ago
I have a couple of questions as I work to get the form fields into our Salesforce org.
1. I am finding an existing or creating a new Contact record. How do I get the Account ID in there? I see the field and I can select it, but I do not have a field on the form that holds the Account Id. I want the same Account Id for all the Contacts that are being created new.
2. In following the directions in the help 1063-how to integrate jotform with salesforce, it shows that I should have an Attachments toggle. But I don't have this available to me. Does this need to be enabled somewhere?
316 days ago
Hi, I have had my team work on trying to integrate a jotform with many fields to feed into salesforce. We have been 100% unsuccessful to even getting one field to populate. Our team talked to salesforce, who said they don't know anything about jotforms. We had to email back and forth with Jotforms to get the answer that it doesn't work. So how can you market that jotforms integrates with salesforce when we cannot get anyone who knows how to actually do this? we would love it to work but don't know what we are missing to get it to work. Please help!
330 days ago
Great integration! IHere's a question for your team.
A challenge I found was to "Find existing record", particularly when the Object to be found is a Contact, the name of which is composed of two entries "First Name" and "Last Name", but I need the Jotform space to be a single entry. I ended up doing the link through a specific Object Field, like an email address... Unfortunately, the integration only works when the Jotform entry is an Email widget, which requires the user to type the address, as opposed to choosing from a list. Do you have any suggestions on the matter? Thank you
363 days ago
After integrating (authenticate/link) the form to Salesforce Sandbox account, how can integrate (re-authenticate/re-link) the same form to Salesforce Production account without having to remove the integration and remap again?
More than a year ago
Can we connect to a Salesforce sandbox to test? I haven't been able to get it to authenticate. Also, how do you authenticate when using an SSO? Thank you for your help!
More than a year ago
Very simple and seamless integration. Love it!
More than a year ago
Is it possible to simply send the form pdf to a record in Salesforce or do I need to sync every field from the form to a field within Salesforce?
More than a year ago
Hello, is the integration available with Salesforce Lightning and is there a monthly fee? thank you!
More than a year ago
We used to integrate our Jotforms into campaigns in Salesforce through the "Legacy" integration. It was very simple using a specific security token from SalesForce. With the new integration options, I can no longer add members to campaigns from the forms. Is there a work around?
More than a year ago
We are attempting to configure donations collected through Jotform (with PayPal) and we are not getting the files to map correctly each time. Is there a log that we can see that might give us insight on whyb some fields are not mapping correctly and resulting in blank records?
More than a year ago
I'm a SF consultant. I am working with a non-profit that has a super limited budget. I was curious if the SF integration was only available at a certain plan level and/or is there an additional cost to using that integration?
Thanks,
More than a year ago
re: jotform - Salesforce integration. (using appexchaneg or legacy integration).
Is it possible to send a jot form survey result (pdf) to salesforce "files" via the integration? or can I only fill in fields?
More than a year ago
Working on several forms where we have the SalesForce Standard Contact Matching Rules set up but it is still duplicating (creating new) contacts with the same information rather than updating the current contact. Please help me out!
More than a year ago
Integrated jotform into salesforce but when I tried to enter field on jotform its not coming up on my salesforce dev org
More than a year ago
I currently utilize Salesforce for job intake, however, I have a field on my Jotform where the user can put in an already existing Salesforce job number. How do I link JF and SF so that when the user inputs an existing SF job number, the form they're filling out will link to that job in SF?
More than a year ago
Hi,
Can I use it for Web to Case too?
More than a year ago
Hi we are salesforce partner, we have a prospect looking to integrate Jotforms with Salesforce but are looking at Salesforce Professional edition and need to send data to a custom object, is this possible or does this require Enterprise Edition of Salesforce?
More than a year ago
Here's what I'm envisioning: A separate dashboard where we can view all of our form submissions (applications, contact form, product waitlists, demo sign-ups). We would like to assign reps and attach notes that are easily accessible/viewable on the contact's page. Is this possible?
Will be submitting a support ticket to see if what I'm envisioning is possible. Or perhaps there's a better way to accomplish this? All of our forms are currently in Jotform and our reps are using a Google Sheet to view submissions. They're unable to make edits to the sheets without resetting the integration.
Any ideas on how to make this easier for them?
More than a year ago
Is it possible to update an exisiting salesforce contacts' details through jotform by submitting a jotform that has matching fields such as name, email address and mobile number, as well as new information that I would like to update in the coattails details in salesforce?
More than a year ago
our salesforce integration is just a blank screen now. What is going on?
We have also reached out to Jotform but we no one is responding, Why?
More than a year ago
How can I integrate Jot form with salesforce without Creating duplicate Accounts. Ex. When i create the contact Alfredo Ford salesforce create the account Ford Household and if i create the contact Carmen Ford salesforce create another Ford Household instead add the contact Carmen Ford to the existent Ford Household
More than a year ago
Do you have a sample of taking an uploaded file on the form and passing that to Salesforce (Content Version object)?
More than a year ago
None of the examples show the mapping of a Salesforce Checkbox field (boolean / true-false) to a field in a Jotform. The integration does not show any eligible fields on our form when we select those field types in Salesforce. There doesn't appear to be a simple boolean flag field type in the form elements. How is this integration possible?