Collecting payments through online forms has never been easier, thanks to Jotform! If you’re searching for a reliable payment processor, Authorize.Net stands out as one of our top choices. Setting up the integration is quick and straightforward, taking just a few minutes. With Authorize.Net, you can seamlessly collect payments for product orders and manage recurring payments, all without any additional transaction fees.
Adding and Setting up Payment Field
Whether you’re creating a new form or updating an existing one, you can add and set up the Authorize.Net payment field on your form in a few easy steps. Here’s how to do it:
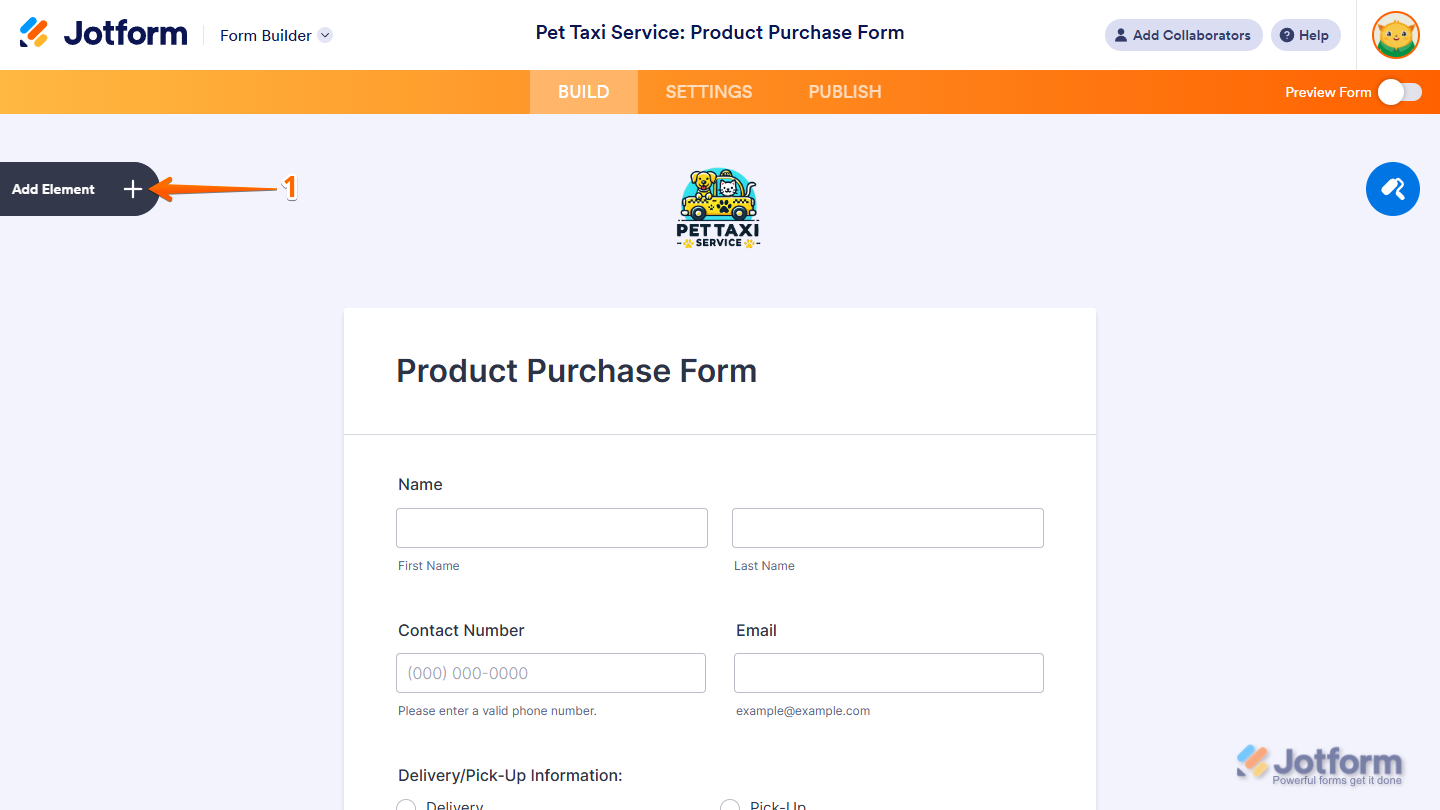
- In Form Builder, click on Add Element on the left side of the page.
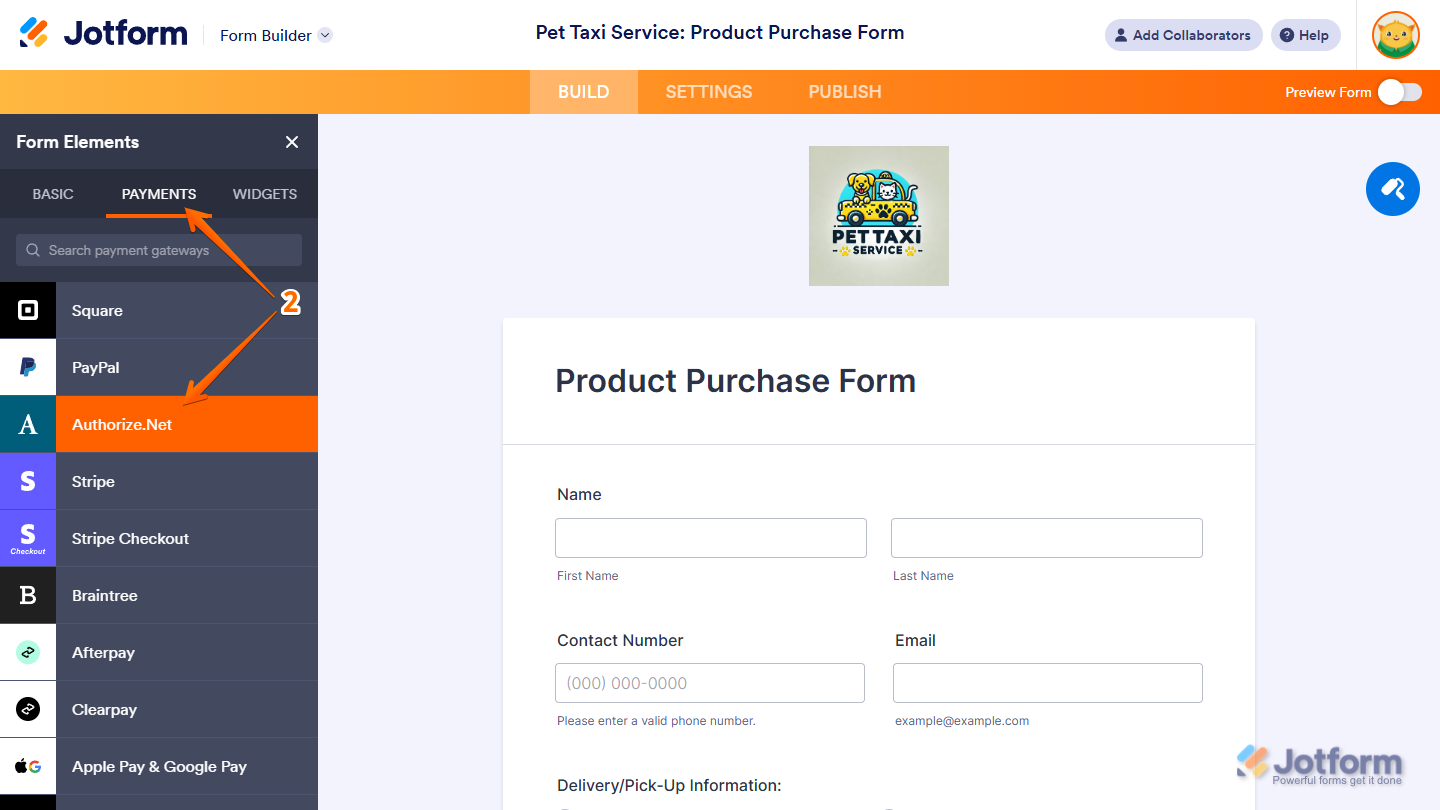
- Now, in the Form Elements menu, under the Payments tab, click on Authorize.Net. Or, just drag and then drop it to where you want it to be on your form.
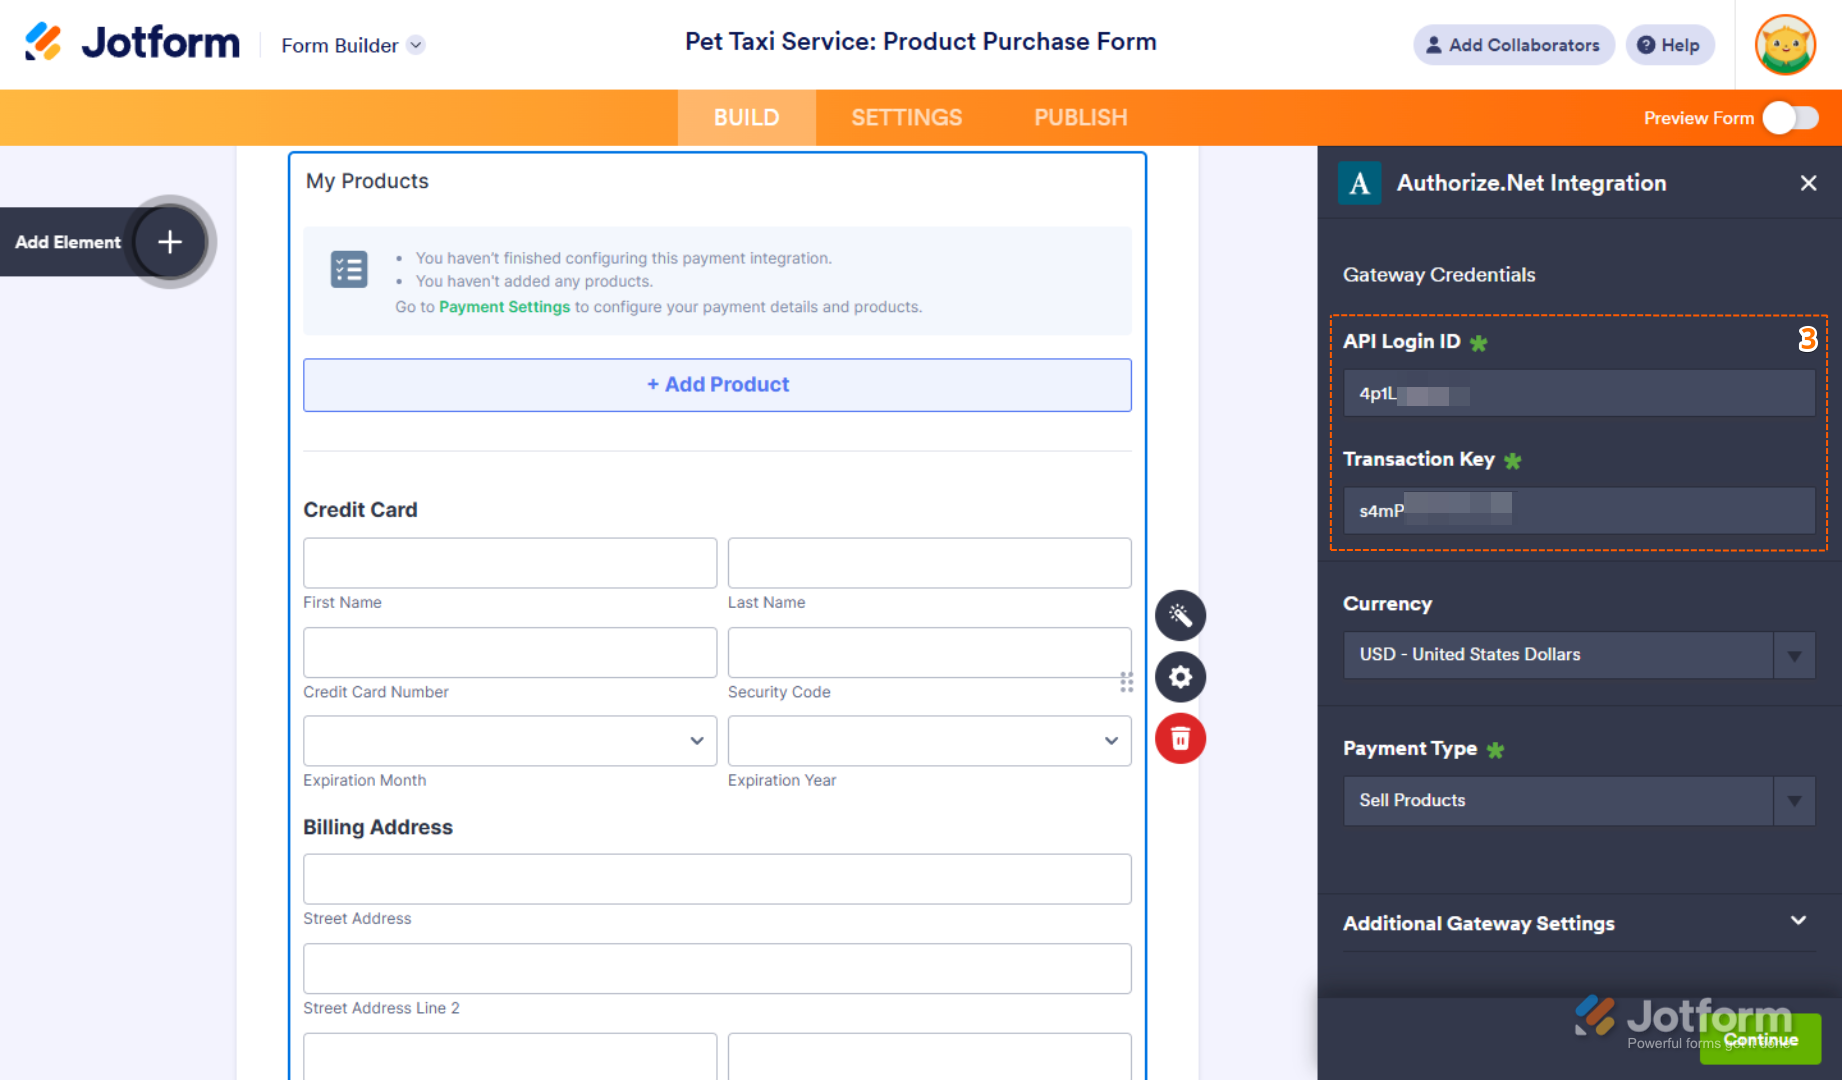
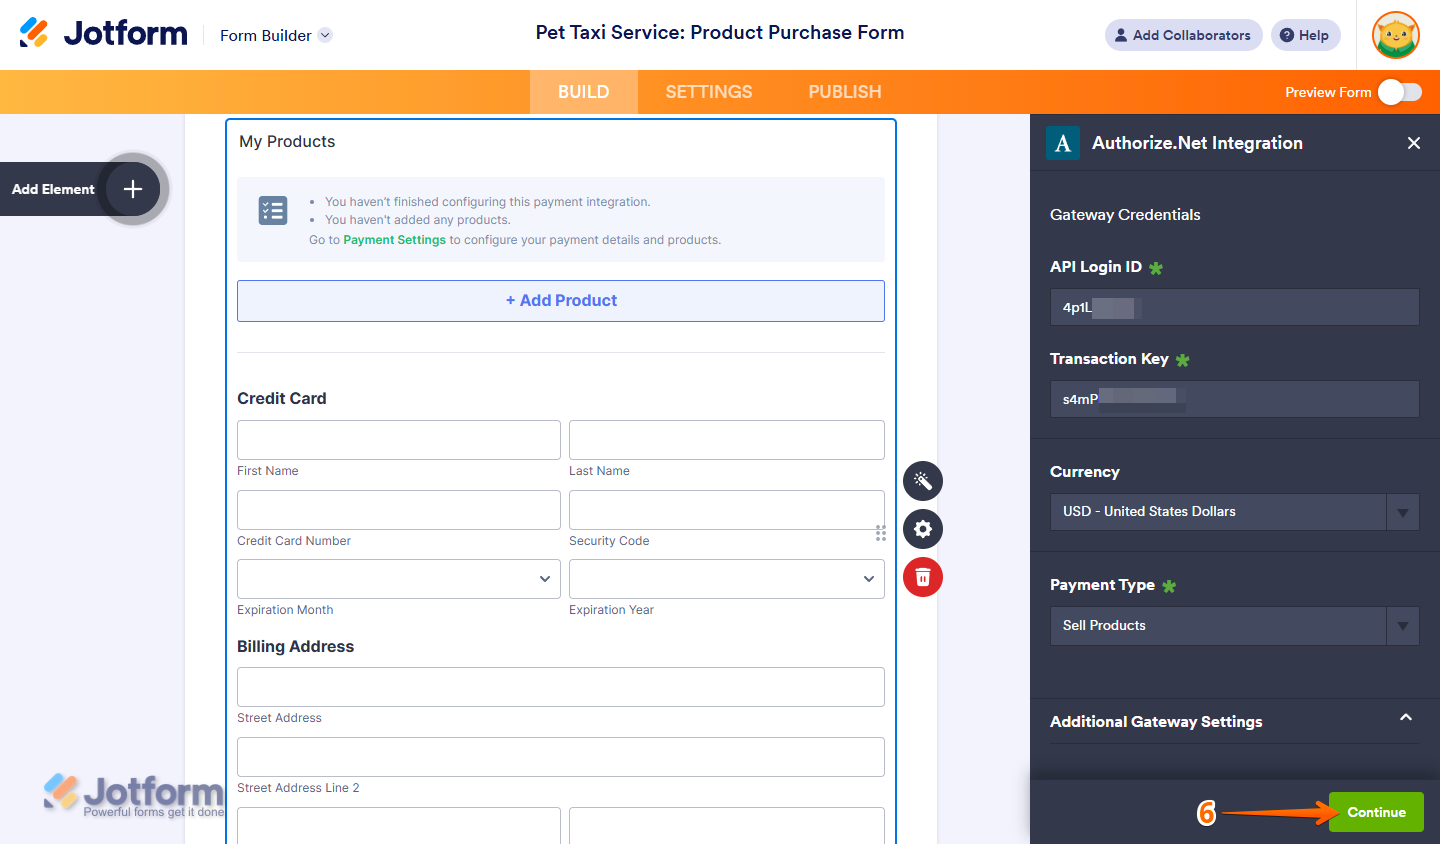
- Next, in the Authorize.Net Integration window that opens on the right side of the page, enter the API Login ID and Transaction Key from your Authorize.Net account in the Gateway Credentials section. If you’re not sure how to get those, check out our guide on How to Obtain API Login ID and Transaction Key for Authorize.Net to learn more about it.
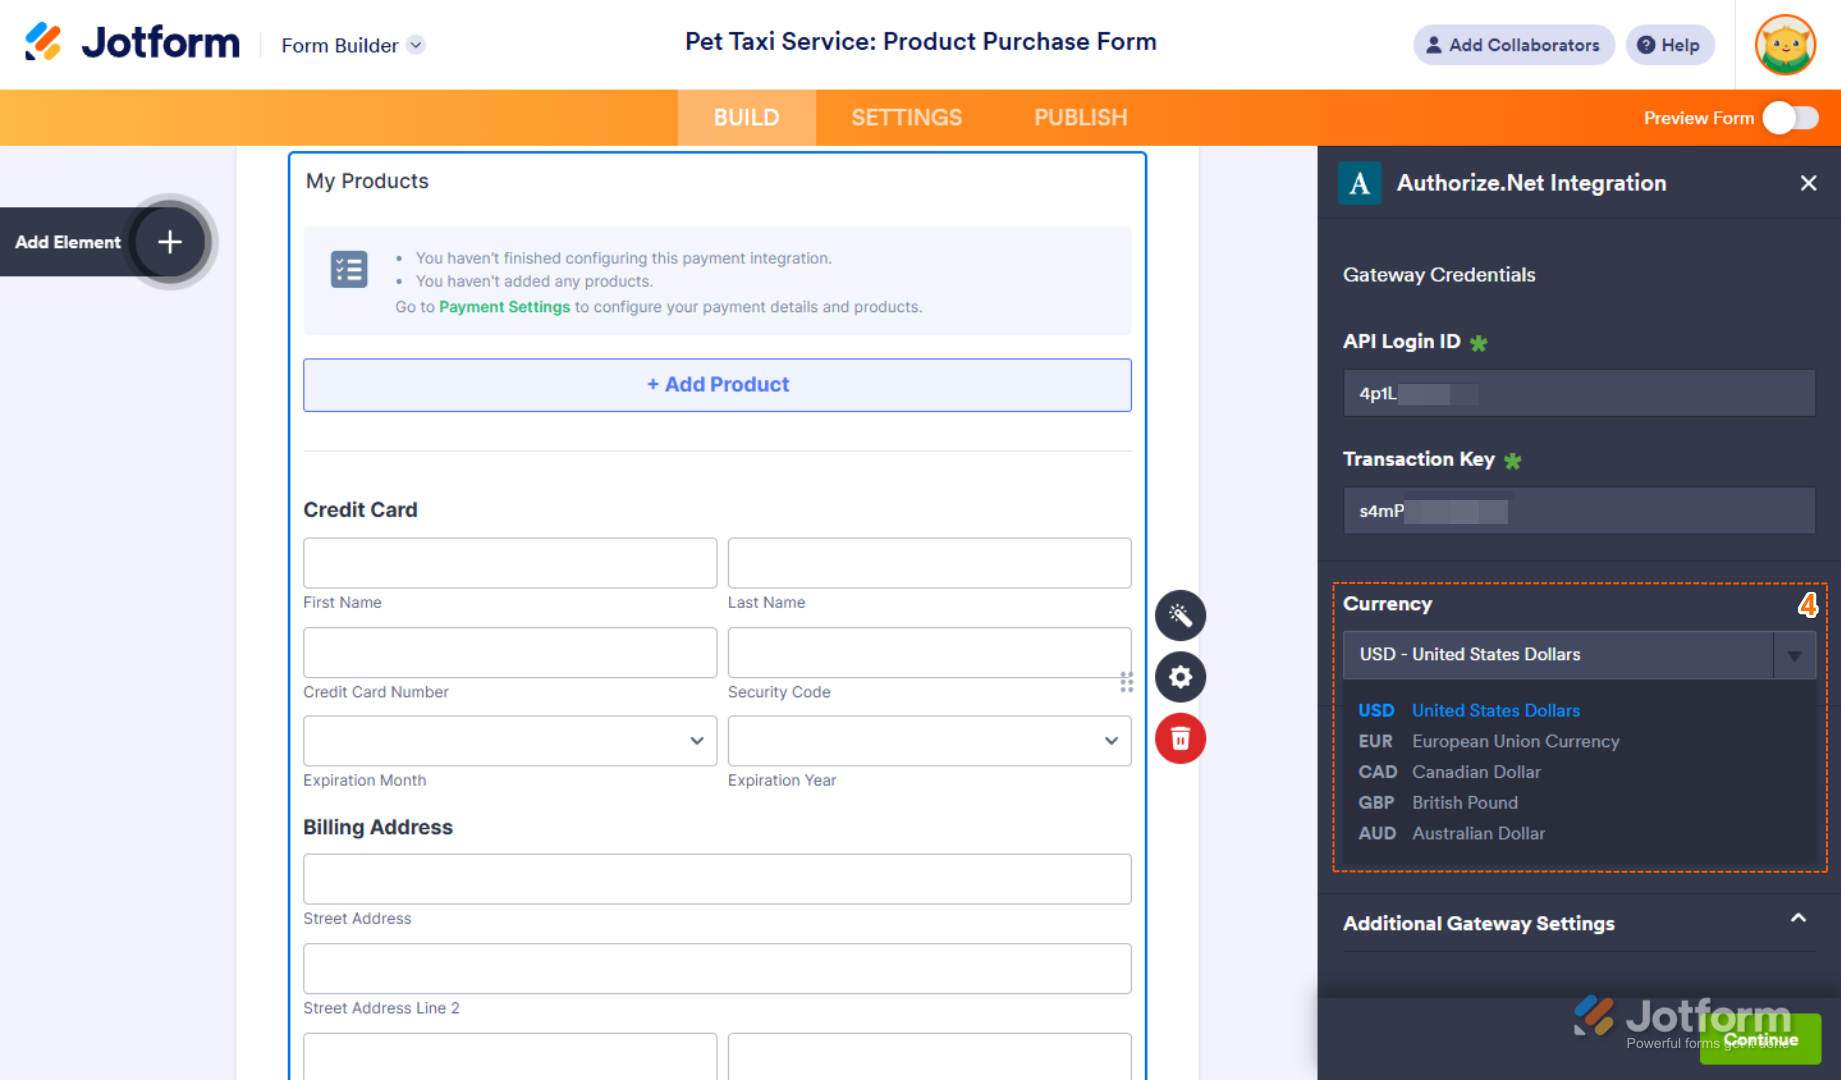
- Then, in the Currency Dropdown menu, select one of the currencies available with the integration:
- USD – United States Dollars
- EUR – European Union Currency
- CAD – Canadian Dollar
- GBP – British Pound
- AUD – Australian Dollar
- After that, in the Payment Type Dropdown menu, select what you’d like the payment to be processed for:
- Sell Products — This is selected by default. Use this to sell physical or digital goods at a fixed price, allowing customers to make a one-time purchase.
- Sell Subscriptions — Choose this to charge customers on a recurring basis for services, memberships, or other ongoing access.
- User-Defined Amount — This lets customers enter the amount they want to pay. It’s useful for tipping, custom amount pricing, or flexible payments.
- Collect Donations — Select this to accept voluntary contributions, commonly used for fundraising, nonprofit support, or charitable causes.
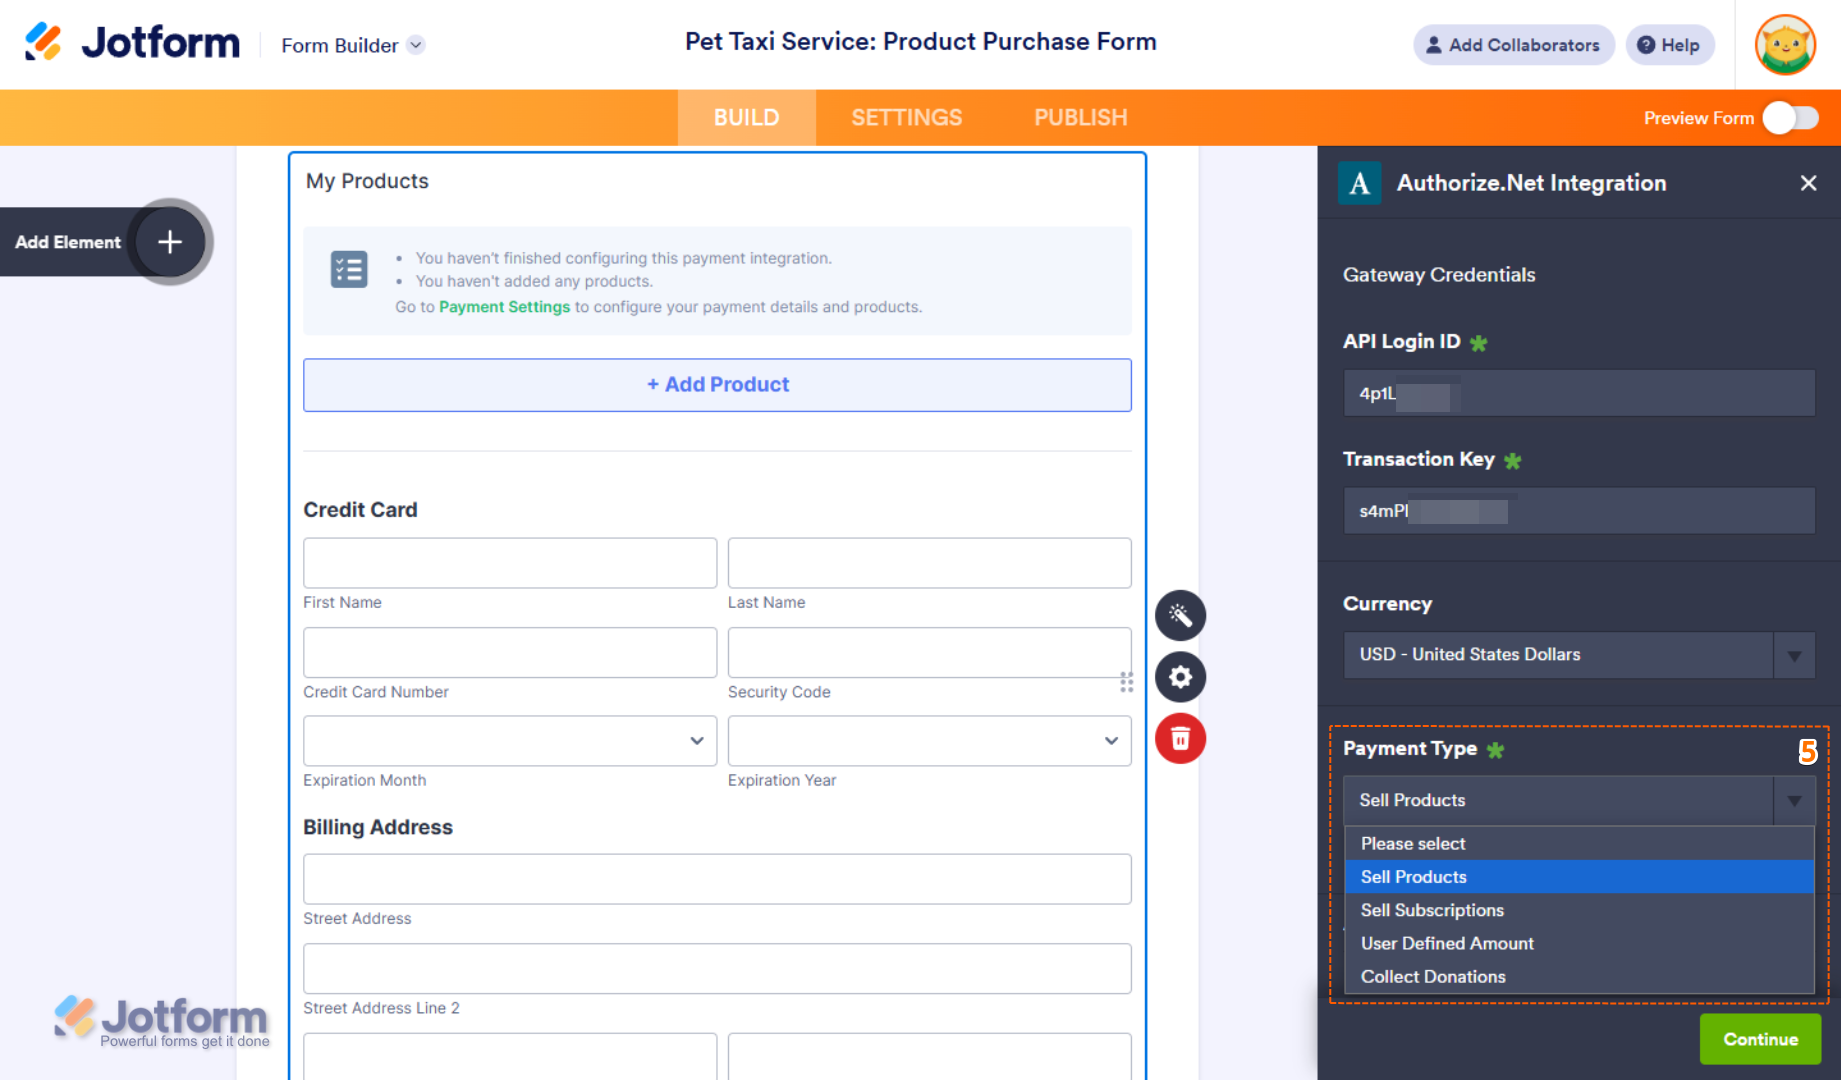
- Once everything is set for the Sell Products and Sell Subscriptions payment types, click on Continue to continue with creating products and subscriptions for your payment field. For the User Defined Amount and Collect Donations payment types, just click on Save at the bottom.
When setting up your products and subscriptions, you might also want to check out these guides:
- Setting Up Your First Order Form
- How to Set Up a Recurring Payment Option
- How to Add Options to Payment Forms
- How to Add Coupon Code to Payment Forms
- How to Add Tax to Your Payment Form
- How to Add Shipping Cost to Payment Forms
- How to Generate an Invoice for Your Payment Form
- How to Enable and Manage Product Stocks in Payment Fields
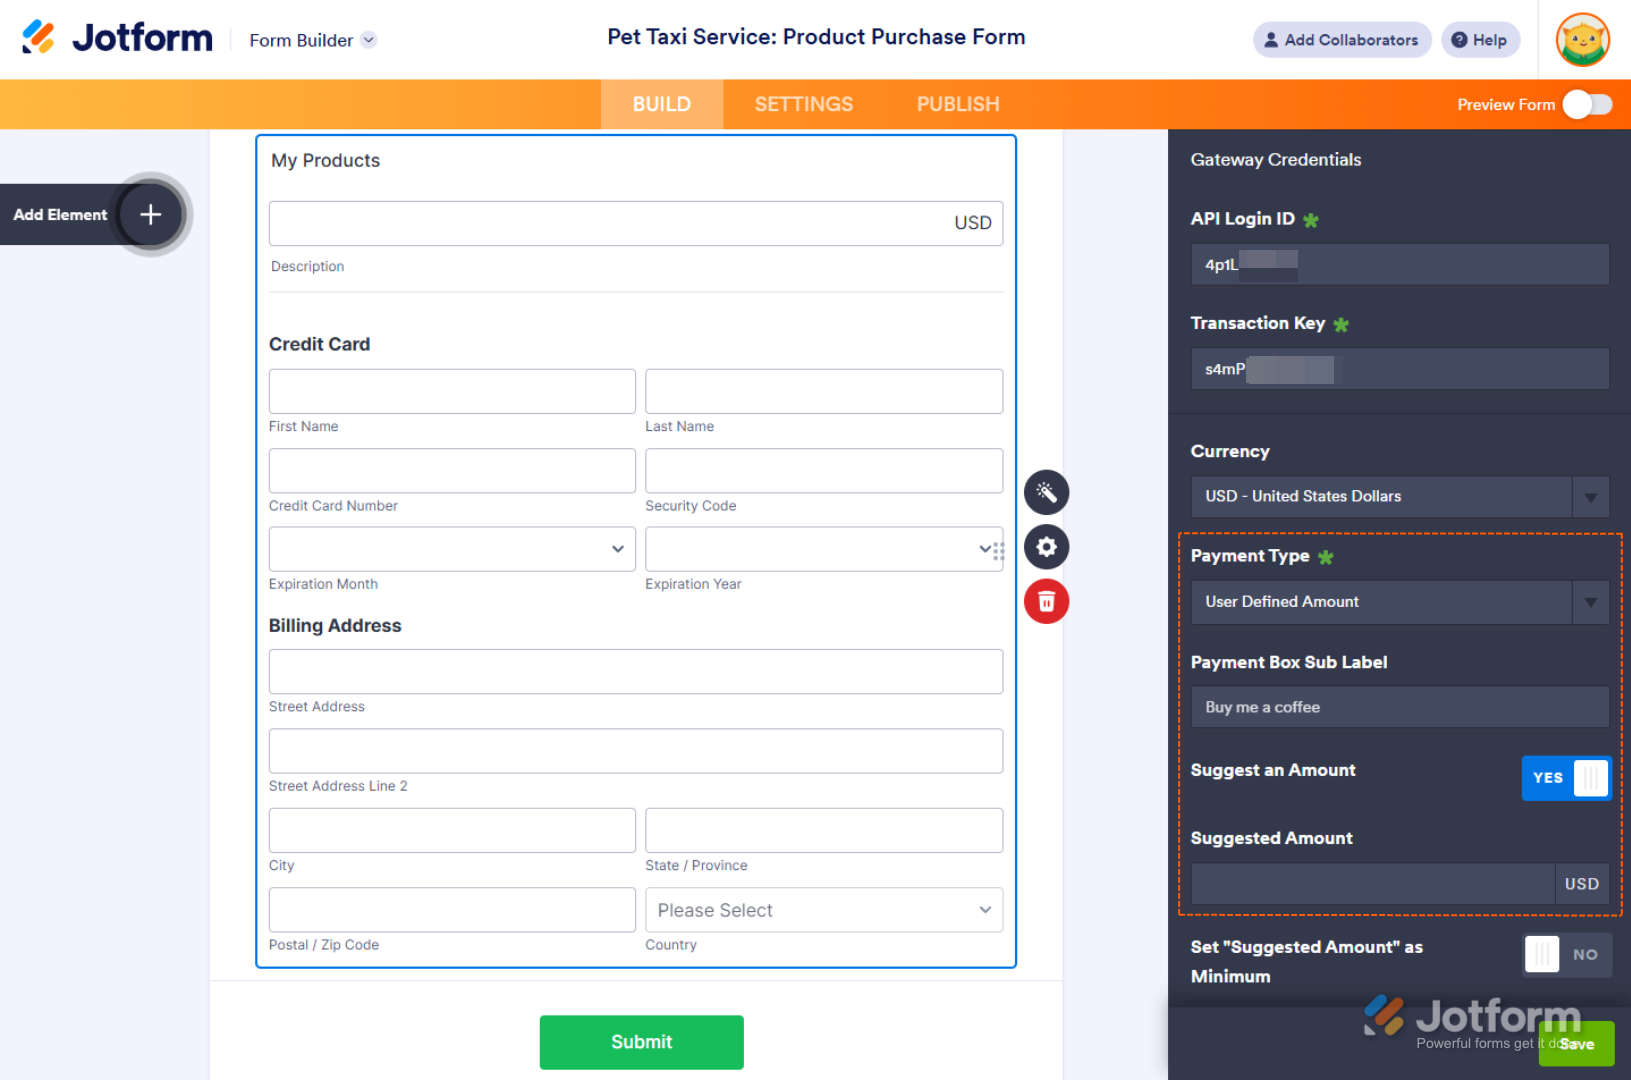
For the User Defined Amount and Collect Donations payment types, you can enter a description that’ll appear under the payment box on your form. You can also provide a suggested amount and set it as minimum or get the price from a Form Calculation widget, which is useful when you want to pass a calculated amount to your payment field instead of getting it from users. You can check this guide on How to Pass a Calculation to a Payment Field to learn more about it.
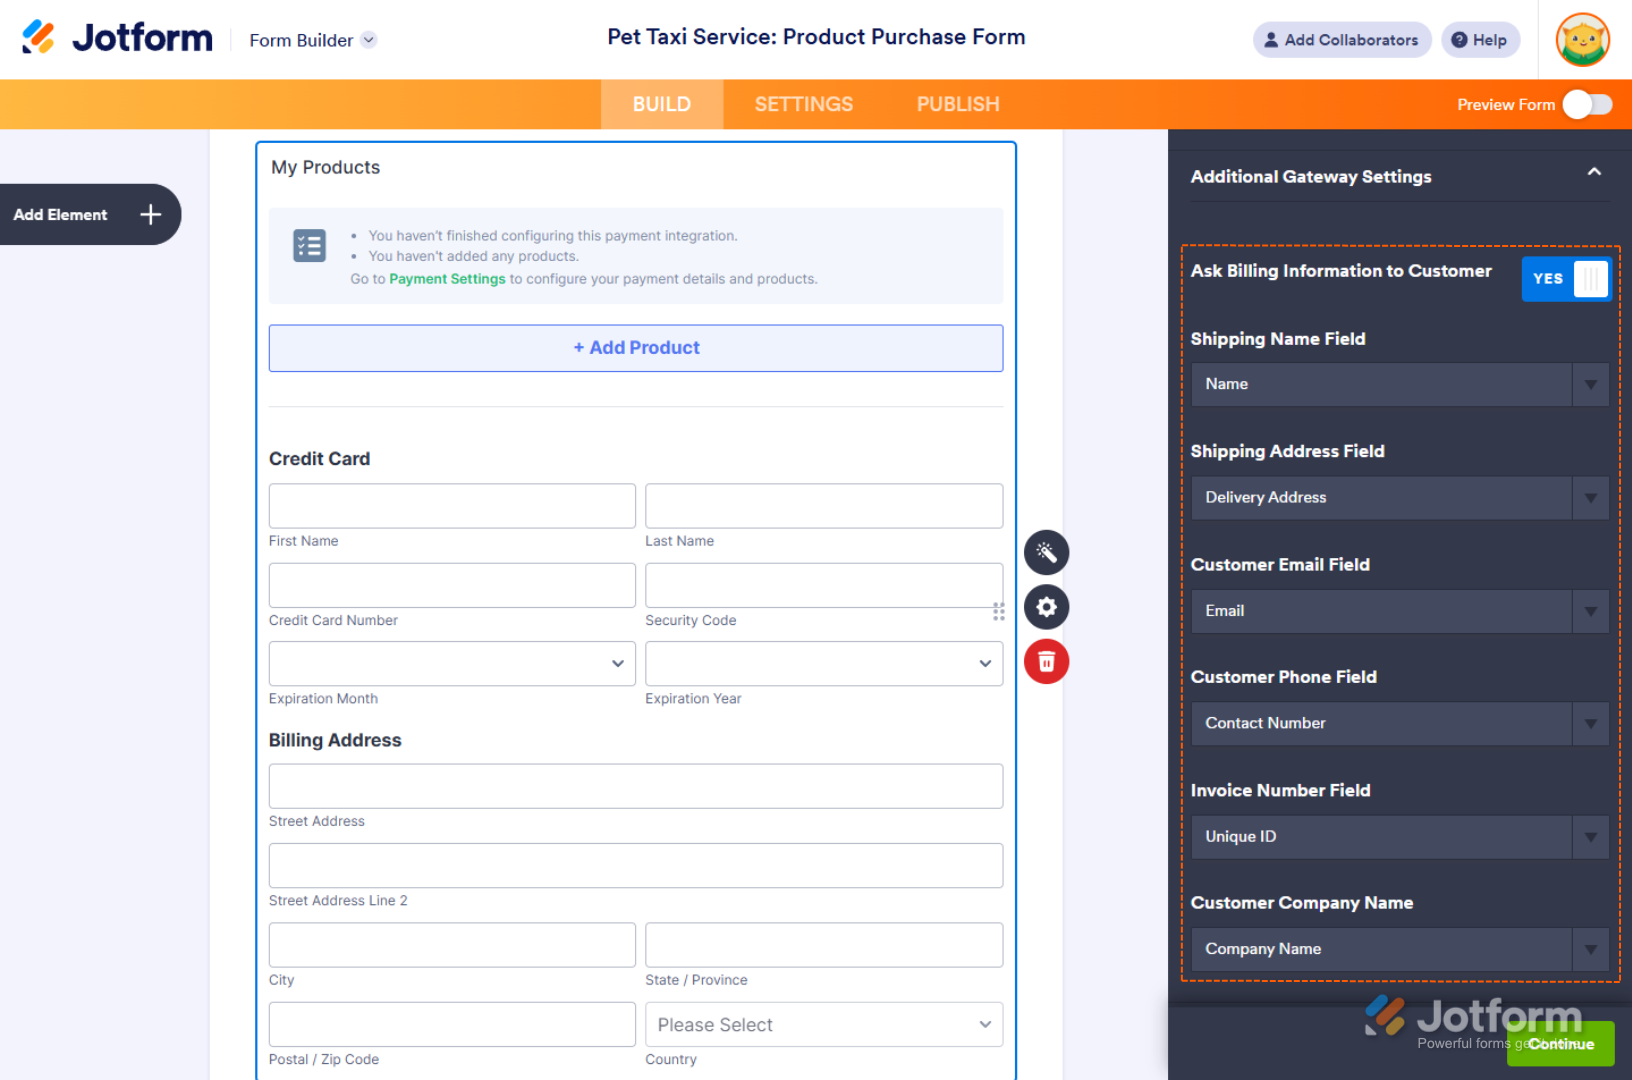
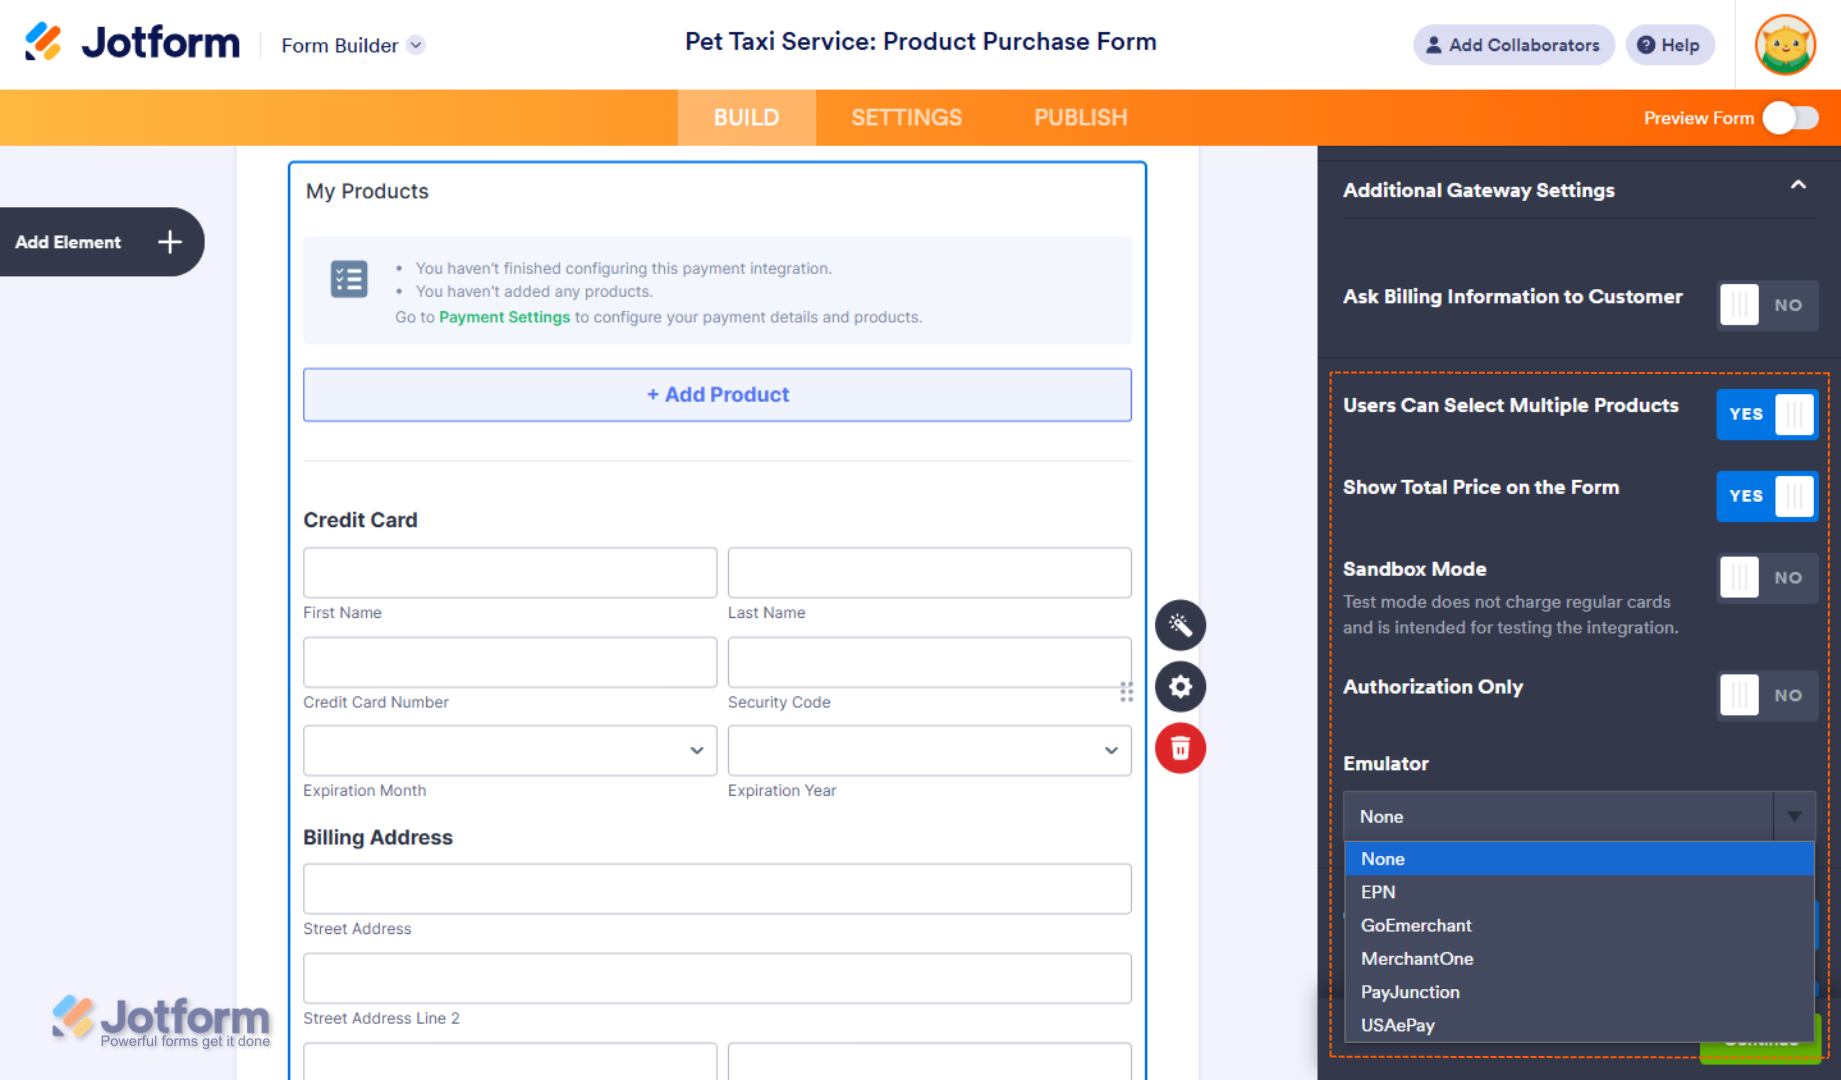
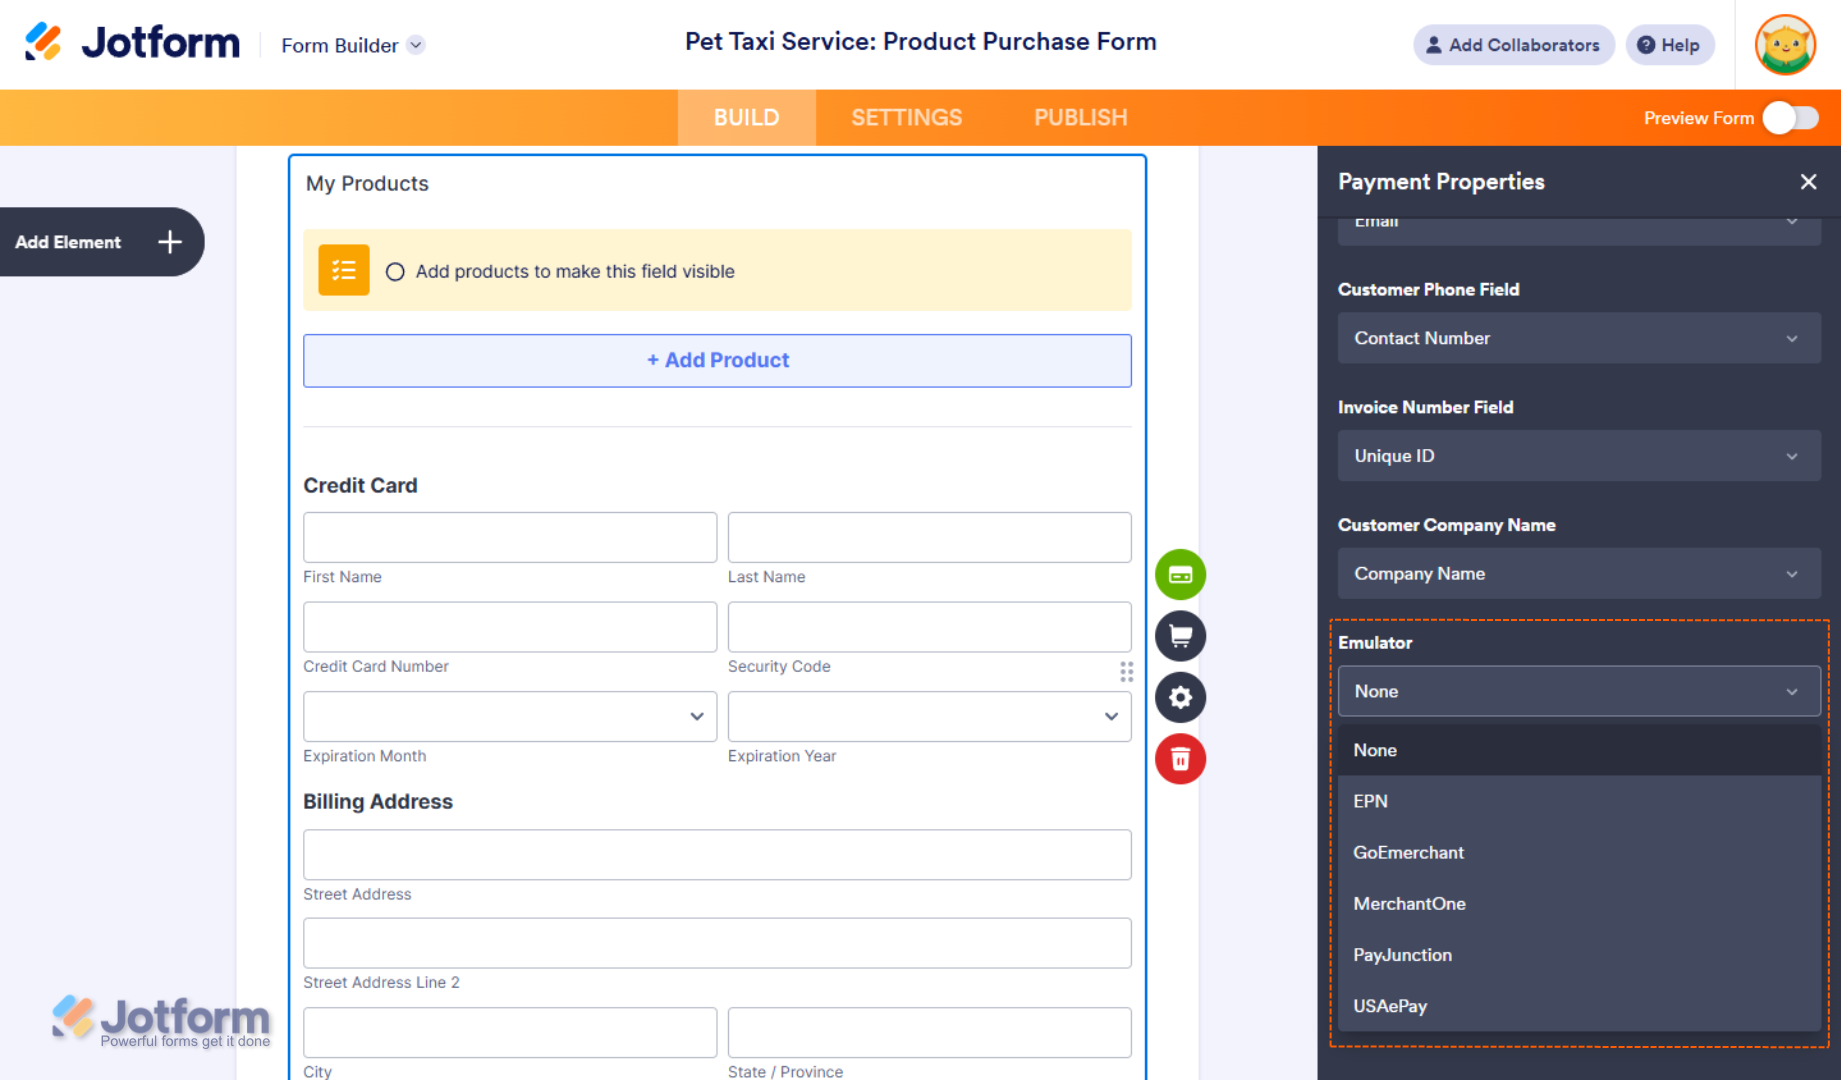
When you expand the Additional Gateway Settings of the Authorize.Net Integration section, you can configure the following based on the type of payment you selected, as needed:
- Ask Billing Information to Customer — Along with the transaction details, you can toggle this On to send the following billing information to Authorize.Net by matching them to supported form fields:
- Shipping Name Field — Select a Full Name field to match this billing field.
- Shipping Address Field — Select an Address field to match this billing field.
- Customer Email Field — Select an Email field to match this billing field.
- Customer Phone Field — Select a Phone field to match this billing field.
- Invoice Number Field — Select a Unique ID widget or a Short Text field to match this billing field.
- Customer Company Name — Select a Short Text field to match this billing field.
- Users Can Select Multiple Products — This is only available with the Sell Products payment type and is enabled by default. You can toggle this Off if you want customers to select only one (1) product per submission.
- Show Total Price on the Form — This is only available with the Sell Products payment type and is enabled by default. You can toggle this Off if you want to hide the total price of selected products on your form.
- Sandbox Mode — Enables testing transactions without processing real payments. You can check our guide on How to Test the Authorize.Net Payment Tool in Sandbox Mode to learn more about it.
- Authorization Only — Authorizes a payment upfront and collects the funds later. This is useful for preapproving payments before delivery. It’s available for all payment types except Sell Subscription. You can check our guide on How to Enable Payment Authorization to learn more about it.
- Emulator — This can be used to integrate your forms with the following payment gateways that aren’t directly supported yet but can work by emulating the Authorize.Net framework:
- EPN
- GoEmerchant
- MerchantOne
- PayJunction
- USAePay
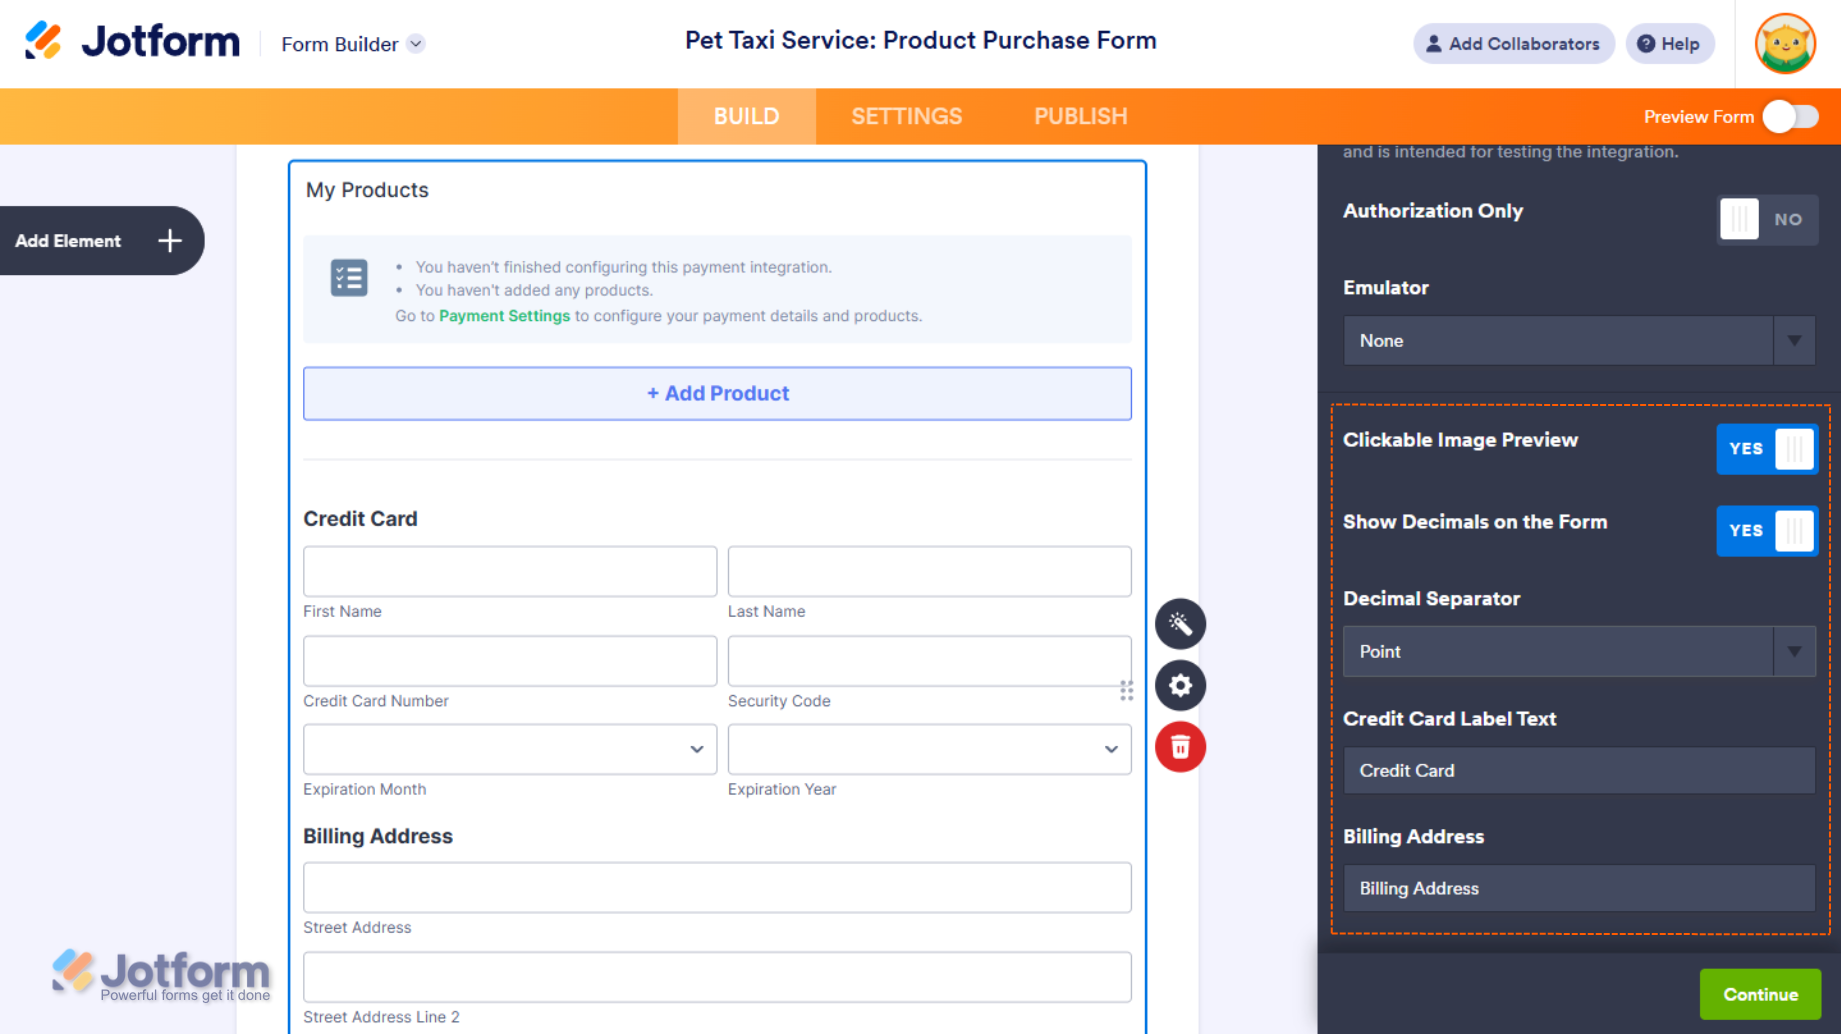
- Clickable Image Preview — This is only available with the Sell Products and Sell Subscriptions payment types and is enabled by default. You can toggle this Off to prevent customers from enlarging product or subscription images.
- Show Decimals on the Form — This is only available with the Sell Products and Sell Subscriptions payment types and is enabled by default. You can toggle this Off to hide decimals on both the item prices and total amount.
- Decimal Separator — When decimals are shown on your payment field, you can select between a period, which is used in English-speaking countries, or a comma, which is used in many European countries.
- Credit Card Label Text — This allows you to change the heading of the Credit Card fields in your Payment field.
- Billing Address — This allows you to change the heading of the Billing Address fields in your Payment field.
Setting Up with Reusable Payment Connections
Reusable Payment Connections is a feature that lets you set up Payment Processor Integrations, like Authorize.Net, once with the same payment gateway credentials and configuration, and use them across different assets in your account, such as Forms and Apps.
Whether you are creating a new form or updating an existing one, you can add a payment field to your form and set up an Authorize.Net Reusable Payment Connection in a few easy steps. Here’s how to do it:
- In Form Builder, click on Add Element on the left side of the page.

- Now, in the Form Elements menu, under the Payments tab, click on Authorize.Net. Or, just drag and then drop it to where you want it to be on your form.

- Then, in the Payment Properties section that opens on the right side of the page, click on the Plug icon to add a reusable Authorize.Net payment connection.
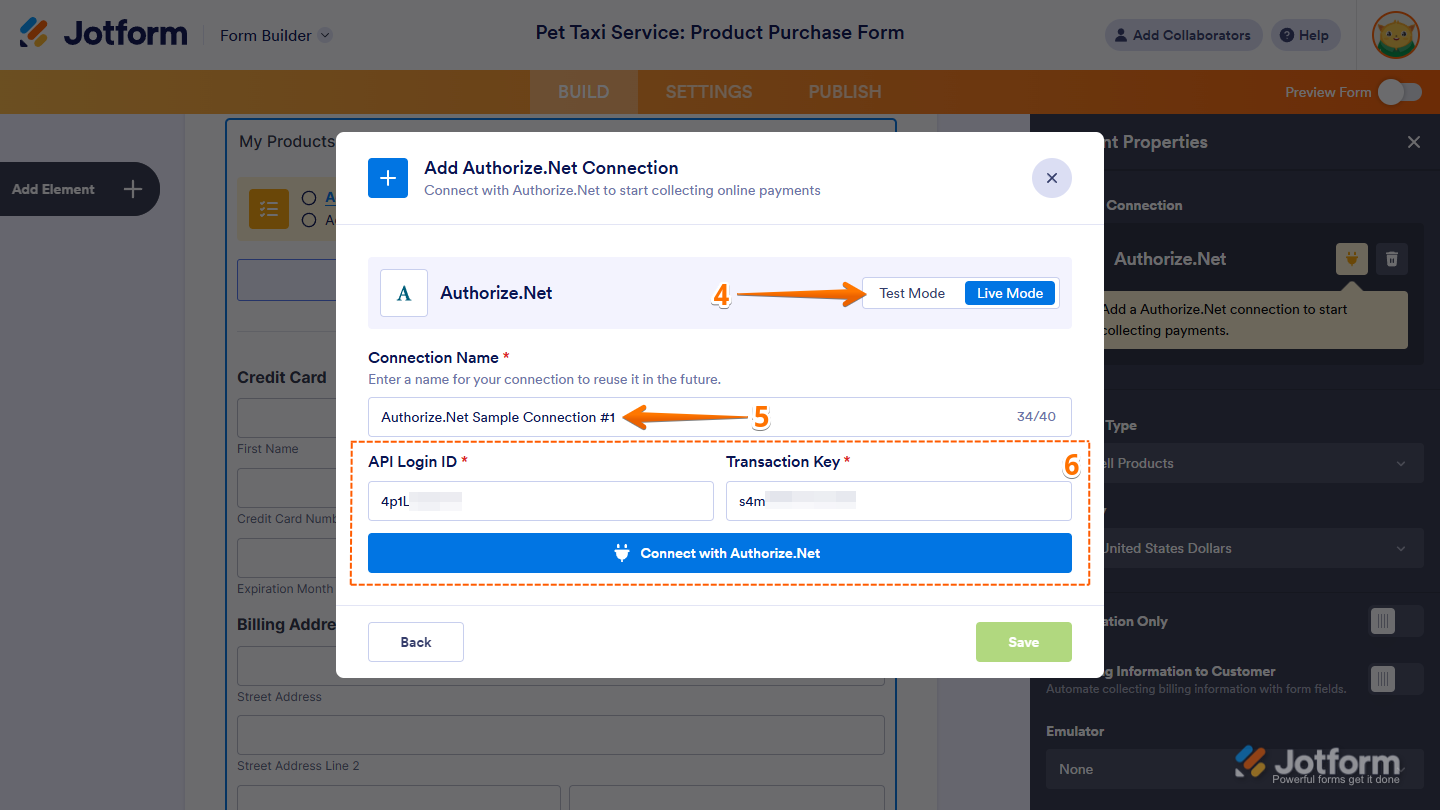
- Next, in the Add Authorize.Net Connection window, click on Test Mode or Live Mode at the top to select which environment you’re adding a payment connection for.
- Then, in the Connection Name section, enter a name you haven’t used in other reusable payment connections in your account, if there are any.
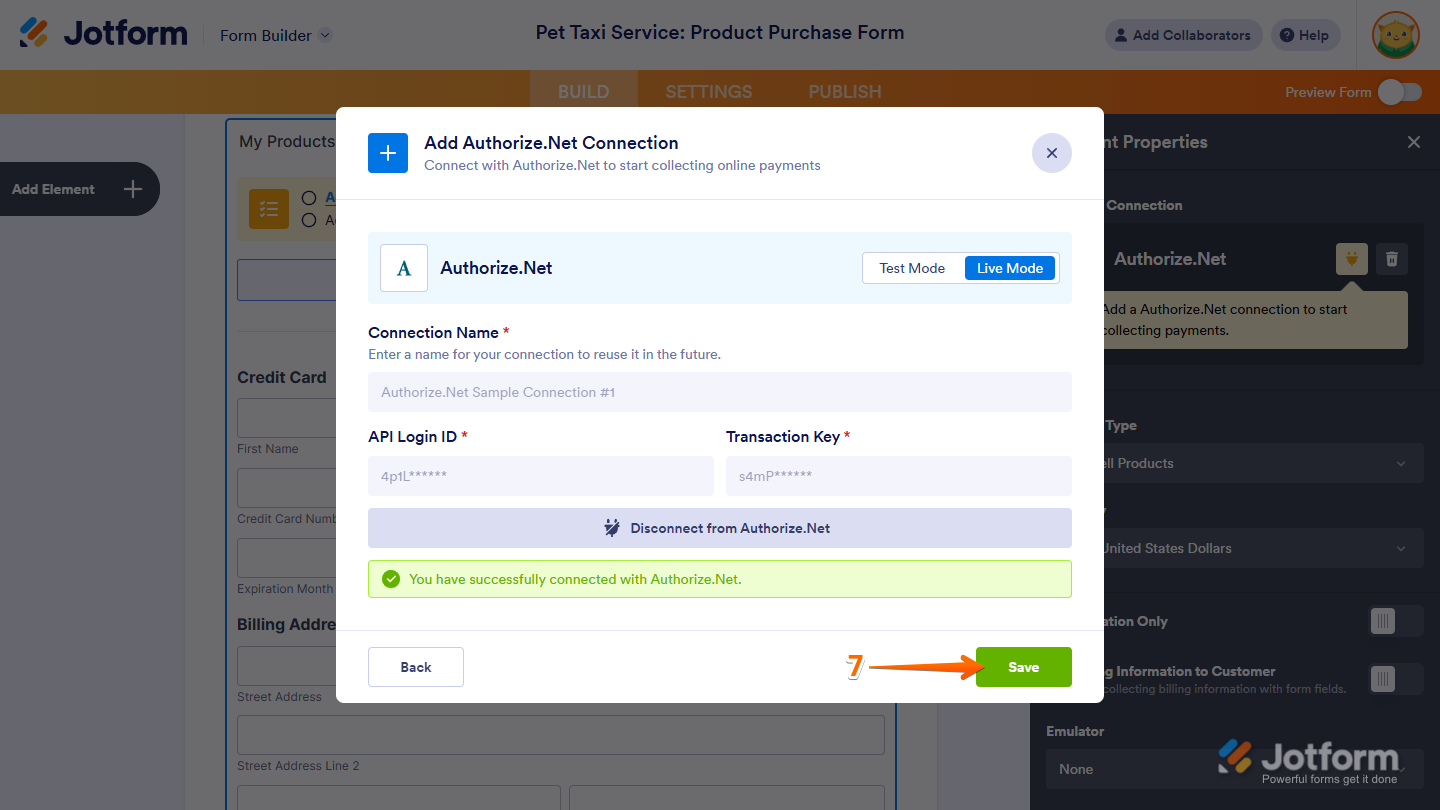
- After that, enter the API Login ID and Transaction Key from your Authorize.Net account and click on the blue Connect with Authorize.Net button. If you’re not sure how to get those, check out our guide on How to Obtain API Login ID and Transaction Key for Authorize.Net to learn more about it.
- Once it is connected successfully, click on Save at the bottom to add the reusable payment connection to your account.
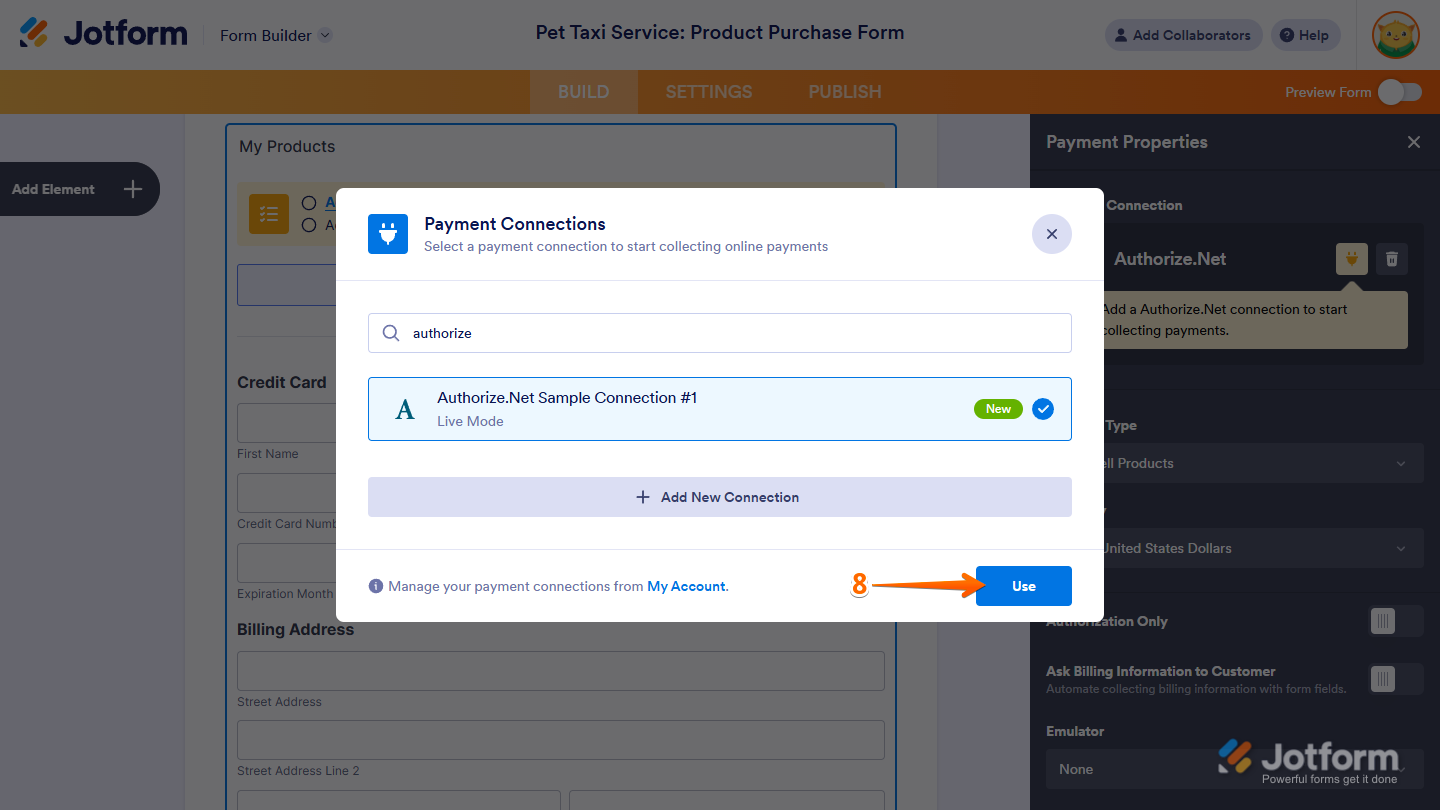
- Then, in the Payment Connections window, click on the Authorize.Net payment connection you’ve just added to select it, and then click on Use at the bottom.
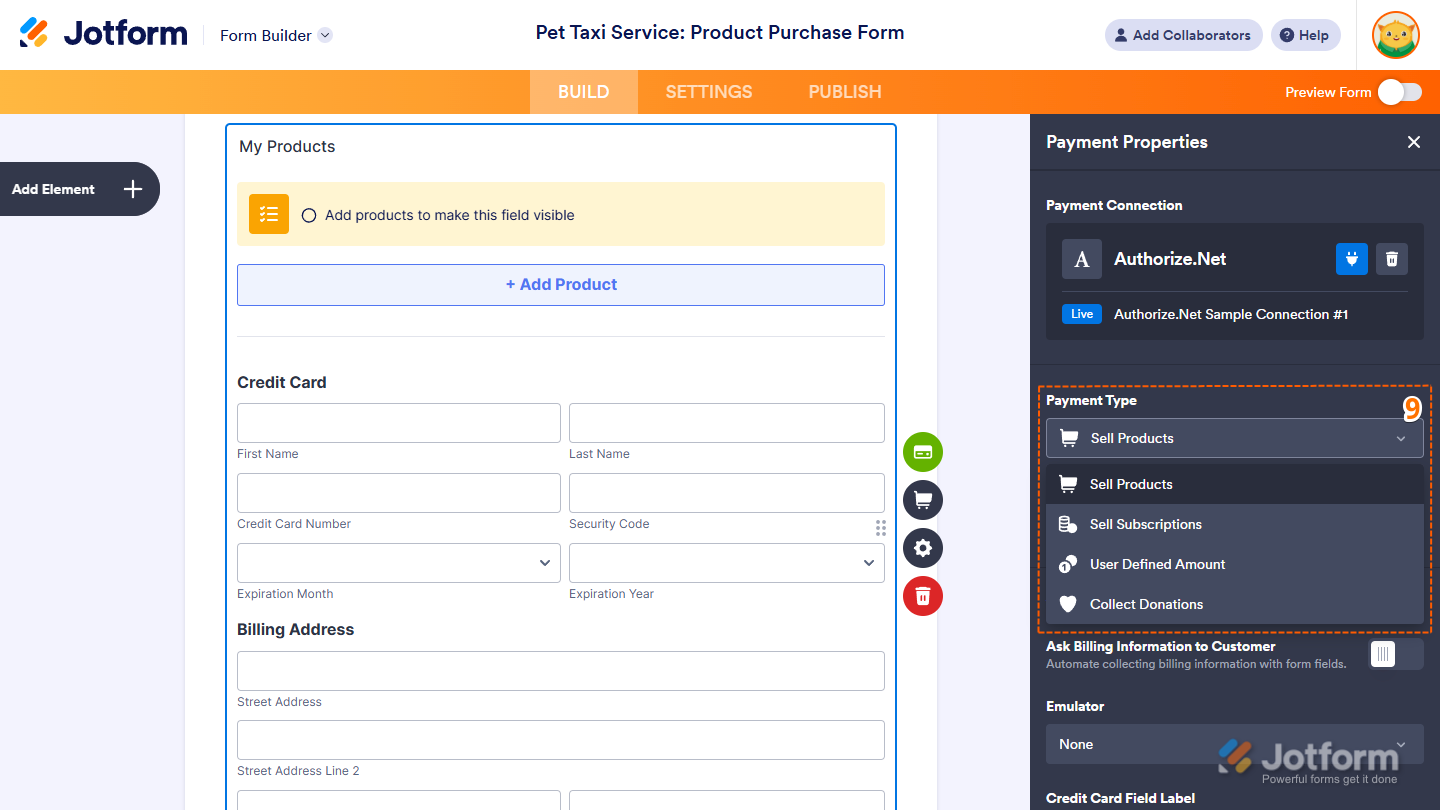
- In the Payment Properties window on the right side of the page, click on the Payment Type Dropdown menu and select the option you’d like the payment to be processed for:
- Sell Products — This is selected by default. Use this to sell physical or digital goods at a fixed price, allowing customers to make a one-time purchase.
- Sell Subscriptions — Choose this to charge customers on a recurring basis for services, memberships, or other ongoing access.
- User-Defined Amount — This lets customers enter the amount they want to pay, useful for tipping, custom amount pricing, or flexible payments.
- Collect Donations — Select this to accept voluntary contributions. It’s commonly used for fundraising, nonprofit support, or charitable causes.
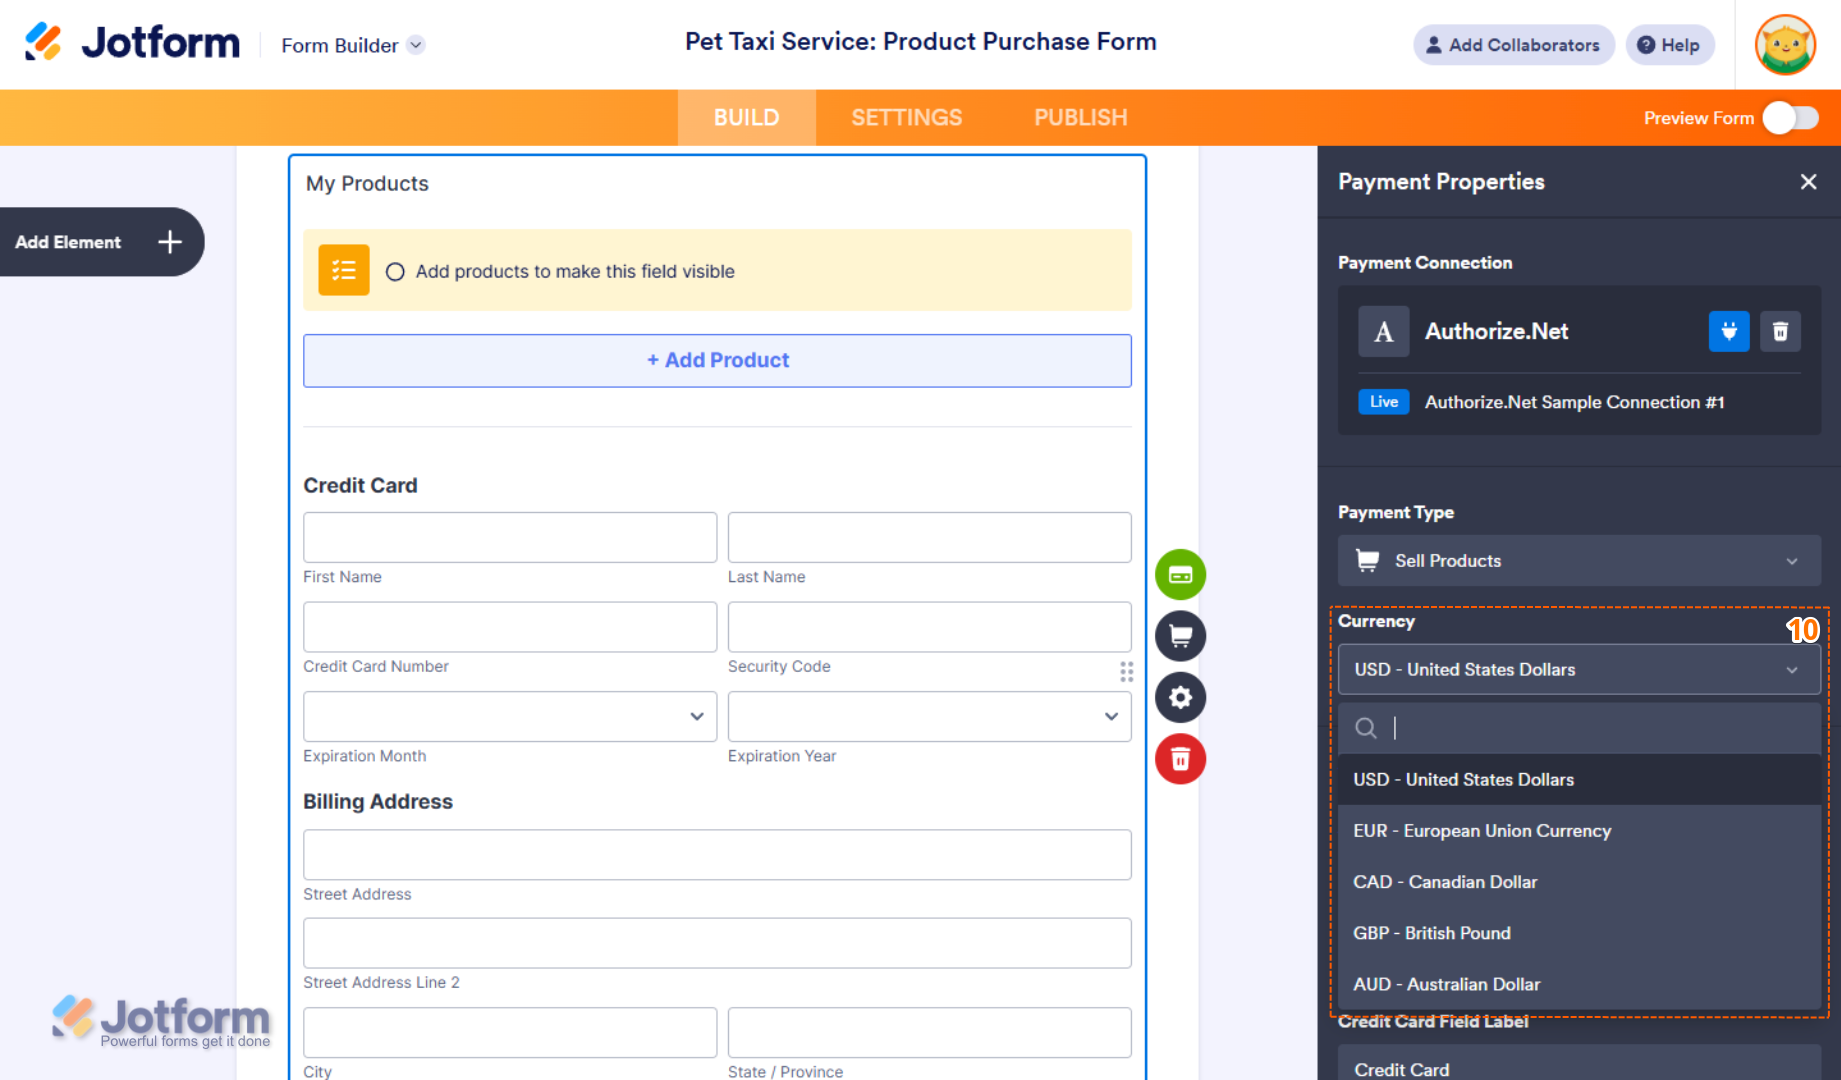
- Then, in the Currency Dropdown menu, select one of the currencies available with the integration:
- USD – United States Dollars
- EUR – European Union Currency
- CAD – Canadian Dollar
- GBP – British Pound
- AUD – Australian Dollar
Here are other gateway settings you can configure as needed:
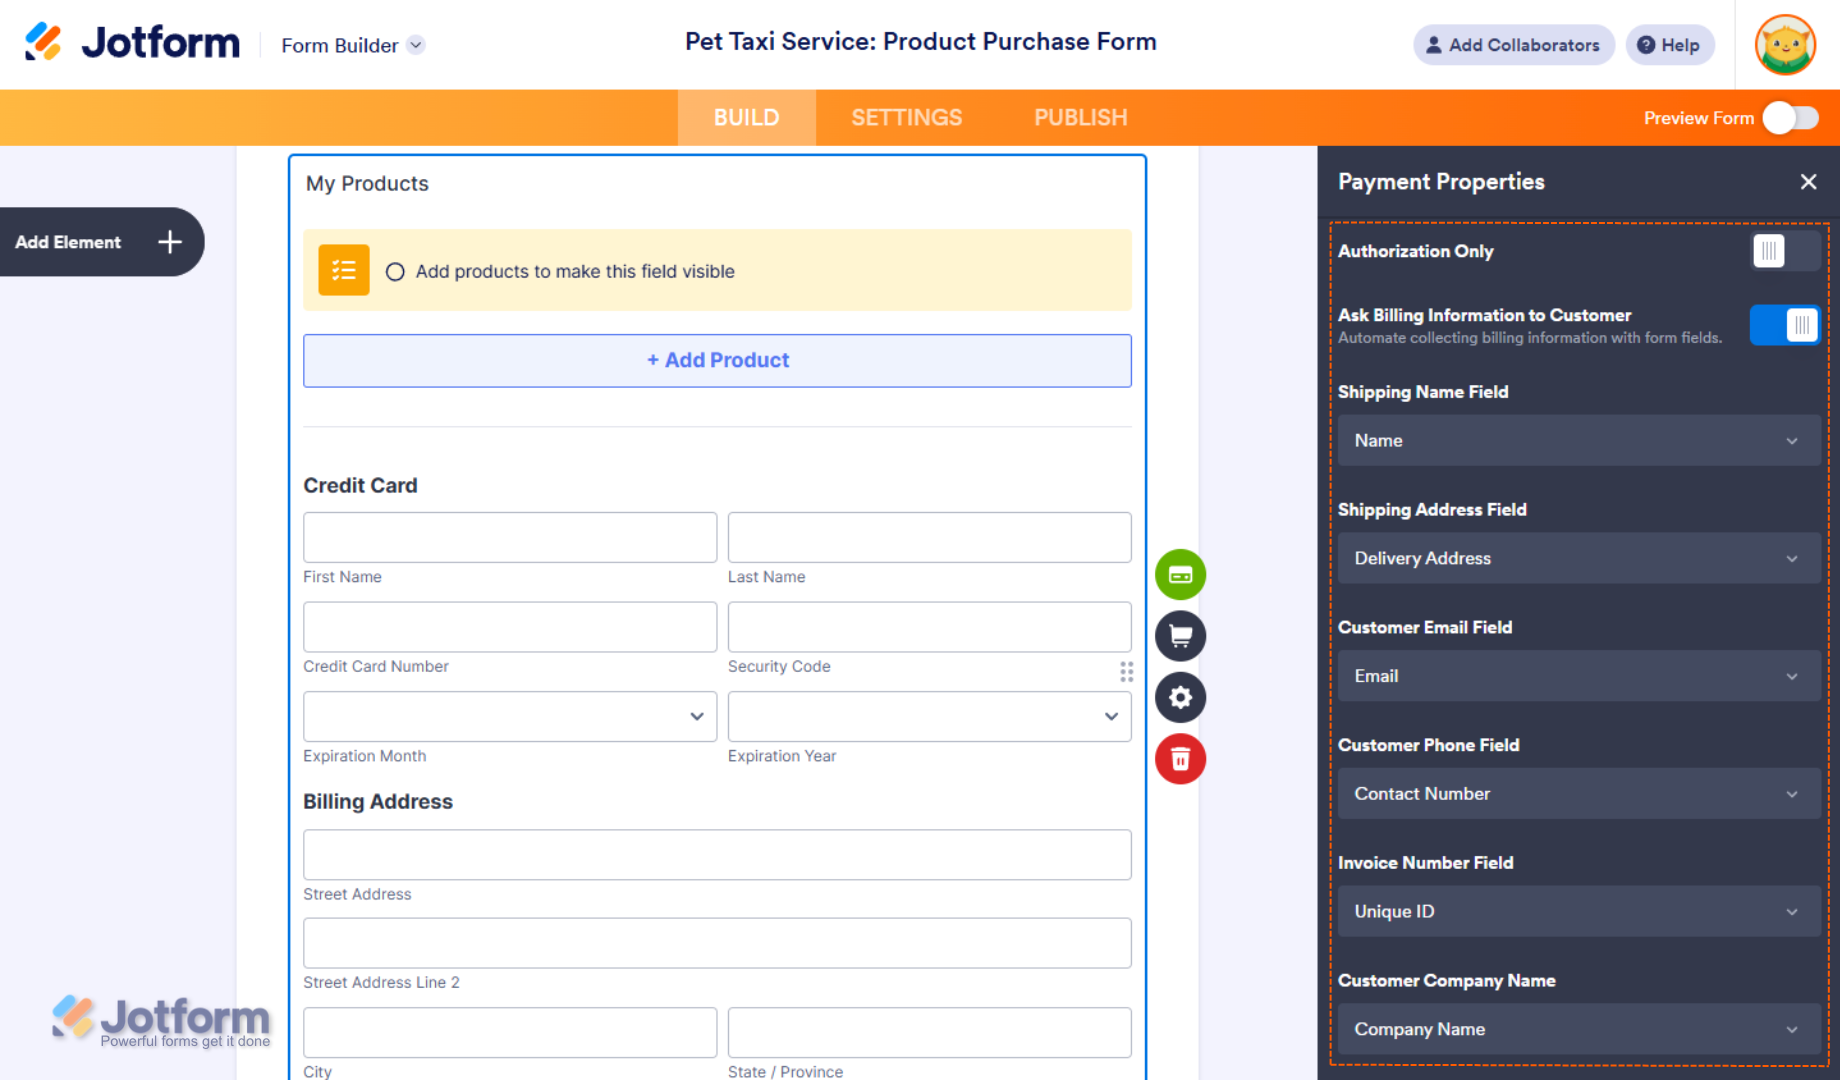
- Authorization Only — Authorizes a payment upfront and collects the funds later. This is useful for preapproving payments before delivery. It’s available for all payment types except Sell Subscription. You can check our guide on How to Enable Payment Authorization to learn more about it.
- Ask Billing Information to Customer — Along with the transaction details, you can toggle this On to send the following billing information to Authorize.Net by matching them to supported form fields:
- Shipping Name Field — Select a Full Name field to match this billing field.
- Shipping Address Field — Select an Address field to match this billing field.
- Customer Email Field — Select an Email field to match this billing field.
- Customer Phone Field — Select a Phone field to match this billing field.
- Invoice Number Field — Select a Unique ID widget or a Short Text field to match this billing field.
- Customer Company Name — Select a Short Text field to match this billing field.
- Emulator — This can be used to integrate your forms with the following payment gateways that aren’t directly supported yet but can work by emulating the Authorize.Net framework:
- EPN
- GoEmerchant
- MerchantOne
- PayJunction
- USAePay
- Credit Card Field Label — This allows you to change the heading of the Credit Card fields in your Payment field.
- Billing Address Field Label — This allows you to change the heading of the Billing Address fields in your Payment field.

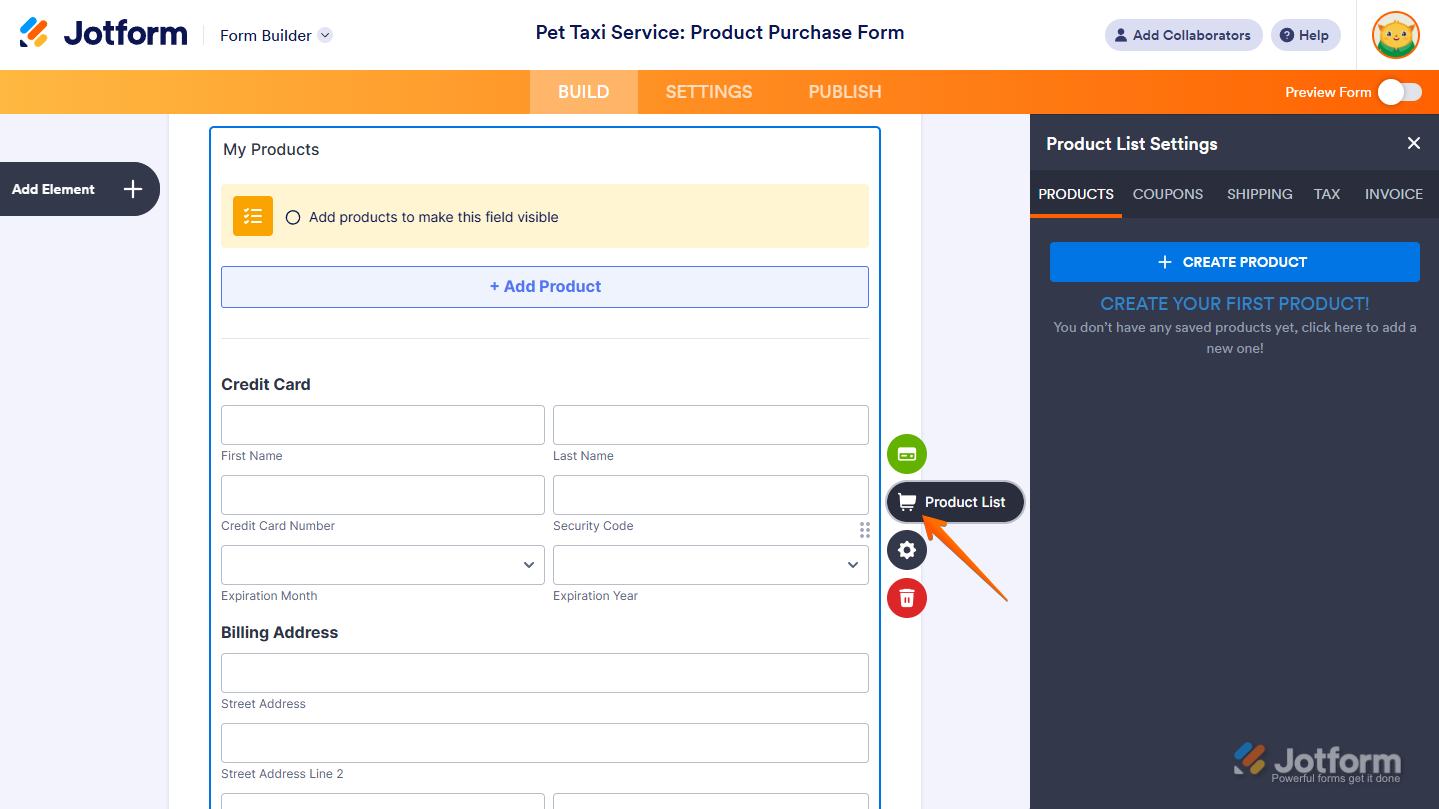
Once everything is set, on the right side of the field, and depending on the type of payment you selected in the Payment Properties window above:
- Click on the Shopping Cart icon to set up your Products.
- Click on the Stacked Coins icon to set up Subscriptions.
- Click on the Money Token icon to set up User-Defined Amounts.
- Click on the Heart icon to set up Donations.
Setting up Form Fields in Authorize.Net
If your customers get an error related to billing information—such as the Invoice Number, Company Name, Email, or Phone Number—when submitting your payment form, it may be due to the Payment Form Field settings in your Authorize.Net account.
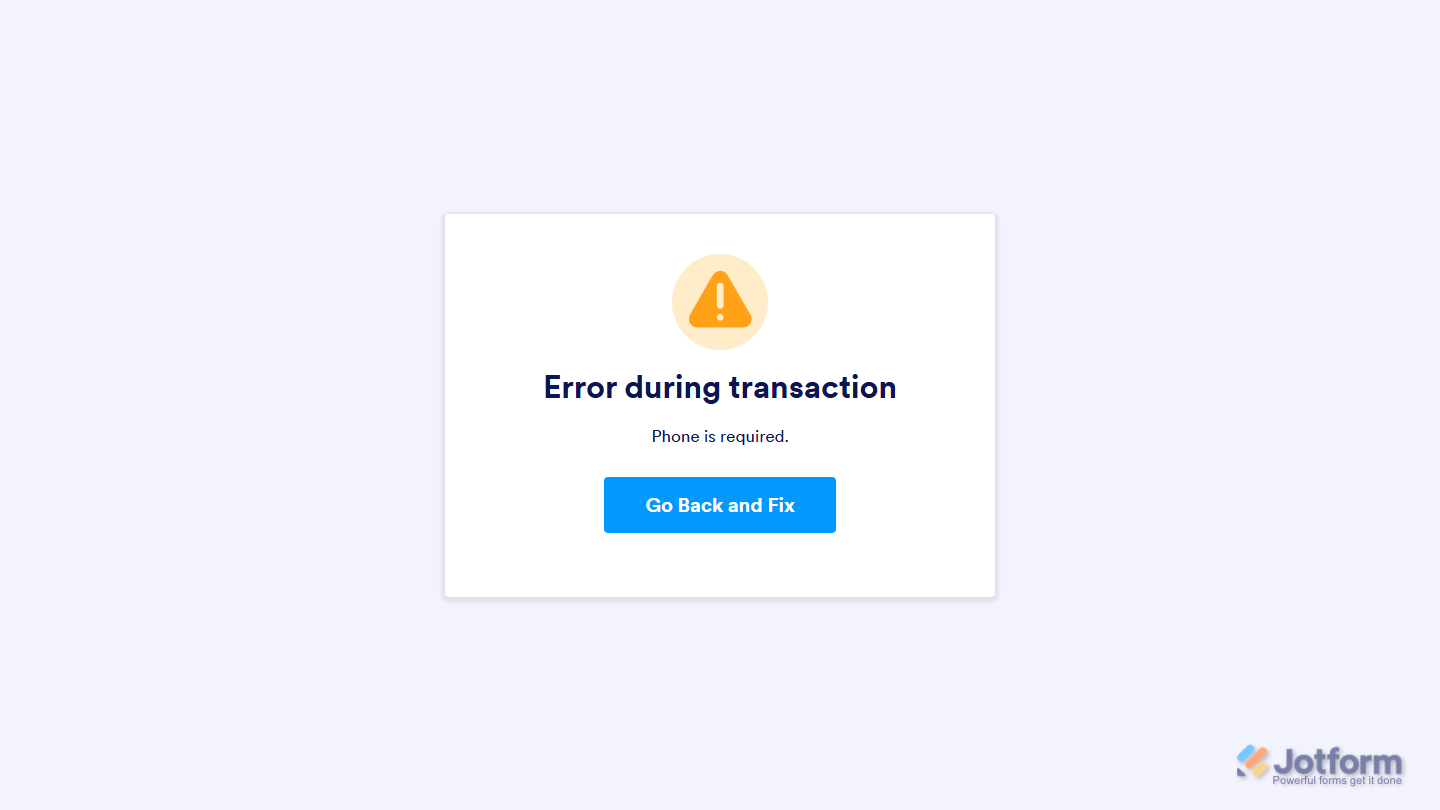
This usually happens when a Billing Information field on your form is left empty during submission, while the corresponding field in your Authorize.Net account is marked as required. To fix this, you can either Make the Form Field Required or update your Authorize.Net settings to no longer require that field. Here’s how to do it:
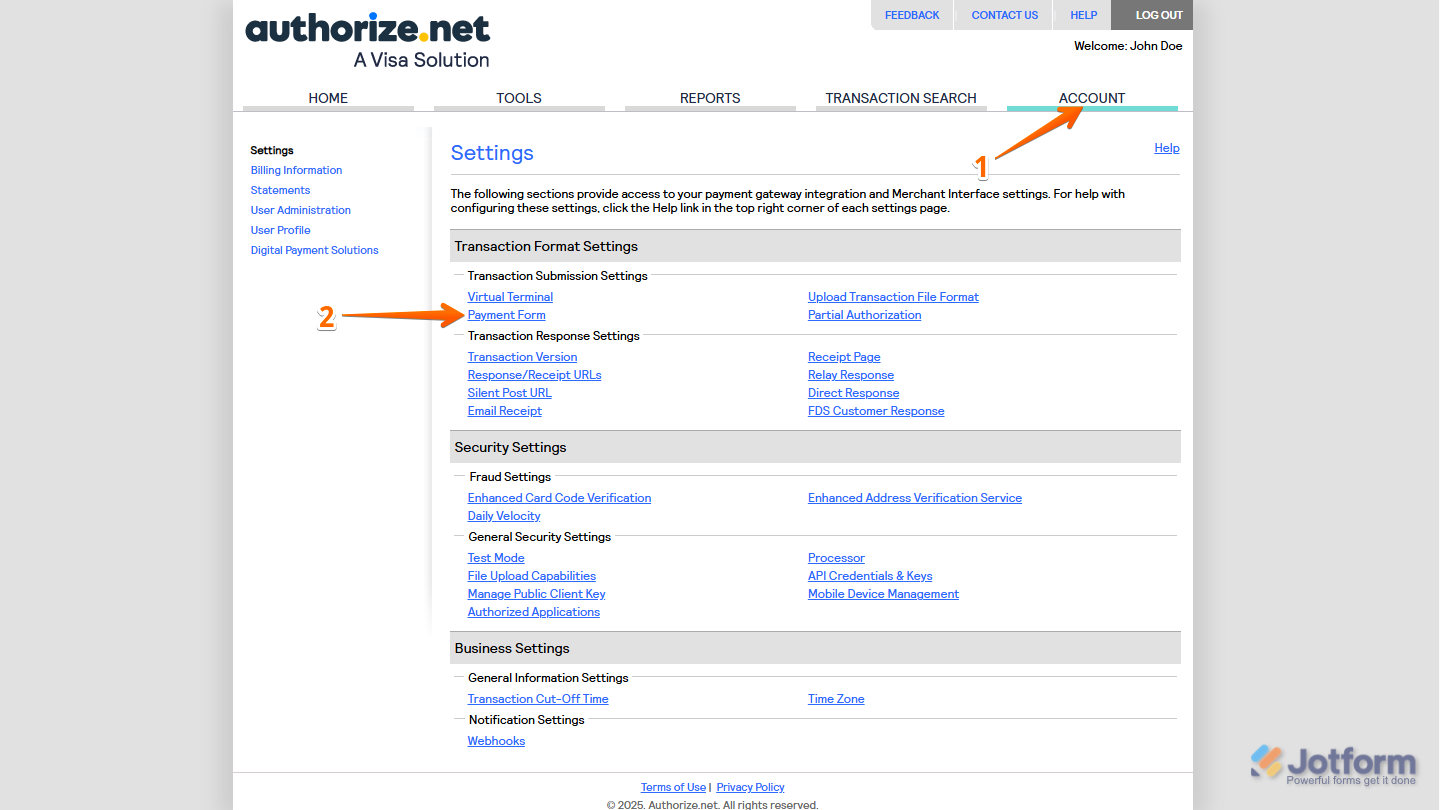
- Log in to your Authorize.Net account and go to the Account tab on your Dashboard.
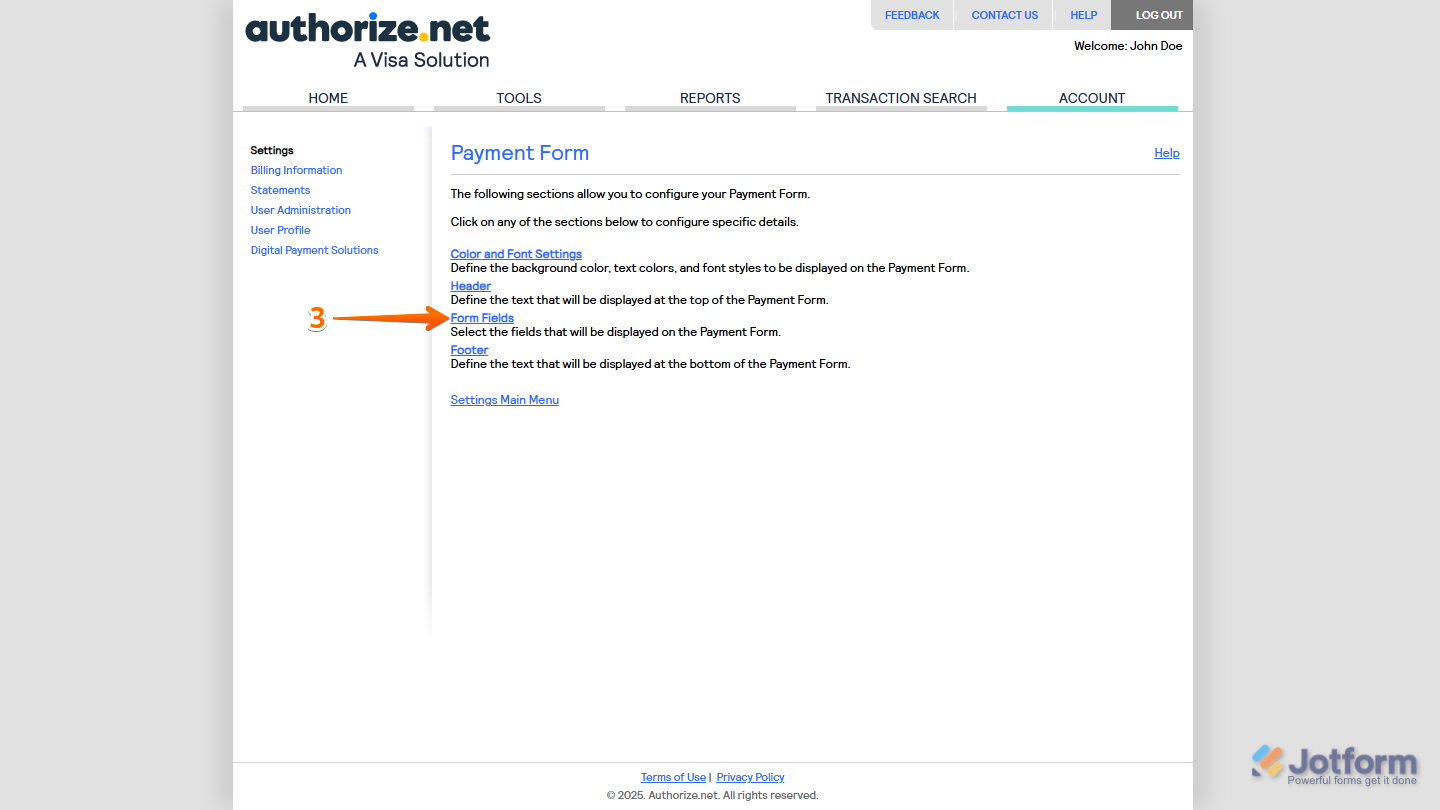
- Now, in the Settings menu, under the Transaction Submission Settings section, click on Payment Form.
- Then, in the Payment Form section, click on Form Fields.
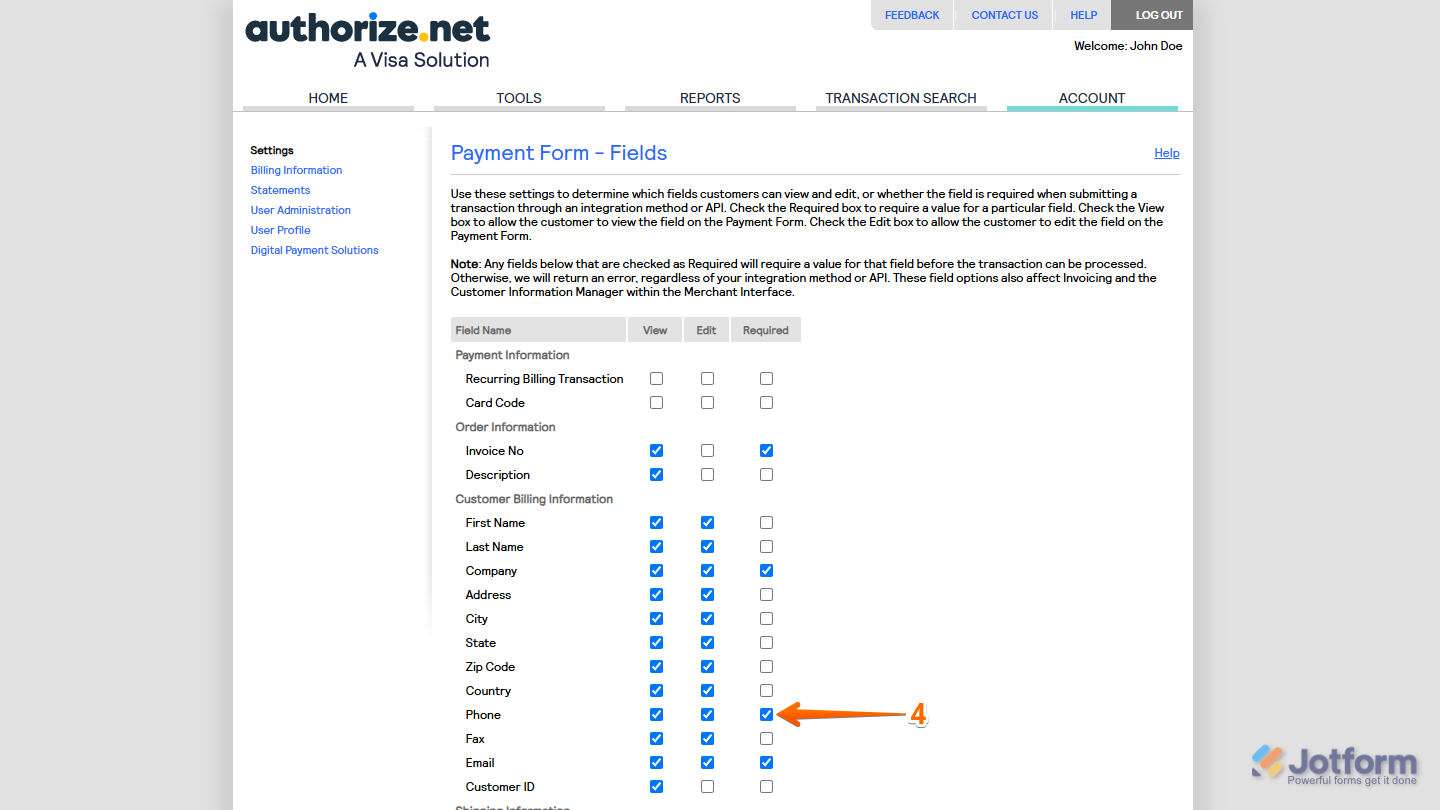
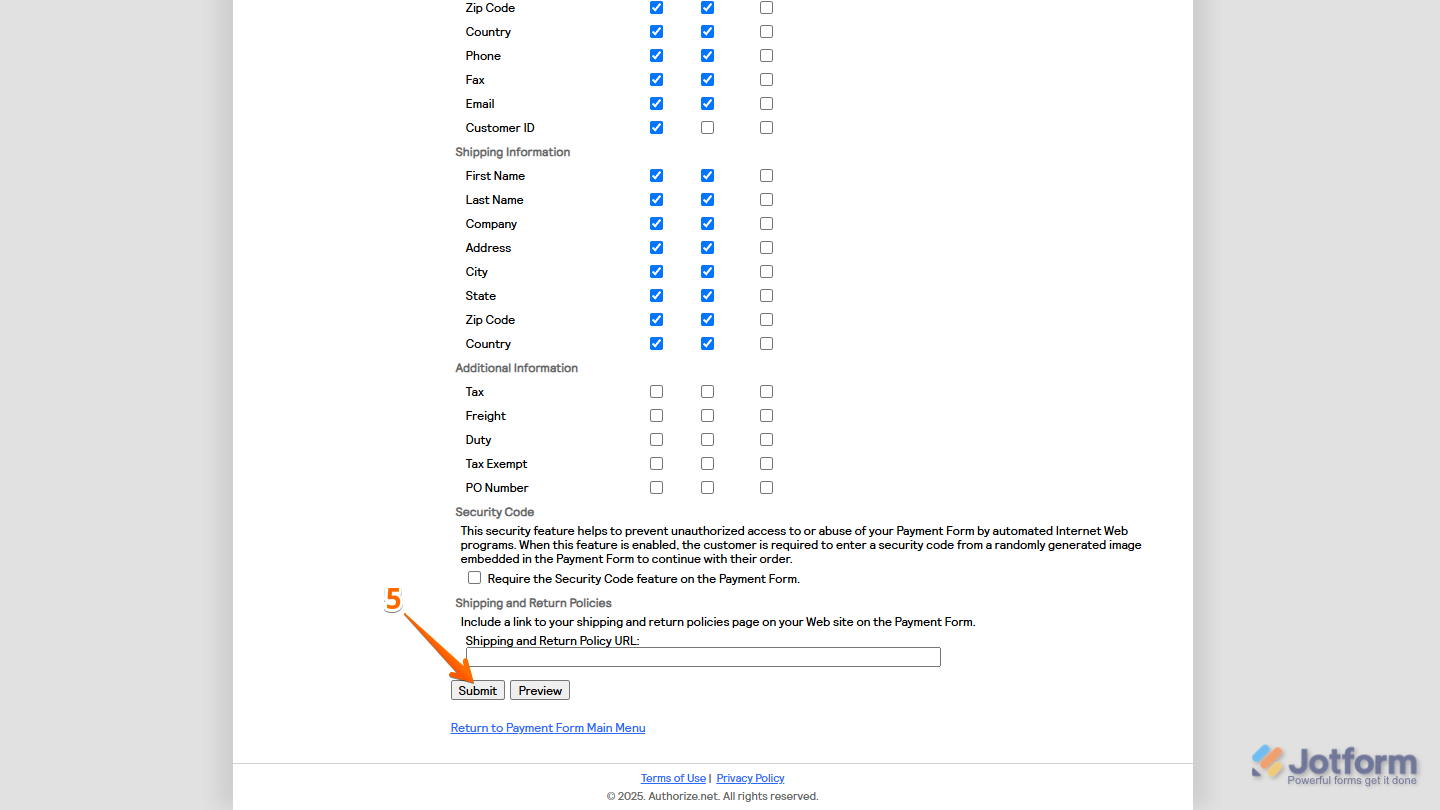
- Next, in the Payment Form – Fields section, locate the field causing the error in the Field Name column of the table, and then uncheck the box next to that field in the Required column.
- After that, click on Submit at the bottom to save your changes.

Send Comment:
7 Comments:
224 days ago
Need help with Authorize.net widget.
I have selected Payment Type to User Defined Amount. But then the next field called "Get Price From" is not showing me any options to select from. I have already setup a field (Number) as a placeholder for the amount that I proposed to pass via custom url. I was going to have a "pre-filled" link sent out to the customer so that the form would have the amount already set.
More than a year ago
Hello,
My form is built with authorize.net integration and i want to give full payment and installment option to choose, however when i use sell subscription option to do that, I cannot add coupons. Could you please help with how to do both at the same time?
Thanks!
More than a year ago
Error during transaction
The merchant login ID or password is invalid or the account is inactive.
I am adding this to a Wix website. I know the Authorize.net account is active. Does this have anything to do with the fact we are not using Wix's preferred Authorize.net provider?
More than a year ago
How do you set up gift cards with Jotform after you have integrated with Authorize.net?
More than a year ago
I have already set up the integration with Autorize.net and have processed a few transactions. How can we have jotform settle the transactions automatically in autorize.net?
More than a year ago
Received error message when first tired to send this support ticket.
Account is locked. How do I unlock it?
username: mdubee (this needs to be changed, but couldn't even though logged in as admin)
acct. name: Kayla Gasker
email on account: kgasker@arrowheadlakepa.net
Why doesn't Jotform have any telephone cu
More than a year ago
Is there a way to ask if the billing information is the same as address information?