You may know by now that we live for workflow automation!
And a big part of that automation is your ability to schedule appointments with your customers through the forms they submit.
But to have a fully comprehensive appointment workflow, the form needs to be able to “talk” to your calendar behind the scenes to prevent double-bookings and overwriting events.
In fact, this two-way connective ability has been the #1 feature request for appointments ever since they’ve been a form element. Rest assured, we heard you loud and clear! 😉
We’re happy to announce that Jotform Appointments gives your forms true two-way connections. This means that whether you use Google Calendar, Outlook Calendar, or Calendly, your form filler will only book the slots you’ve made available.
Jotform Appointments lets you enjoy
- Automated appointment management, calendar syncing, and meeting reminders in one place
- Better flexibility, with options for appointment duration and the days and times you accept appointments
- Using one form to handle both appointment setting and deposit collection
- Automated form functionality and next steps based on conditional logic
- The ability to open appointments to one participant or a group
Who needs appointment automation?
Almost everyone has a need for appointment and event calendar automation, but some scenarios stand out.
Wherever they book jobs and appointments from, consultants, coaches, and public speakers need easy automation to keep up with their busy schedules.
For example, a consultant can embed an appointment form on her website. She connects the form’s appointment field to her Google Calendar. When customers schedule an appointment through the form, the appointment field will reflect any existing events on her Google Calendar, thus preventing double-booking.
When a new form is submitted, an event is created in her Google Calendar and can also include a Google Meet video conferencing link.
Beauty salons, spas and clinics, photographers, and tattoo artists all need dependable scheduling on the fly. Booking new appointments is the lifeblood of these small businesses that often have multiple lines of service. Now they can take appointments without worrying about overlap or lack of availability.
Restaurants, boutique hotels, and travel guides need a flexible reservation system that can accommodate complex requests, holidays, and other date restrictions. Jotform Appointments can handle it.
Many recruiters who are short on time use Outlook Calendar for candidate interviews. With an interview scheduling form, a candidate selects an available time, submits the form, and the appointment field gets synced with Outlook. The recruiter’s life becomes simpler with new event creation in Outlook and Teams, keeping everyone on the same page.
Educational advisers and TAs going from student to student need an accurate scheduling mechanism to book and block off office hours. Tying their students’ scheduling requests to forms is now easier than ever.
How to set up two-way appointments
Integrations with Google Calendar, Outlook Calendar, and Calendly make two-way appointments possible.
Whether a slot is filled through your form or directly in your calendar, it becomes unavailable to form users in real time, avoiding any double-bookings.
Let’s take a look at how to link the appointment field in a form to each calendar provider.
How to connect Google Calendar
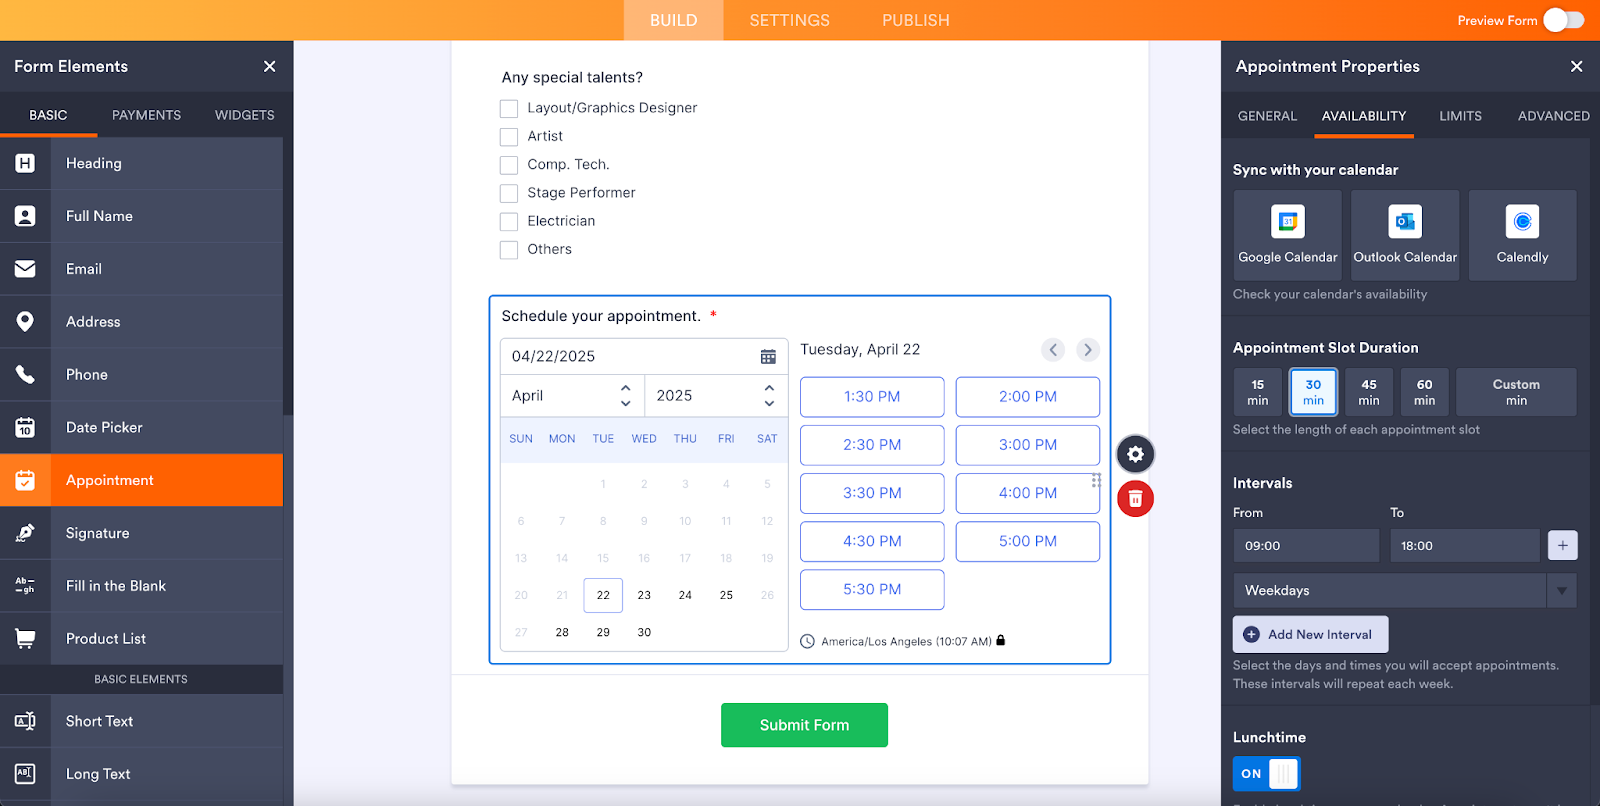
Say you’re an event manager who needs to screen volunteers for an upcoming music festival. Open your form in the Form Builder. From the Form Elements sidebar, add the Appointment form element. Select the field in your form, then select the gear icon to open the Appointment Properties sidebar.
In the Availability tab, you’ll see several options, including
- Calendar sync options
- Appointment duration
- The dates/times you’re available for appointments
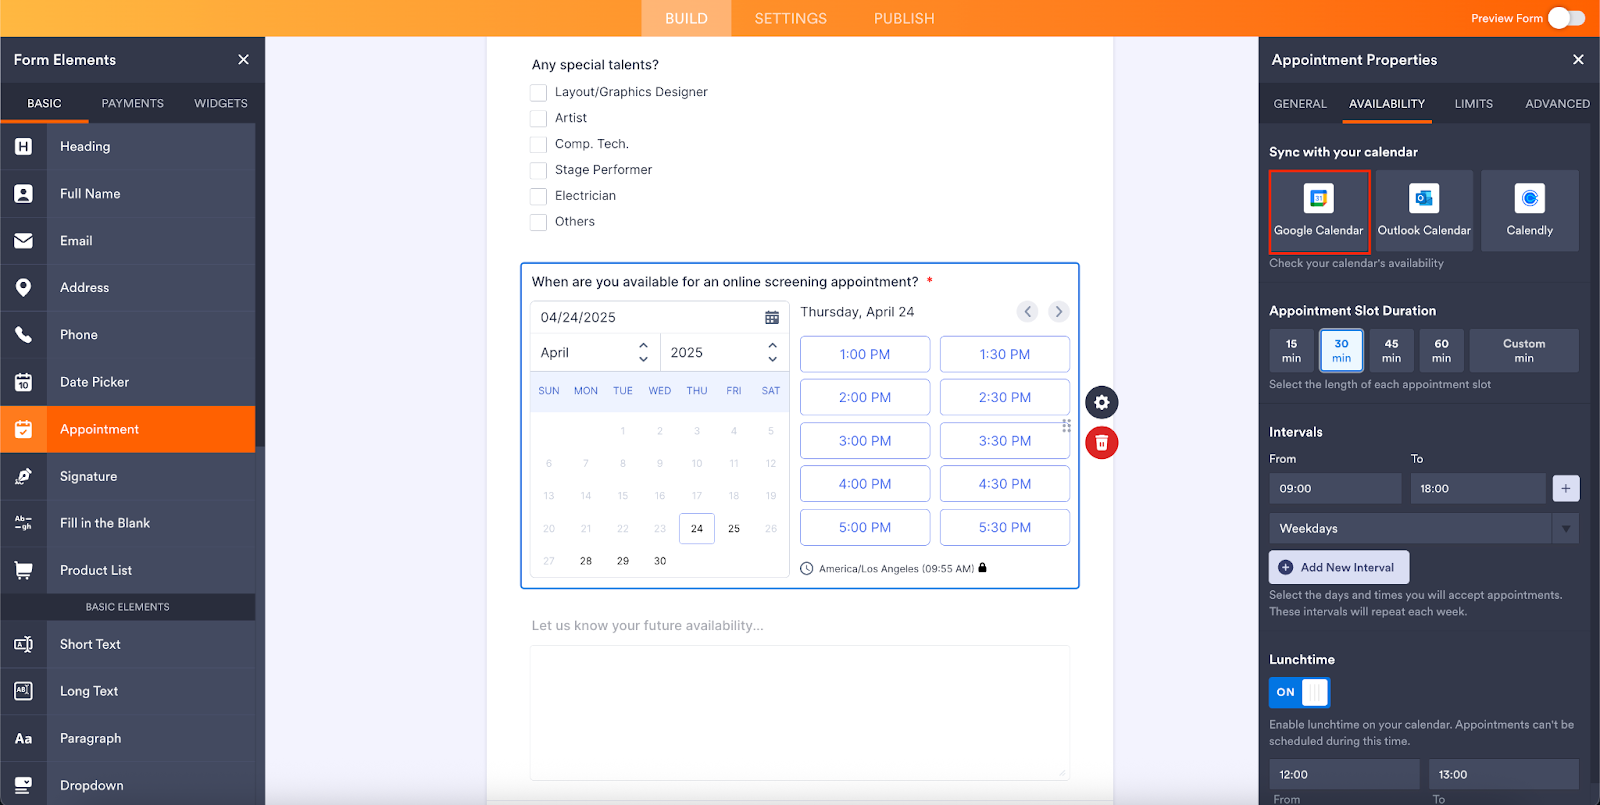
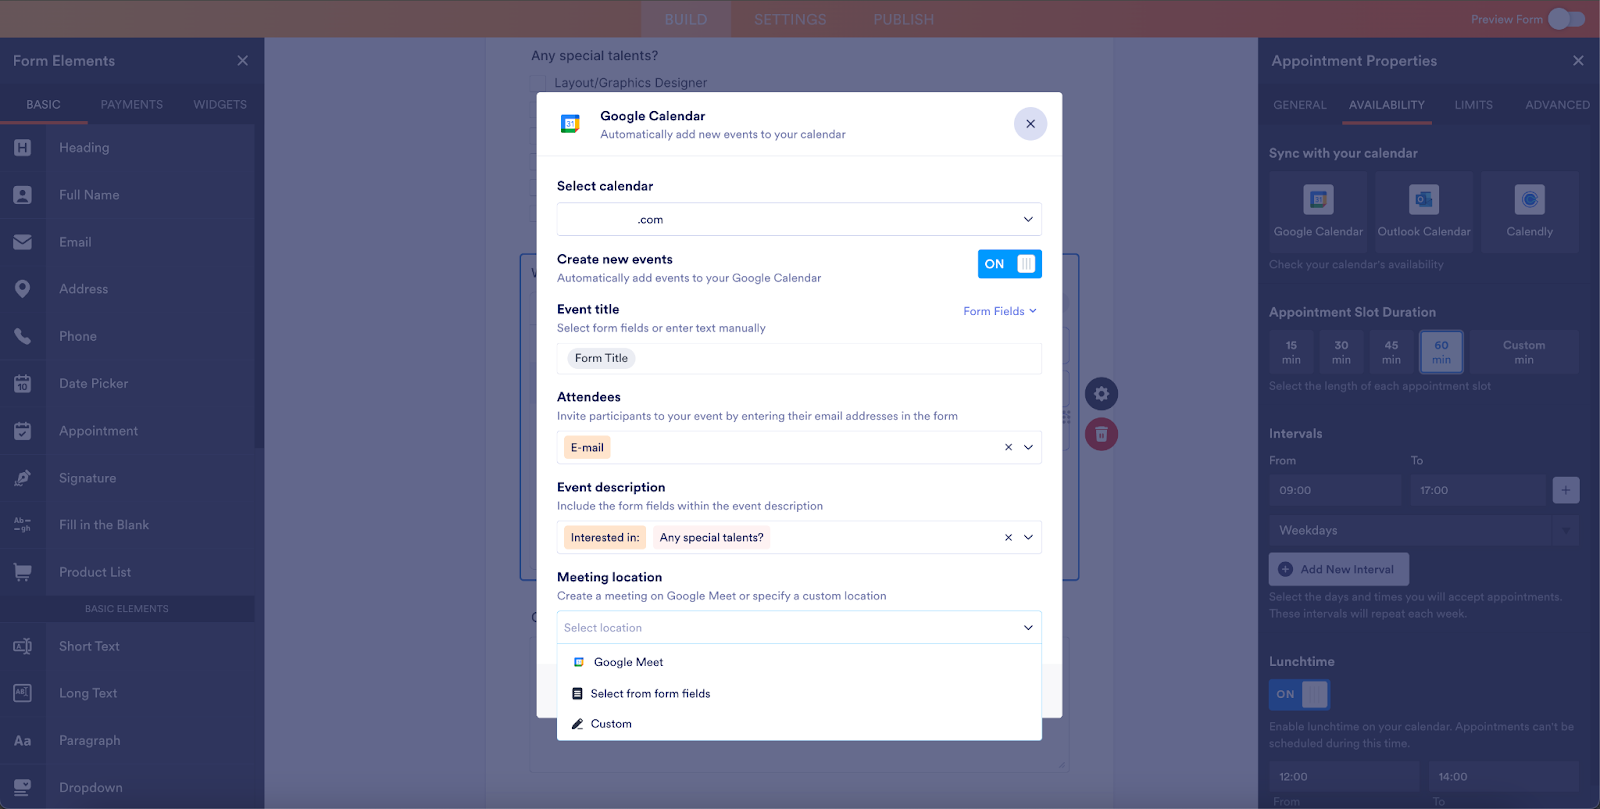
In this case, for the calendar sync option, select Google Calendar. A dialog will open that lets you connect your Google account or choose an already linked Google account.
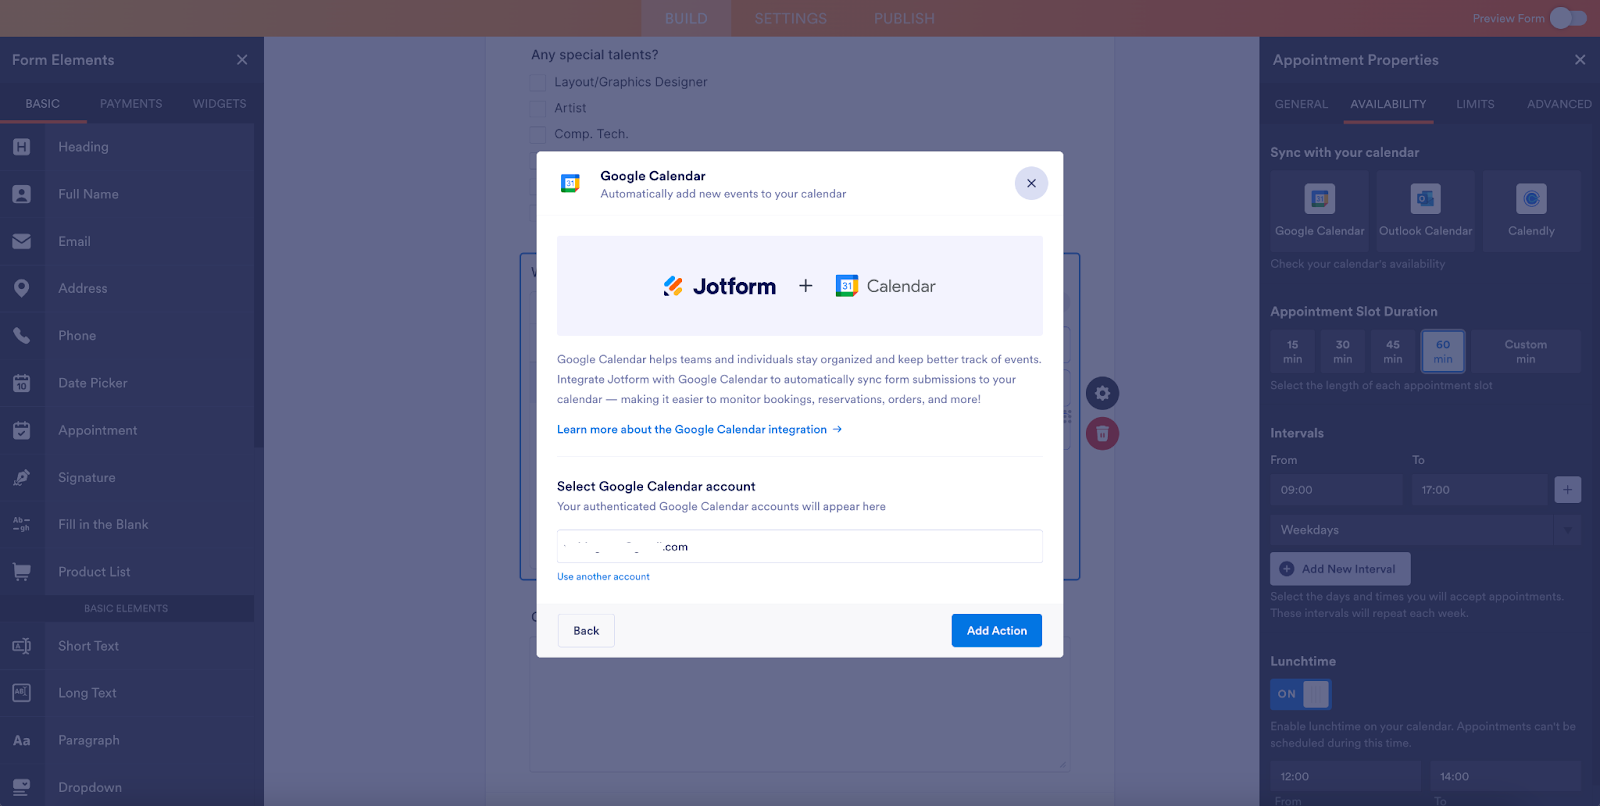
Once you’ve connected your account, you can customize the details of the linked Google Calendar event to your liking. Here, my event/appointment title matches the form title and I’ve included the applicant’s email as an attendee invite.
I’ve also added form fields to the event description.
Finally, I can choose a custom location, whether Google Meet, a physical or virtual location I have preloaded in the form as a separate field, or an alternate video conferencing option. Click Save when you’re finished.
Your Google Calendar settings are now saved. If you ever need to go back and edit your settings or delete the connection, select the pencil icon or the trash can icon by the selected calendar tool.
Now let’s take a look at our event manager’s Google Calendar. You can see the opportunity to screen volunteers is limited, even for a 30-minute meeting!
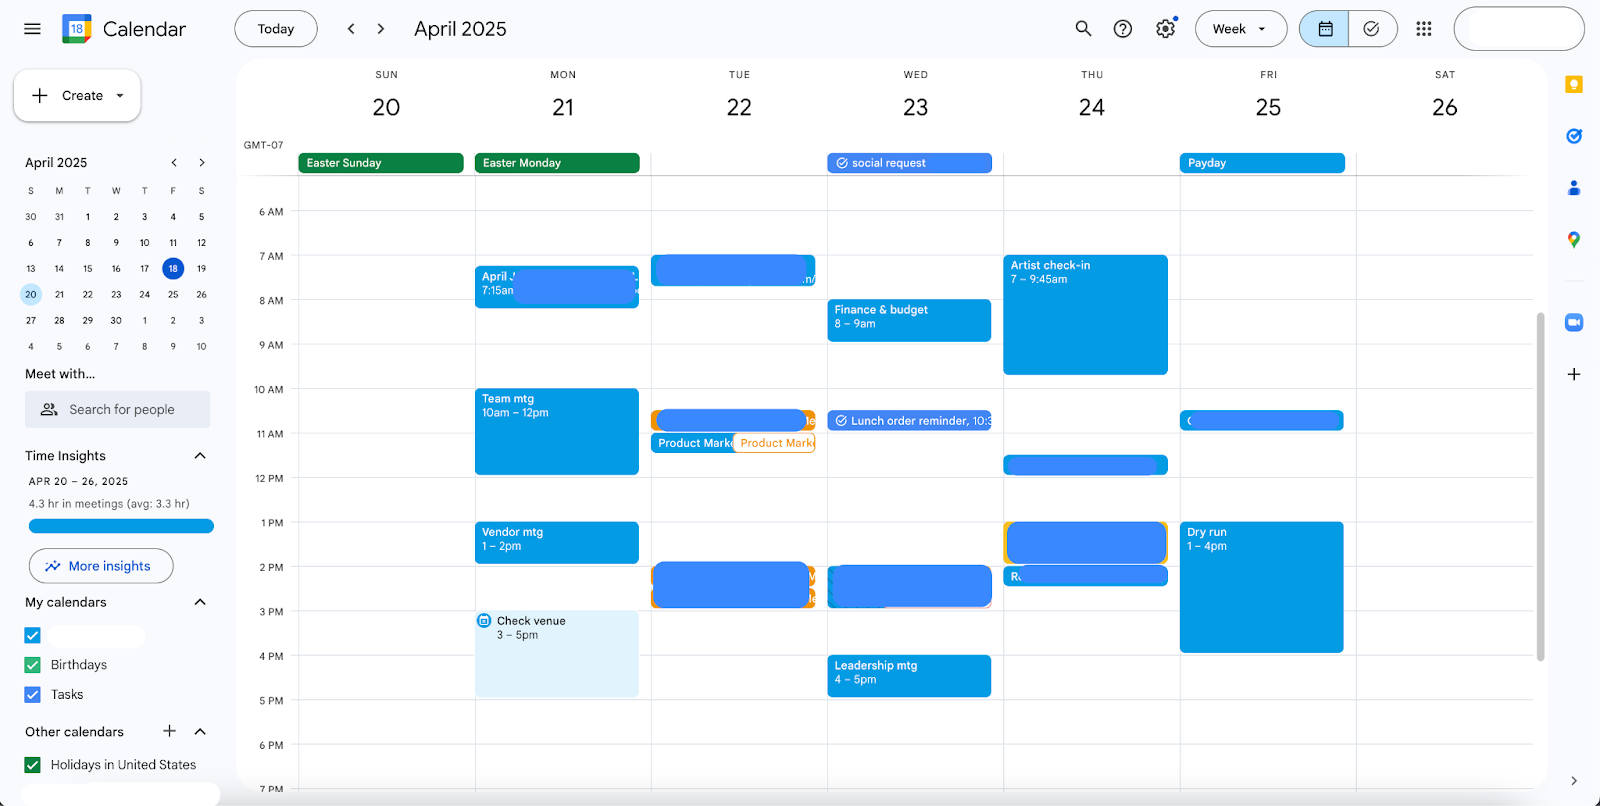
Now that my appointment settings are synced in real time with my Google Calendar, when a prospective volunteer fills out an application, they will only see the times that can accommodate a 30-minute meeting.
Did you know?
The Limits and Advanced tabs of the Appointment Properties sidebar give you additional options for customizing how and when you’d like to arrange your appointments, including location and calendar formatting. For example, you’ll want to select a default time zone that matches your own to ensure timing accuracy.
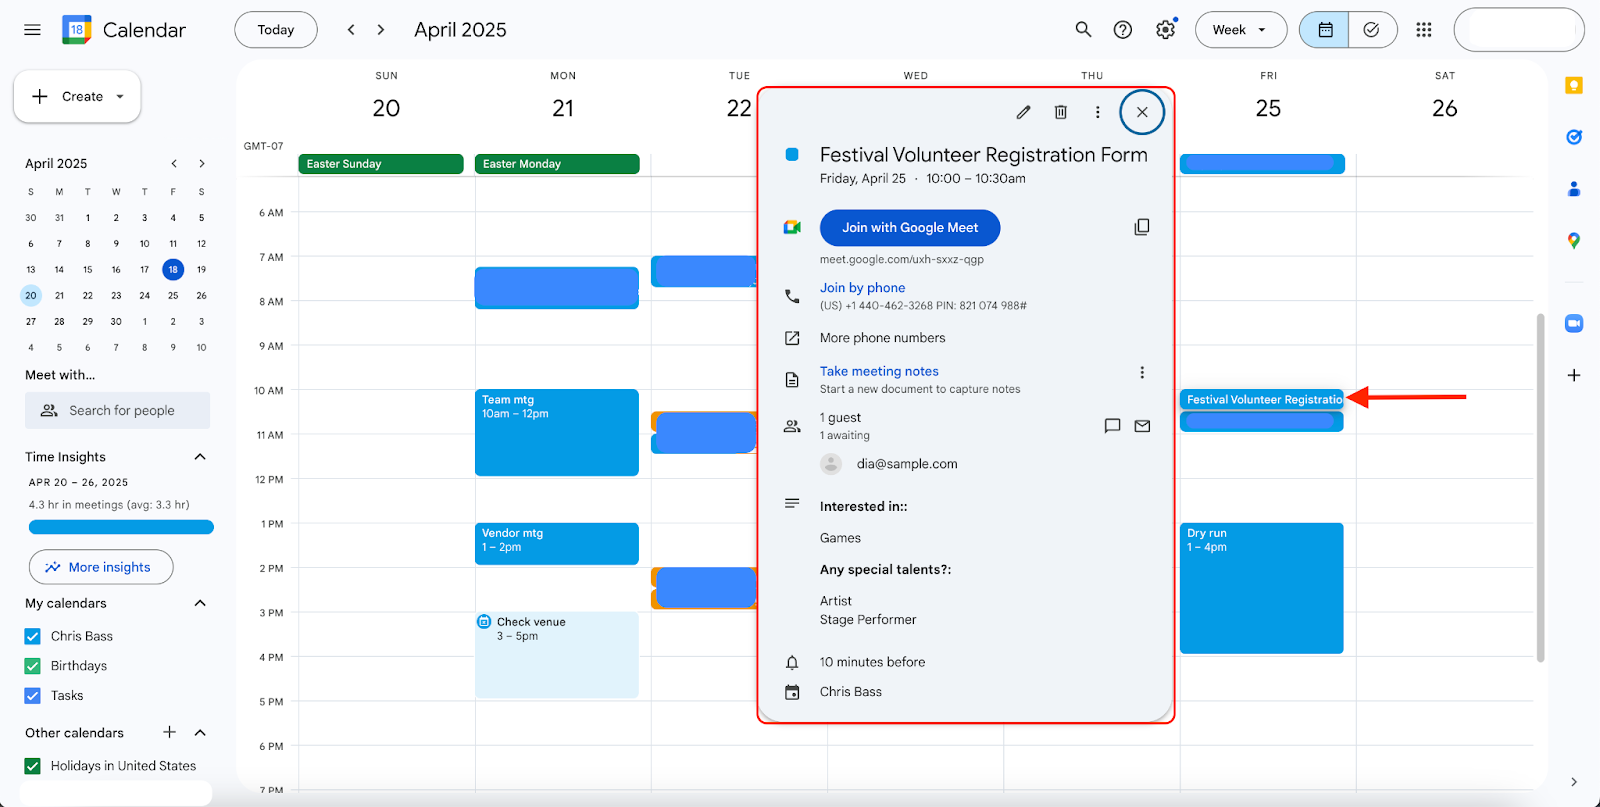
As soon as the form is submitted, a new appointment will appear on our event manager’s calendar. The calendar event includes all the information that was designated when we set up the Google Calendar connection, ensuring the event manager would go into the video conference meeting prepared.
How to connect Outlook Calendar
The setup for Outlook Calendar closely resembles our Google Calendar example.
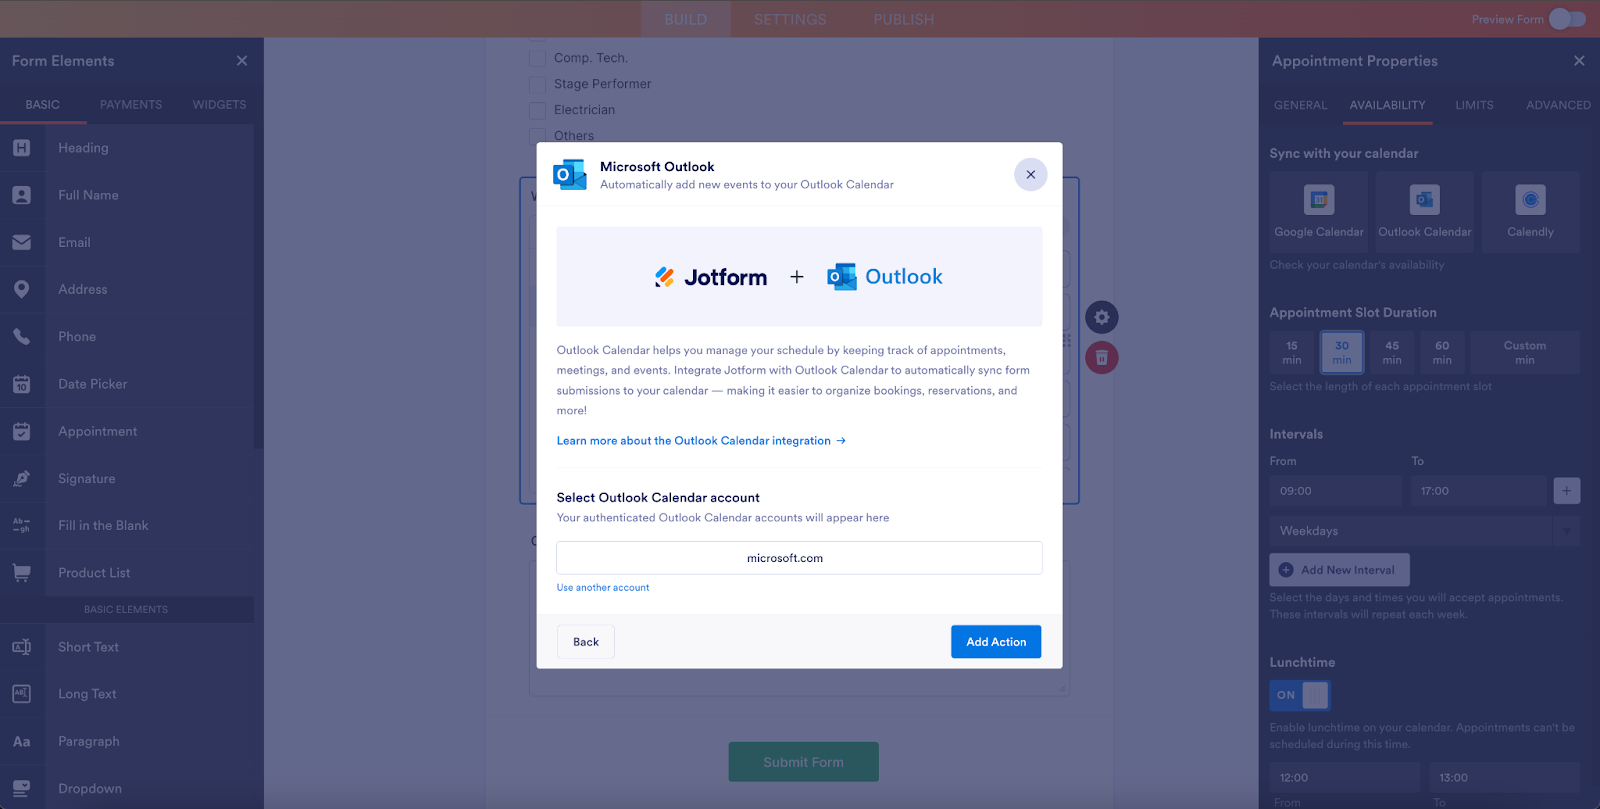
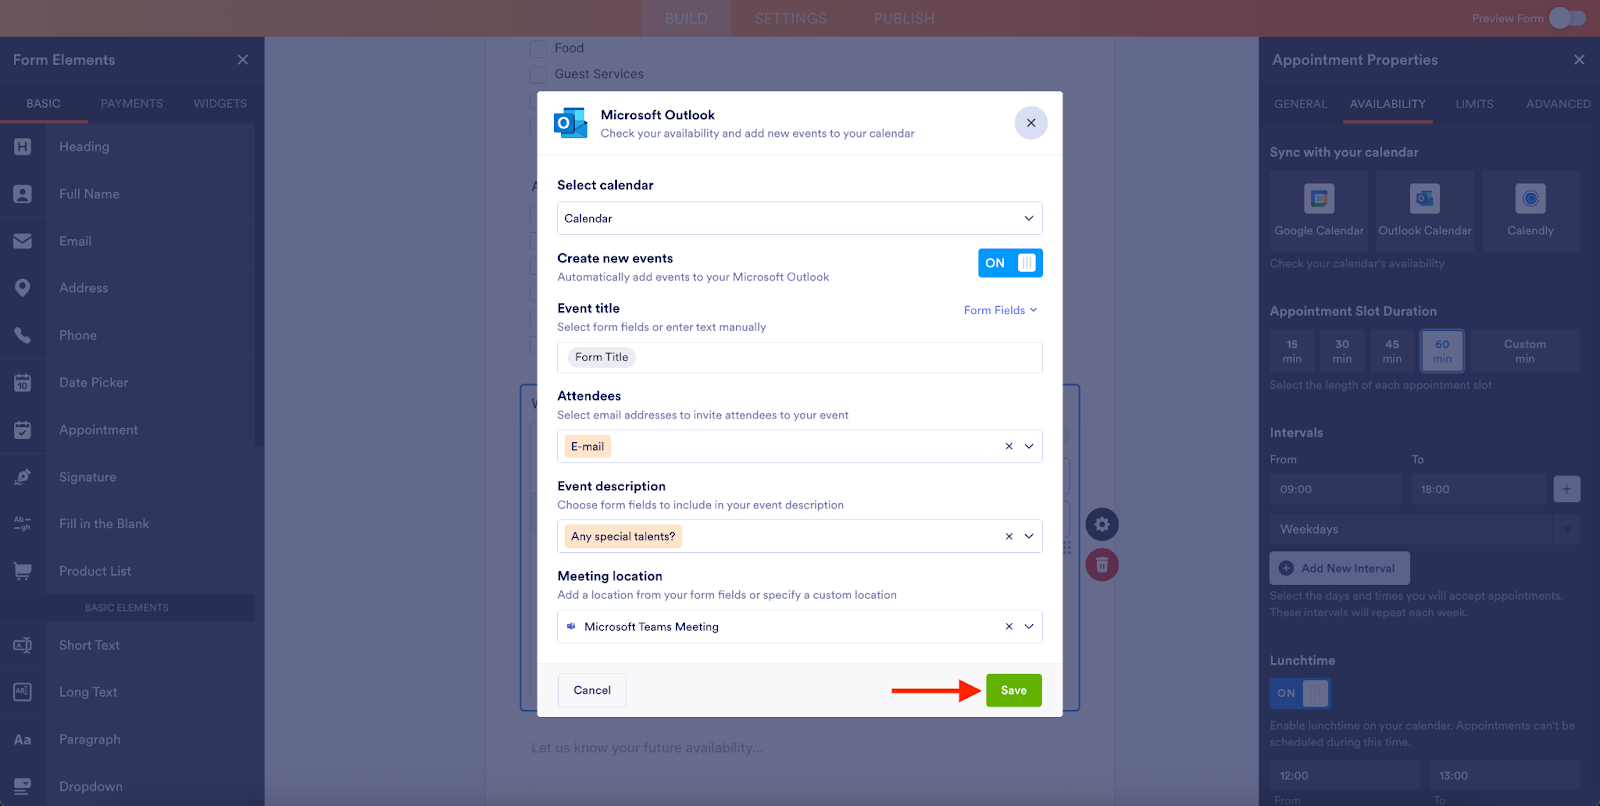
Select Outlook Calendar from the Appointment Properties sidebar and connect your Outlook account. You’ll then be able to customize your Outlook Calendar event details.
I’ve selected the particular Outlook Calendar I’d like to connect, and the event title matches the form title. I’ve also changed the event description to include comments and set my custom meeting location as Microsoft Teams Meeting.
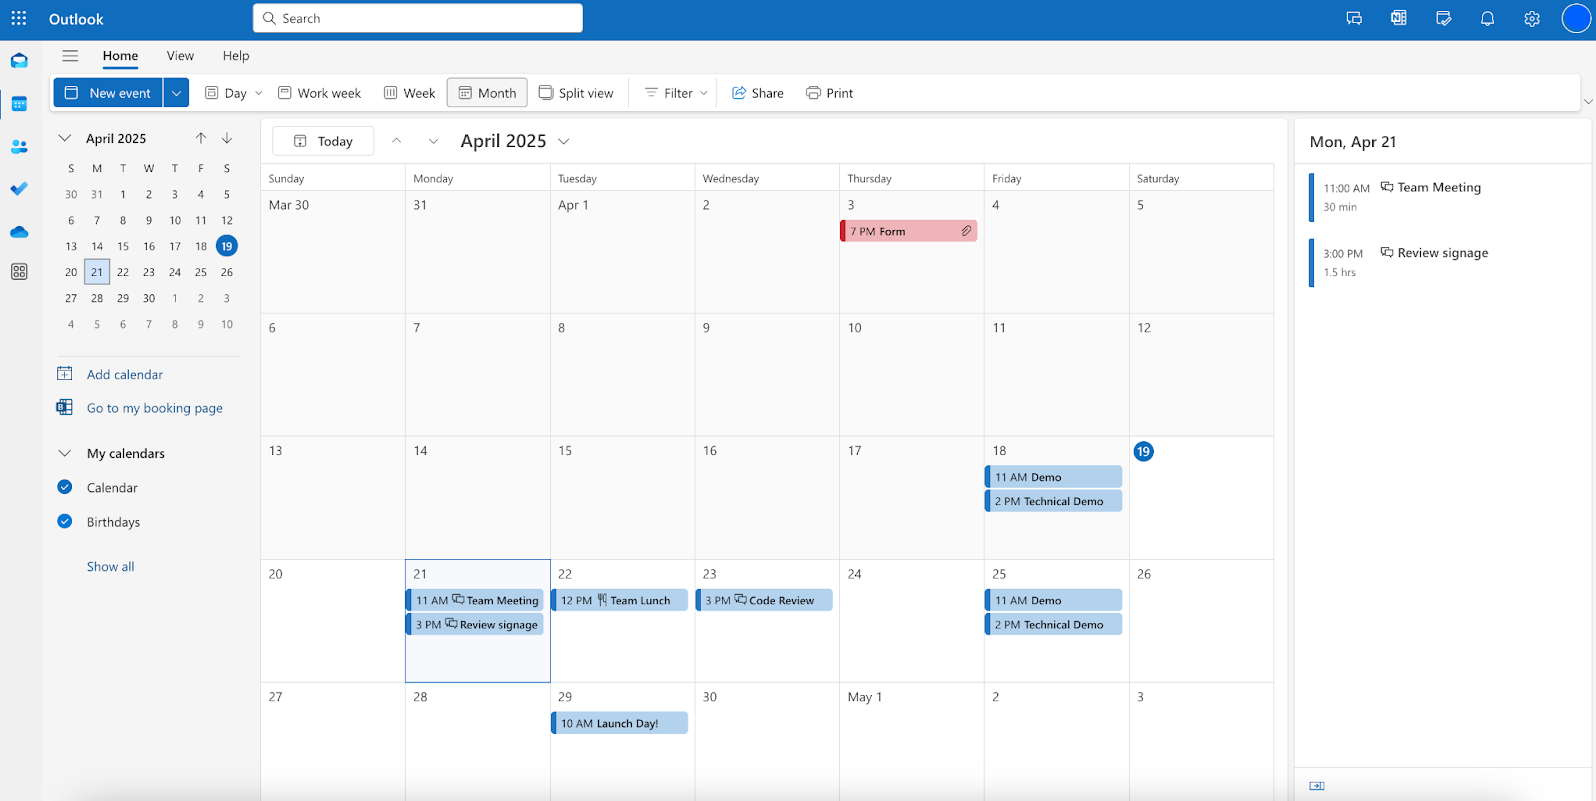
This time the available slots on my calendar must be able to accommodate a 60-minute window. My example Outlook Calendar shows my current availability for April 21.
Pro Tip
You can offer different appointment types or multiple appointment fields in the same form. Also, you can employ conditional logic to display different appointment options based on what the form filler selects. This is a flexible functionality that can serve consultants, coaches, spas, clinics, or any business that offers varied services under one calendar.
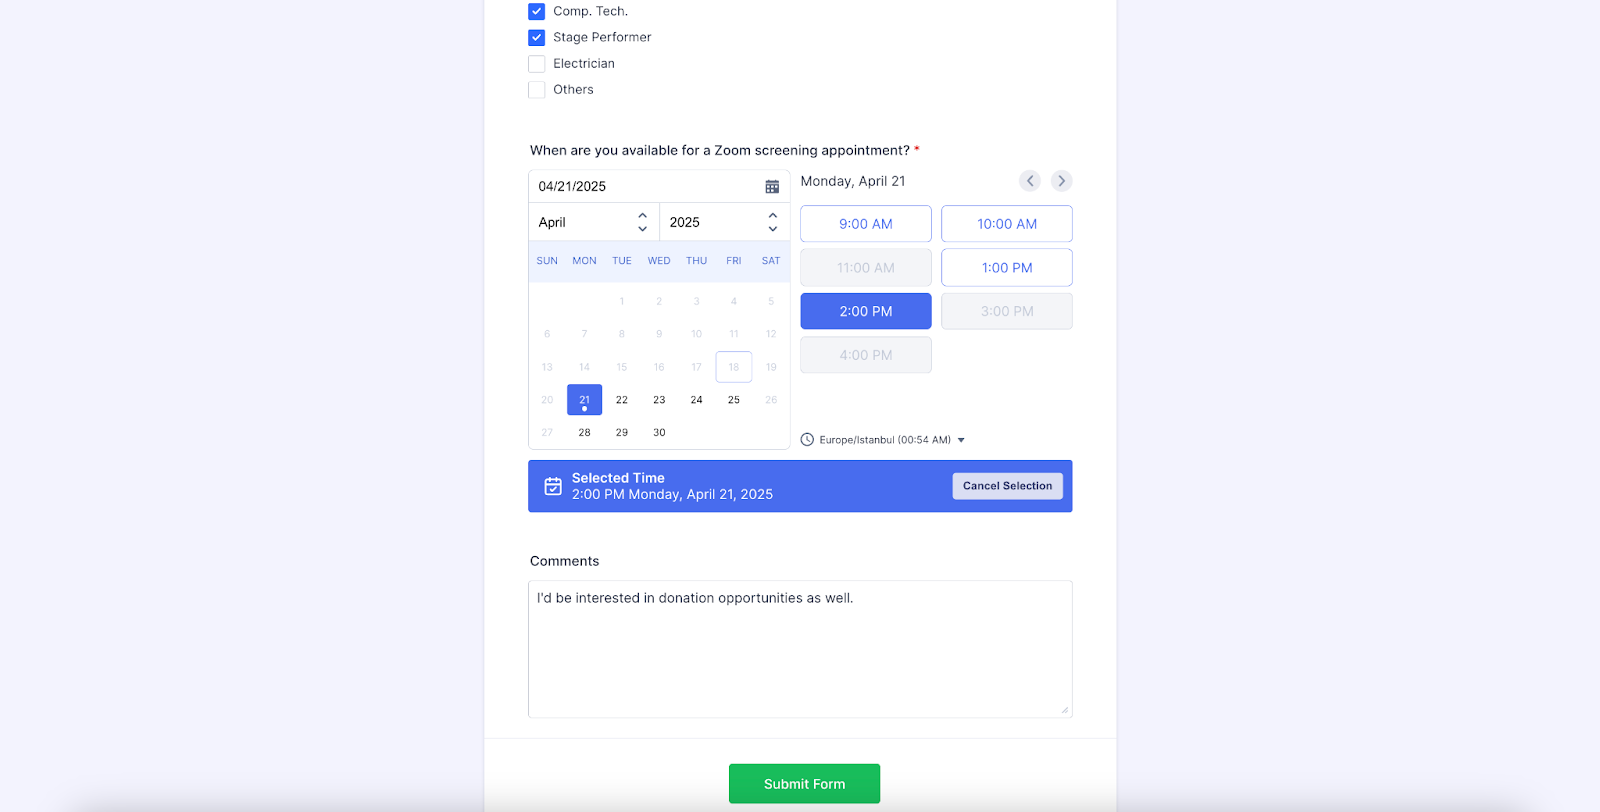
As you can see, when the form filler pulls up the options for April 21, the form only reflects 60-minute windows that are available based on my Outlook Calendar.
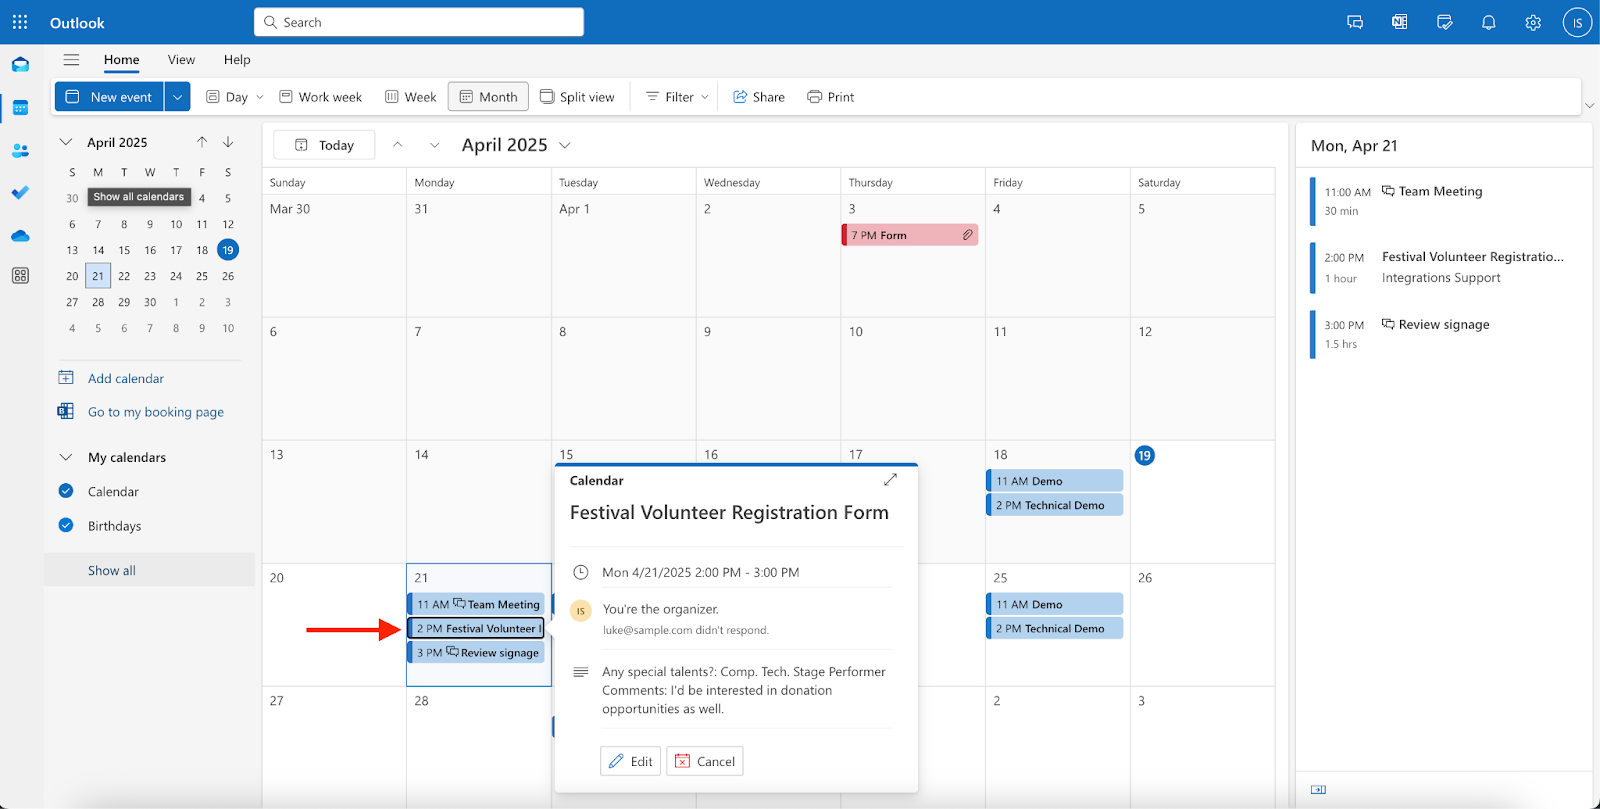
When the form is submitted, the new appointment is immediately logged in my Outlook Calendar.
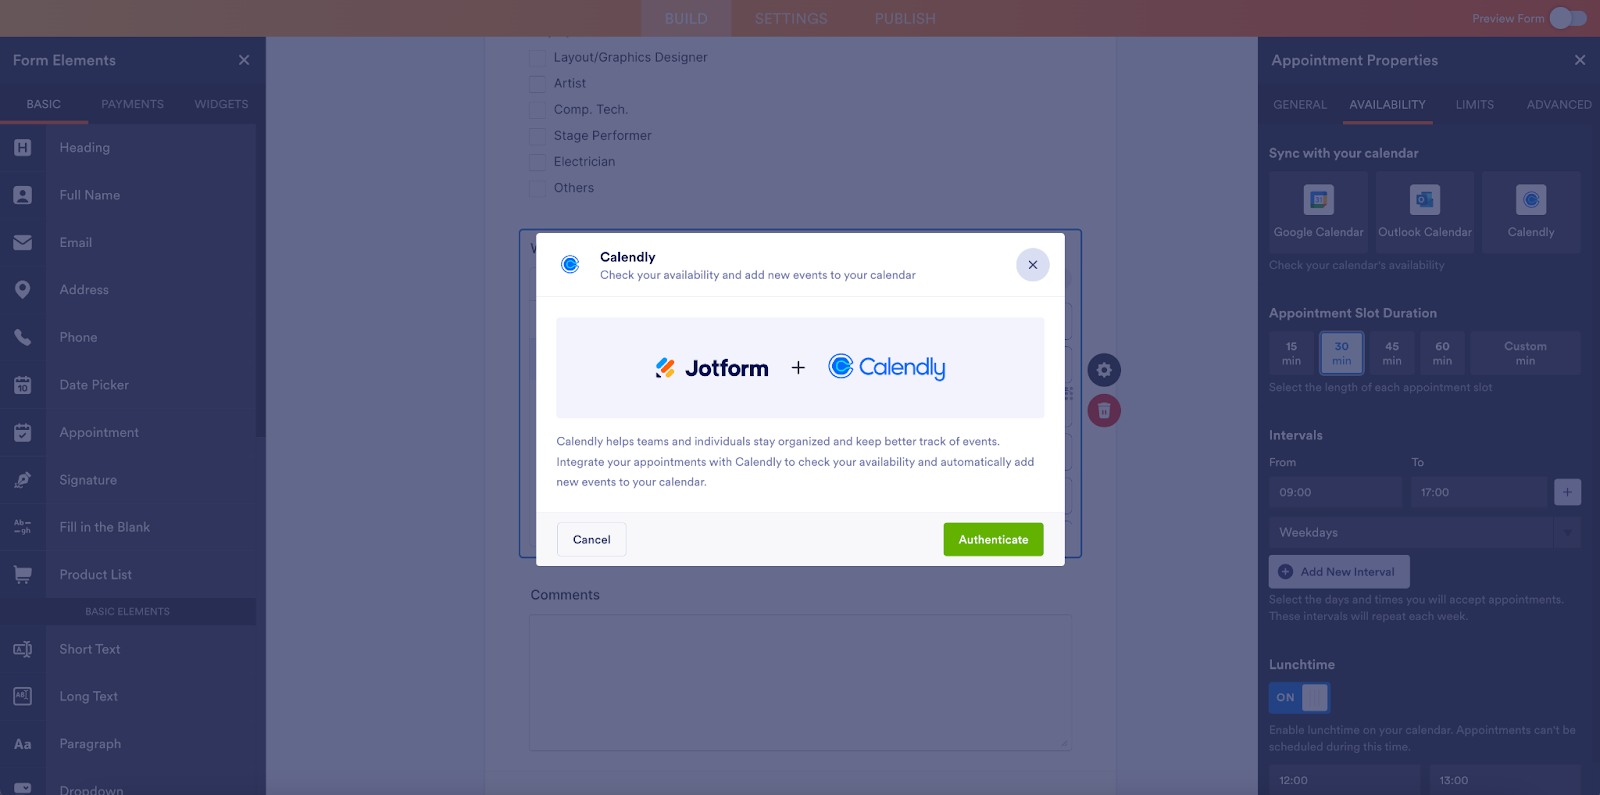
How to connect Calendly
Calendly is an appointment scheduling solution that connects to Google Calendar, Outlook Calendar, Google Meet, Zoom, and other appointment software. For that reason, syncing Calendly to your forms is slightly different than the previous examples.
First, in the Appointment Properties sidebar, select Calendly and connect your account.
You’ll then be able to set up your Calendly event details.
Choose your event duration. In the Prefill section, map form fields to Calendly event fields.
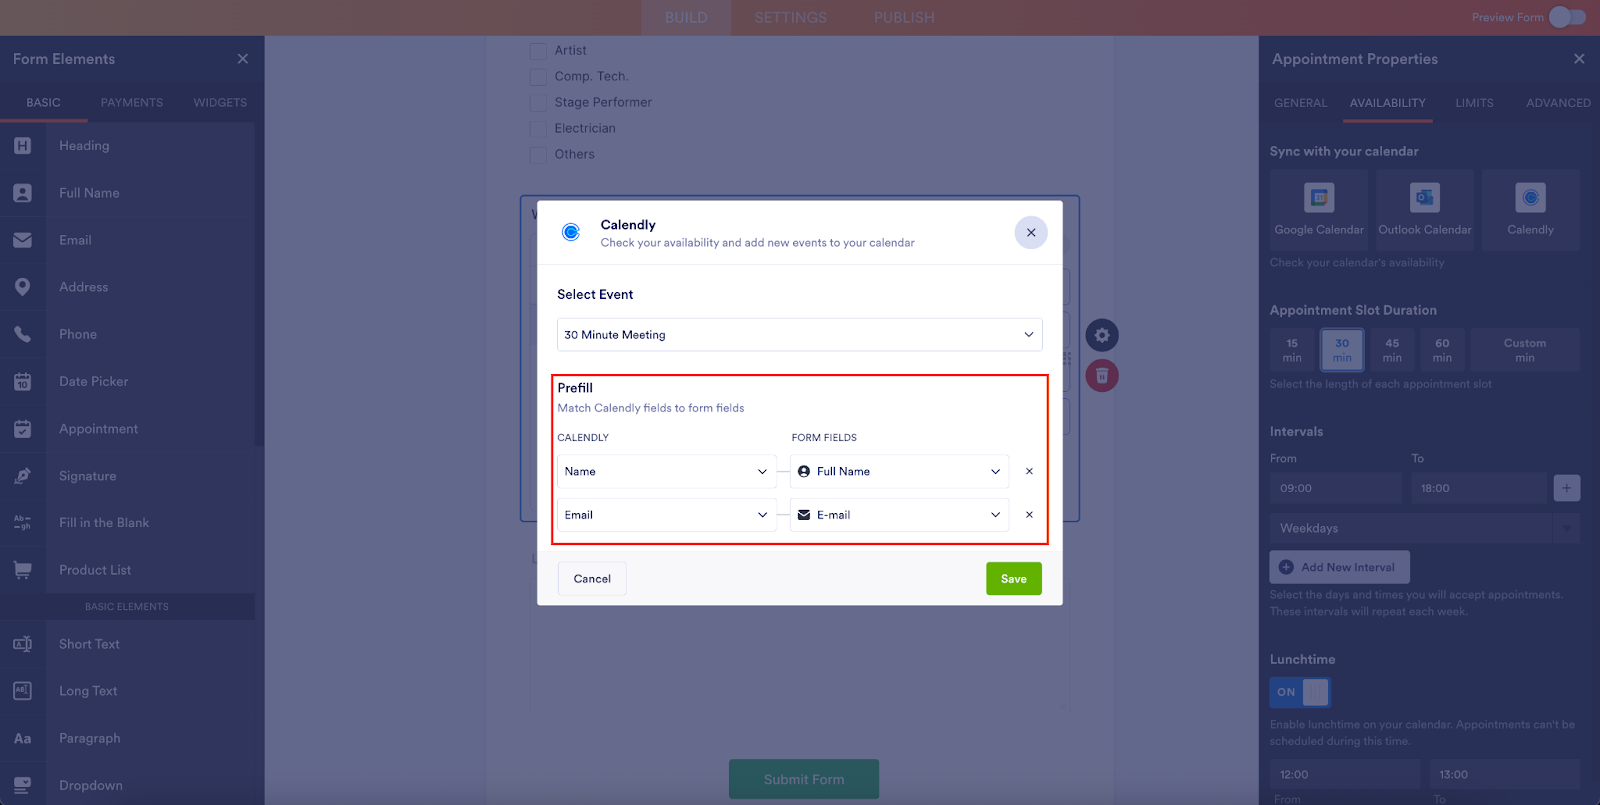
The end user’s information will be saved in Calendly once the form has been submitted. Once you’ve configured the settings, click Save.
The appointment form field once connected to Calendly looks a bit different.
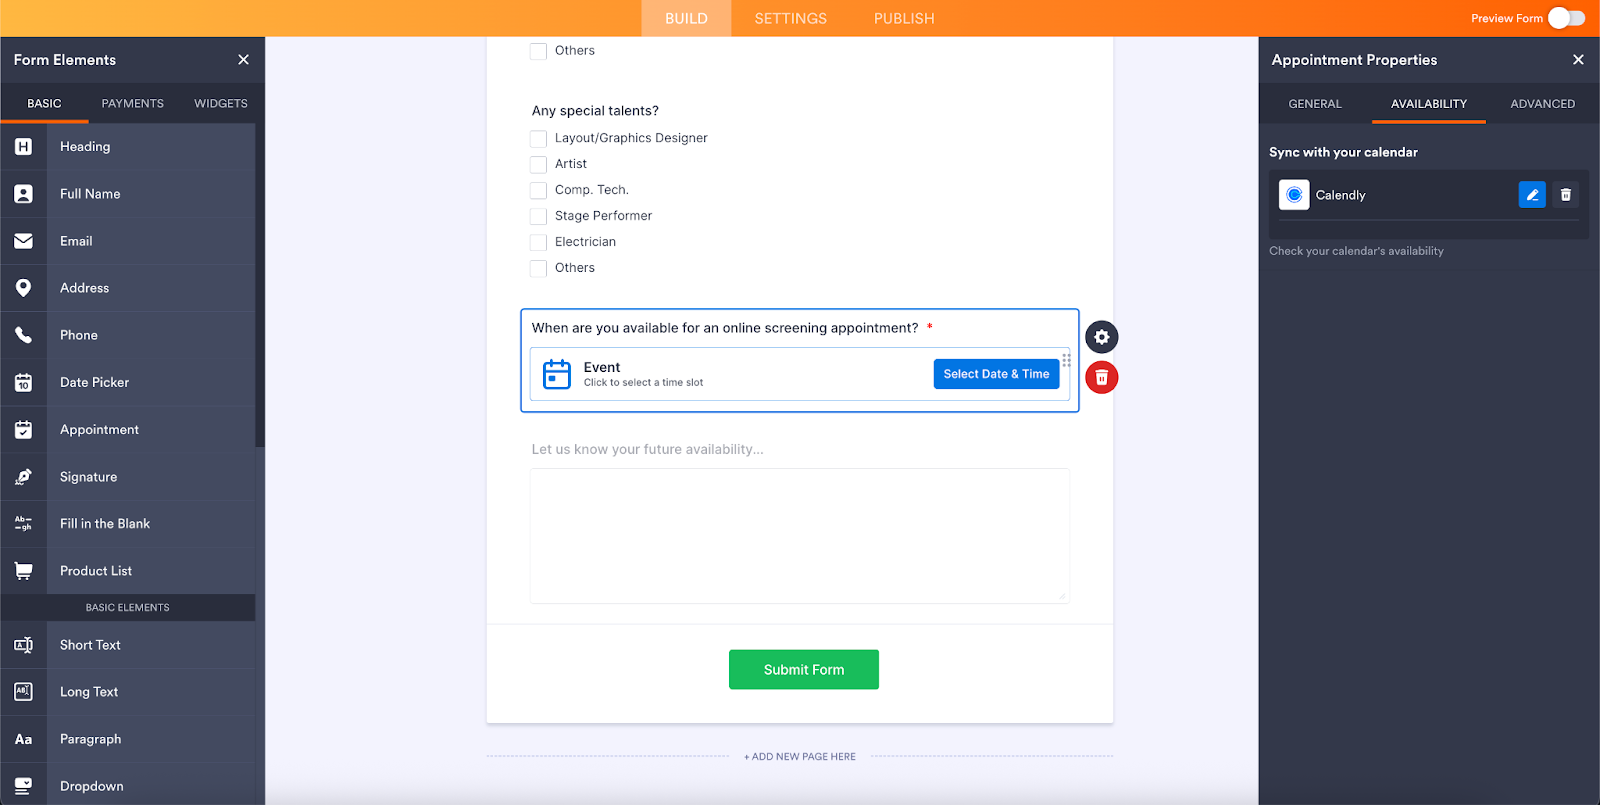
Whichever calendars are connected to your Calendly account, once Calendly is connected to your form’s appointment field, that field will reflect your availability based on those calendars.
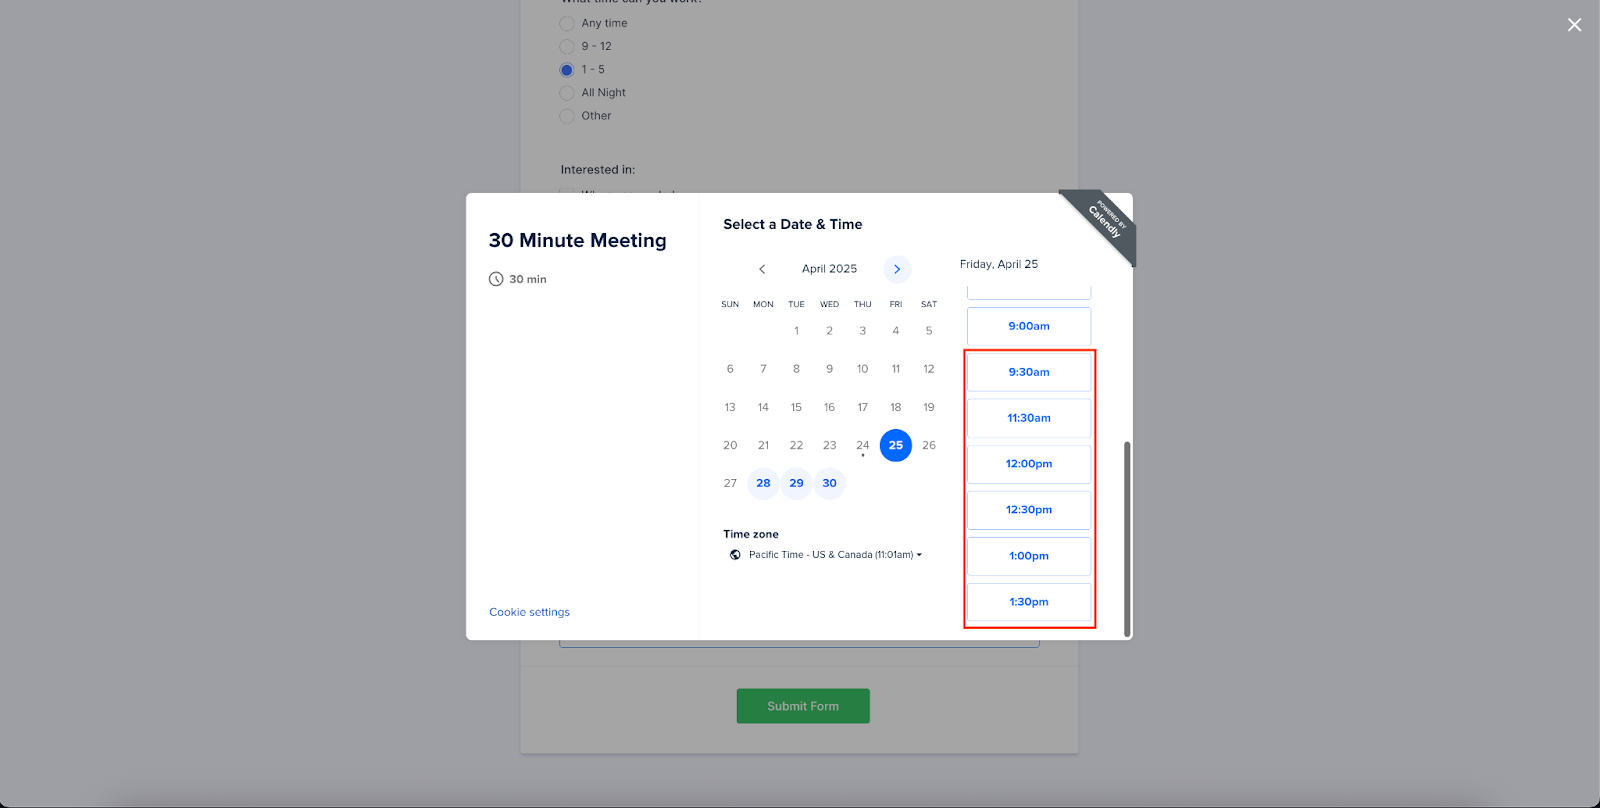
For example, here’s a look at the calendar that’s connected to my Calendly account.
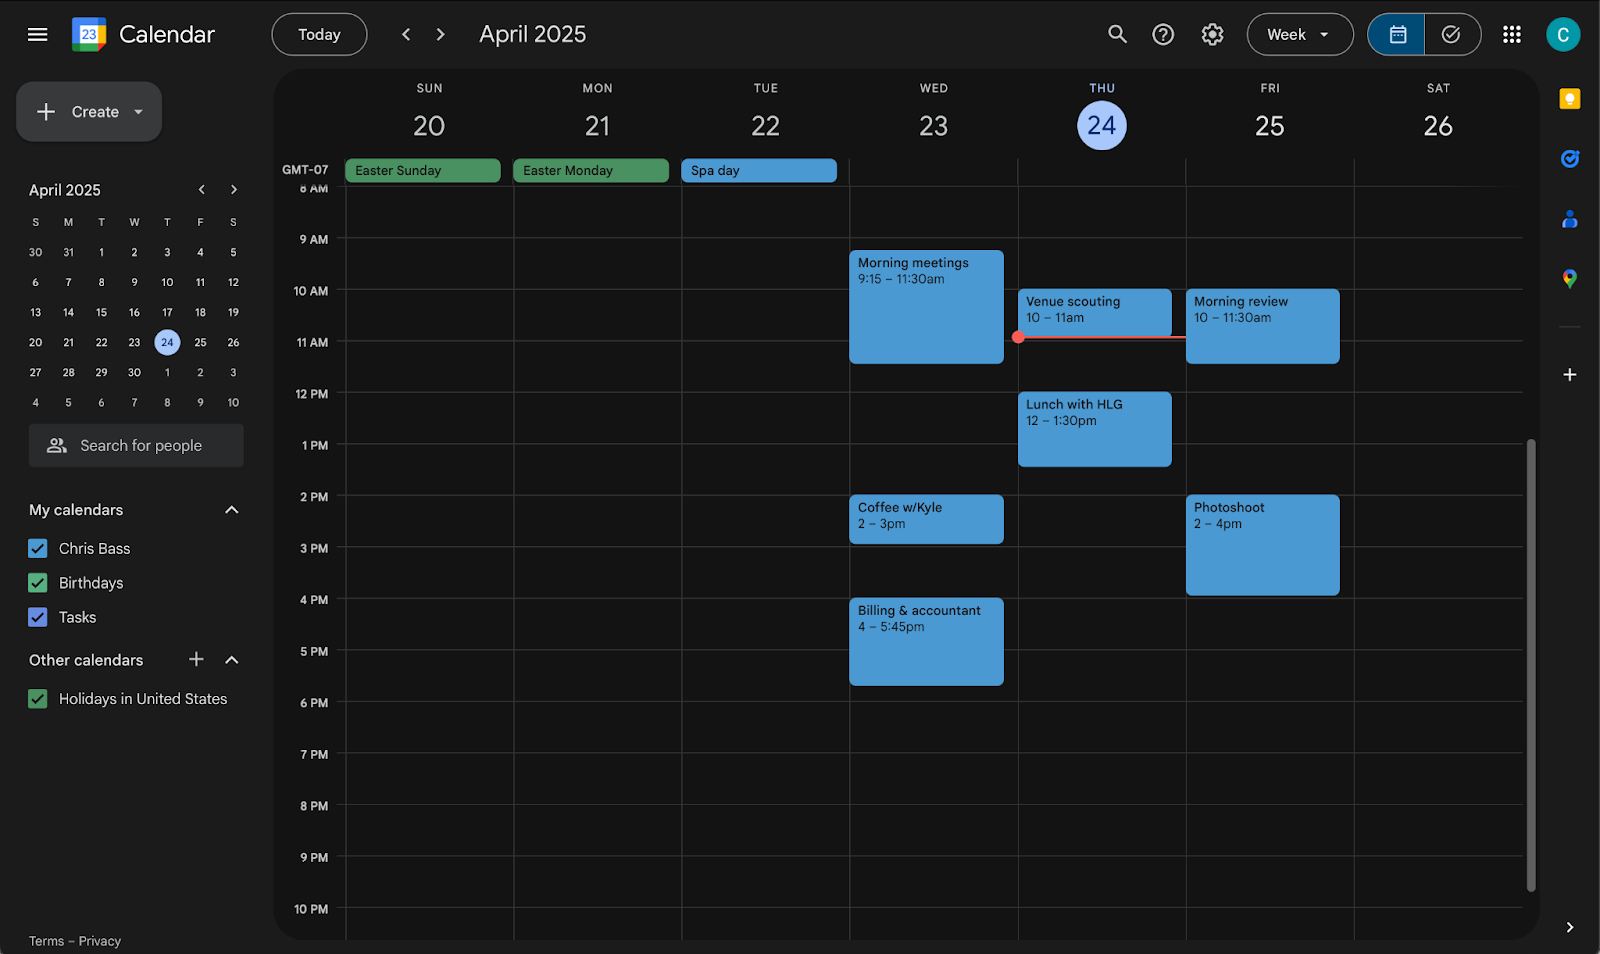
When the form filler looks for available time slots, you’ll notice the times that are unavailable for Friday, April 25, do not appear.
Once a time is selected, the form filler’s information will be prefilled in the Calendly invitation and they can submit their form.
The new appointment is then created within my Calendly account…

…and my connected calendar account.

Here are a couple of things to be aware of with the Calendly appointment option:
- Your appointment field settings will be managed in your Calendly account but will translate to your form.
- Calendly is currently incompatible with HIPAA servers.
Setting up email reminders
An effective way to reduce meeting no-shows and keep your clients and customers prepared is by using the reminder email feature in the Advanced tab of the Appointment Properties sidebar.
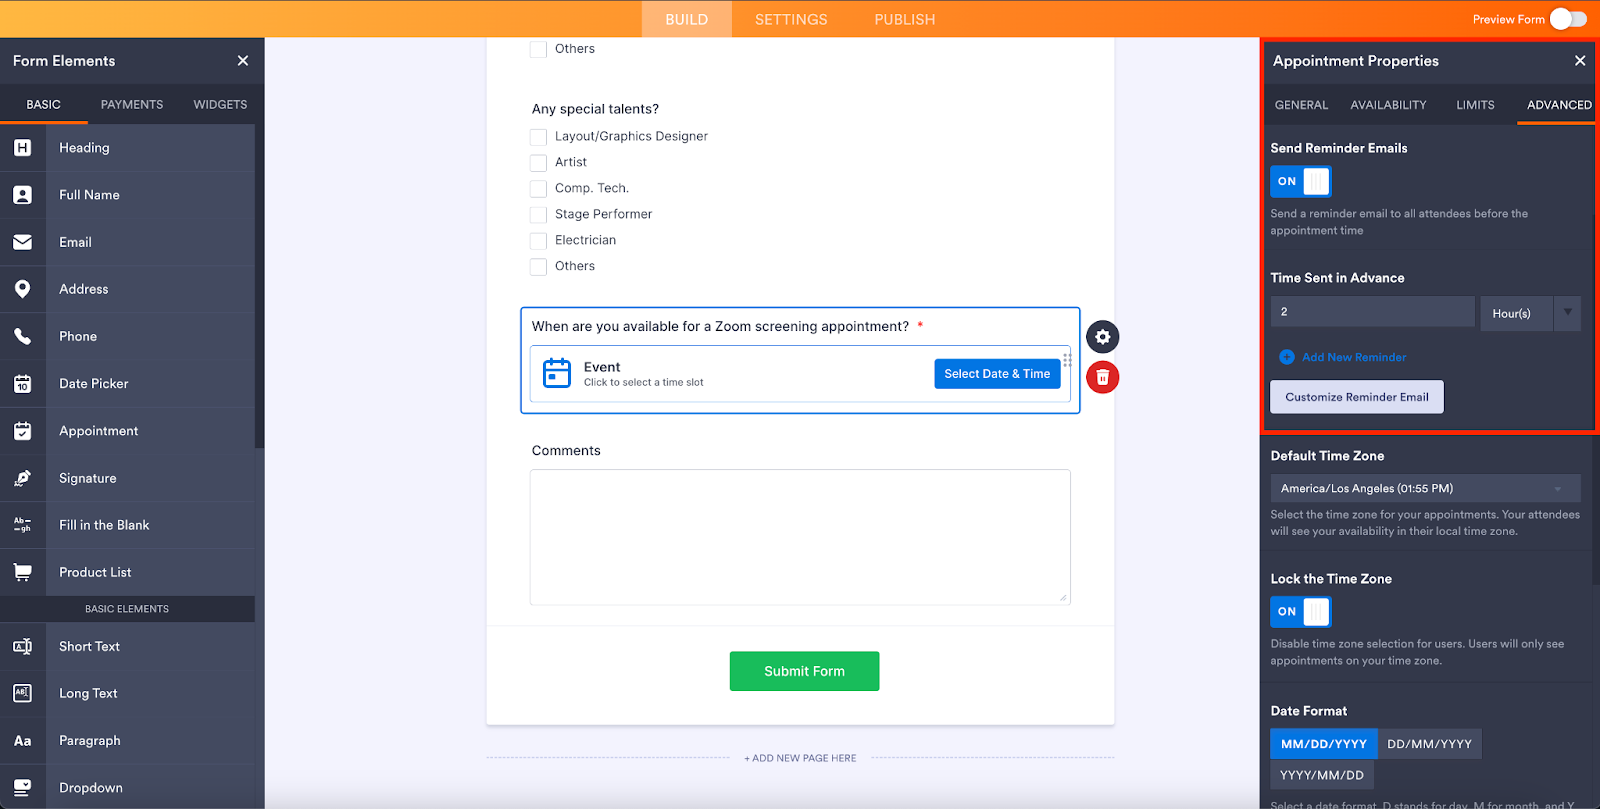
Toggle on Send Reminder Emails to add a reminder email, and add multiple reminder emails by selecting Add New Reminder.
You can also customize how many hours in advance of your event to send the emails in the Time Sent in Advance field. To customize the content of the reminder, select Customize Reminder Email.
Did you know?
- If you set up any of the three calendar integrations via the Form Builder Appointment Properties sidebar, you won’t need to set them up separately in the Settings page of the Form Builder.
- Multiple forms can be connected to one calendar, and you can add multiple appointment fields to a form.
Collect payments and set appointments in the same form
Jotform Appointments turbocharges efficiency for beauty salons, photography studios, tattoo shops, and other SMBs that need to collect deposits when an appointment is scheduled.
Instead of having multiple forms for payments and appointments going to different stakeholders — causing delay and confusion — you can handle both simultaneously by combining the power of Jotform Appointments with a best-in-class collection of payment integrations, including PayPal, Square, and Stripe.
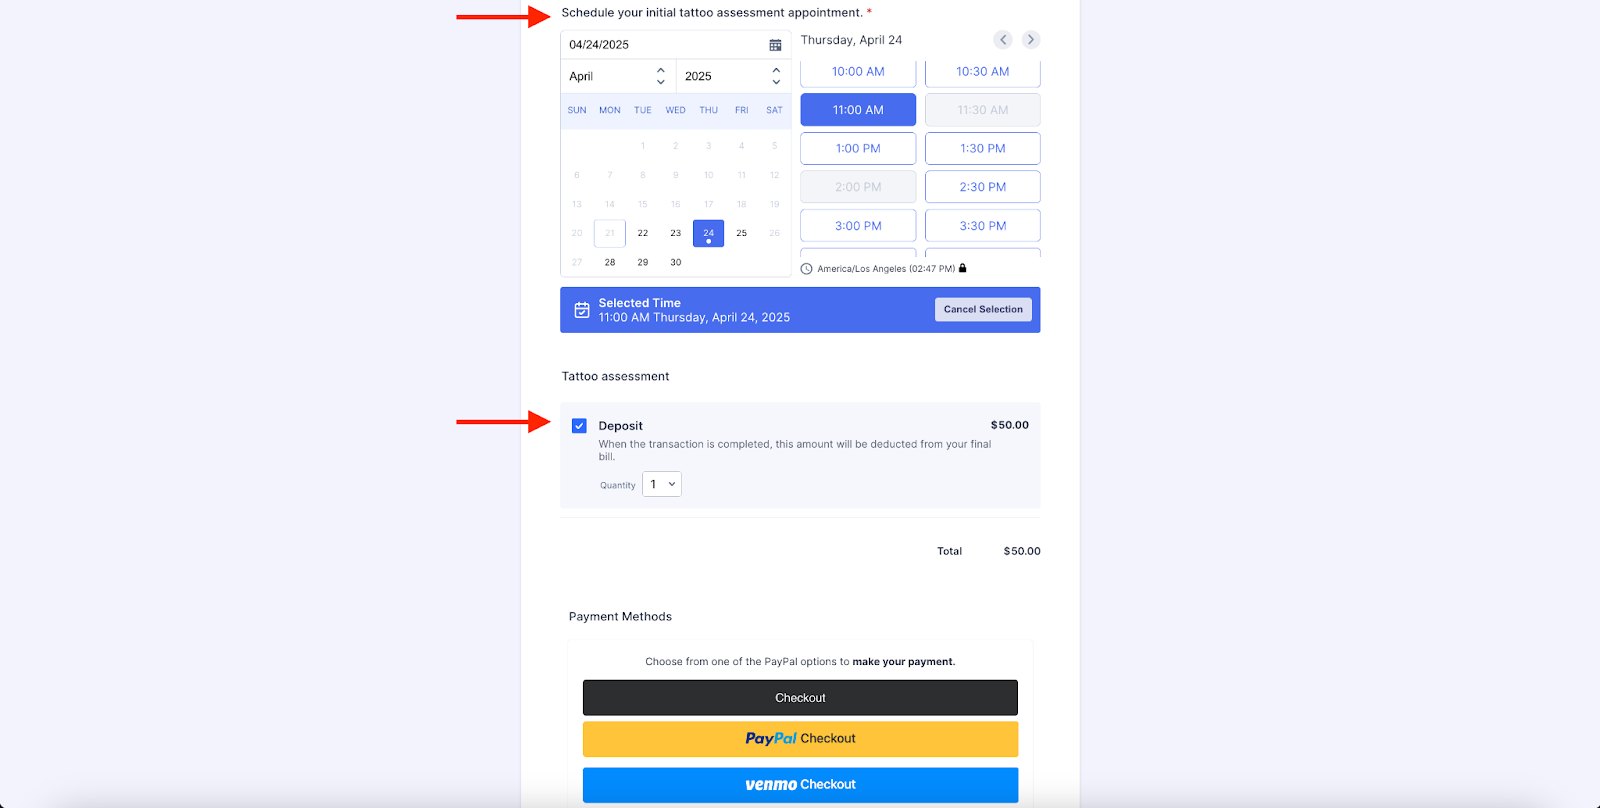
You can also use conditional logic to set your deposit pricing based on the appointment type chosen during booking.
Simplifying appointments, however you work
Jotform Appointments gives you added flexibility in your forms thanks to conditional logic. Let’s say you’re recruiting volunteers for a specific event on a specific day, but you also need a pipeline of more volunteers later on.
You can add a field in your form asking the volunteers who sign up after your event date what their future availability may be.
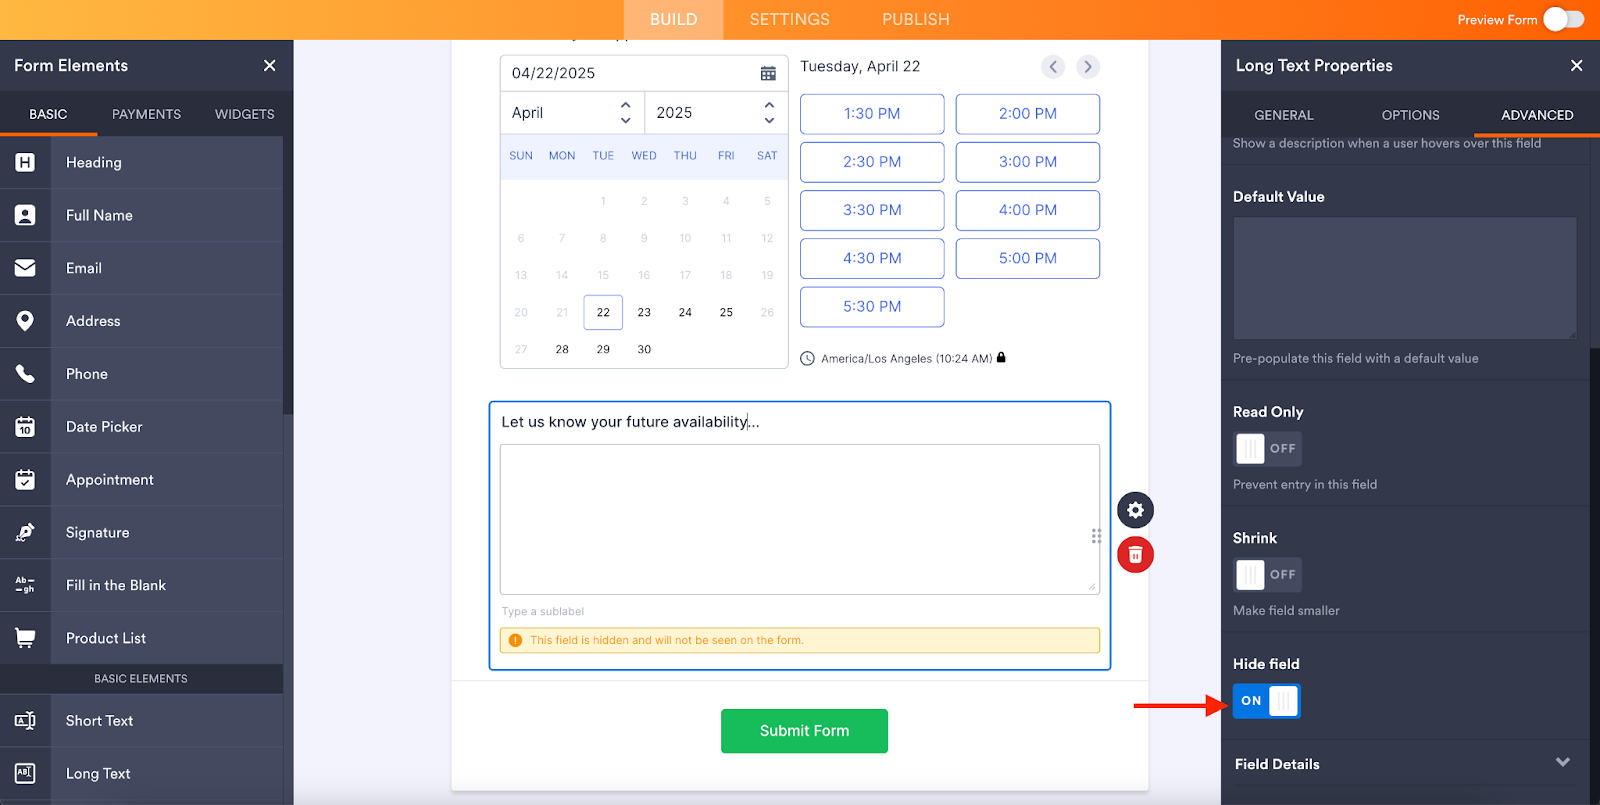
Then you can use conditional logic (in the Settings > Conditions section of the Form Builder) to only display that field if the prospective volunteer signs up after your current event date.
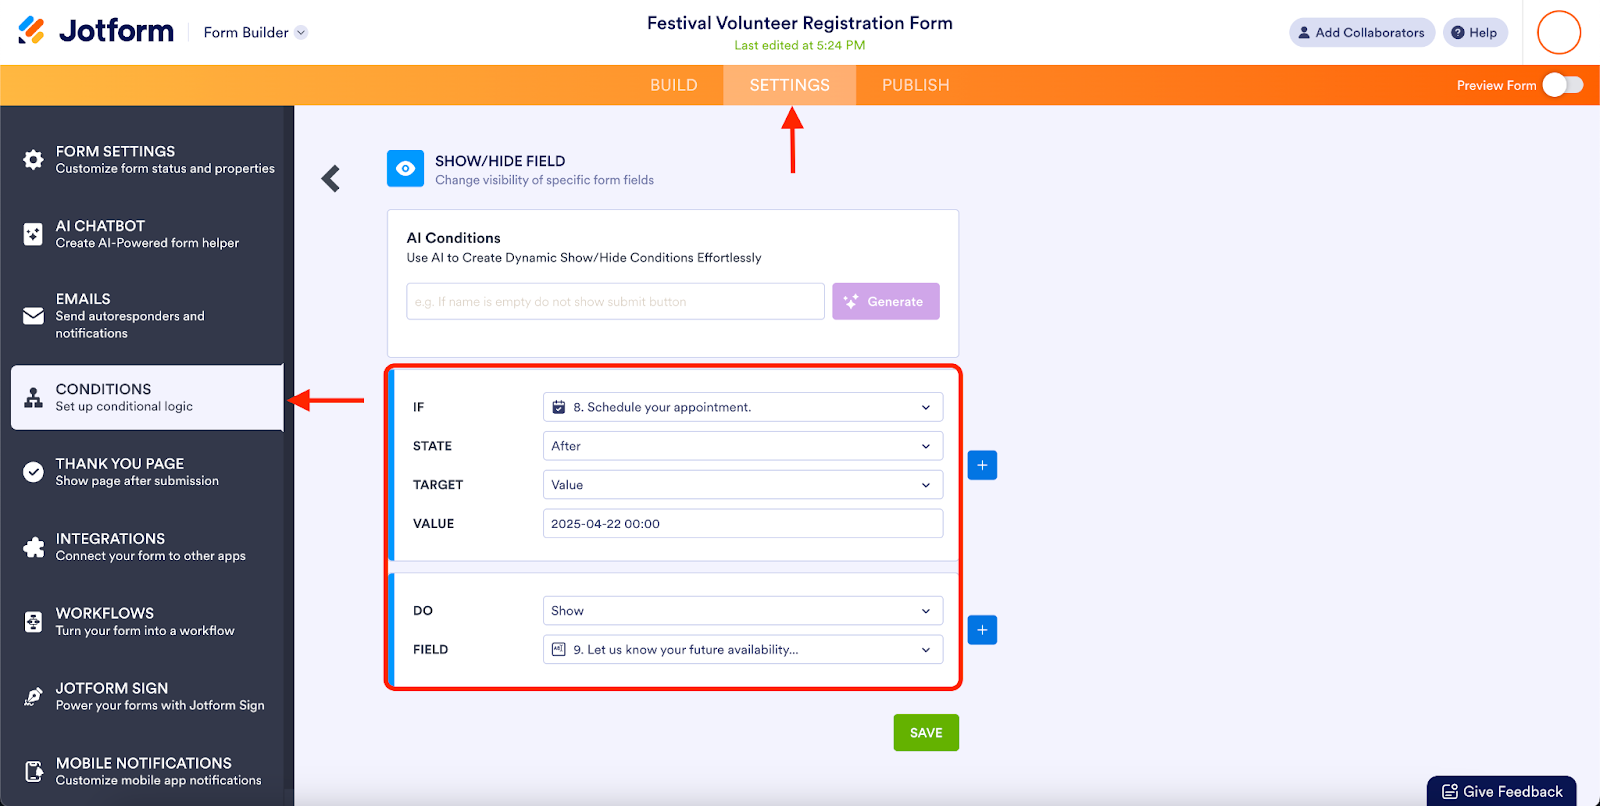
Using conditional logic with your appointment field allows for even more customization (like triggering actions or assigning tasks) depending on when your meeting takes place.
Forms aren’t the only Jotform products that have calendar fields.
If you use Jotform Tables to organize and manage your form data, or if Jotform Workflows is your jam for approval frameworks, you should know that the Google Calendar and Outlook Calendar two-way integrations work within those solutions as well.
For example, in Jotform Tables, you can use the Send Data to Other Apps Action Button to automate Google or Outlook Calendar appointments from the convenience of your table interface.
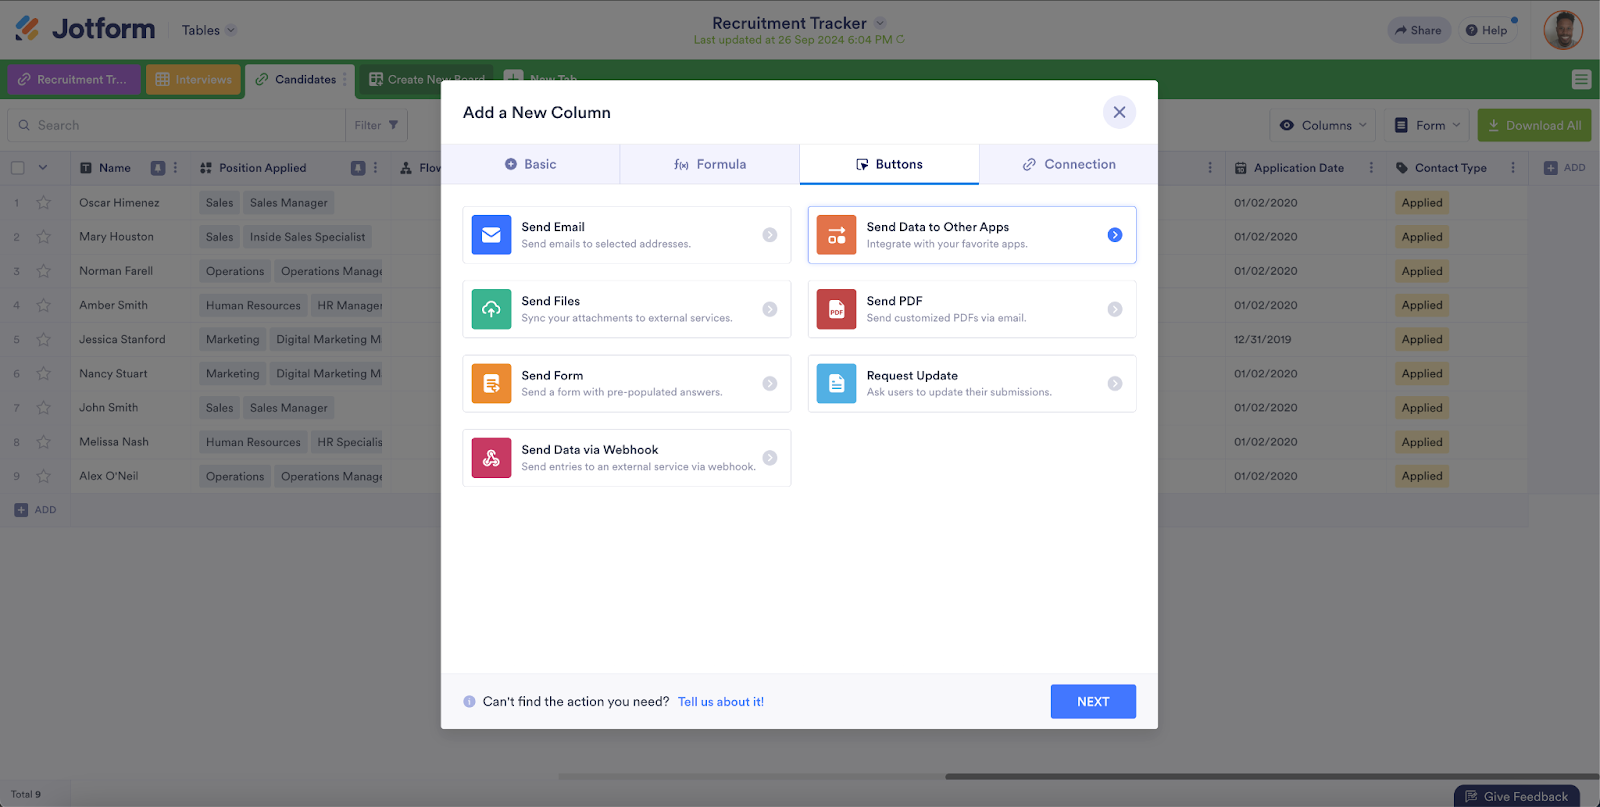
This could come in handy, especially if you need to update or edit existing appointments or bookings.
And in Jotform Workflows, you can trigger a new scheduled appointment via the Outlook Calendar, Google Calendar, or Zoom integration element once your forms are approved.
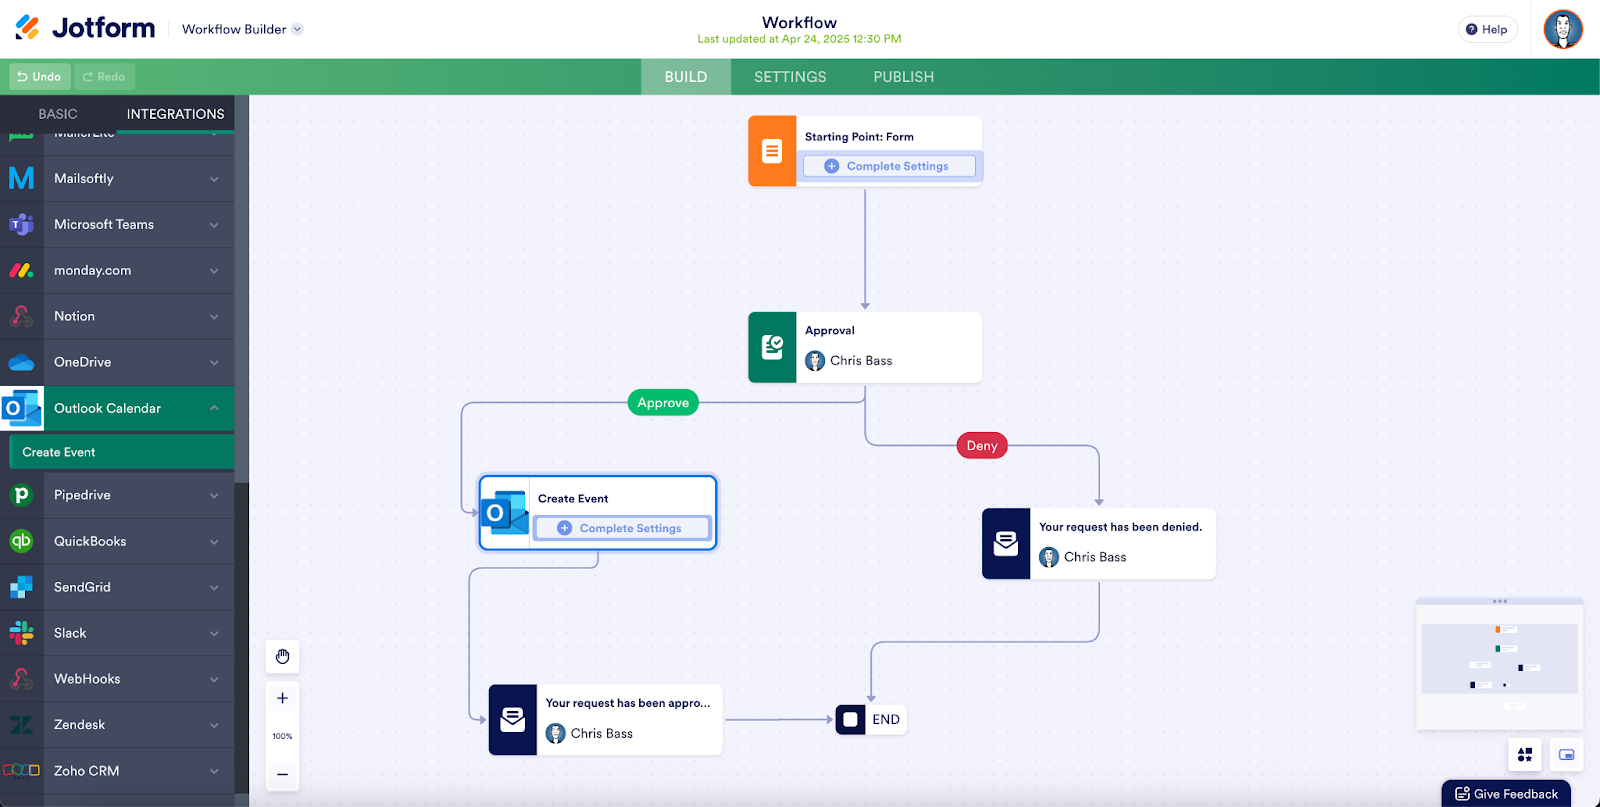
These are just a couple of ways to gain more efficiency: by not having to jump from one software solution to the next to set up the calendar associated with your forms.
Pro Tip
Jotform Tables and Jotform Workflows are currently incompatible with Calendly due to its configuration.
Conclusion
Given their popularity, it’s not surprising that Google Calendar, Outlook Calendar, and Calendly are some of the most heavily used solutions within Jotform for meetings and appointments.
Now, Jotform Appointments can help you streamline your scheduling and event planning.
Jotform Appointments’ two-way communication processes your connected calendars and meeting apps to show your availability and creates new events for when a customer submits an appointment form.
With added flexible event settings, fully customizable email notifications, and the ability to define your working hours and appointment conditions, your schedule is handled.
Jotform’s powerful Google Calendar, Outlook Calendar, and Calendly syncs, flexible forms, and automation tools combine to create an appointment scheduling solution that helps you take full control, without switching tools.


 wasting time at work increases productivity")


Send Comment: