Do you ever get questions about whether you accept Apple Pay as a payment method on your order forms?
If you’ve felt some anxiety responding to this question, worry no longer: Your business can answer with an emphatic yes.
Apple Pay for business is a digital wallet and credit card alternative that simplifies the purchase process for individuals and businesses. It began in 2014 and has grown in use and popularity since. Available through Apple mobile devices and over the web, Apple Pay is on pace to handle one in every 10 global card transactions by 2025, according to recent trend data.
Offering Apple Pay as a payment method gives your organization the payment flexibility today’s customers seek and “future proofs” your organization for the digital wallet growth to come.
It’s well known that offering more payment methods leads to a higher conversion rate. And Apple Pay is no exception: A popular crowdfunding site saw conversions increase up to 250 percent when customers used Apple Pay to fund campaigns.
Part of the reason digital wallets increase the conversion rate is because confirming a purchase with biometric authentication (Touch or Face ID) makes payment quick and simple, skipping additional steps that might create friction in the payment process.
The benefits of Apple Pay
Apple Pay offers a slew of benefits to all participants, not the least of which is security. For example, all a bad actor may need to make a fraudulent credit card purchase would be a customer’s number, expiration date, and three-digit code. However, with Apple Pay, Face ID and Touch ID (or the passcode) are necessary to make purchases on Apple, other devices, or the Safari browser, adding an extra layer of security credit cards can’t claim.
By offering Apple Pay through Stripe Checkout — which we’ll get into shortly — your organization will meet PCI compliance and PSD2 requirements in Europe as Stripe automatically handles strong customer authentication (SCA) for you.
Additionally, you can now offer Apple Pay through the Square payment gateway, which also handles SCA for you.
Here are more benefits you’ll see from adding Apple Pay as a payment method:
- Many organizations now garner a higher percentage of their traffic from mobile than the web, so adding Apple Pay creates a seamless process for the majority of their customers.
- Digital wallet payments have fewer chargebacks than credit cards.
- Apple Pay provides a contactless payment option at retail locations to safeguard customers’ health.
- Organizations achieve a certain brand authority by being associated with Apple and offering a digital wallet payment method.
How to accept payments using Apple Pay through your forms
It’s easy to accept Apple Pay as a payment method for your order forms through both our Stripe and Square Checkout integrations. Note that you’ll need a Stripe or Square account to support Apple Pay. You can sign up here for a Stripe account and here for a Square account (signup is free).
First let’s dive into offering Apple Pay through Stripe Checkout.
If you’d like to view this area of your Stripe account settings, log into your Stripe Dashboard and click the settings icon in the upper right corner.
Next, click on Checkout and Payment links under the Payments heading.
In the Checkout and Payment Links section, you’ll see Apple Pay under Faster checkout. However, mobile wallet payments will be auto-enabled globally for all Jotform customers, so the work is done for you on the back end.
With a Stripe Checkout form, your hosted payment page will automatically adapt to your customers’ device and location.
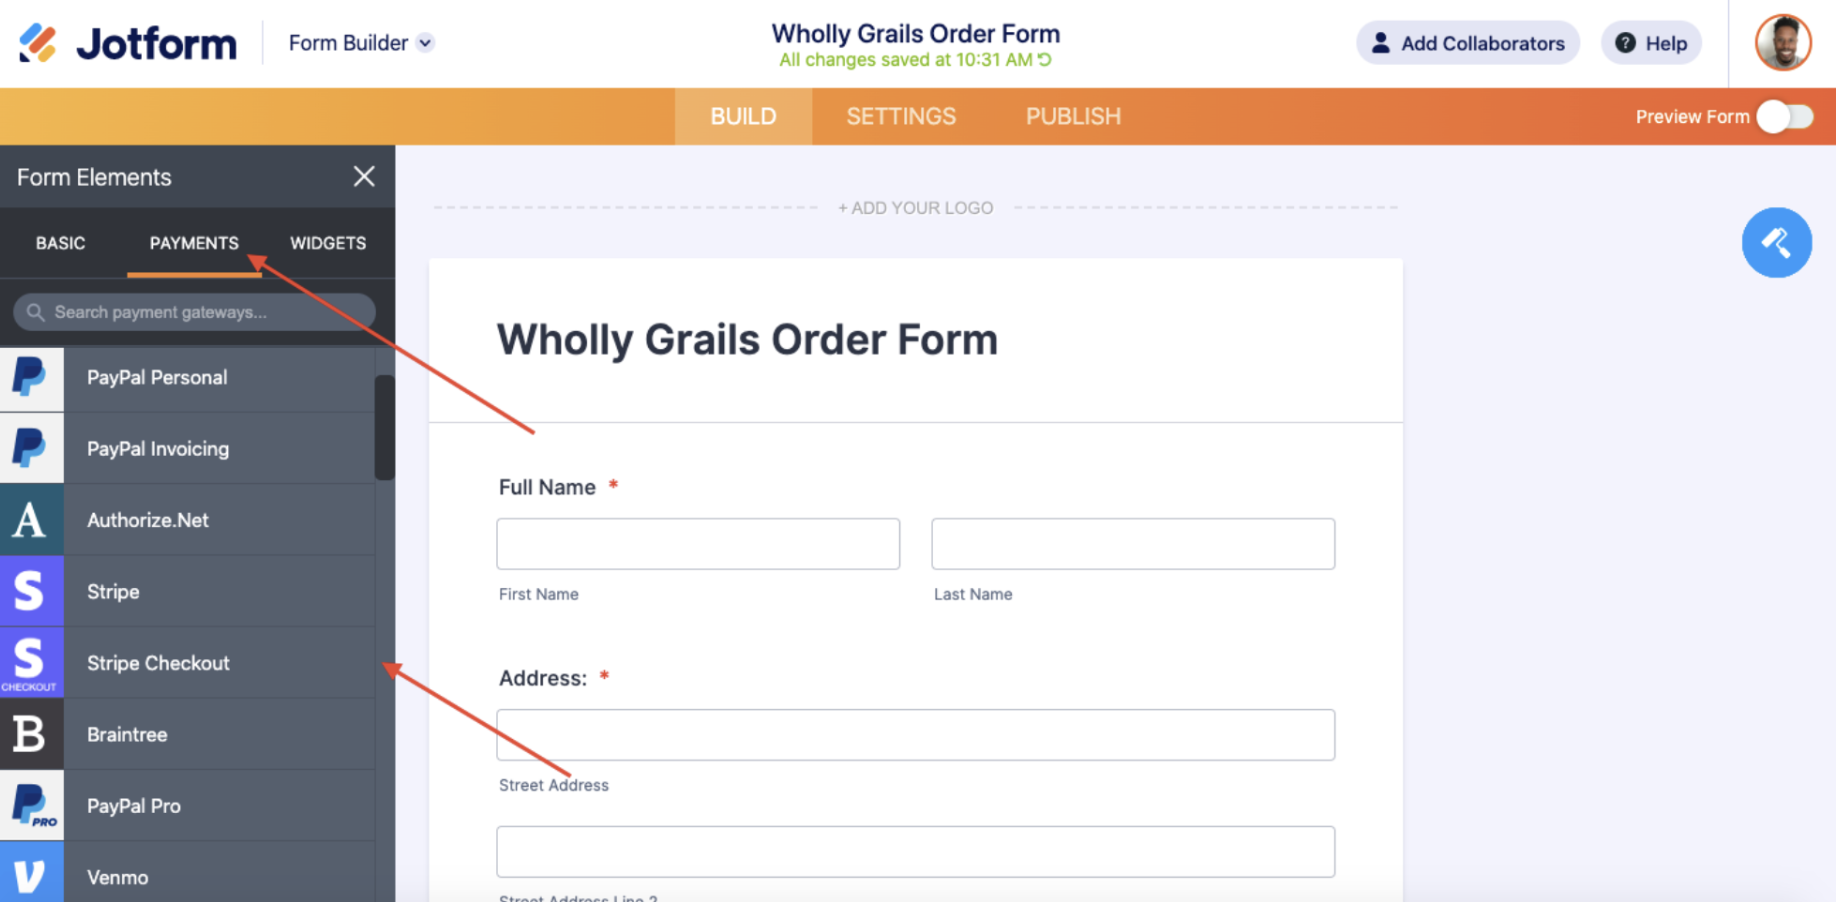
When creating your online order or donation form within the Form Builder, click on Add Form Element on the left of the screen; then select Stripe Checkout as your payment gateway from our list of integrations.
Once you verify and connect your Stripe account, your order form will be set to start accepting payments via Apple Pay dynamically (through Stripe Checkout).
You can set up your order or donation form with all your product details, including additional payment settings, in Jotform’s interface.
For instance, you can adjust supplemental payment settings like payment types (products, subscriptions, or donations) and a host of other payment gateway settings, including custom data fields, coupons from your Stripe account, and stock management.
That’s it! The Apple Pay option will appear when the customer uses a supported device with at least one saved card.
Offering Apple Pay through Square
There are two ways to integrate Apple Pay via your Square account, and the steps are similar to the ones above.
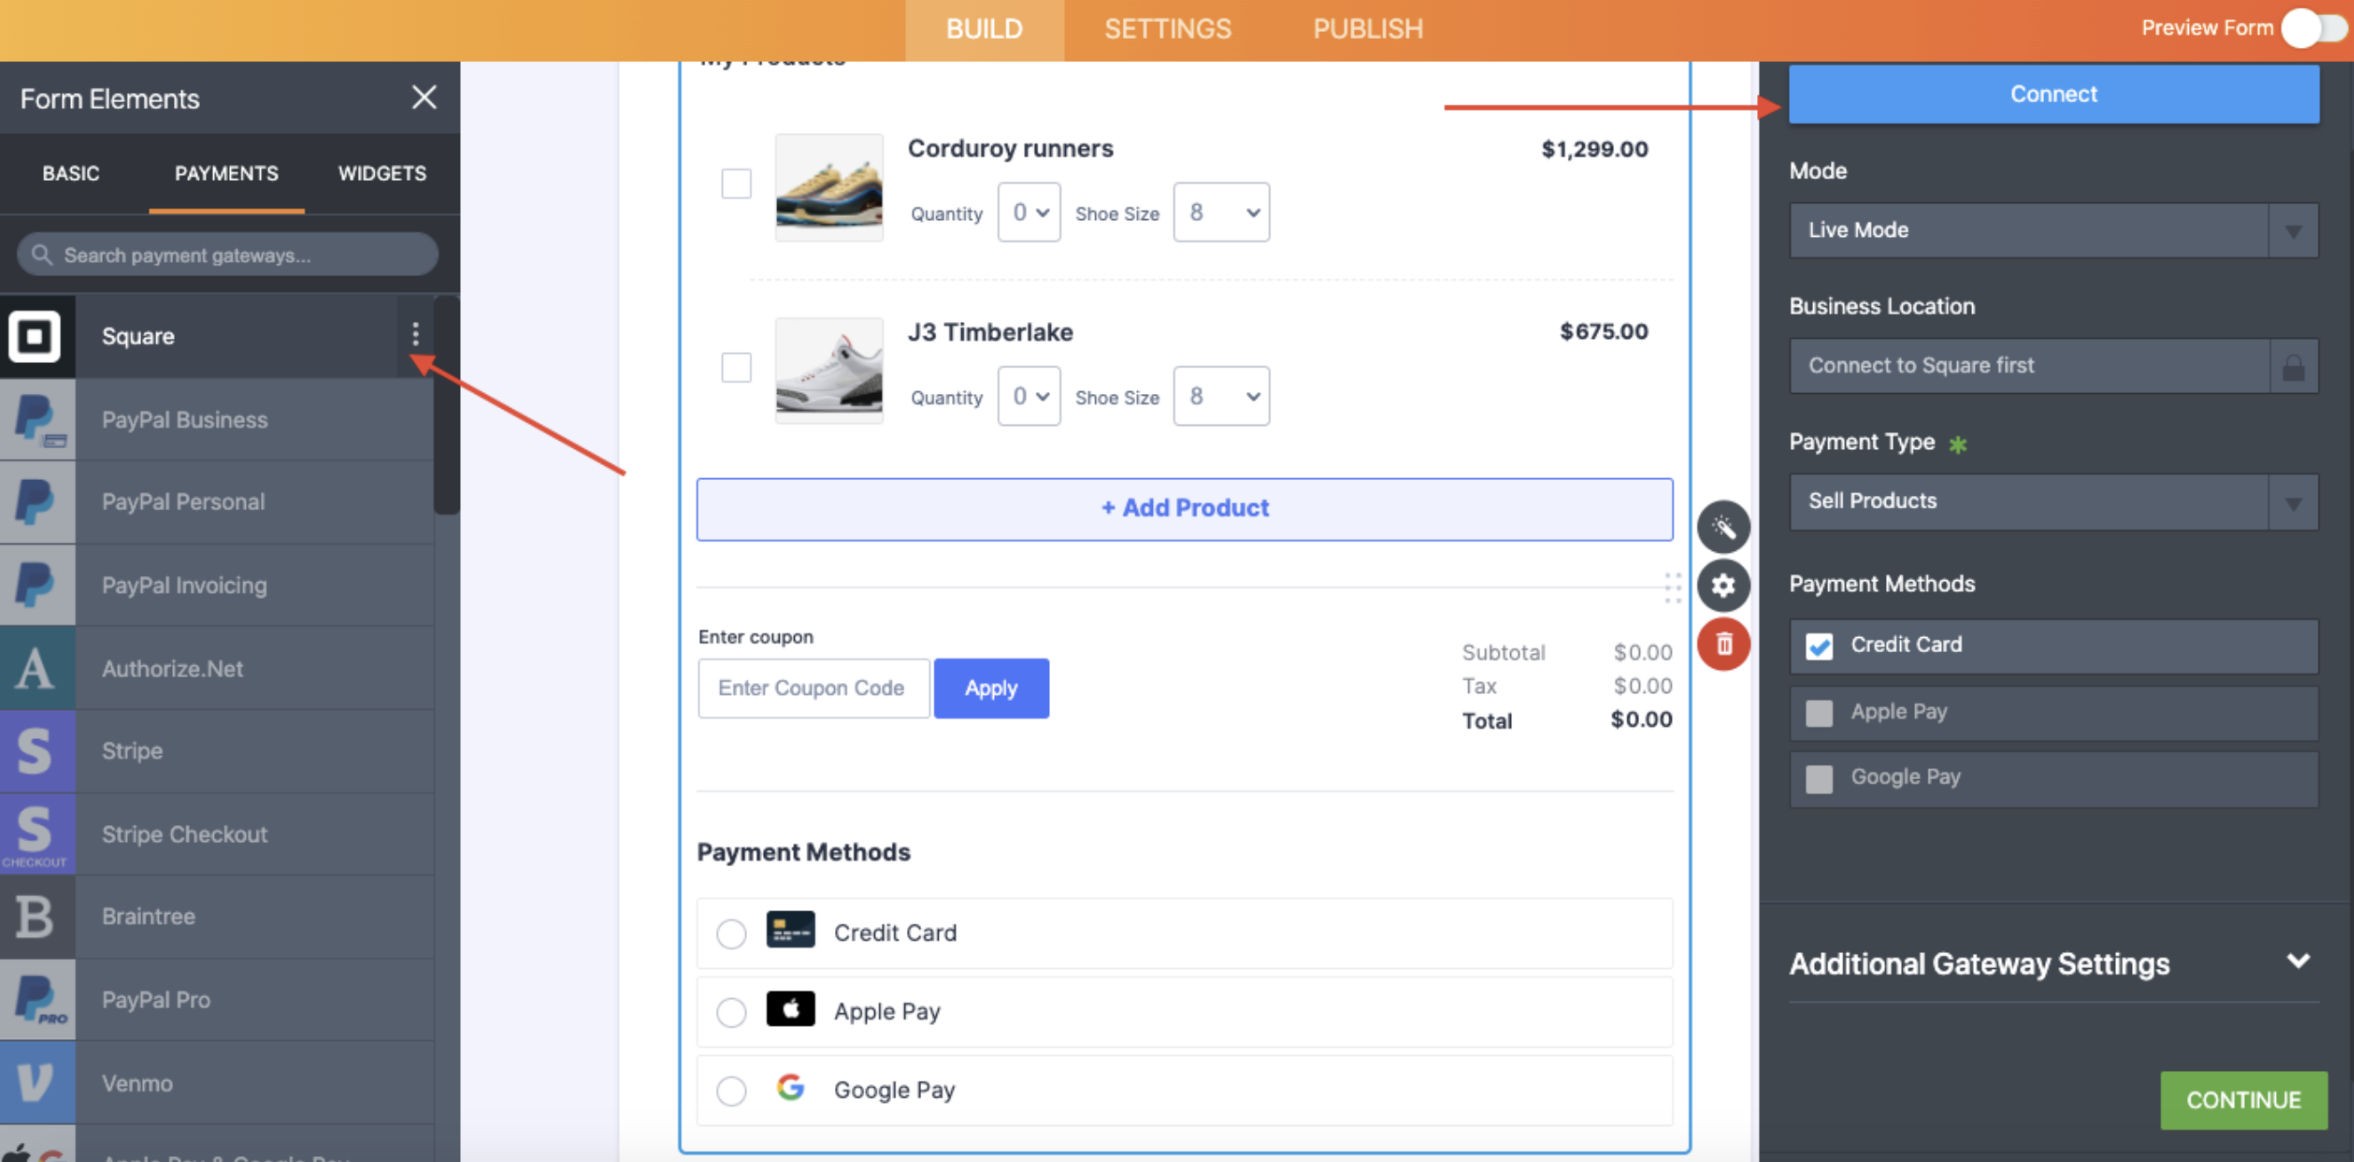
The first is by selecting Square from the Payments menu on the left. A window on the right of the screen will open to connect to your Square account.
When you click Connect, you’ll be prompted to sign in and give Jotform access to your account.
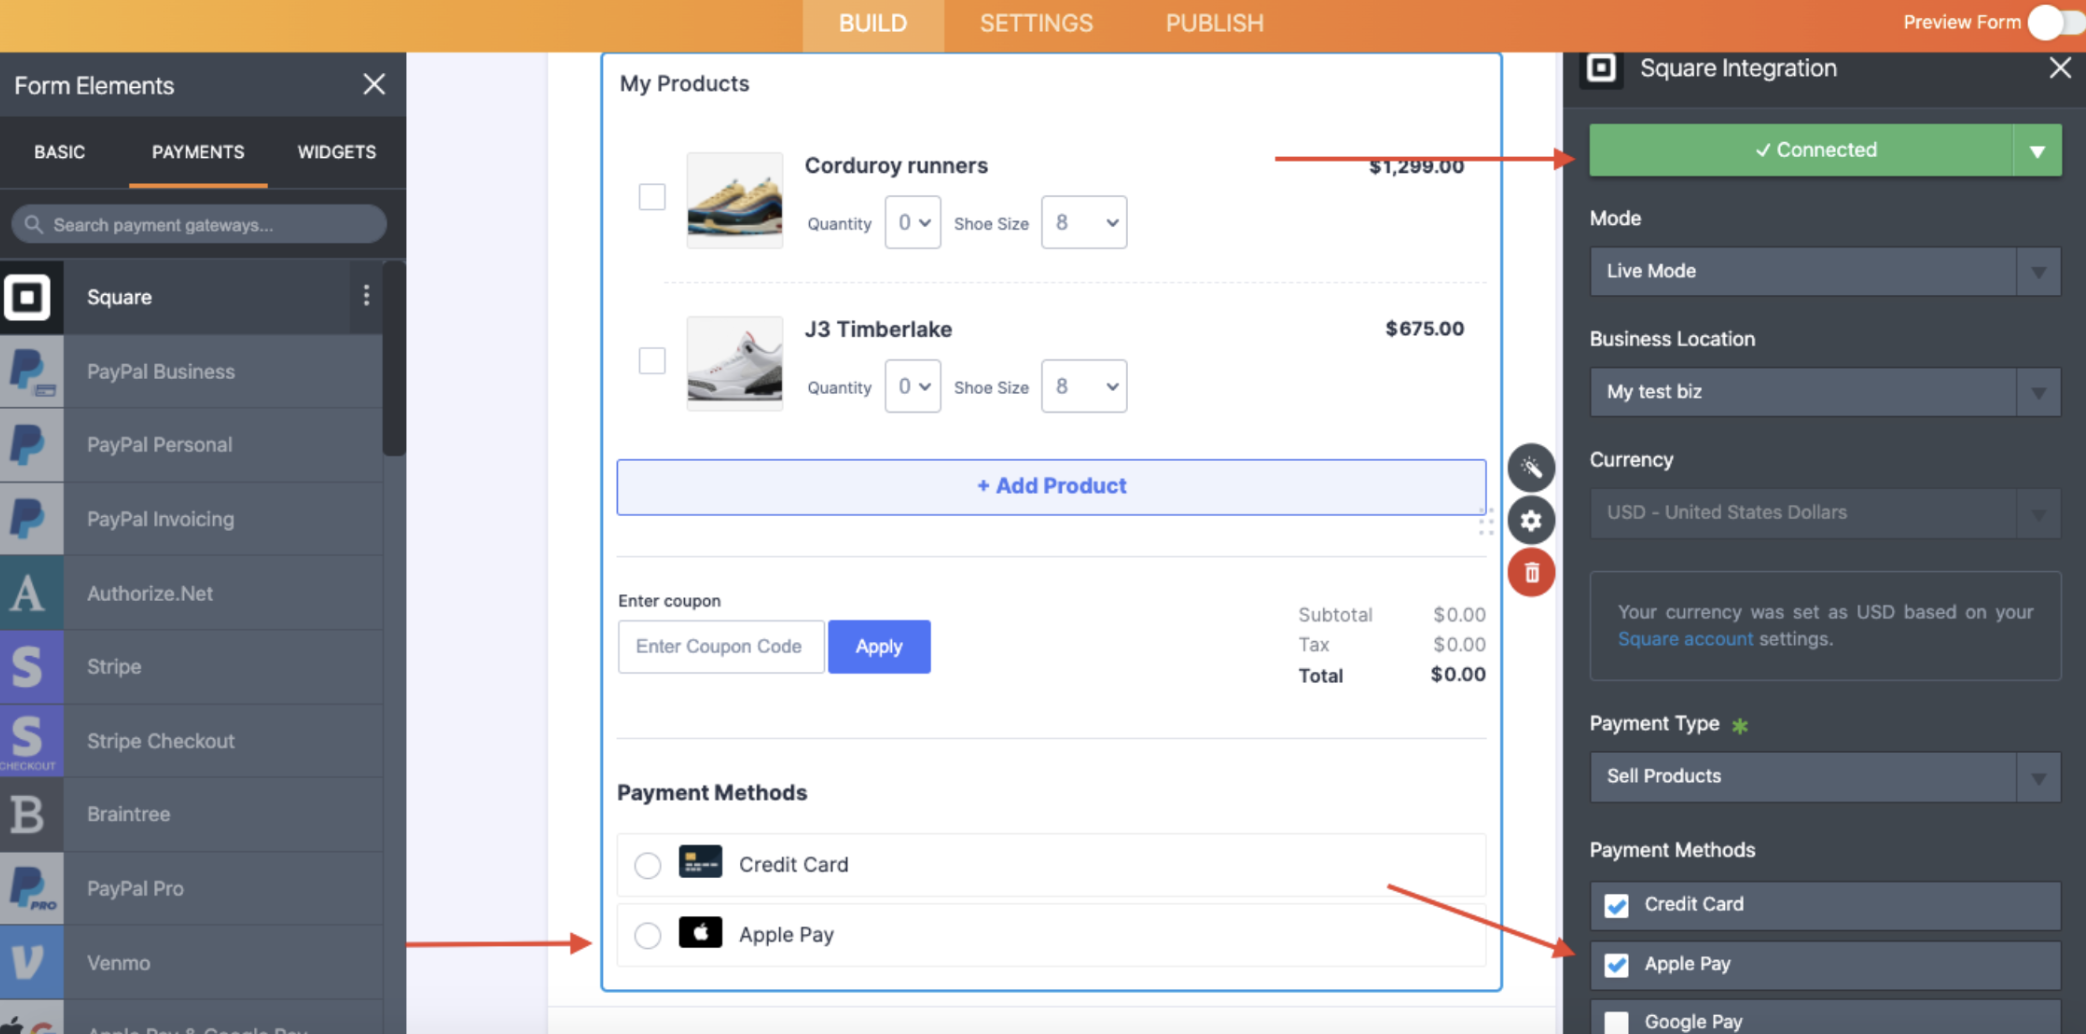
Once your Square account is connected to Jotform, you’ll see the option to include Apple Pay (as well as Google Pay) in your form as a payment option.
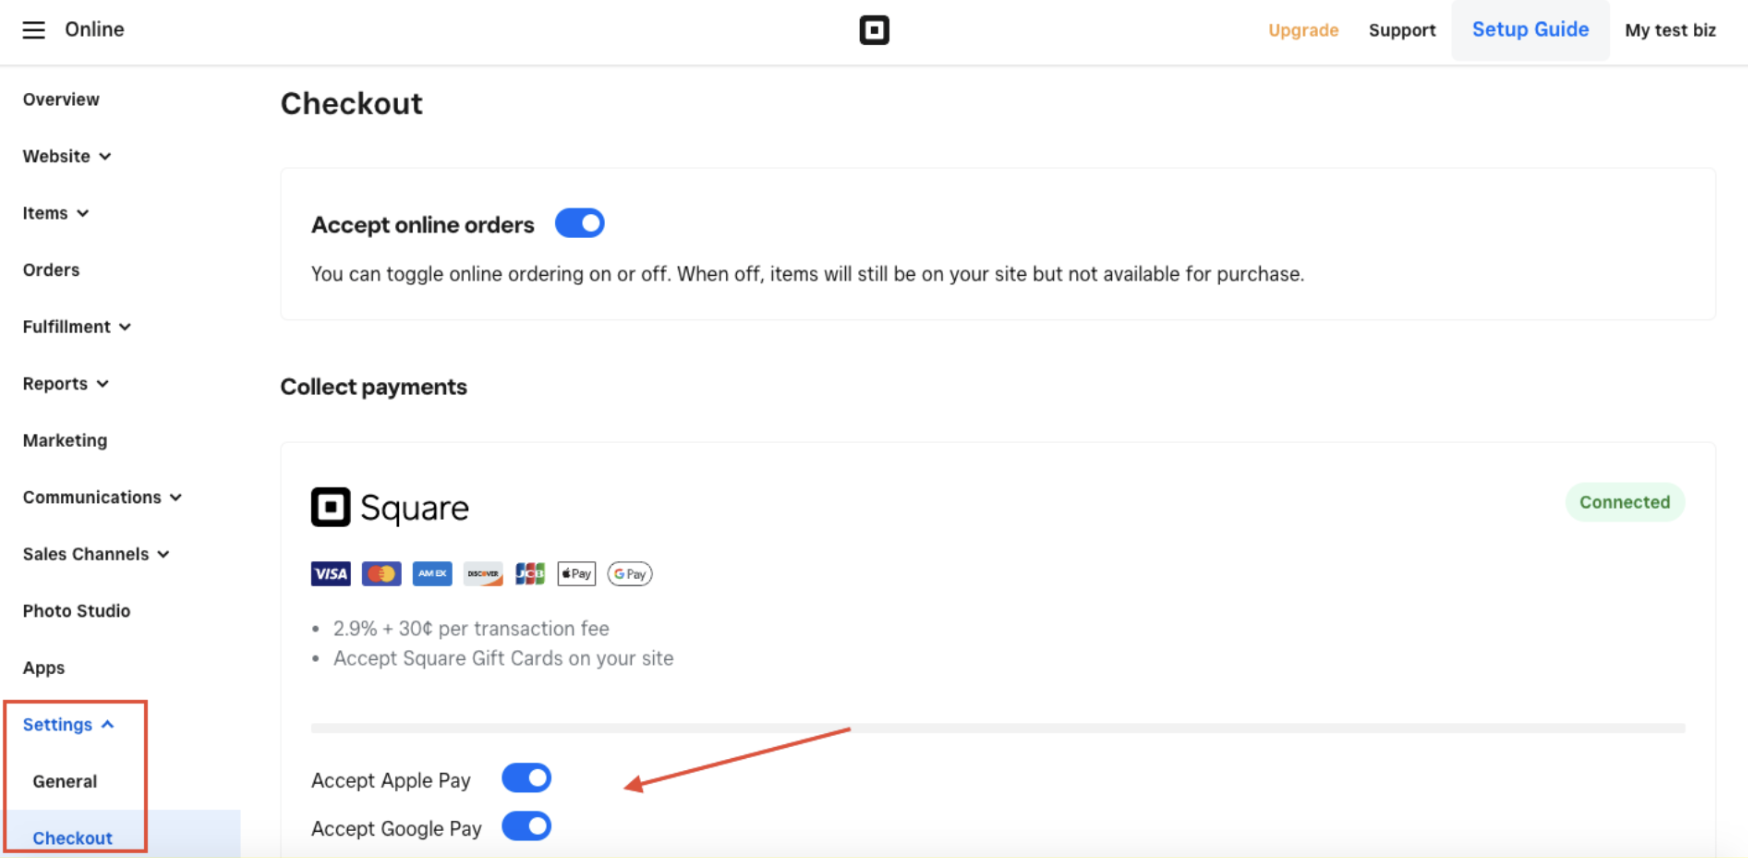
Be aware that to offer Apple Pay within Jotform, your Square account must be enabled to accept Apple Pay in the Settings > Checkout screen of your Square store dashboard.
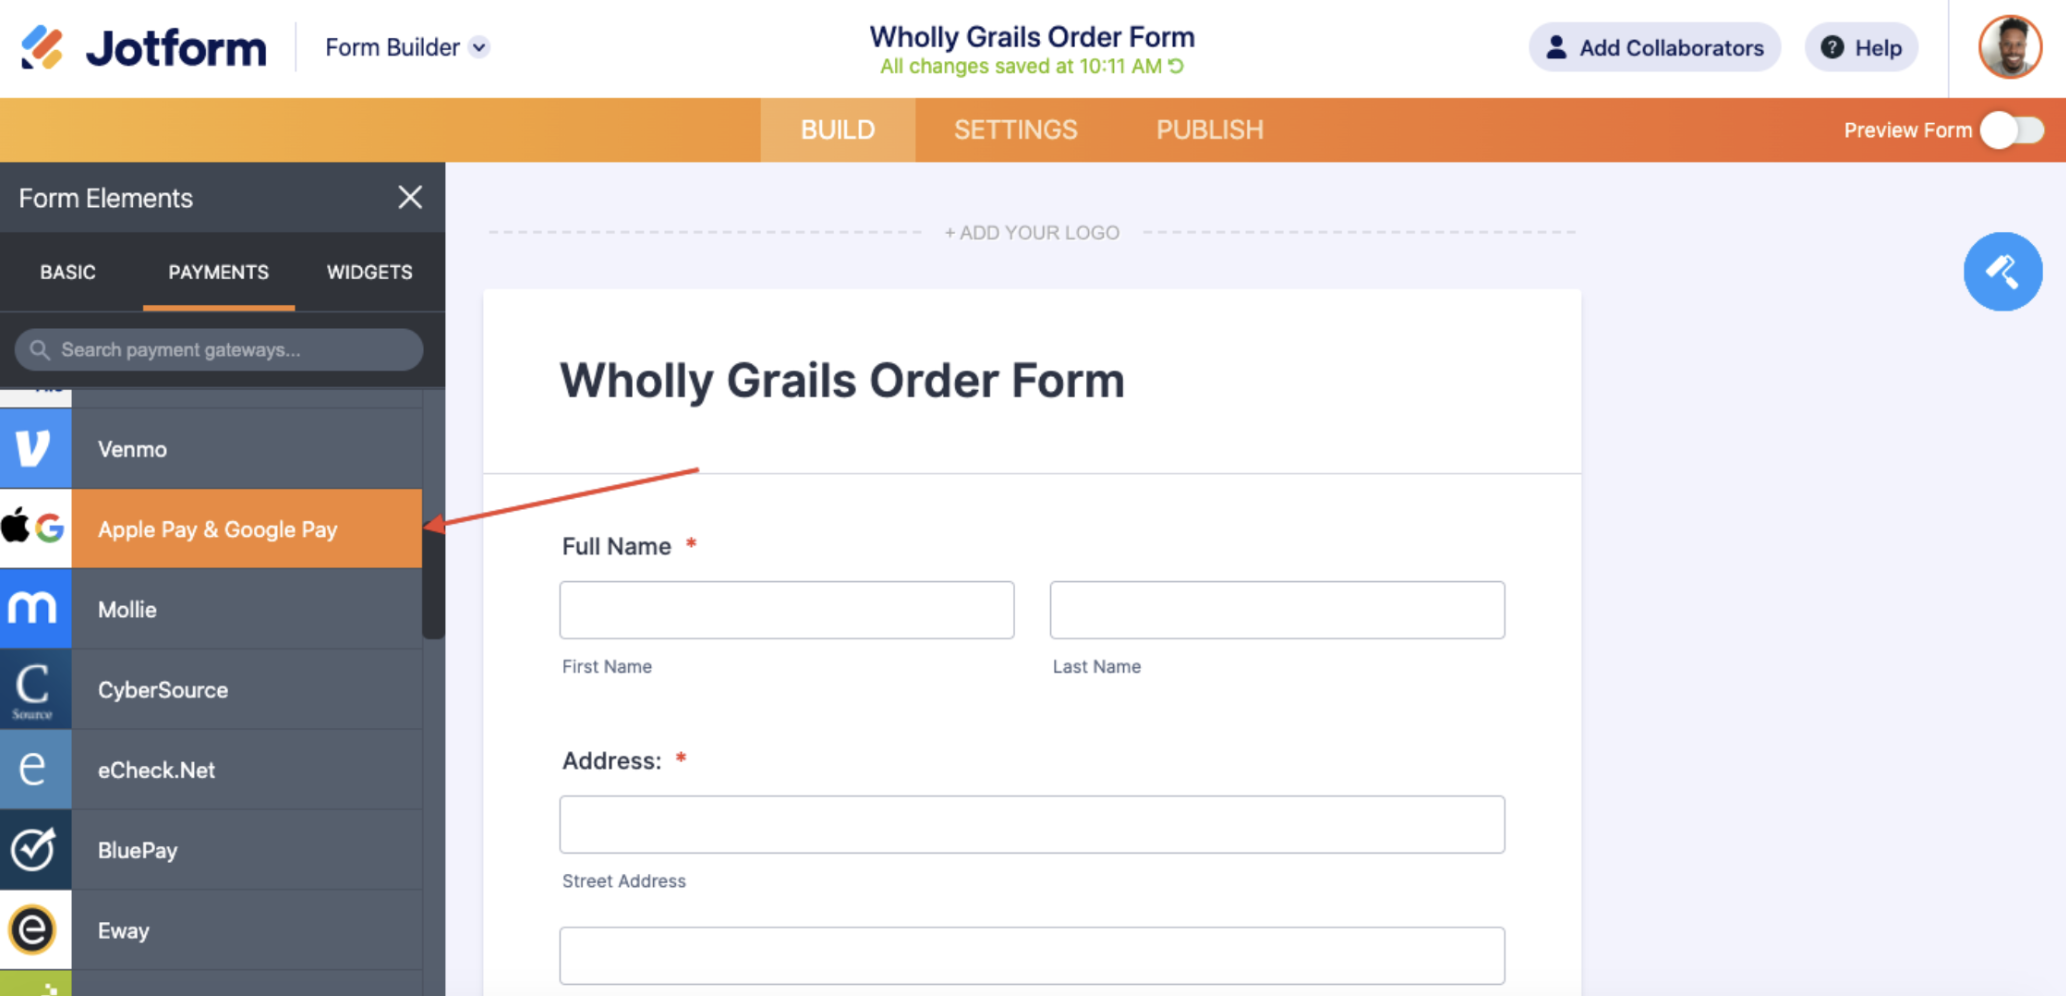
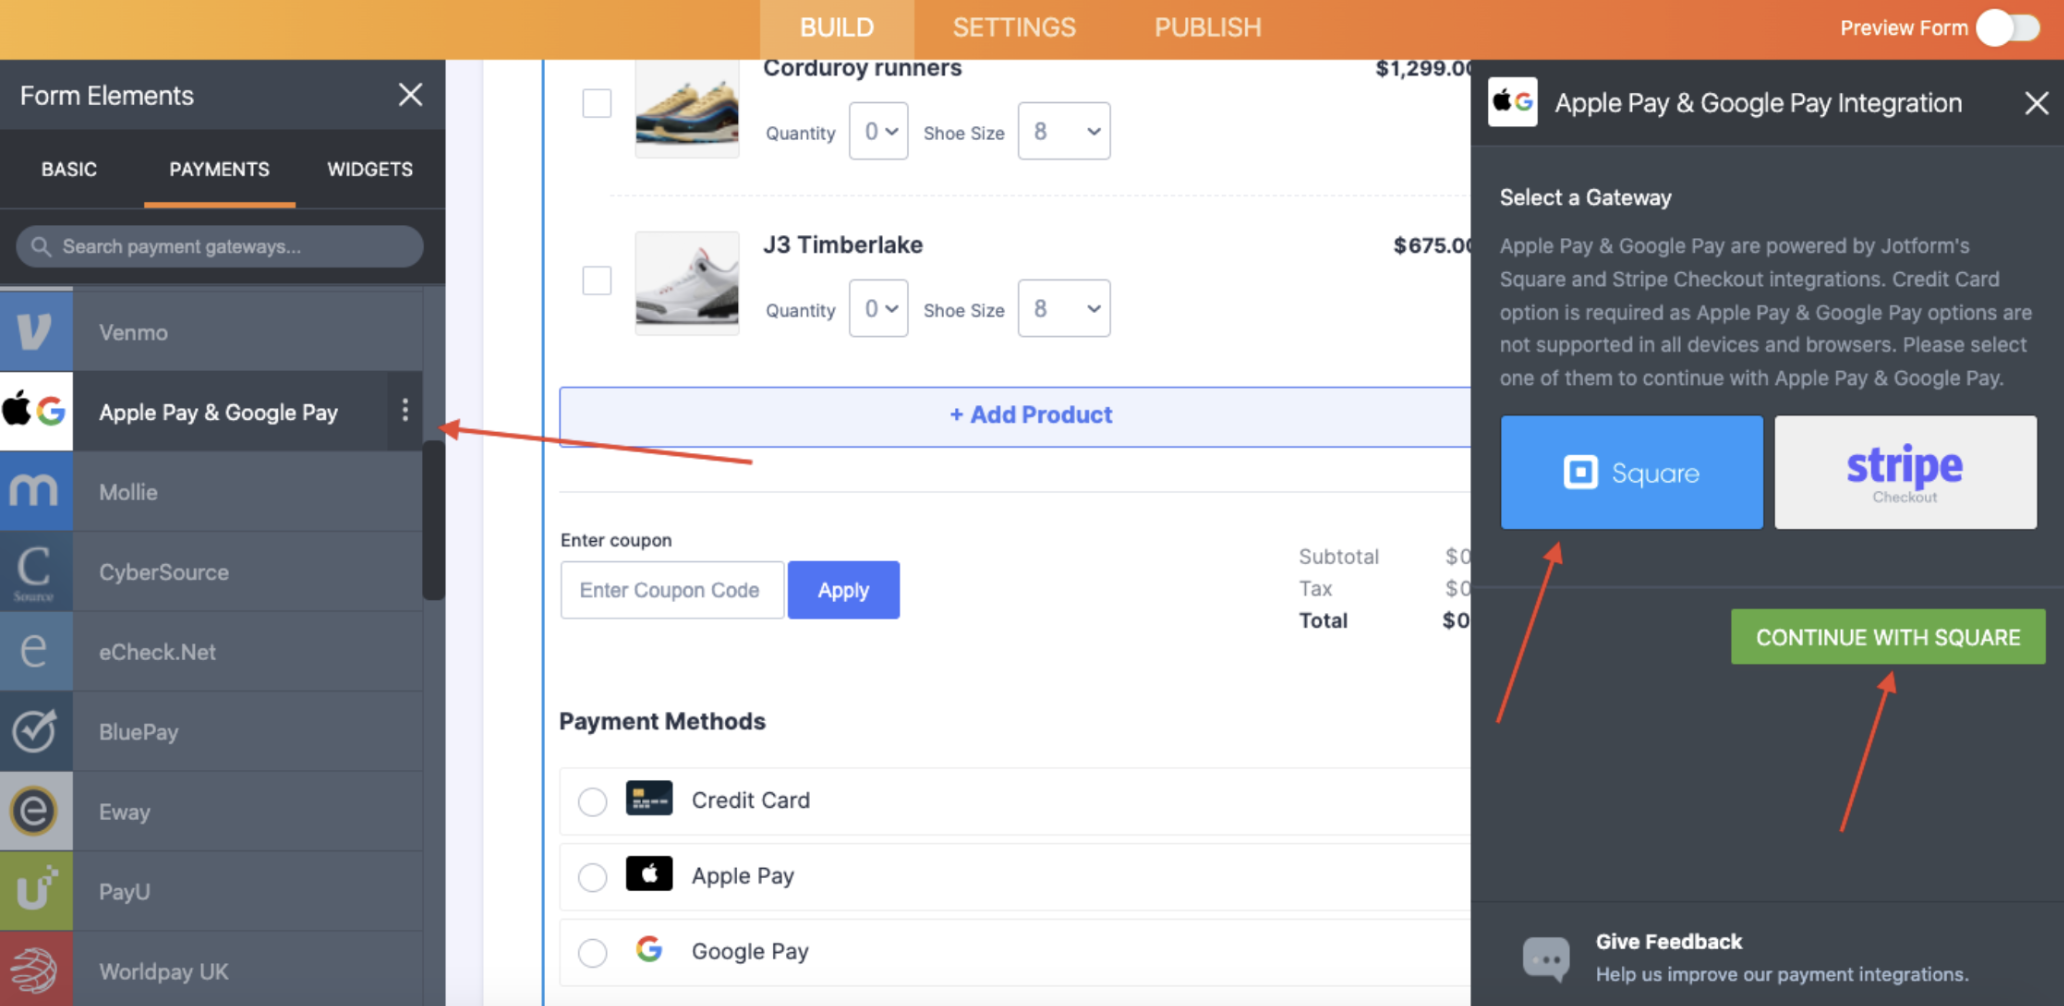
The second way to integrate Apple Pay to your Square account is by selecting the Apple Pay & Google Pay option from the Payments menu on the left.
Next, select the Square gateway in the right menu and click Continue with Square.
At that point, there are some nuances to be aware of.
When you offer Apple Pay through Square, note that two digital wallet options — Apple Pay and Google Pay — will appear on your finished form. This benefits everyone because your customers will be aware that alternate forms of payment are possible for your goods and/or services.
That said, as customers prepare to pay, either the option for Apple Pay or Google Pay will be “grayed out” based on the operating system they’re using.
For example, if your form is displayed on the Google Chrome browser, Google Pay will be available and Apple Pay grayed out. If the form is opened using Apple’s Safari browser, Apple Pay will be available and Google Pay will be grayed out.
This is different from integrating via Stripe in that Stripe first detects the user’s browser/operating system and then serves up only the corresponding payment option on your form.
For more in-depth information about offering Apple Pay (and Google Pay) via Square, click here.
Apple Pay is a smart and safe way to reach more consumers
By accepting payments with Apple Pay via Stripe Checkout or Square, you’ll give your customers a payment option they want and gain access to additional markets across the globe. Currently, users in more than 50 countries and regions can use Apple Pay.
Combined with Square and Stripe Checkout’s extensive language and currency capabilities (plus security compliance), Apple Pay helps you extend your brand into new regions with confidence.
On the privacy front, Apple doesn’t store or monitor the transactions that consumers make with Apple Pay. The company states that it doesn’t know what people are purchasing, nor does it save transaction information.
We often reach for our credit cards to make purchases because of the loyalty points or cash back earnings. Apple has this covered too. The Apple Card, Apple’s credit card, is deeply integrated into the Wallet app and Apple Pay, giving users 2 percent cash back on all Apple Pay purchases made with the Apple Card.
Last, you won’t have to worry about additional fees with Apple Pay. Jotform never charges transaction fees, so you’ll only pay either the standard Stripe account fees (2.9 percent + .30 per successful card charge, the same as all other Stripe credit card transactions) or the standard Square account fees (2.6 percent + .10 per successful card charge).
Begin accepting payments using Apple Pay via Stripe or Square today; you’ll make things easier for your customers and more fruitful for your organization.









Send Comment:
2 Comments:
More than a year ago
I get this when I try to add Apple Pay?
Add a new domain
In order to register your domain with Apple, you will need to first verify your ownership of the domain.
1
Provide the domain where the file will be hosted
Input the top-level domain (e.g. stripe.com) or sub-domain (e.g. shop.stripe.com) that you wish to enable Apple Pay for.
example.com
2
Download verification file…
3
Host the verification file
You'll need to host the verification file you downloaded above at your domain in the following location:
More than a year ago
Jotform is best friend web ever