
If you’ve ever worked on a large Microsoft Excel spreadsheet, you’ll know that entering data directly into the sheets can be a pain. With all the horizontal and vertical scrolling, it’s easy to lose your bearings — adding time to the process and increasing the risk of making mistakes.
The good news is that there’s a faster, less error-prone way to add or edit records: Excel has a built-in data entry form that streamlines this process with a clean, labeled dialog box. In this article, we’ll walk you through how to create an Excel data entry form, step by step.
And, if you often work on large or shared worksheets and want a more powerful option for data entry, we’ll introduce you to Jotform, a leading form builder with advanced functionality and a direct integration with Microsoft Excel.
What is an Excel data entry form?
A data entry form in Microsoft Excel is a dialog box that displays a table one row at a time, including all the column fields. Data entry boxes are commonly used by data analysts, project managers, human resources and operations teams, and small business owners.
If you’re dealing with a large worksheet, a data entry form makes it easier to clearly find the cell you’re looking for so you can type information into labeled fields instead of raw cells. You can avoid having to scroll horizontally and vertically, ensuring that the data you’re entering goes in the right place, minimizing errors and typos.
You can use a data entry box to
- Edit existing data.
- Delete existing data.
- Navigate between rows and columns.
- Conduct simple criteria-based searches in the worksheet.
Note that only certain versions of Microsoft Excel support data entry forms: Excel 365, Excel 2019, Excel 2016, Excel 2010, and Excel 2007. If you use Excel for the Web, data entry forms aren’t available.
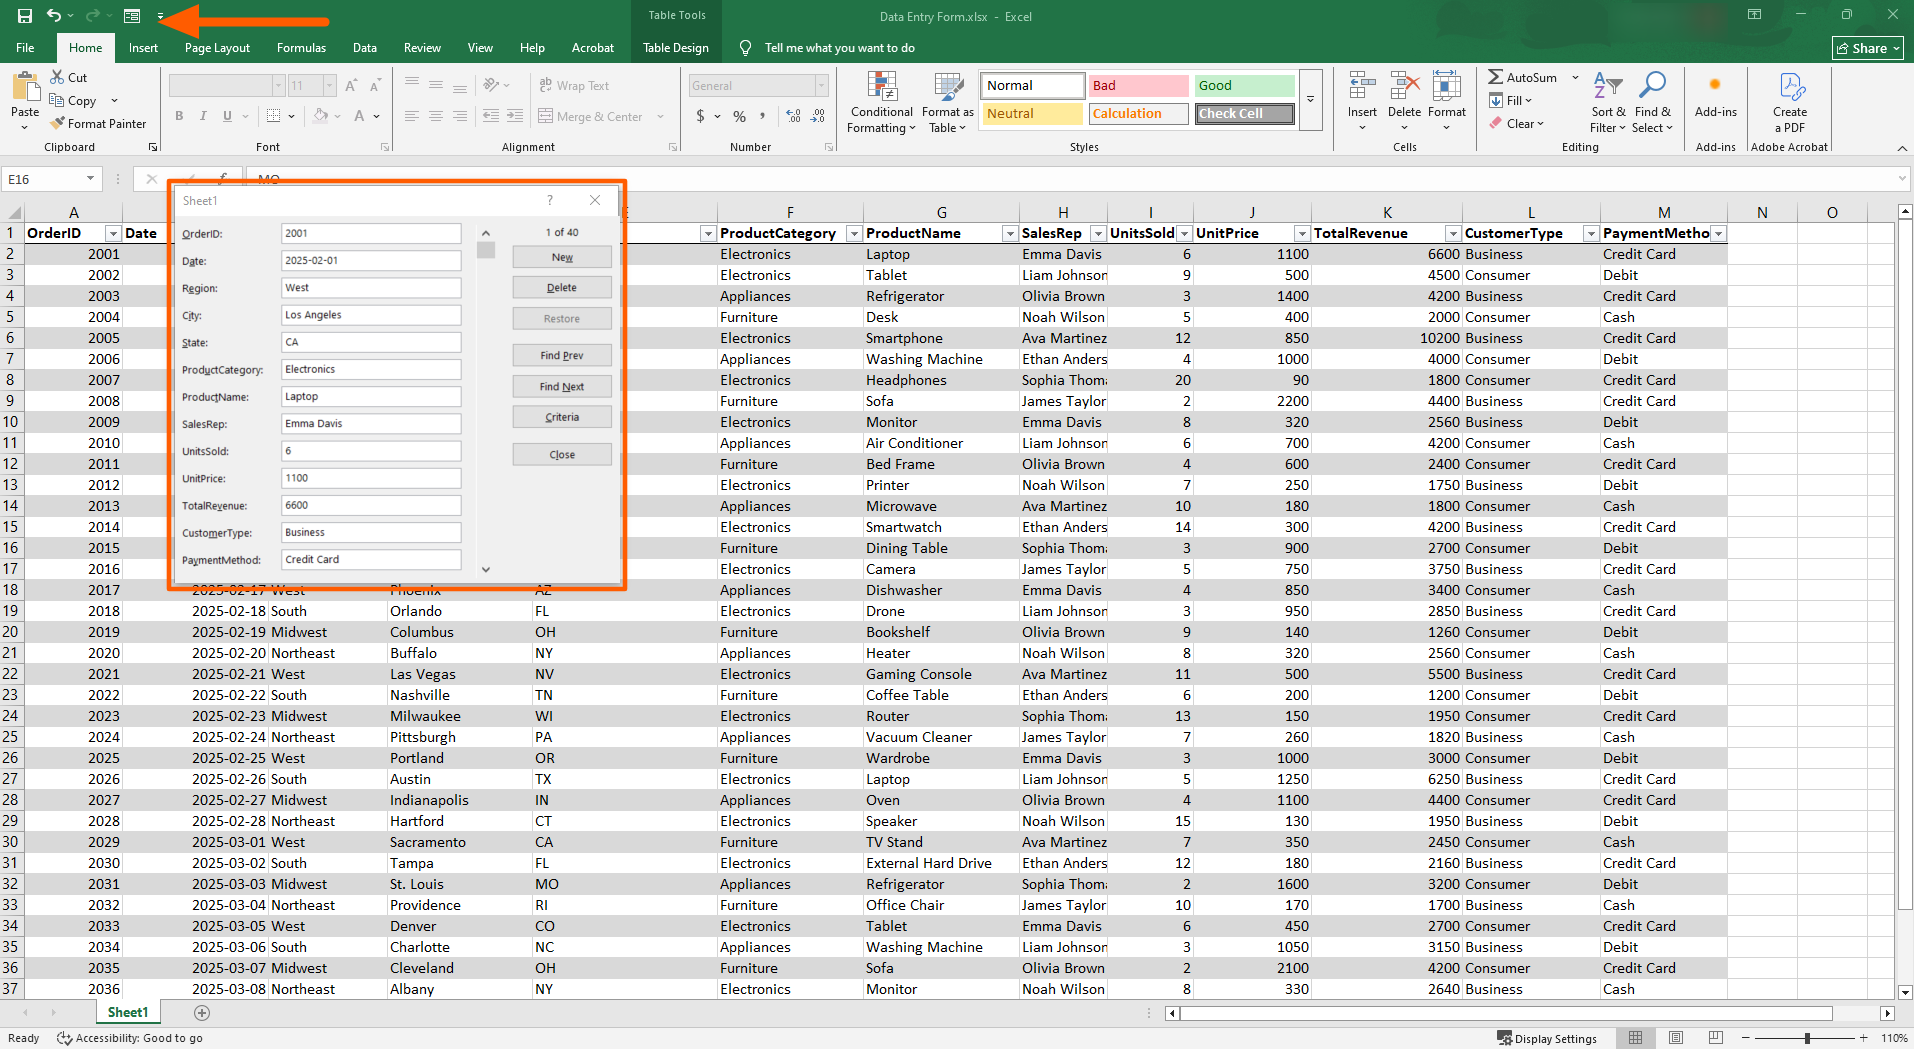
You can see an Excel data entry form example highlighted in the screenshot below.
Pro Tip
Make the most of your data by implementing effective practices for storage and analysis. Learn about proven data management techniques and best practices in our article, What is data management?
How to enable the data entry form in Excel
Figuring out how to enable this functionality isn’t as obvious as it may seem. The data entry form is hidden by default in Excel and needs to be manually added to the Quick Access Toolbar before you can use it.
Here’s how to create a data entry form in Excel:
- Open Microsoft Excel.
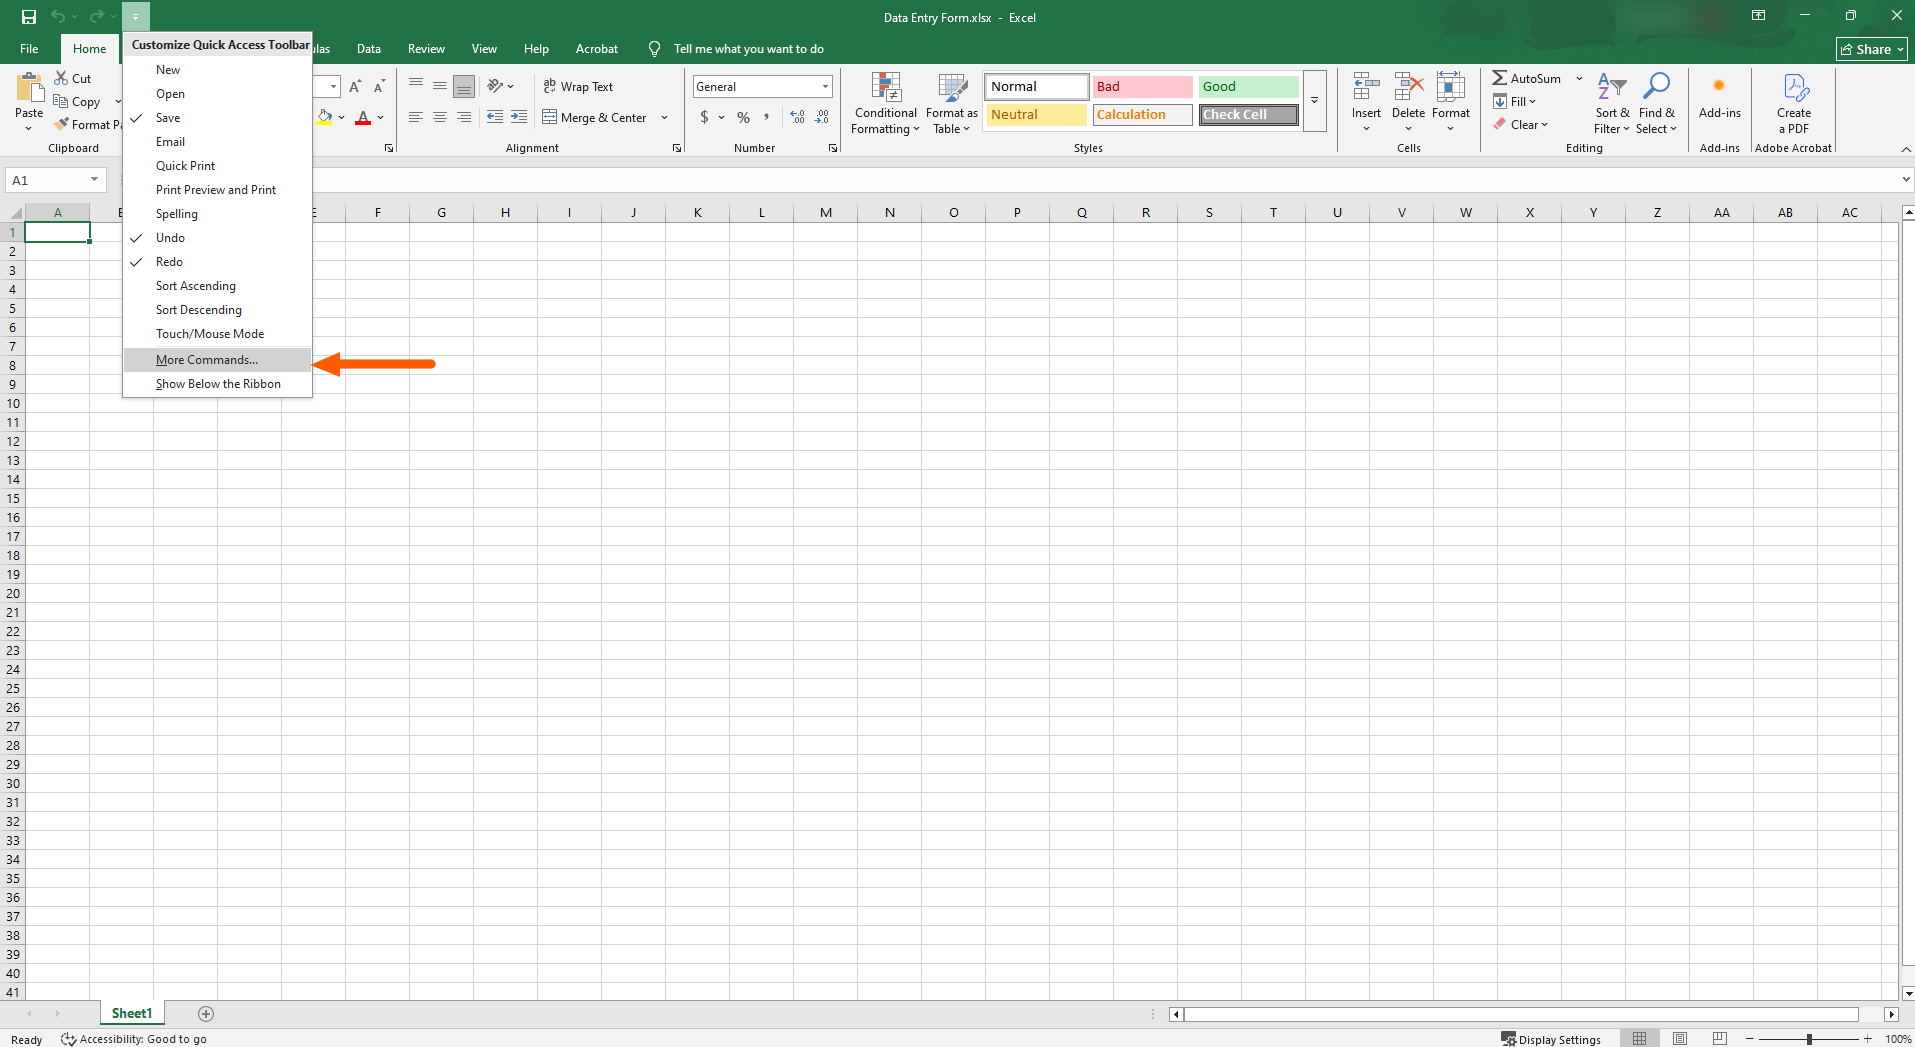
- Click the dropdown arrow at the end of the Quick Access Toolbar at the top left.
- Click More Commands.
- Under Choose commands from, select All Commands.
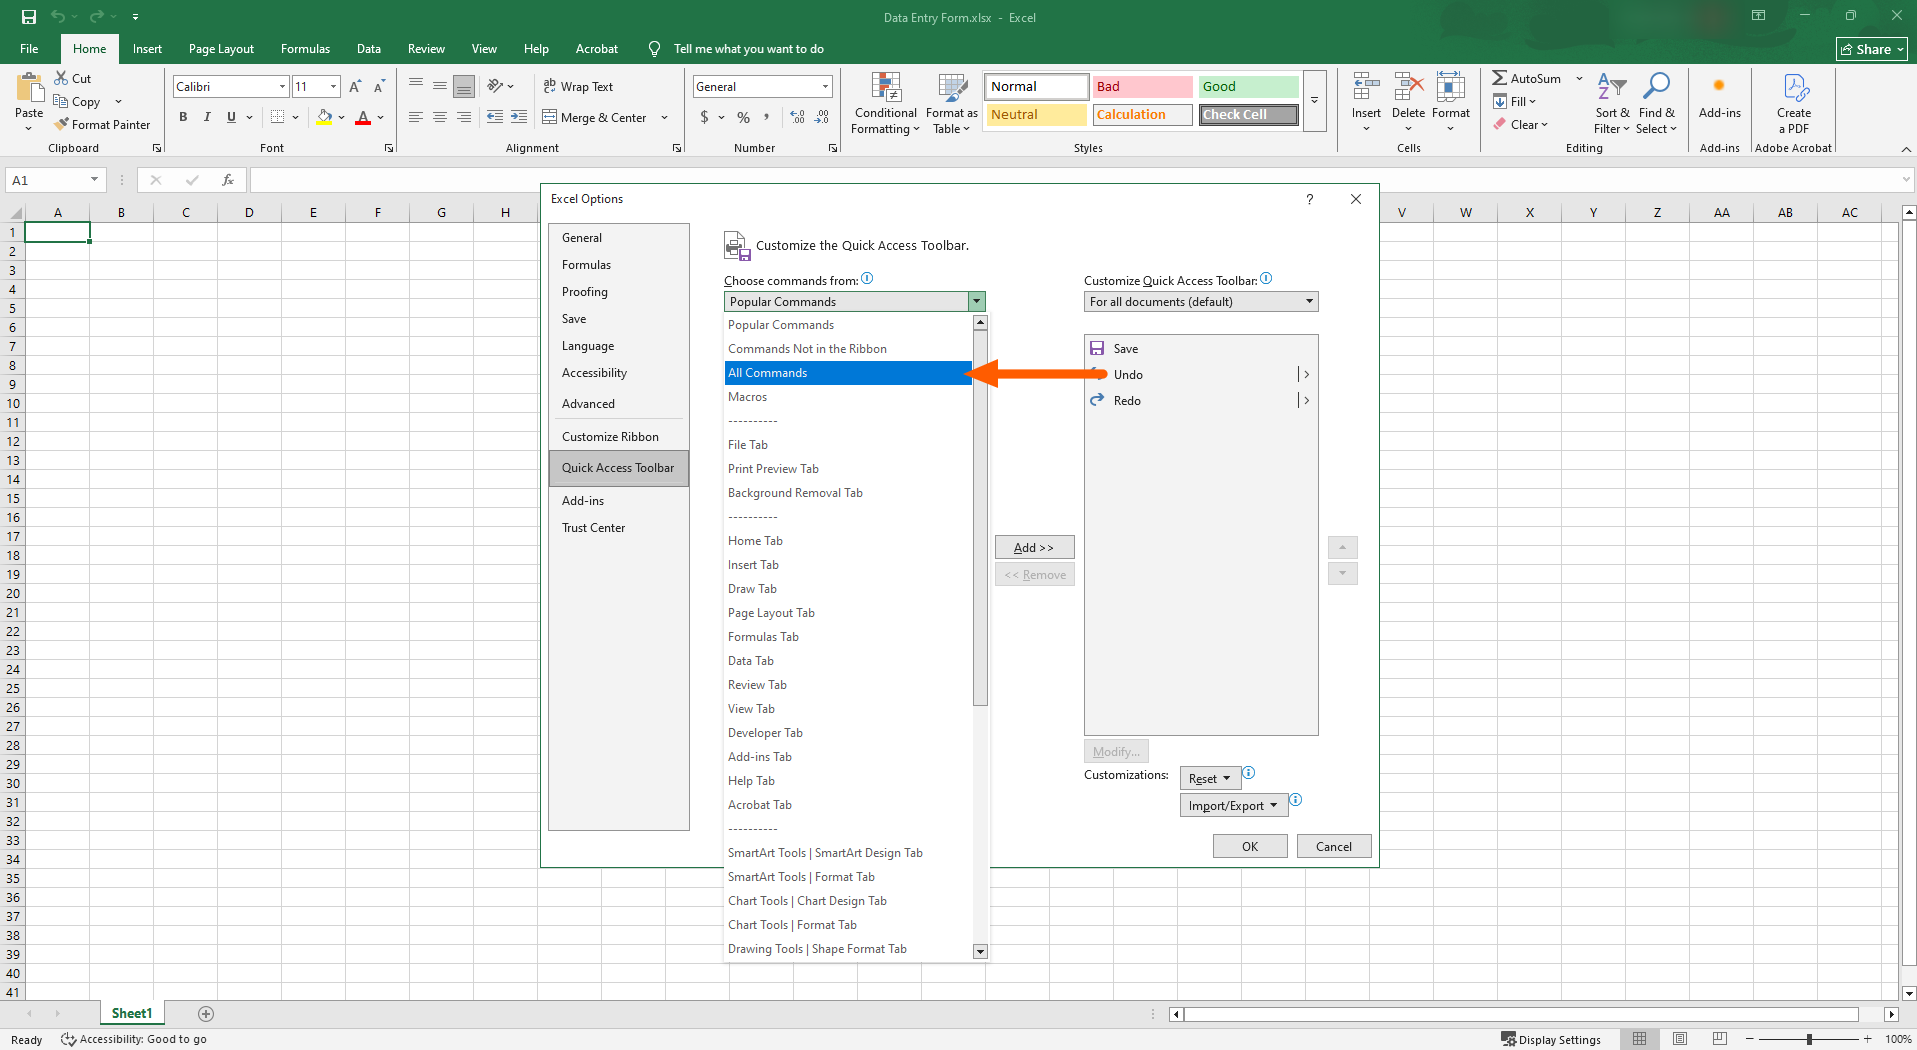
- Scroll down to Form. Click Add to move it to the toolbar.
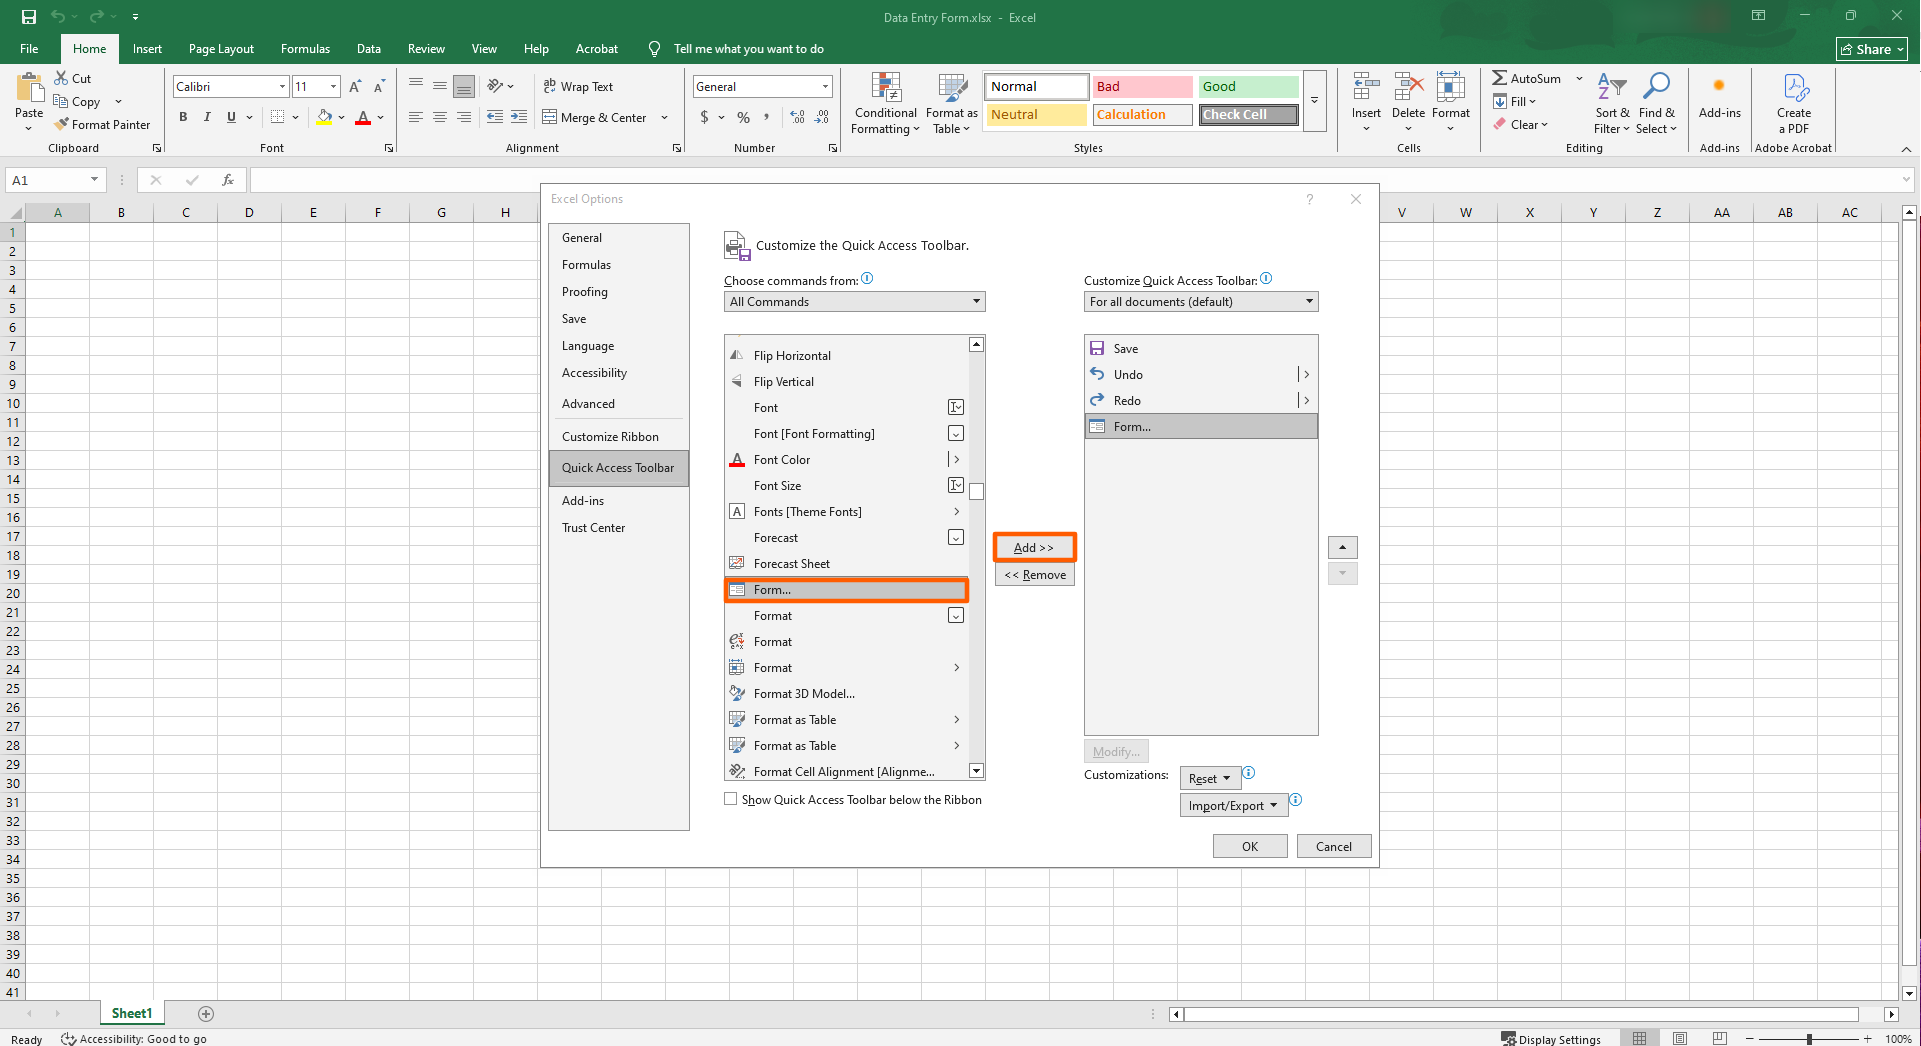
- Click OK. Now, the Form button will appear in the Quick Access Toolbar.

The data entry form is a fairly advanced Excel feature, but even some of the tool’s more basic features require a bit of know-how to use. Our other articles on how to create a form in Excel, how to create a dropdown in Excel, and how to insert a checkbox in Excel might be helpful. We also have a full Microsoft Excel tutorial to help you get your bearings.
How to use the Excel data entry form to add and edit records
Now that you’ve enabled the Excel data entry form in your worksheet, using it is a lot more straightforward. Note that you can only use the Excel data entry form with a fully functional Excel table — not a blank worksheet. To begin, you’ll need to create a new Excel table or open an existing Excel table. (If you need help, Microsoft provides a detailed tutorial on creating and formatting Excel tables).
Here’s how to use the Excel data entry form:
- Open the Microsoft worksheet for the relevant table.
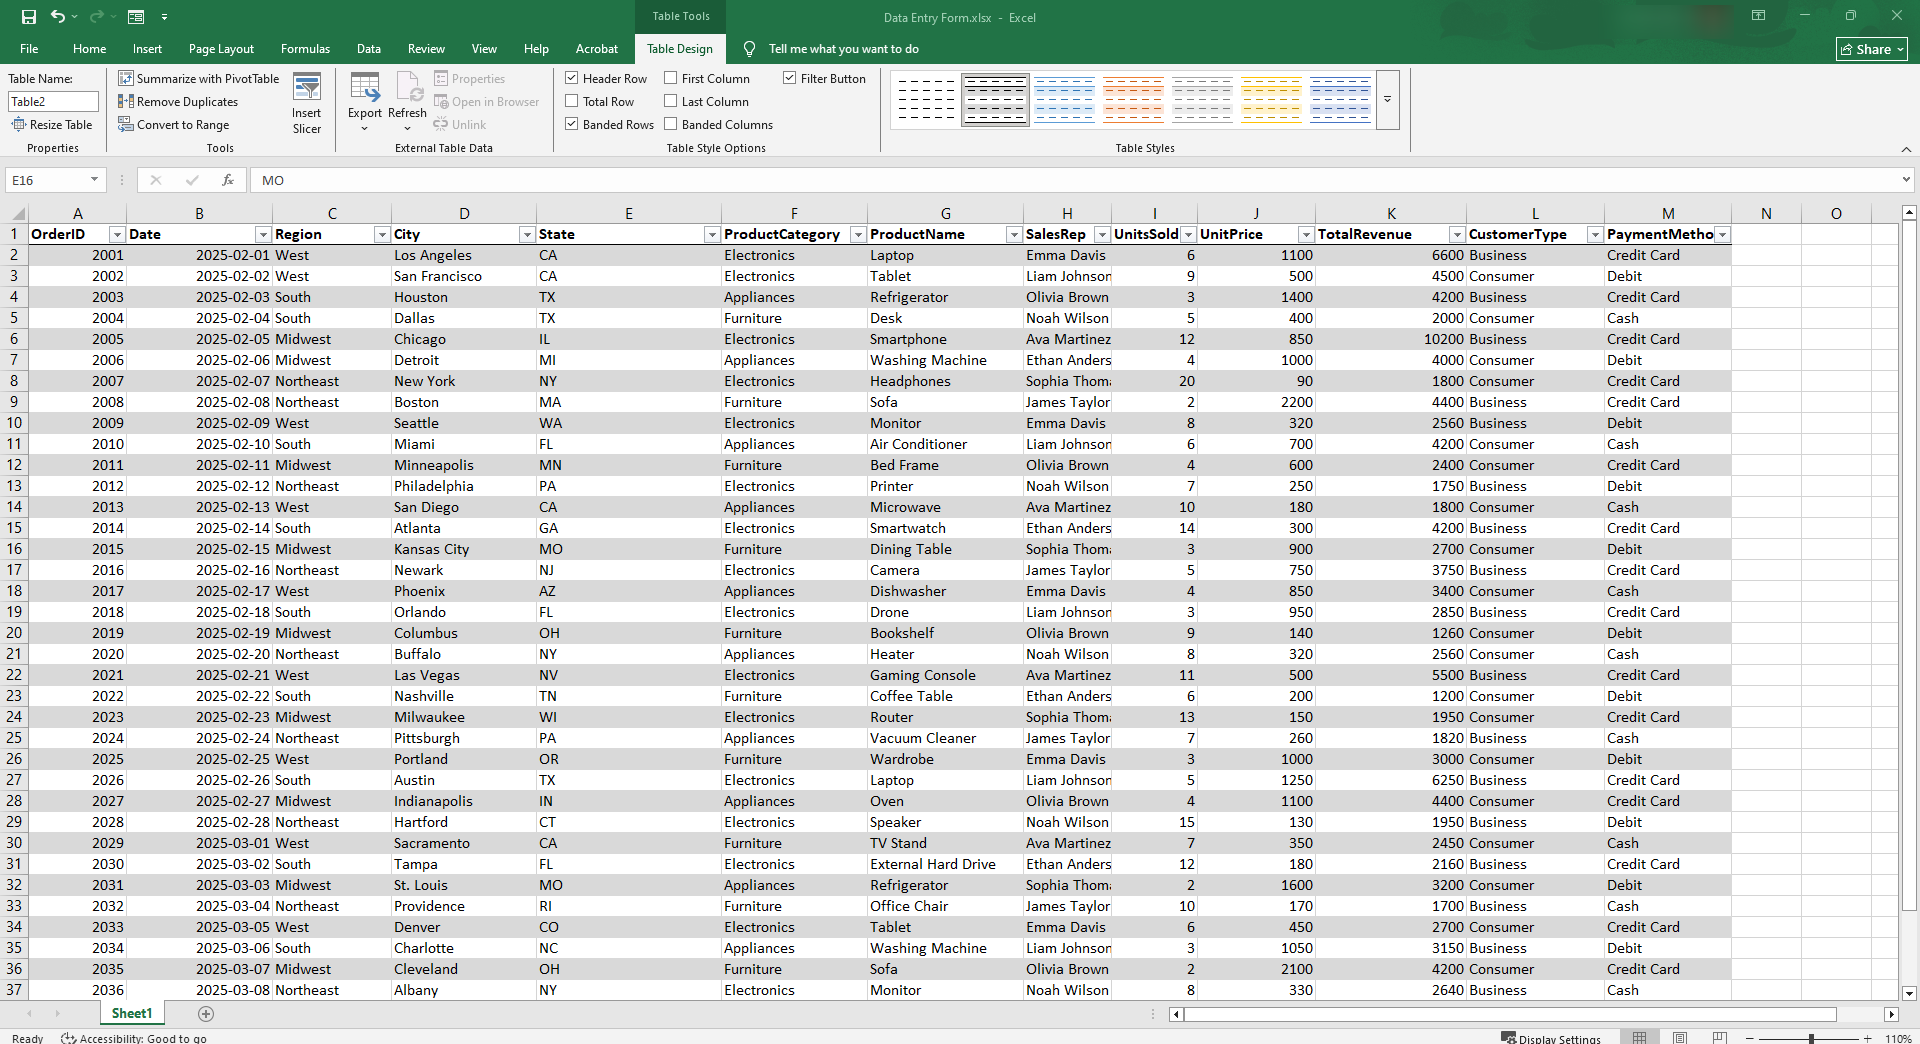
- Click any cell inside the formatted Excel table or data range.
- Click the Form button in the Quick Access Toolbar. The data entry form dialog box will open, showing each column as a labeled field one row at a time.

- To add a blank data record, click New. Fill in the fields and press Enter.
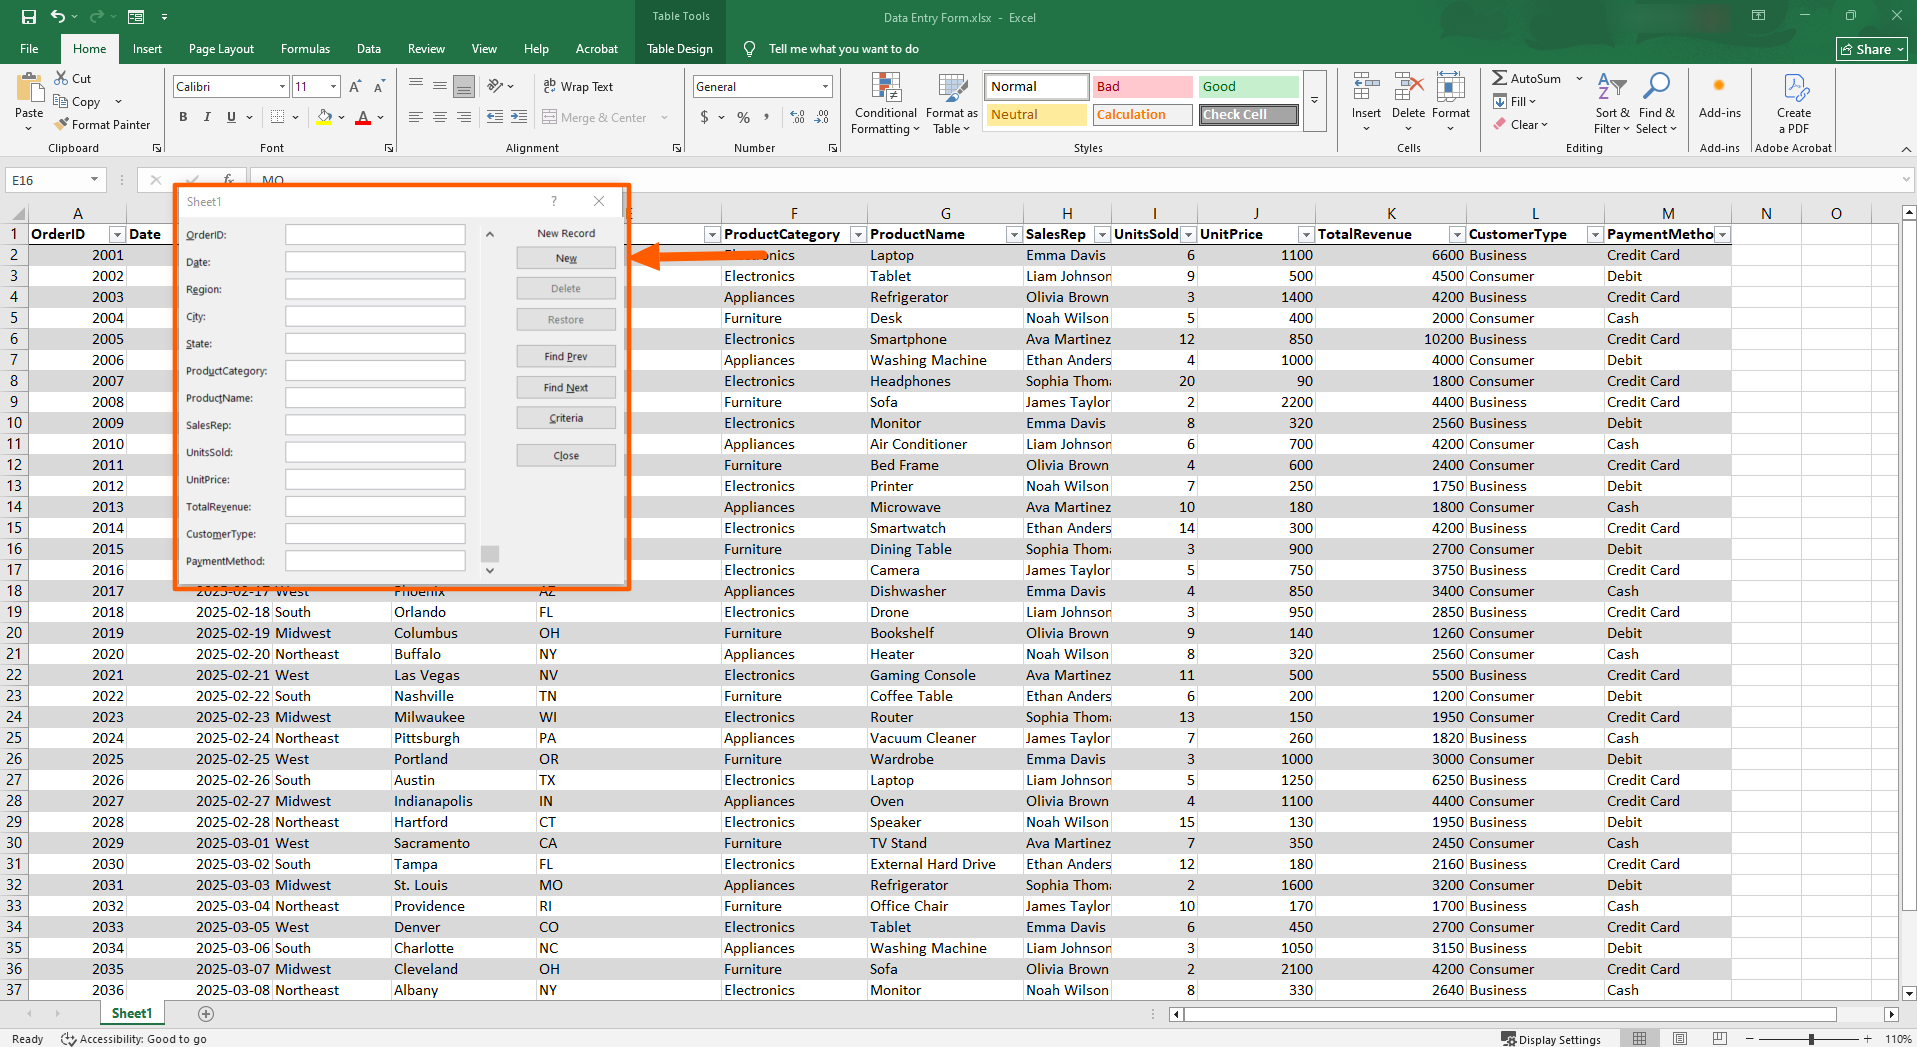
- To find data, click Find Prev or Find Next and navigate through existing records. You can also click Criteria to search for a specific field value.
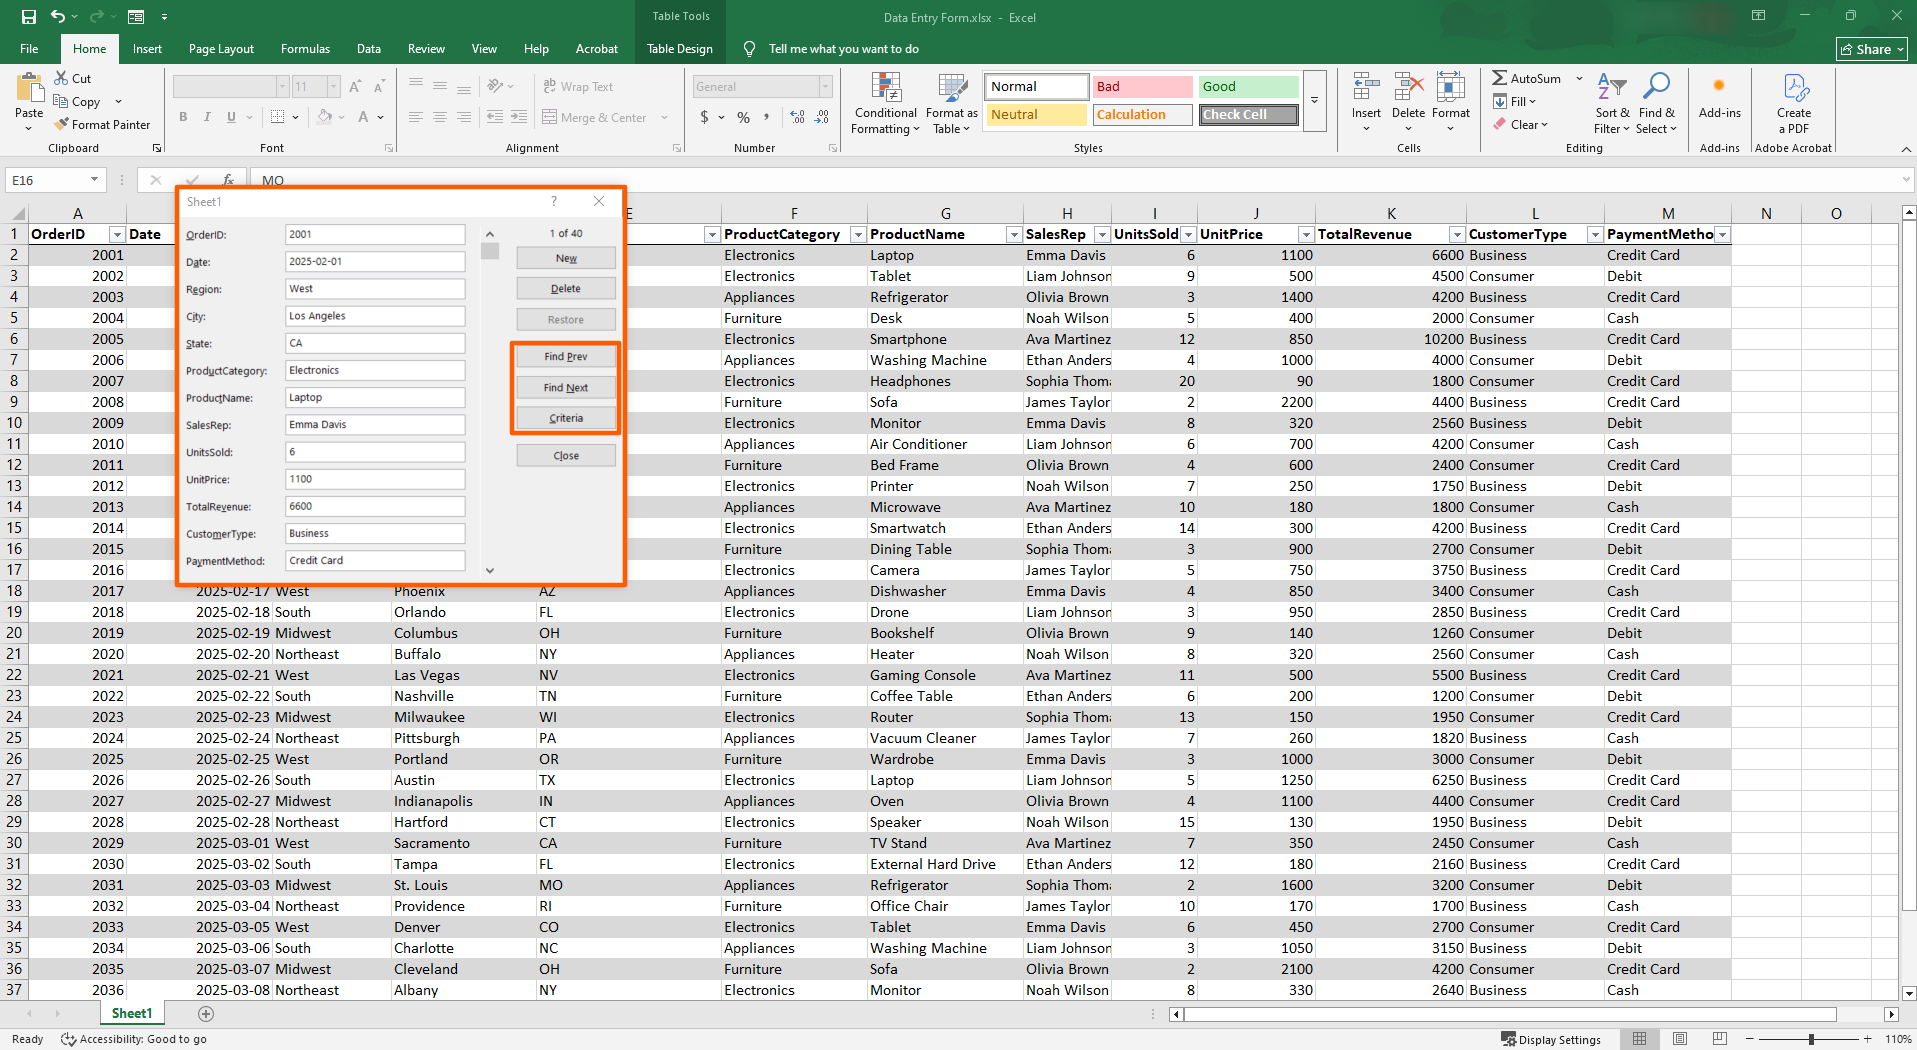
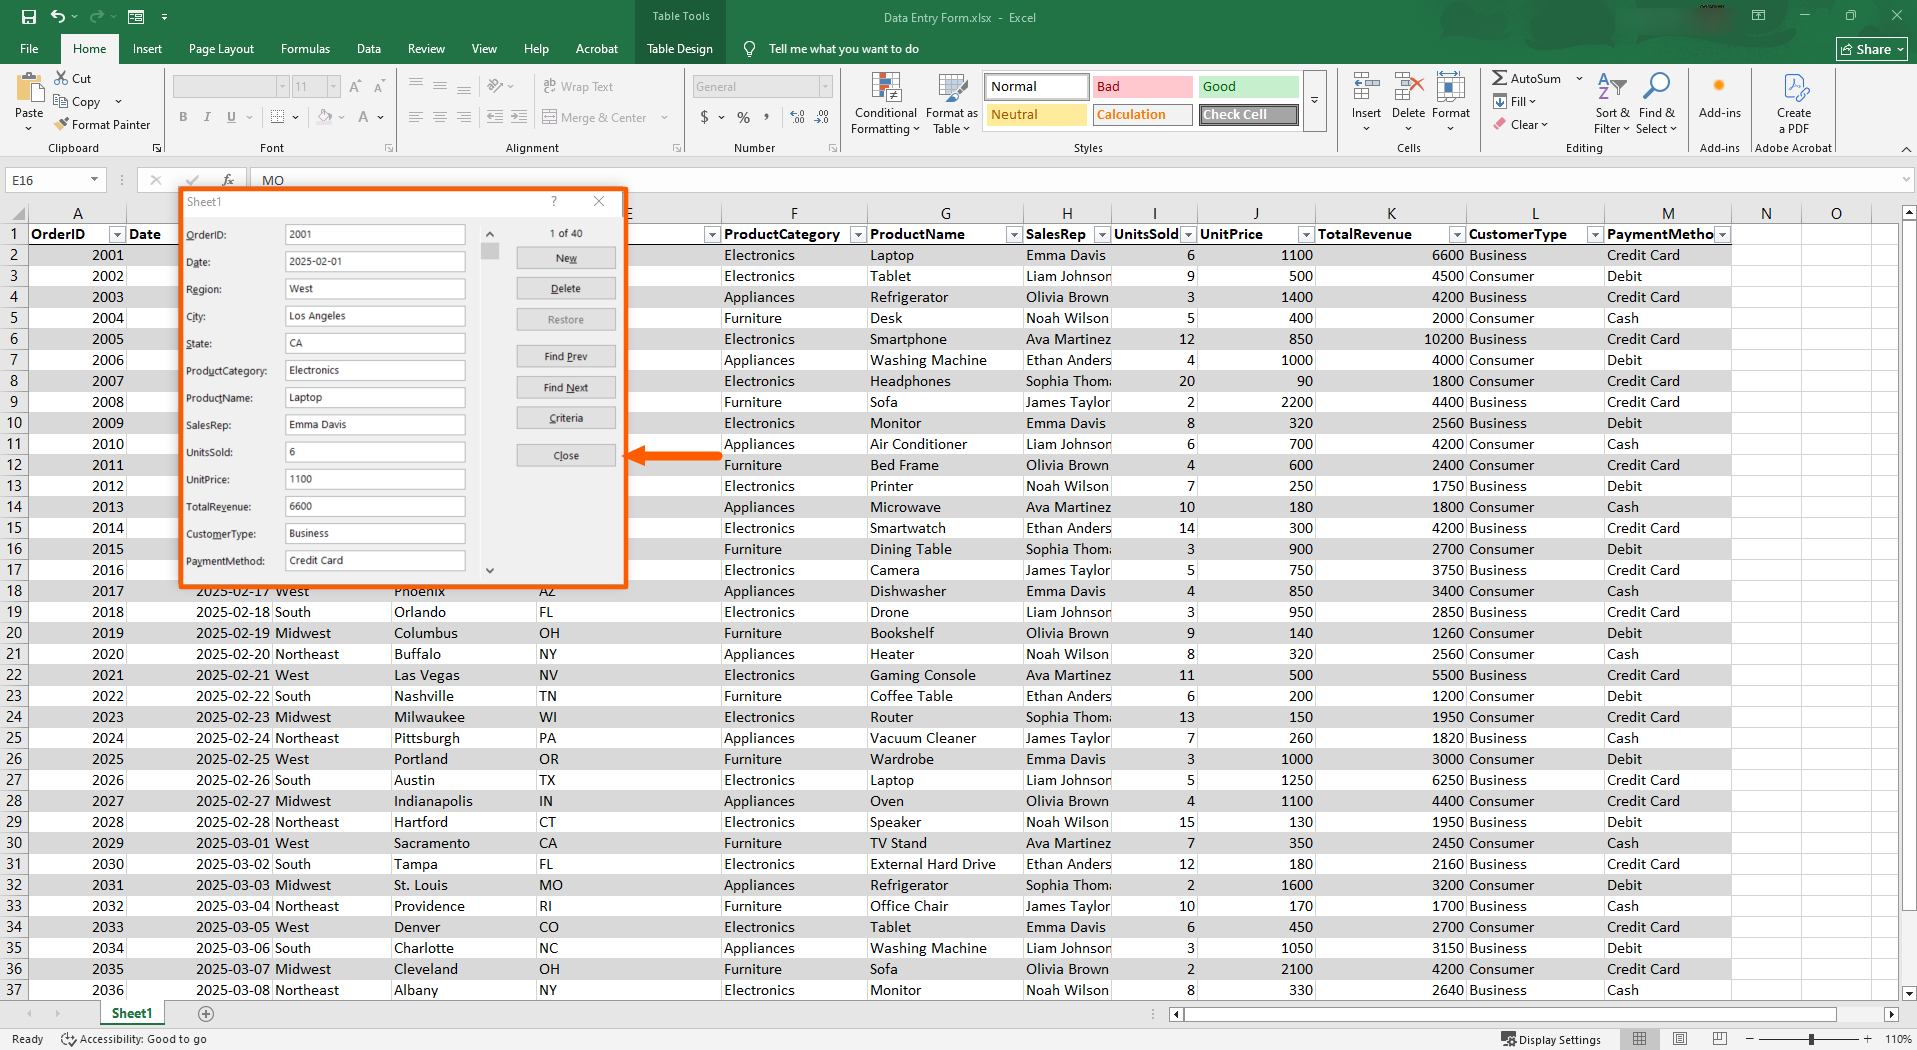
- To delete a record, click Delete.
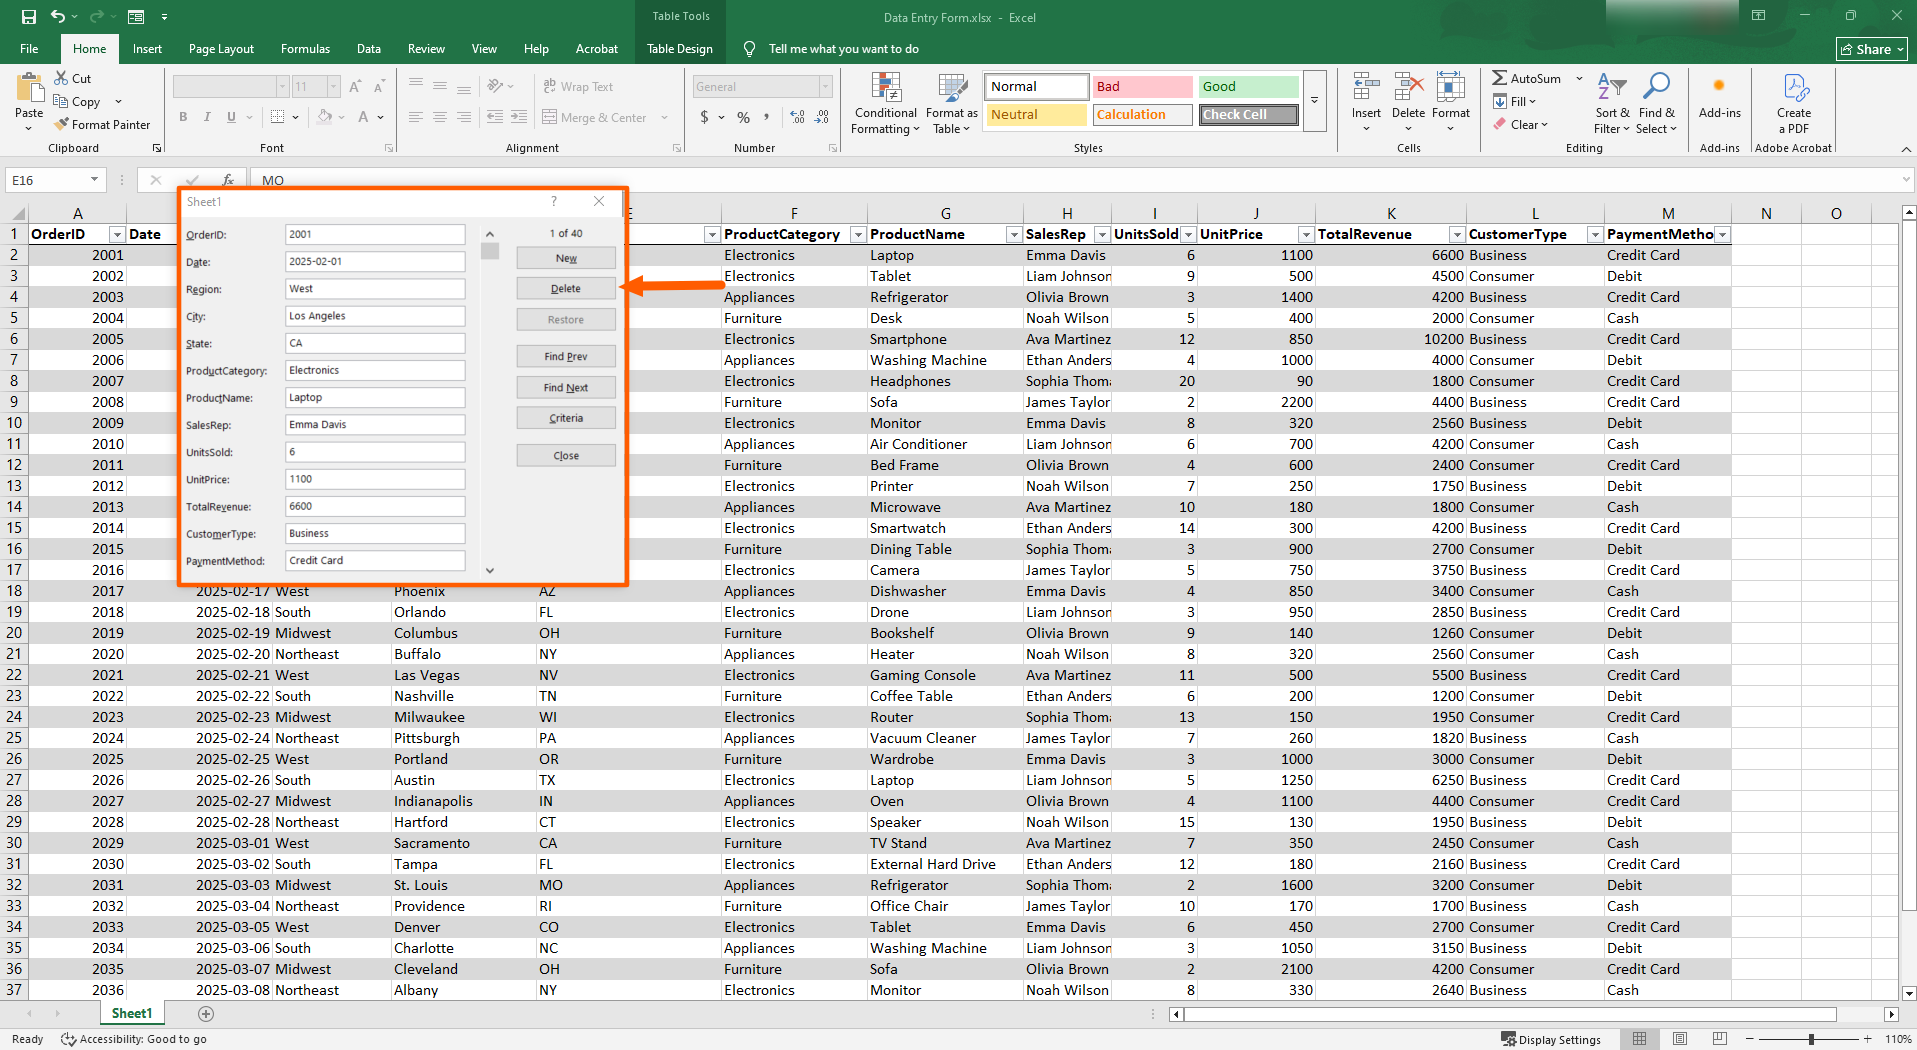
- When you’re done adding in data, click Close. All data you’ve entered will be saved directly to the Excel table.
Why Excel’s data entry form falls short for real data collection
While it’s easy to create a form in Excel for data entry, there are a few drawbacks to using this tool. Microsoft Excel doesn’t live up to the standards that many people focused on data management need. Here are some shortfalls to consider:
- The Excel fillable form box only supports text fields: There’s no option for dropdowns, checkboxes, or date pickers, which might pose a problem depending on the type of data you need to collect.
- The Excel data entry form is limited to 32 fields per form: If you have more than 32 columns, you’re out of luck with this feature.
- Excel worksheets aren’t good for live collaboration: If you often work on spreadsheets with other users, Microsoft Excel isn’t a good option. Only one person who has the file open locally can work on it at a time.
- The Excel data entry form isn’t available in Excel for the Web: If you’re using the web version of Excel, you’ll have to manually scroll through large worksheets because the online version doesn’t support the data entry form feature.
- Microsoft Excel doesn’t have built-in notifications: There’s no option to get notifications or confirmation messages when a user is filling in the spreadsheet. This can be problematic for collaborative teams.
Microsoft Excel and the data entry form can work for some use cases, but if you’re part of a team that needs to collect data from multiple users or you want a form you can easily share with others via a link, you need a more powerful option.
Pro Tip
Thinking that Excel may not be right for your needs? There are plenty of alternatives to Microsoft Excel that offer advanced features, integrations, and customizations. Check out the list and explore tools that might work better for you.
Send Jotform submissions straight to Excel
What if you could have the data from form submissions flow directly into an Excel file — no data entry needed? It’s possible with Jotform.
Jotform is a free, no-code form builder that integrates natively with Microsoft Excel, enabling you to automatically send data collected through Jotform into an Excel file. This leading form builder helps you track, organize, and analyze your data in a structured and readily accessible way, while making it easy to collect data from multiple internal or external users at the same time.


Just build your form in Jotform to collect the data you need, share the link with your users, and every form submission automatically populates a connected Excel spreadsheet. No manual importing, no CSV uploads, and no copying and pasting needed.
How to use the Microsoft Excel integration with Jotform
Here’s how easy it is to use Jotform’s Microsoft Excel integration:
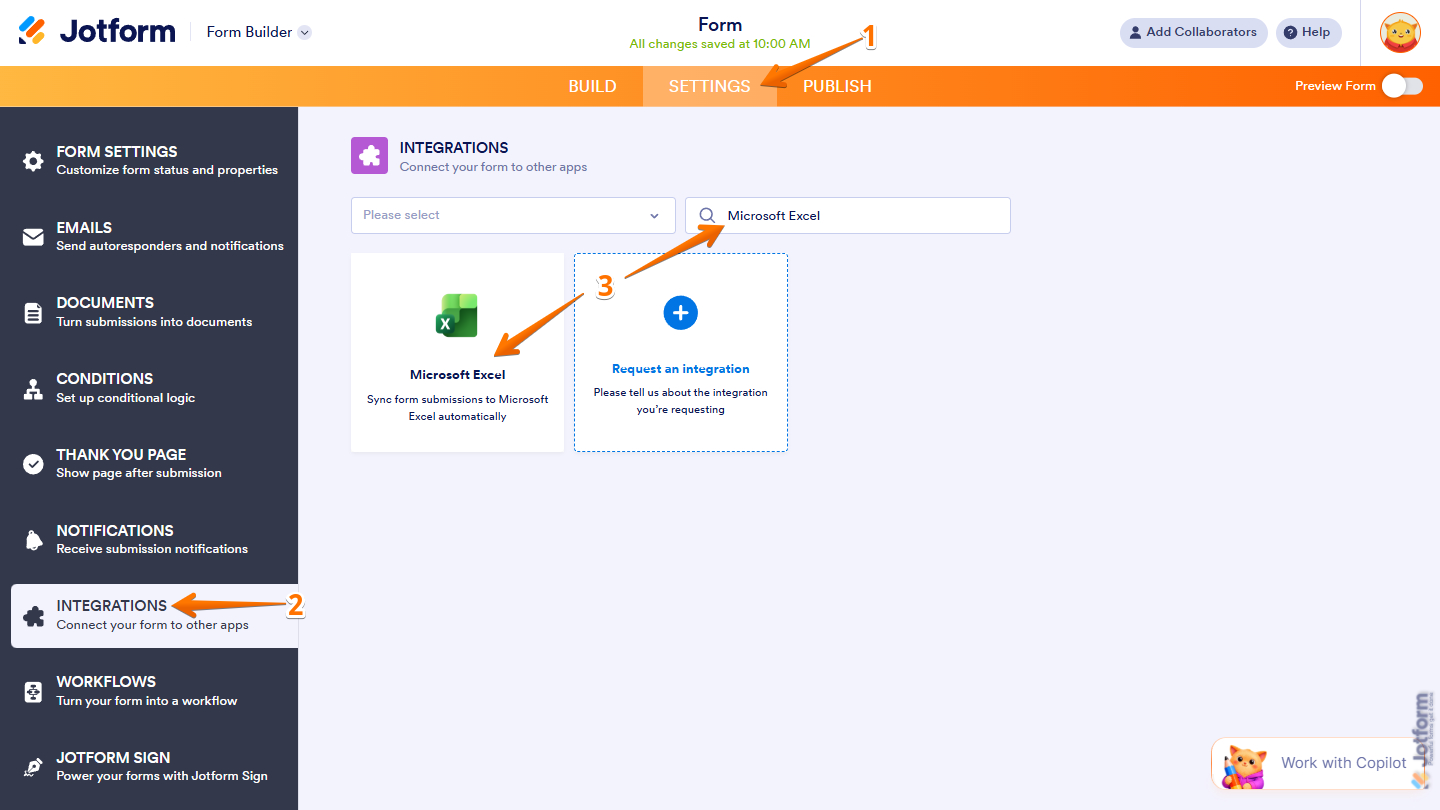
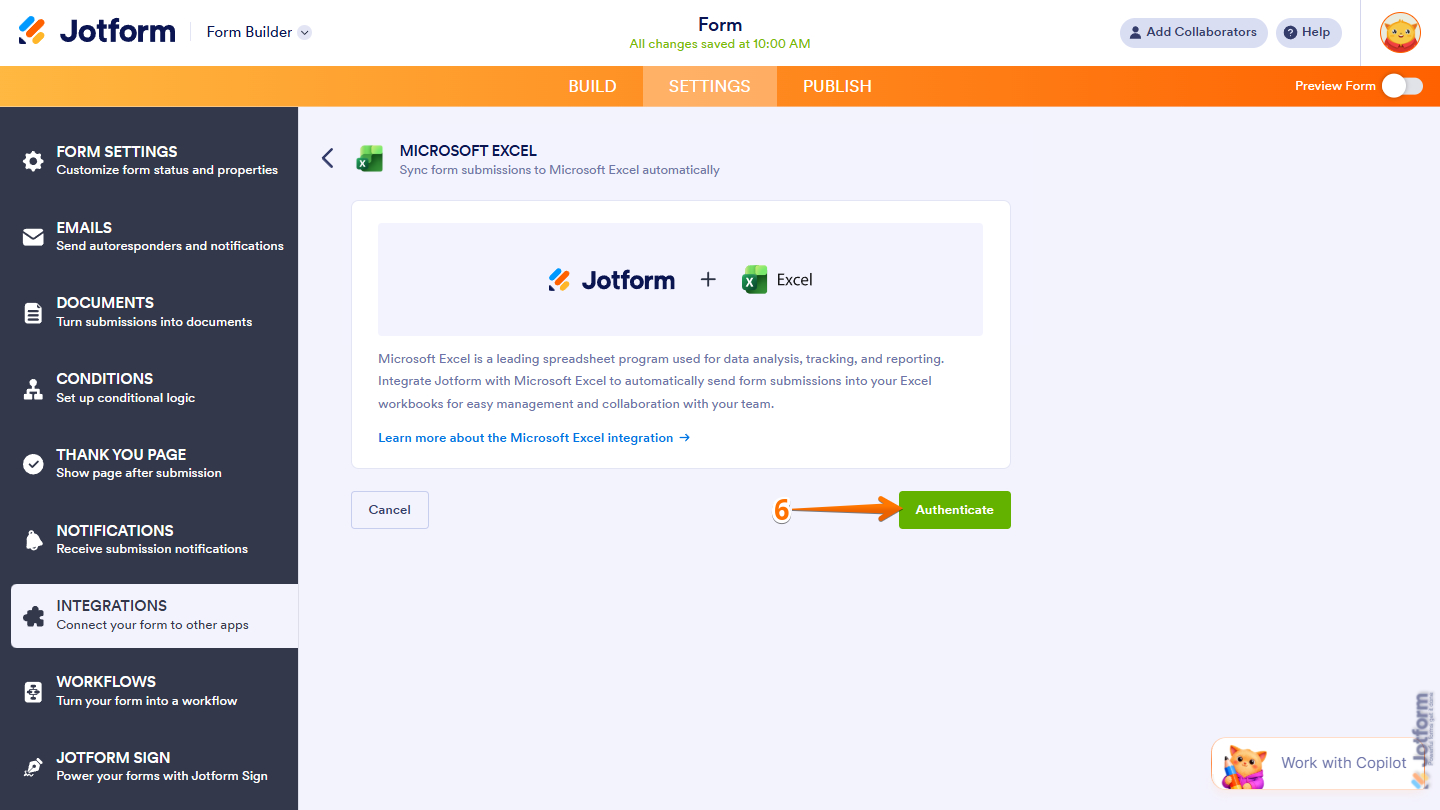
- Open your form in the Jotform Form Builder, and click Settings.
- Click Integrations.
- Search for and click on Microsoft Excel.
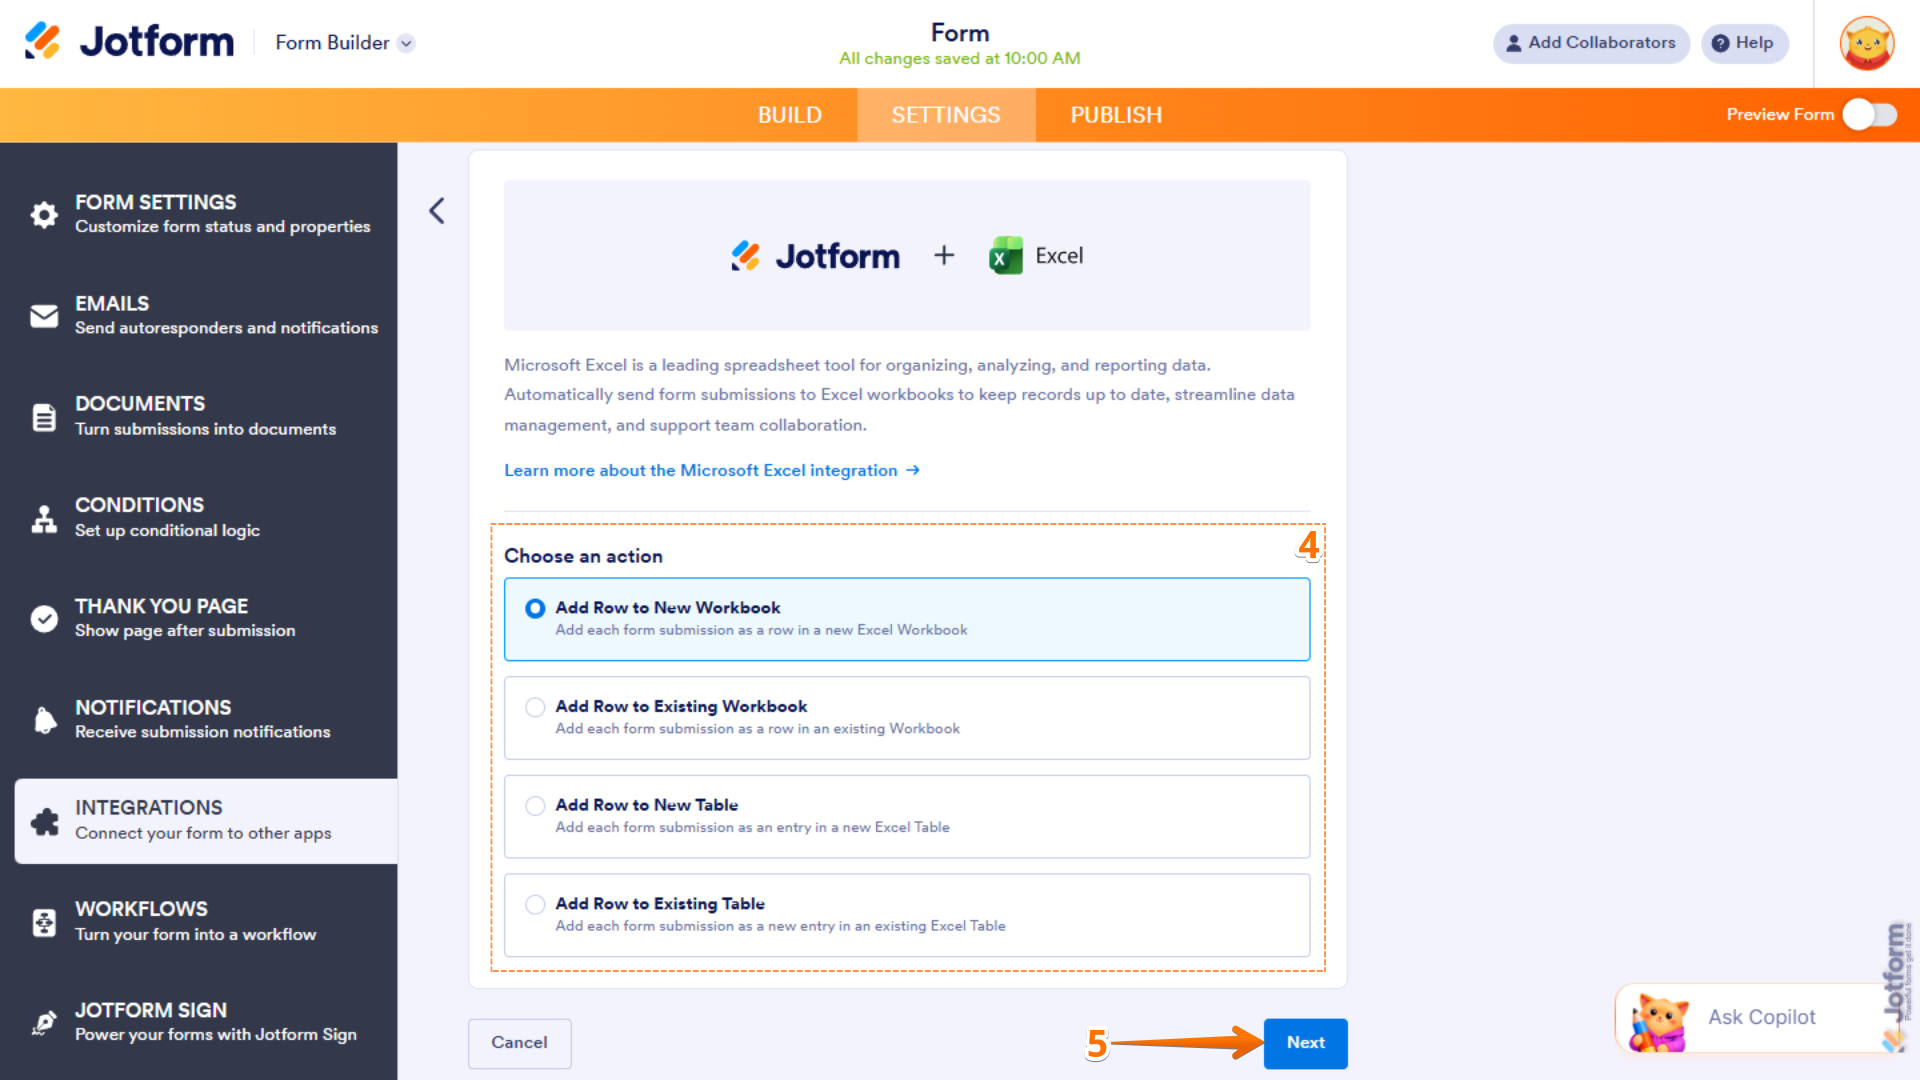
- Under Choose an action, make the selection you need. You can select from the following:
- Add Row to New Workbook: Choose this option if you want to create a new Excel workbook and add records from each form submission as a new row.
- Add Row to Existing Workbook: Choose this option if you want to add each form submission as a new row to an existing workbook.
- Add Row to New Table: Choose this option if you want to create a new Excel table and add records from each new form submission as a new row.
- Add Row to Existing Table: Choose this option if you want to add each form submission as a new entry in an existing Excel table.
- Click Next.
- Click Authenticate. Log into your Microsoft account.
Connecting your Jotform form to Microsoft Excel is that easy. Once you’ve enabled the native integration, you can go ahead and specify the settings for the action you selected in step 4 (more details on how to do that here).
Once you’ve set it up, every single form submission in Jotform will appear in your connected Excel spreadsheet in real time. All responses will be stored in Jotform’s submission inbox as well, so you can easily review and access them whenever you need.
Stop entering data manually — let Jotform do it for you
When you use Excel forms, you end up doing a lot of manual data entry. With or without the data entry form dialog box, you’re bound to make mistakes like typos or entering data into the wrong cell. So it’s a good thing that manual data entry isn’t your only option…
With Jotform, your data automatically goes from your form submissions to your connected Excel worksheet — no typing, copying, or pasting needed. You can guarantee your data is entered correctly and you don’t need to worry about having the wrong data in your spreadsheet.
Jotform’s native Microsoft Excel integration makes it easy to flow data into the right place, but there are many other reasons to choose the form builder:
- Jotform entry form templates: You don’t need to create a form in Jotform from scratch. It comes with more than 20,000 ready-made templates for every use case you can think of, such as order forms, intake forms, surveys, human resources forms, and so much more. Just choose a template and customize it in the intuitive form builder.
- A collaborative spreadsheet-style workspace: Jotform has its own data management tool called Jotform Tables, which is a great alternative to Excel. It captures your form submissions so that you don’t need to export or sync your forms with another tool. Plus, multiple users can collaborate within the workspace together, unlike Microsoft Excel.
- Dozens of data management integrations: Jotform offers over 70 data management integrations with other tools — such as Google Sheets, OneDrive, and Oracle Export — so you can route form submissions into other workflows and minimize manual data entry.
Best of all, Jotform offers a free plan, so you can start right away. Just pick a form template, customize it for your needs, and connect it to Microsoft Excel with the native integration. Give Jotform a try today.
FAQs about Excel data entry forms
To create an Excel fillable form, you have to use the features available in the Developer tab. Microsoft provides step-by-step instructions on creating a fillable form.
To start using the data entry form in Excel, open an Excel table and click anywhere within the table. Click the Form button in the Quick Access Toolbar to open the data entry form dialog box.
If you want to auto-populate data in Excel from another workbook, you have a few options, including direct cell referencing, lookup functions, or Power Query. The easiest option is to use direct cell referencing.
This article is for office workers, data analysts, project managers, HR and operations teams, and small business owners who regularly input data into Excel spreadsheets and want a faster, less error-prone way to add or edit records — especially those working with large or shared worksheets where direct cell editing leads to mistakes.


Send Comment: