

More than 150,000 businesses worldwide depend on Salesforce as their single source of truth for sales, support, and marketing efforts. To say they’ve invested a lot in Salesforce is an understatement.
But managing the Salesforce platform on a daily basis can involve repetitive tasks and manual data entry (you know, fun stuff like that 🙃).
Wouldn’t it be nice if there was an easy way to automate Salesforce workflows, customer support, and lead capture? How about a way to provide 24-7 service without coding or complex integrations?
We’ve got your back. Today, we’re excited to announce our new Salesforce Agent, an AI-powered chatbot that connects directly to Salesforce.
TL;DR: What is a Salesforce Agent?
Salesforce Agent is
- An AI-powered chatbot that connects directly to Salesforce Sales and Service Clouds, enabling you to automate lead capture, case management, HR requests, and more in real time
- Equipped with features like predefined workflows, support for standard and custom objects, automatic knowledge retrieval, and omnichannel deployment (chat, web, and phone)
- Capable of streamlining repetitive tasks and syncing every interaction in Salesforce, giving teams better data, 24-7 responsiveness, and a whole lot of their time back
- Quick and easy to set up — a new way for organizations to move beyond manual busywork and avoid pricey alternatives
- An accessible, enterprise-grade Salesforce automation that drives efficiency and growth
Additional Salesforce Agent features
The Salesforce Agent also offers
- Predefined agent skills (lead management, case management, HR support, lead capture, and more)
- AI-powered interactions that deliver natural, human-like responses
- Tracking and visibility via integration logs (so admins can monitor every action)
How to set up your Salesforce Agent
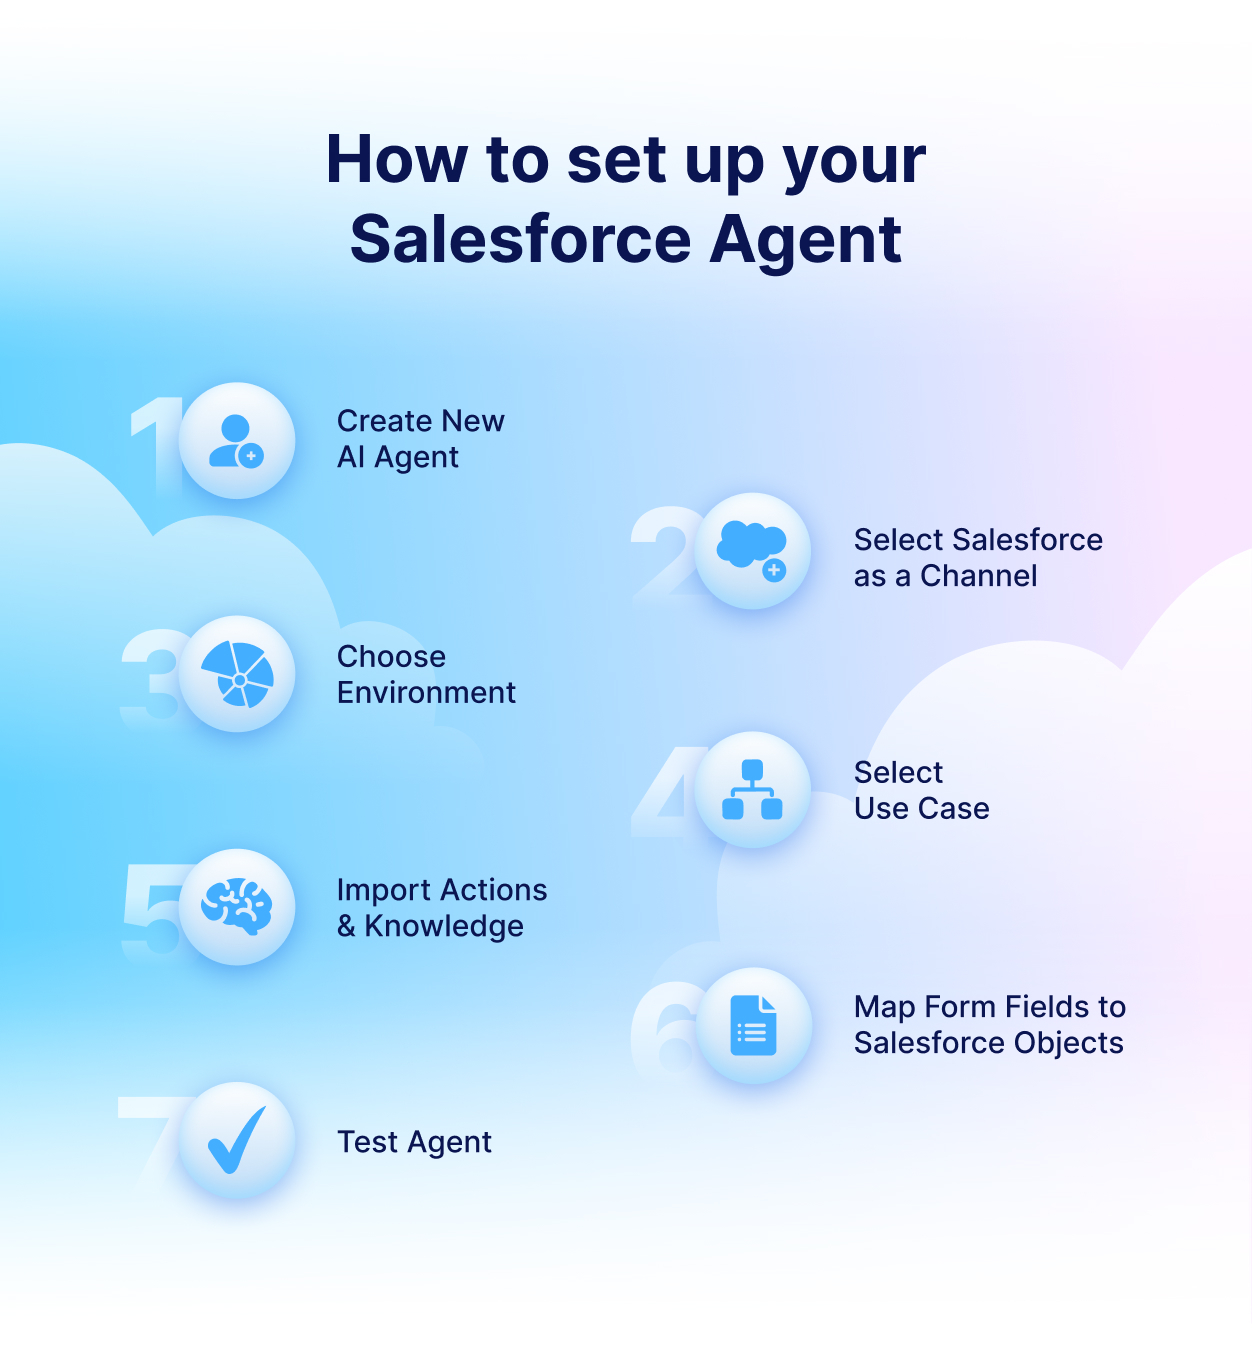
Setting up your Salesforce Agent is straightforward and doesn’t take much time.
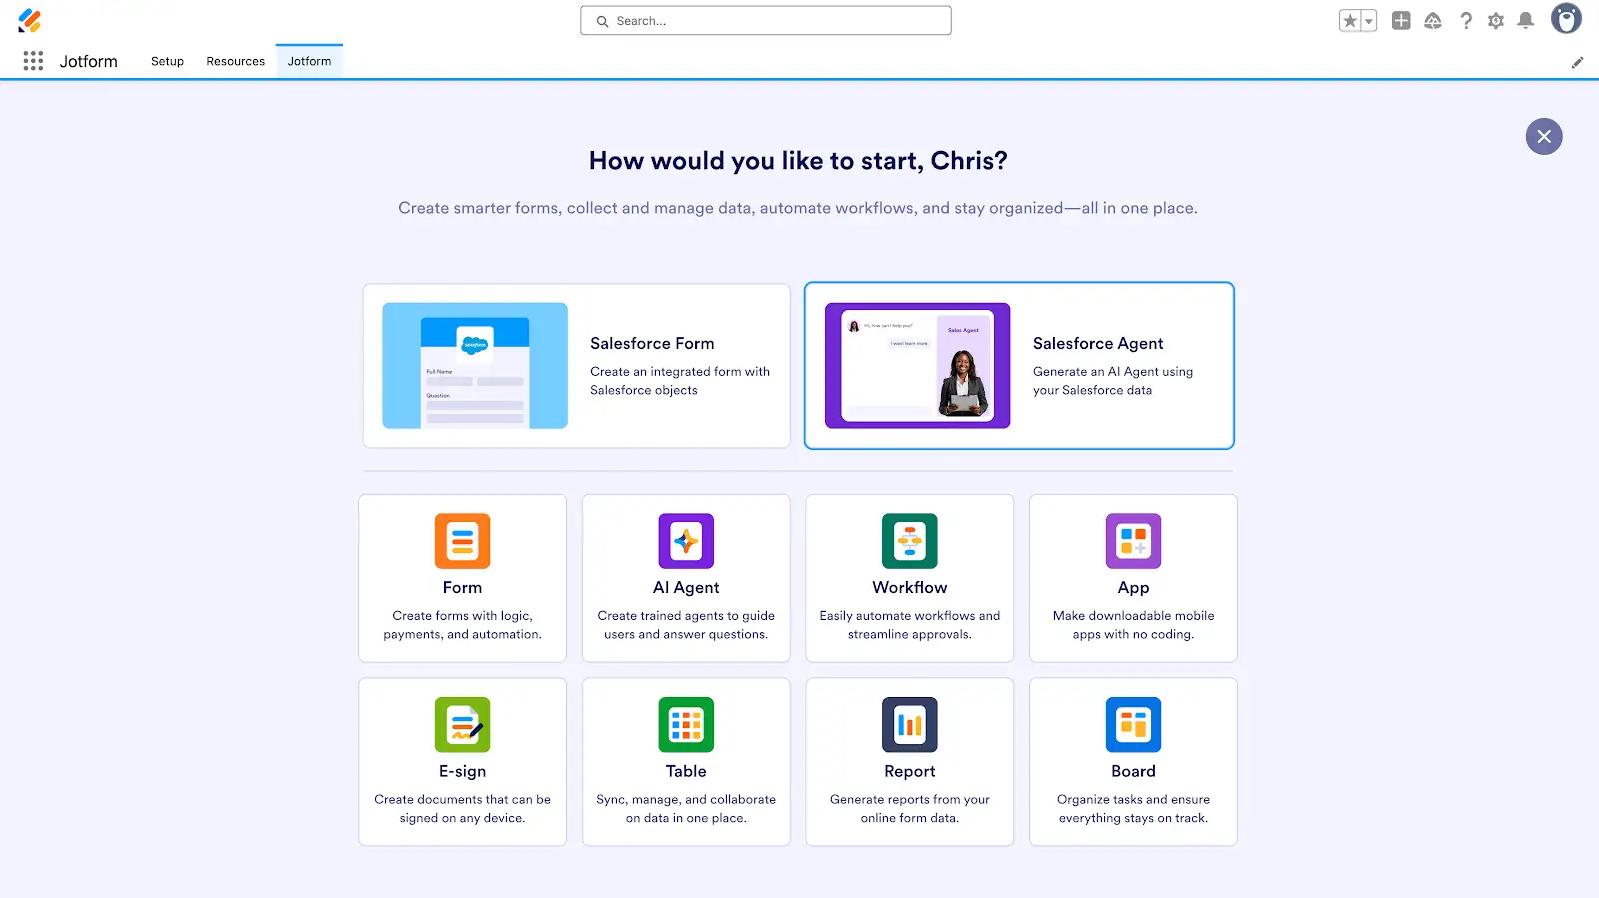
Create a new AI Agent
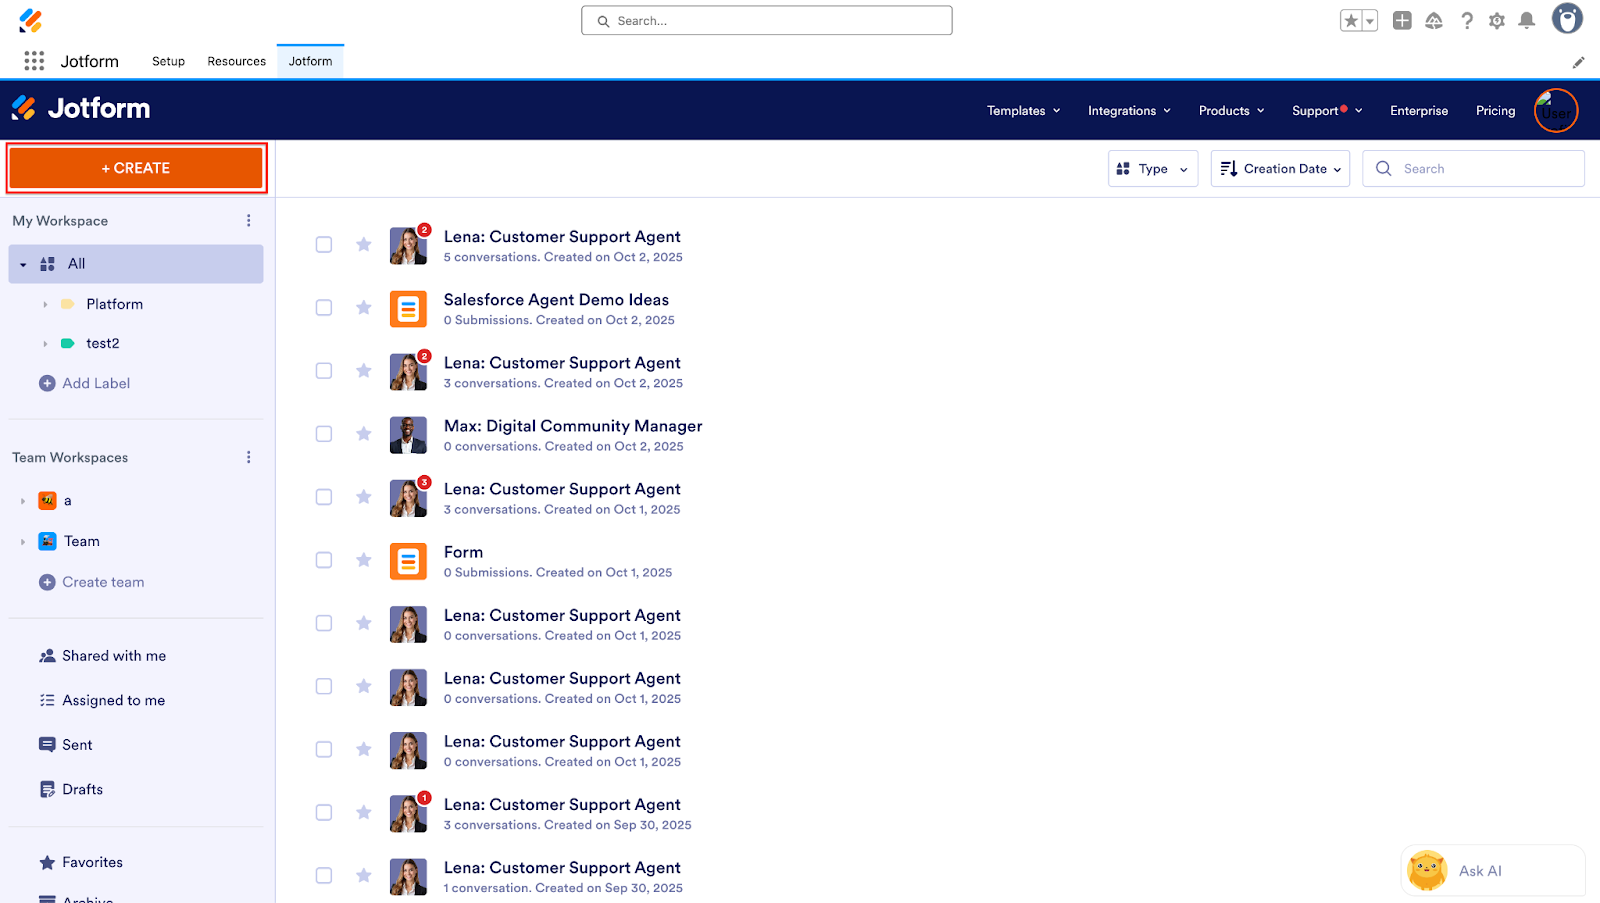
From your Jotform Workspace, click on the Create button in the upper left corner. Then select AI Agent to get started.
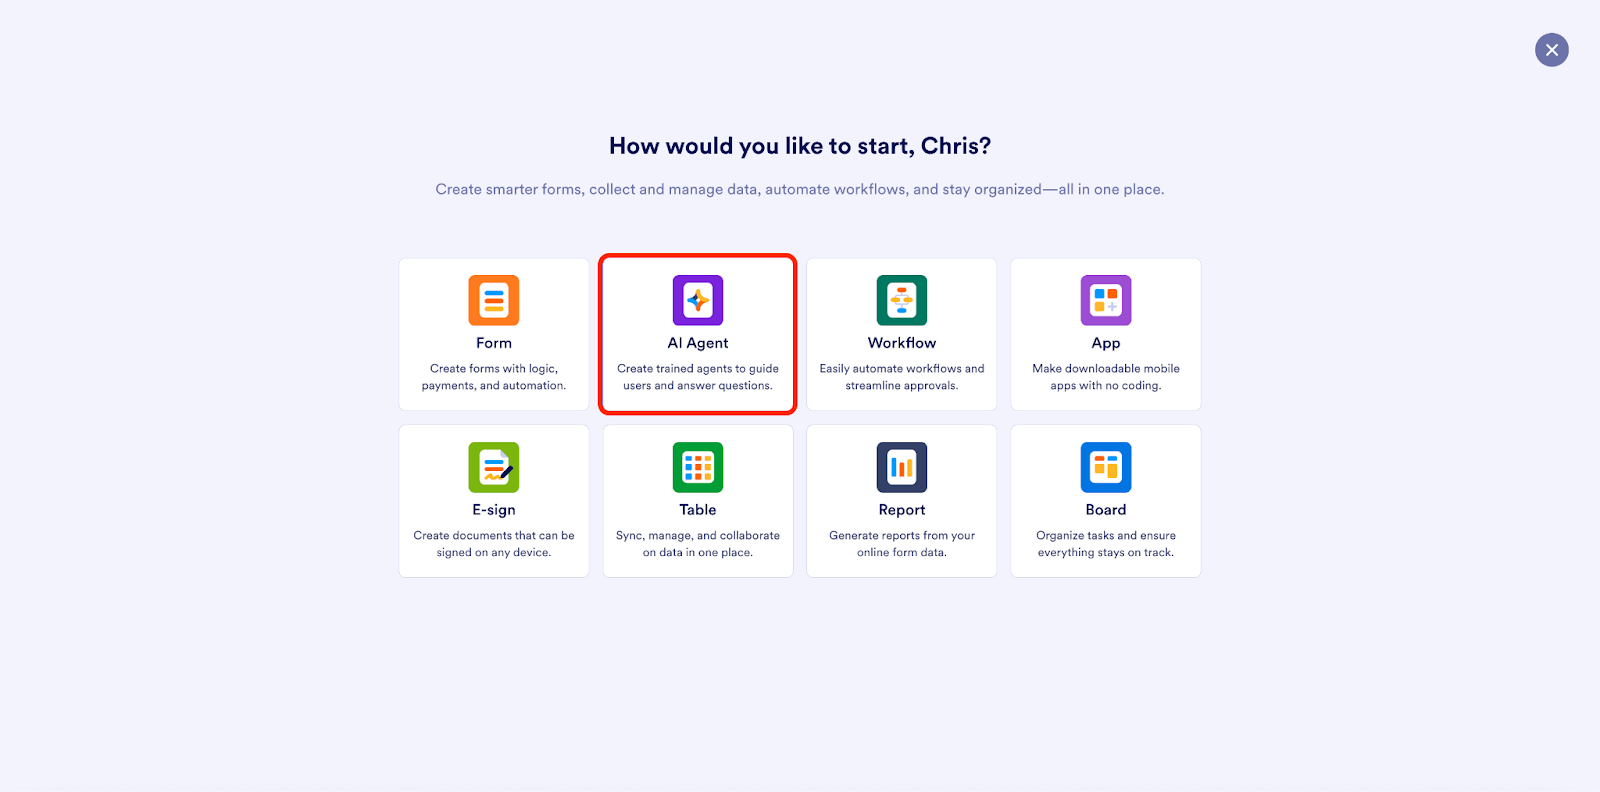
Describe the kind of agent you’d like to create, or use one of the preset options available, such as Customer support or Feedback. Click the Create button.
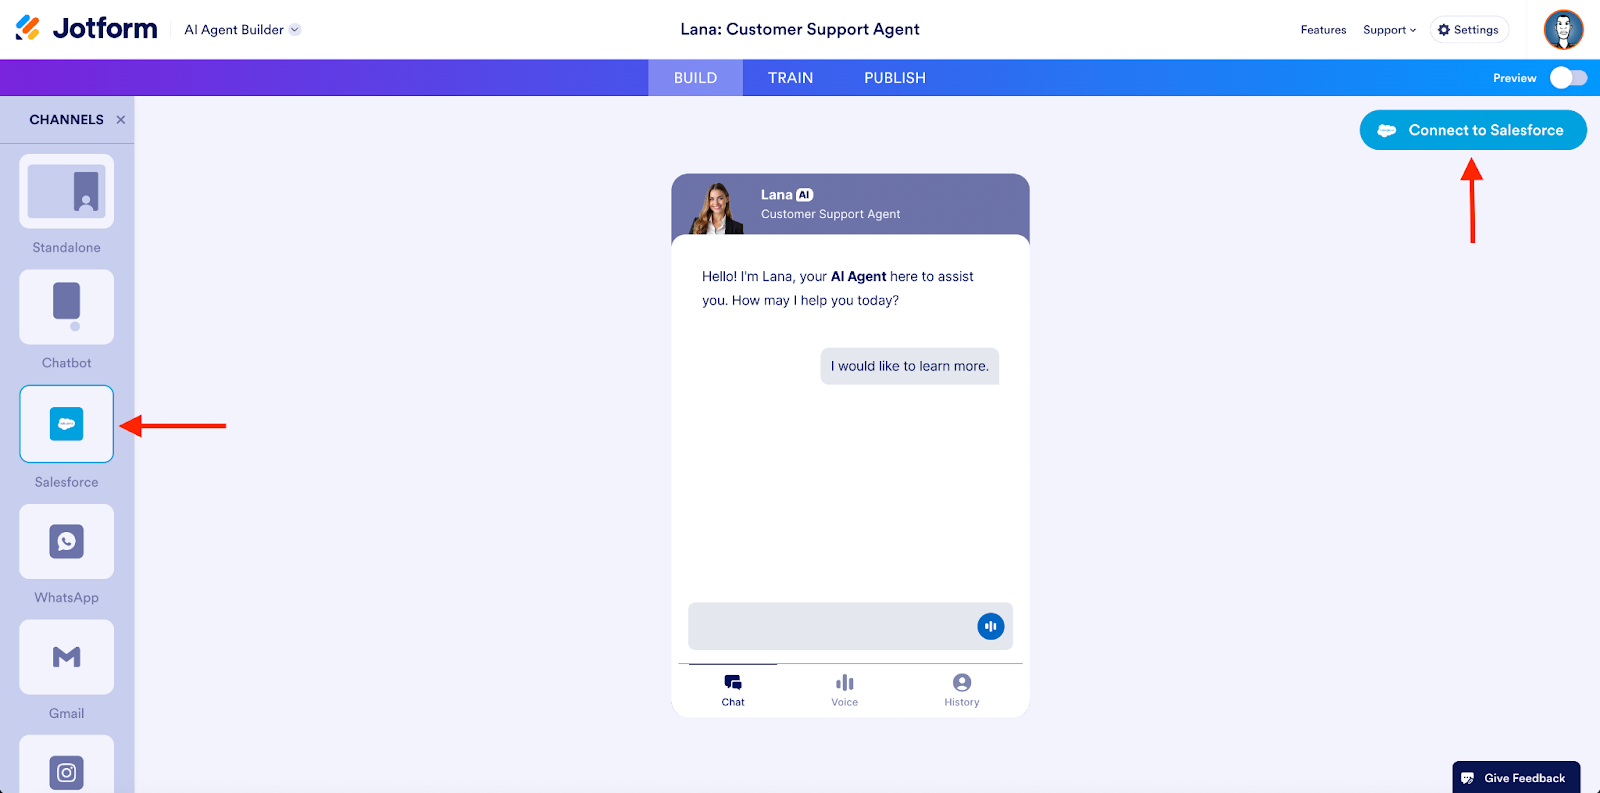
Select the Salesforce channel
In the AI Agent Builder, select the Salesforce option in the left panel, then click Connect to Salesforce in the upper right of the screen.
On the next screen, select the Salesforce environment you want to connect to. You can choose Production or Sandbox.
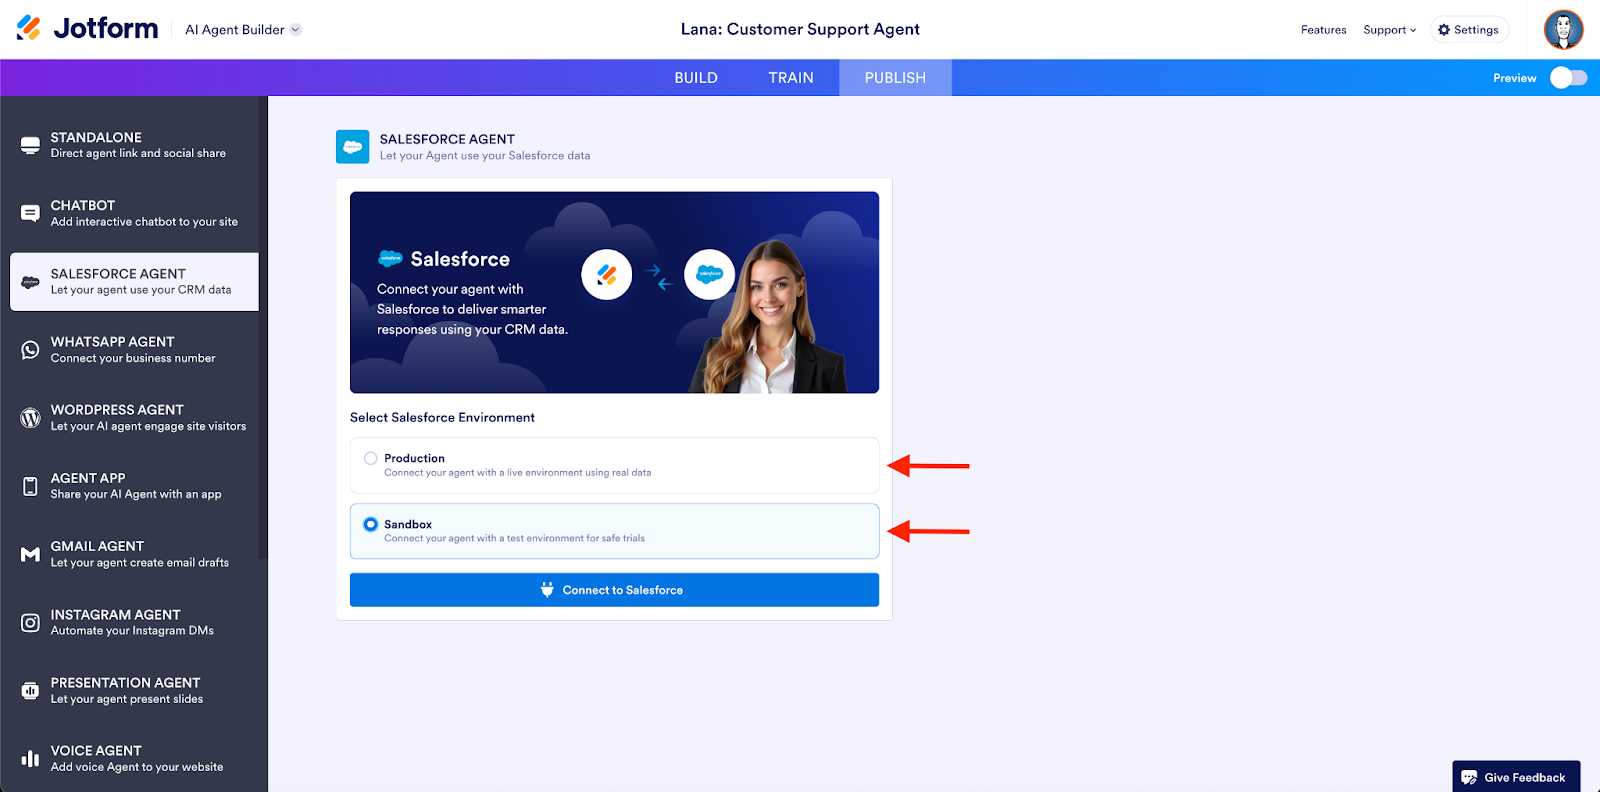
As an FYI, Sandbox is a copy of your production environment, typically used by admins and developers for testing and training so that live customer data isn’t impacted. It’s a best practice to test your agent in Sandbox mode before going live to be sure you catch any mapping or workflow issues.
Enter your Salesforce credentials to connect your account.
Select a use case
Once connected, you can select from a handful of predefined use case options for your agent, including lead management, order tracking, case management, appointment scheduling, HR support, and more. Or you can start from scratch to build your own agent.
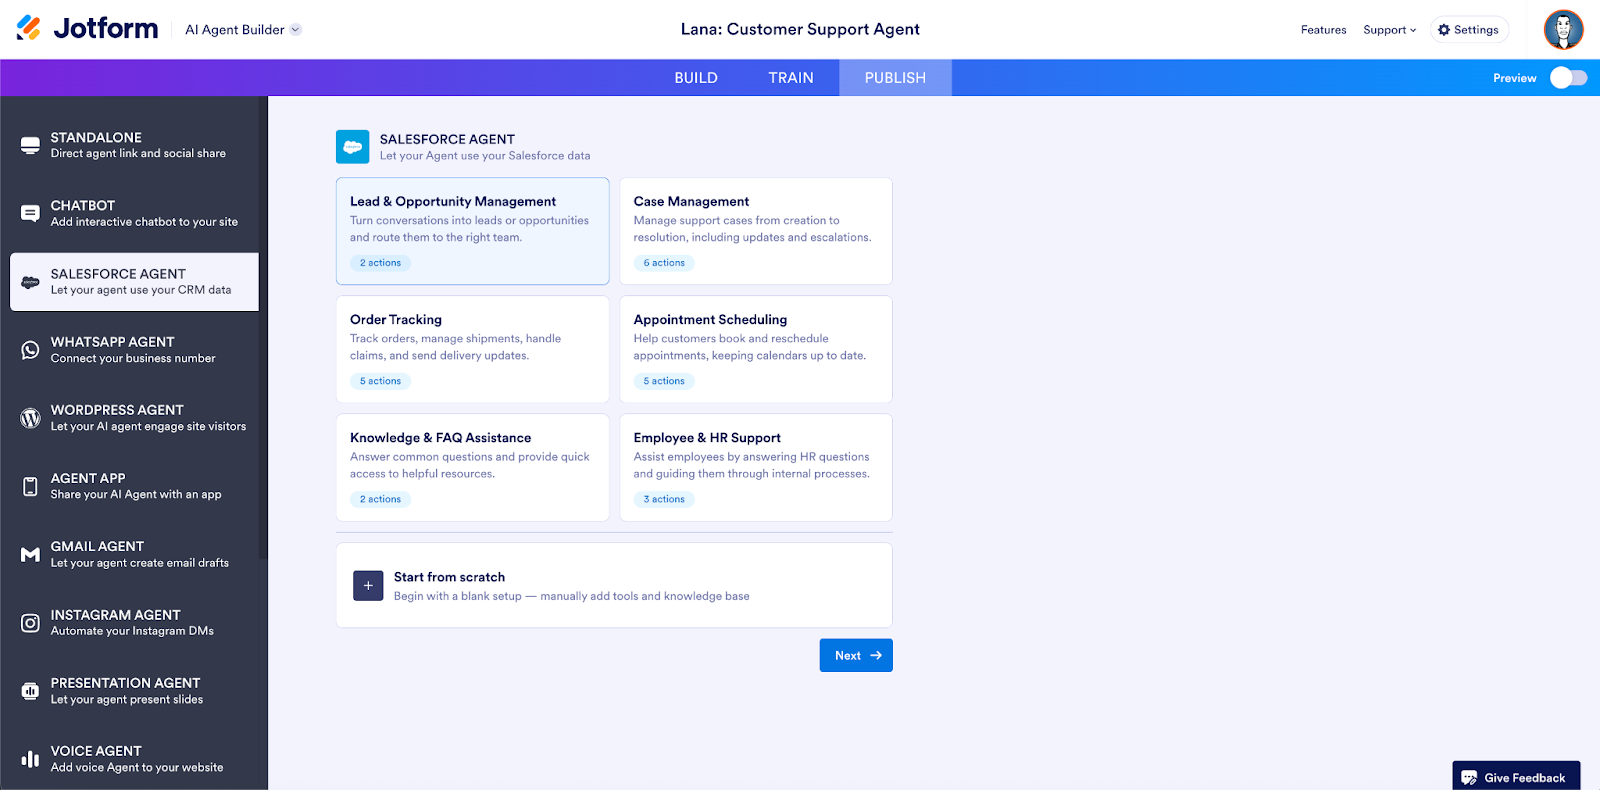
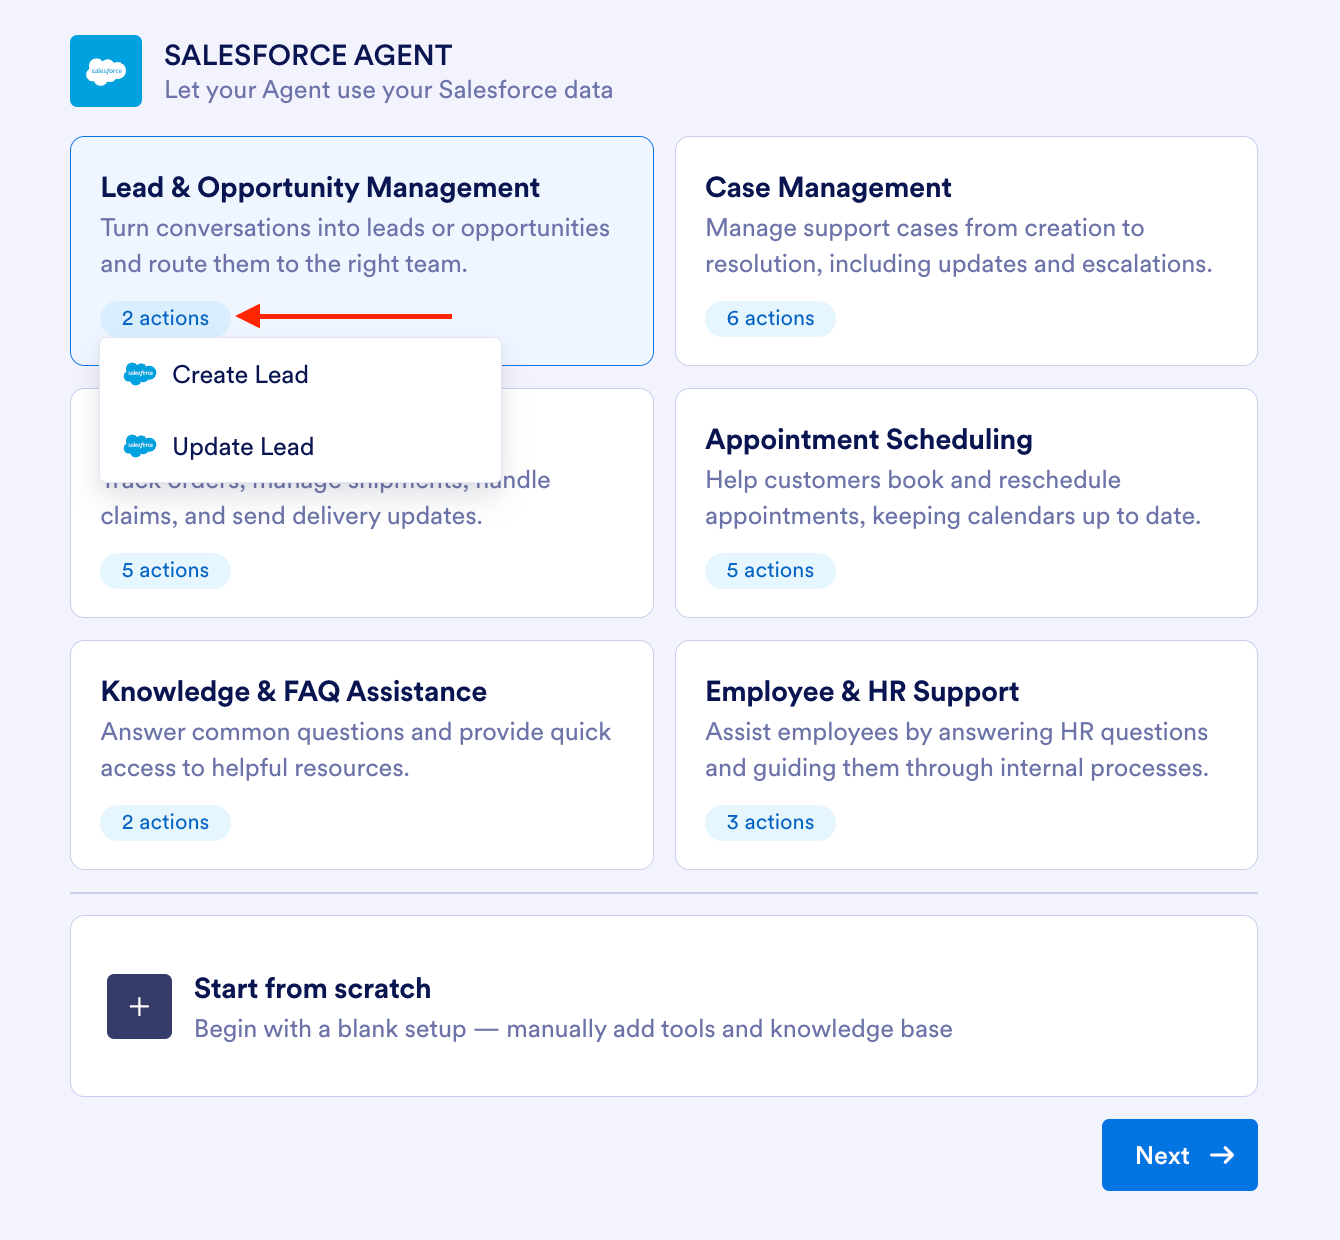
Under each option you’ll also see predefined objects and actions, such as Create Lead under Lead & Opportunity Management.
Conveniently, there are also resource articles available for some options. All the resources are based on the most popular scenarios for Jotform and Salesforce users.
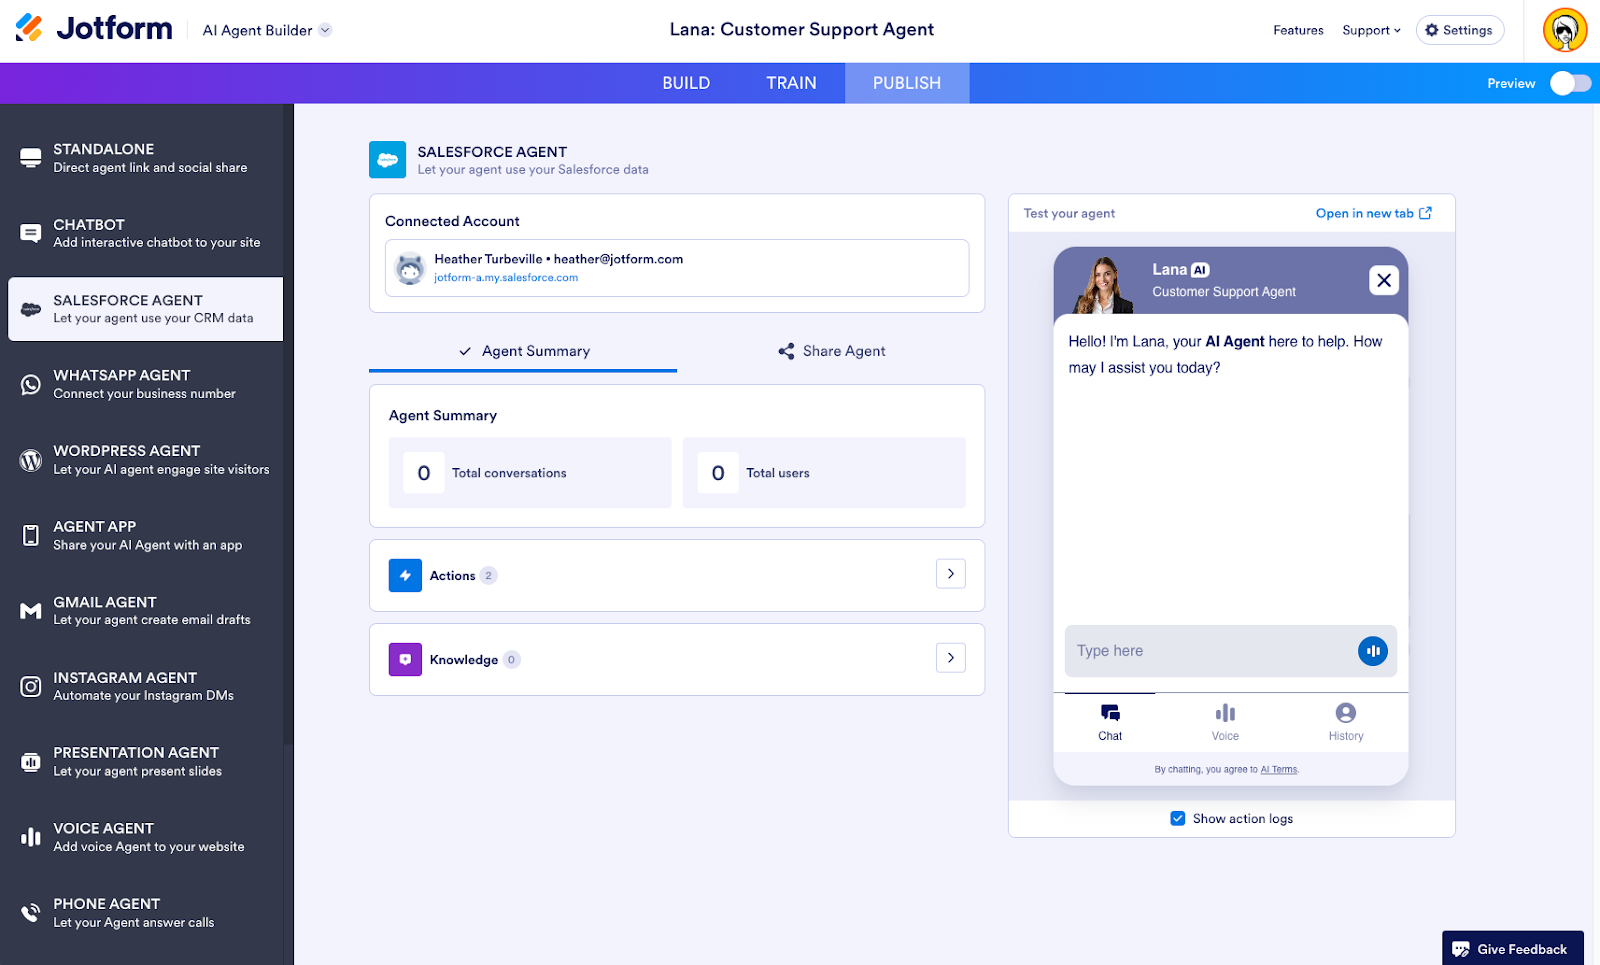
Review & test
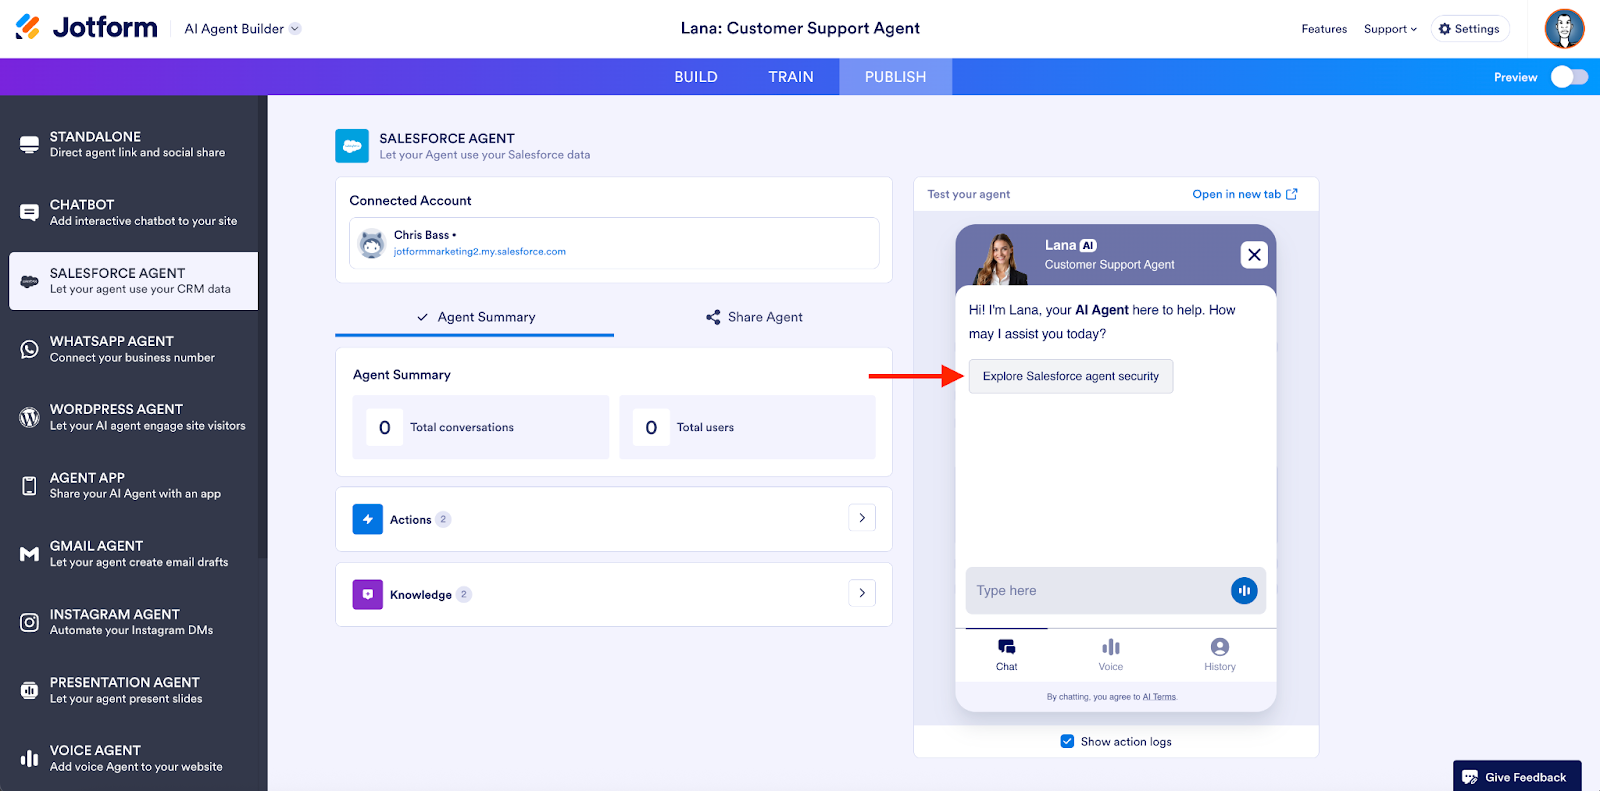
Once you’ve selected your use case, it’s time to review your configuration and test your agent. On this screen, you’ll see your connected account. When you click on it, you’ll be redirected to your Salesforce instance.
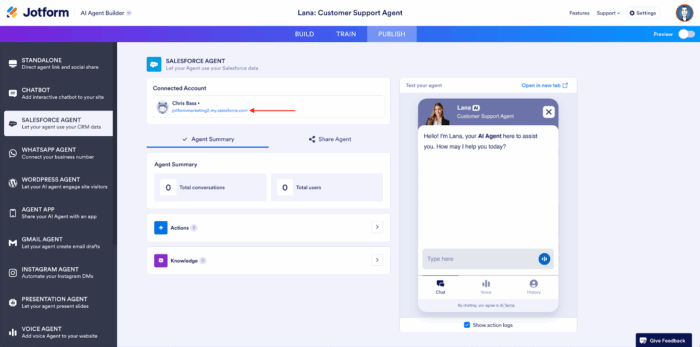
Under Agent Summary, you can see all the associated activity for your agent, including its conversations and users to date (I don’t have activity yet, which is why there are zeros). This screen also lists the actions and knowledge that have been linked to your agent.
Actions
To the right of your actions is an arrow icon. Click on the icon to edit your actions, add new ones, view the action’s logs, and more.

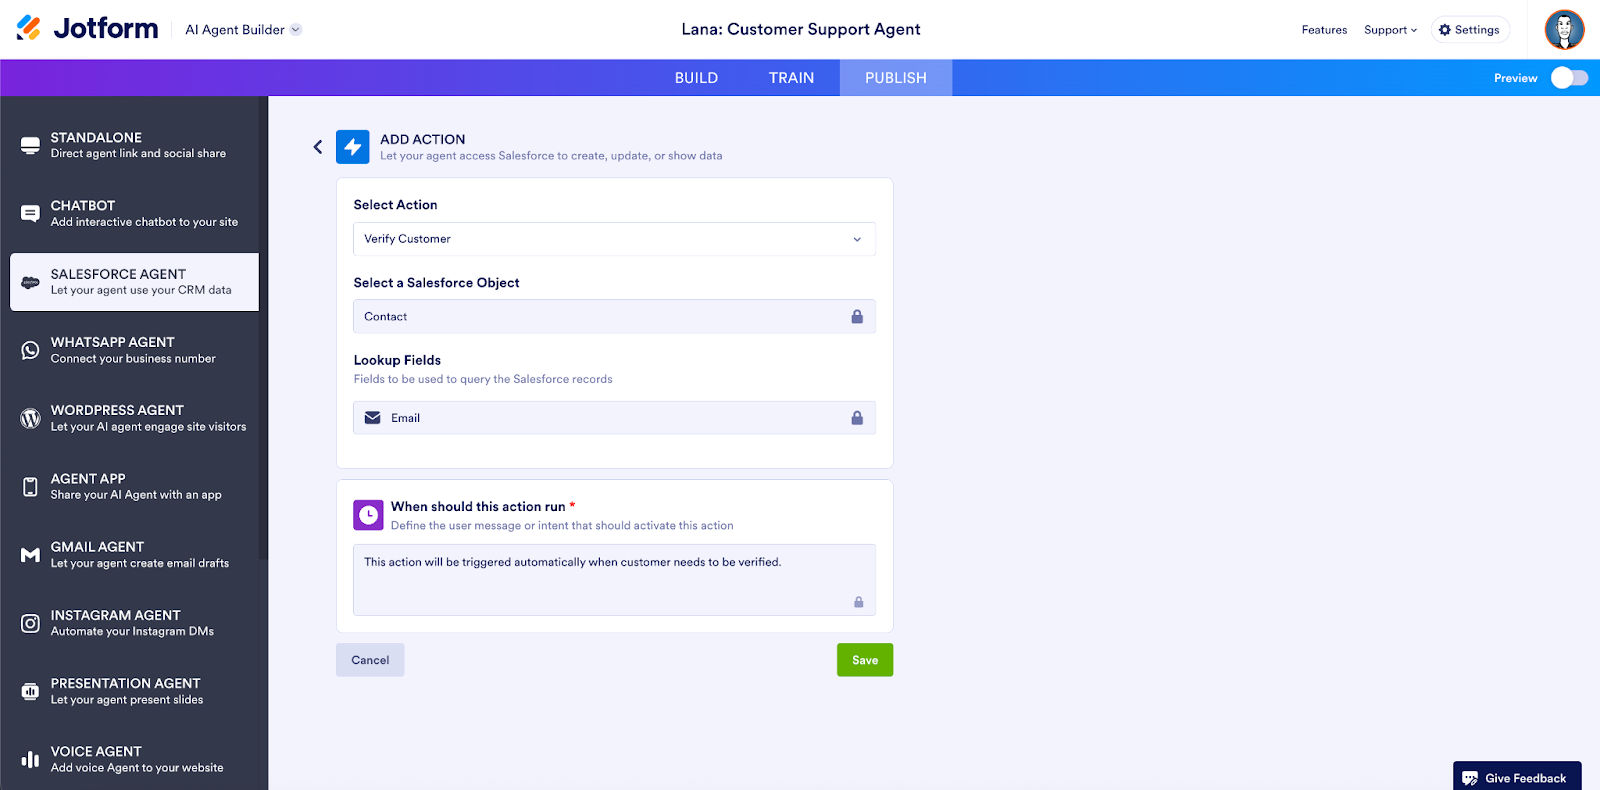
After clicking Add New Action, you’ll be able to set up your action’s trigger. The trigger defines the user message that will activate the action.
An example is an action that verifies the customer based on your Salesforce Object (Contact), with Email as the Lookup Field.
Did you know?
Your agent has a Conversations inbox. To view it, just click on the ellipsis icon that appears when you hover over an action and select See Action Logs from the dropdown menu. Here, you can view the history of the chat and your integration’s details (record IDs, action successes/failures) on the right side of the screen.
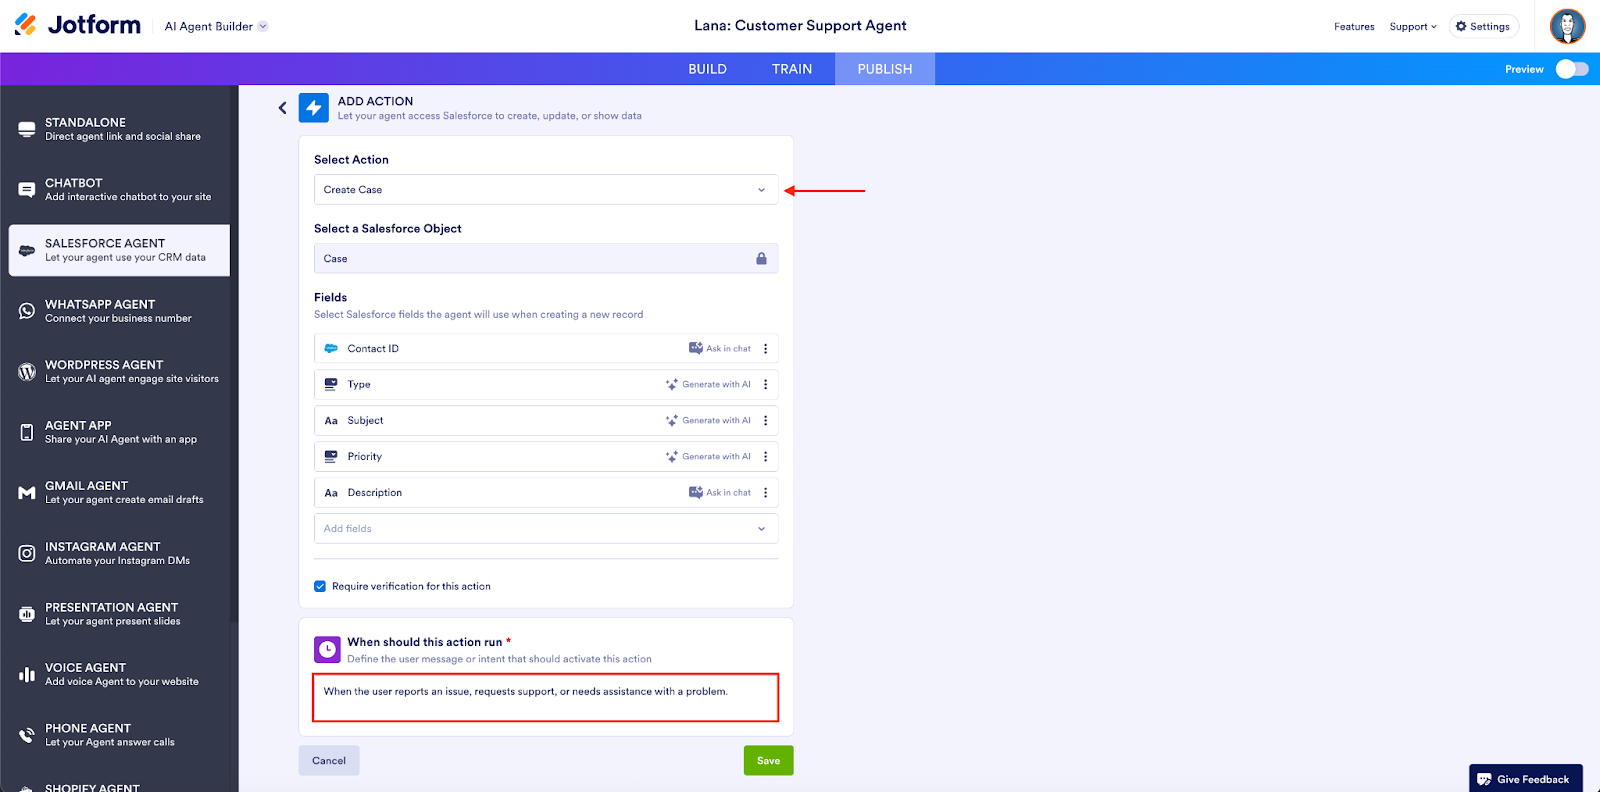
The flow is similar when editing a Create Case action, an excellent usage for customer service.
For example, your action trigger can be a prompt such as “When the user requests support or needs assistance.” You can set up your agent to create a case within Salesforce and choose which suggested fields your agent will use to create the new record.
Clicking the ellipsis icon for a given field allows you to access the field’s settings or remove the field. You can also customize fields based on your unique objects.
If you want your agent to ask the end user to provide the content a particular field asks for, select the Ask in chat fill method. This will trigger your agent to ask for that information inside the chat.
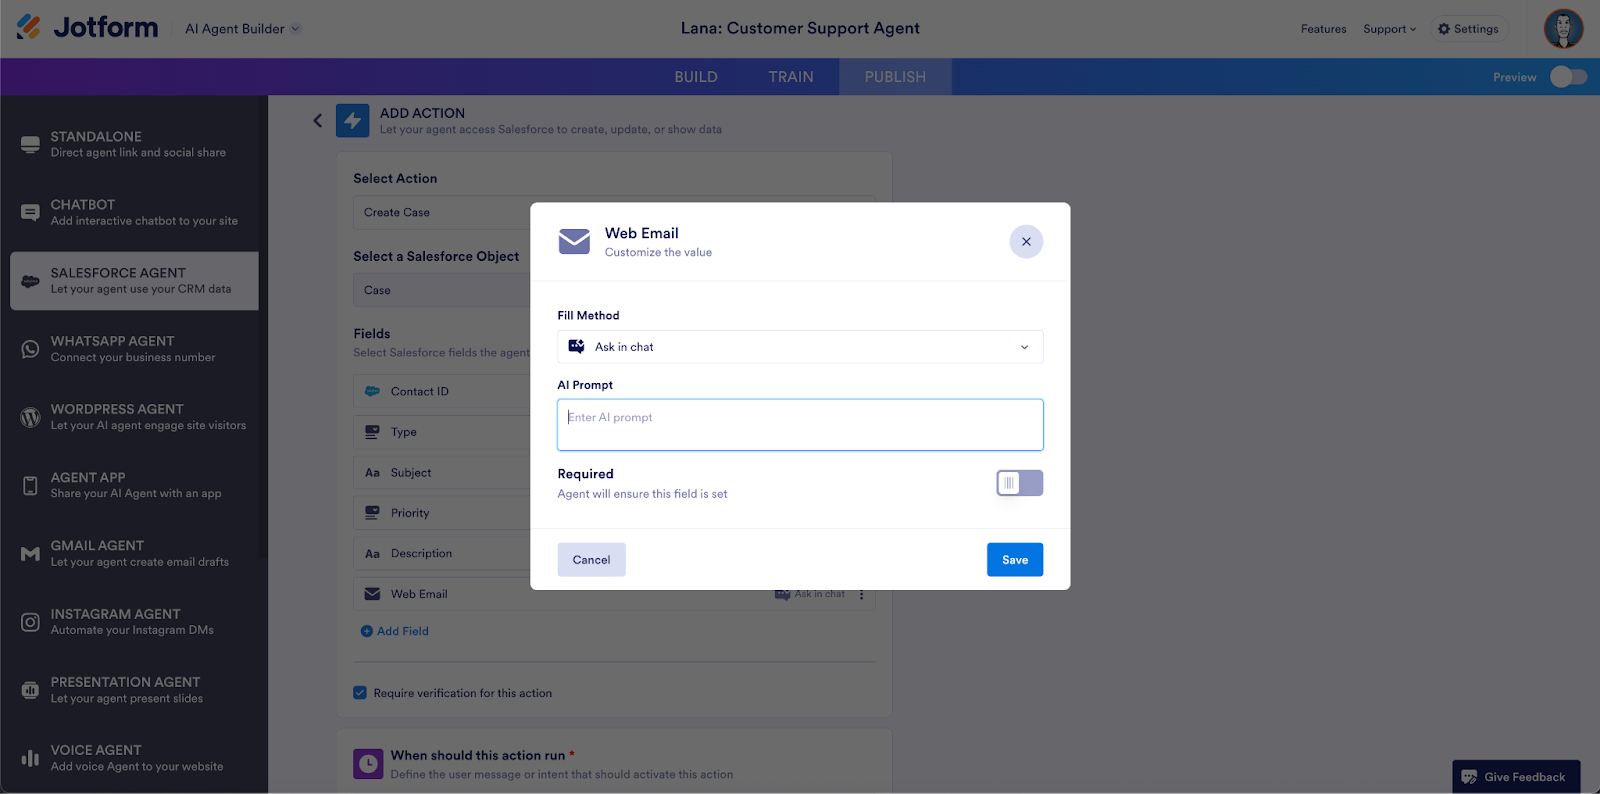
There are other fill methods for fields, such as Generate with AI (the agent will infer the content for the field based on the subject or type of case; i.e., selecting high priority for angry customer language), Static value (based on Salesforce values), or Lookup result (connecting Salesforce objects to agent actions). You can mark all methods of learning for the field type as required if you choose.
We’ll go into more depth on the Lookup result method a little later.
At the bottom of the screen, you can opt to require customer verification for the action. This means your agent will verify the customer’s identity with a verification code sent to their email before fulfilling the task.
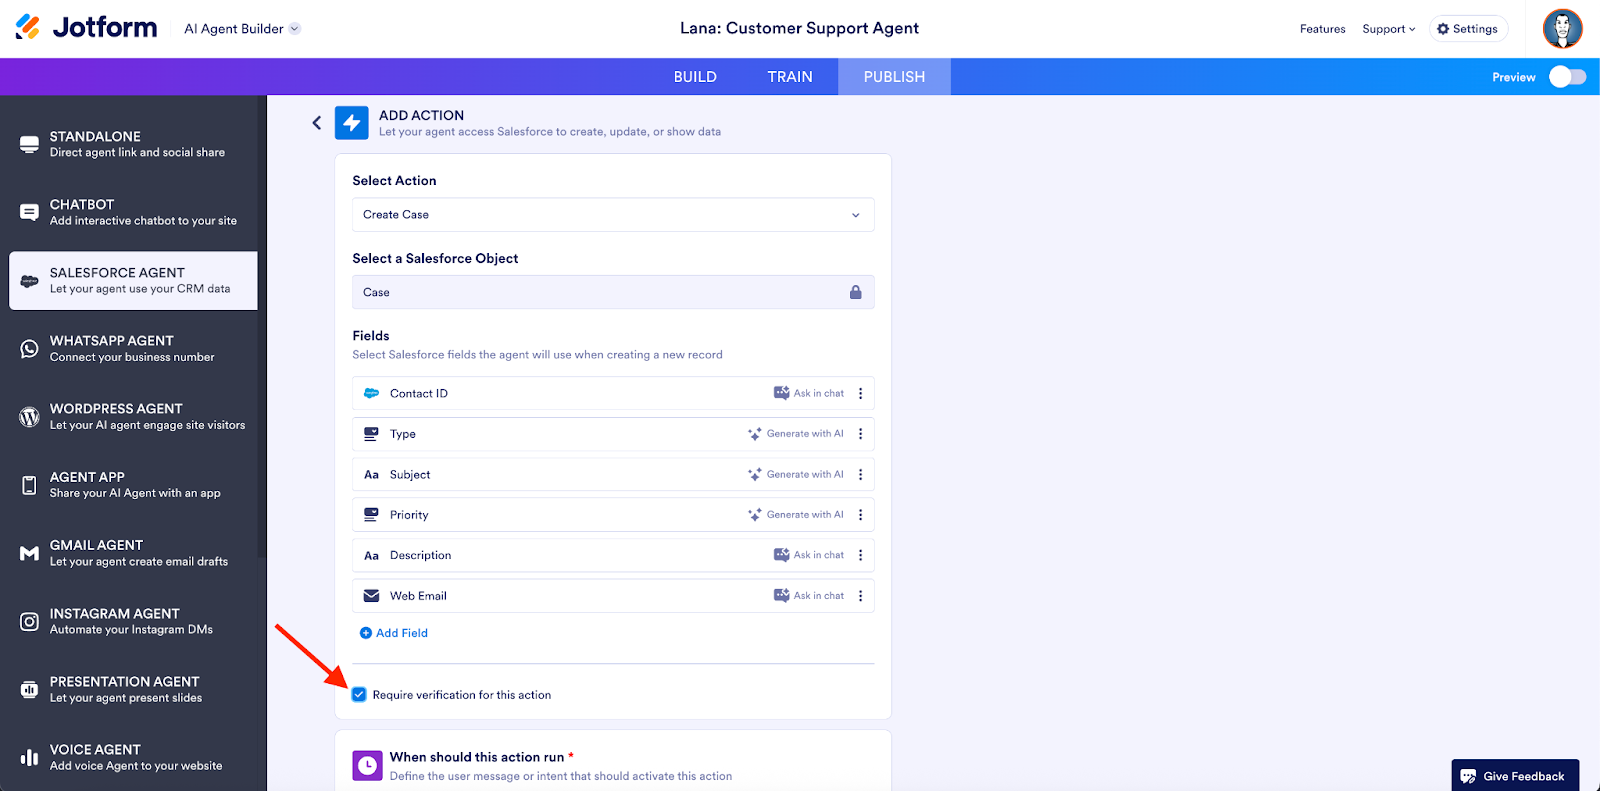
Unchecking this option means new records (leads, opportunities, etc.) will be created without verifying the customer’s identity. This is helpful in scenarios like a customer service manager creating cases for a new customer.
Did you know?
There are over 25 actions you can trigger with your Salesforce Agent. Create leads, cases, records, contacts, appointments, and order-related actions. Your agent is equipped to handle almost anything.
Knowledge & Share Agent
Click Knowledge under the Agent summary to view knowledge articles in your Salesforce organization. You can add new knowledge by clicking the arrow on the right.

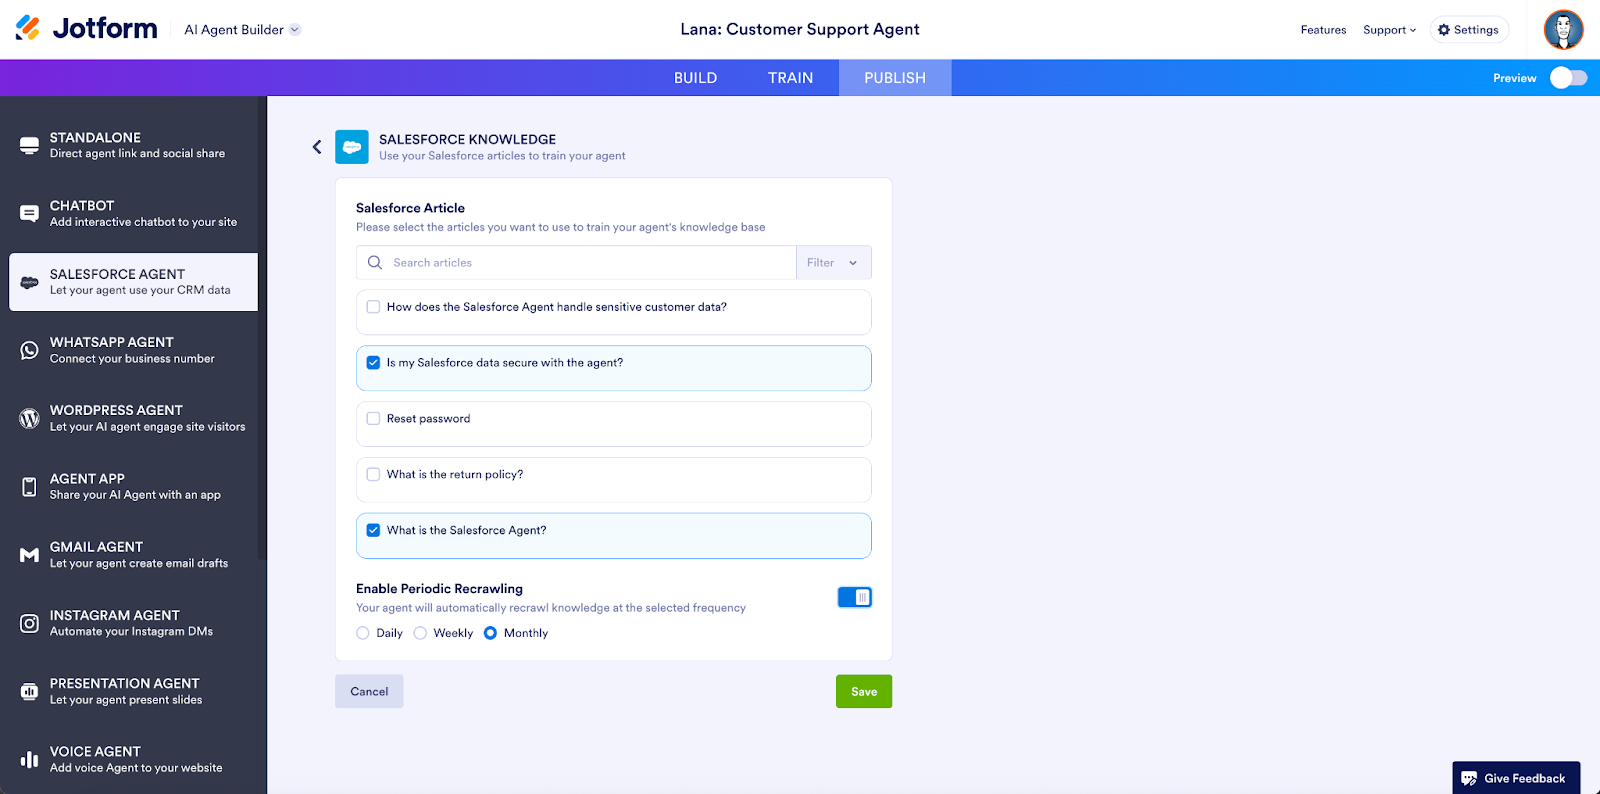
Once knowledge has been shared, your agent will have a number of predefined buttons the end user can choose from (i.e., “Review return policy” or “Reset a password”) in the chat interface. Your agent will draw upon these from the Knowledge Articles section of your Salesforce instance.
Next to the Agent Summary tab is Share Agent. Here you can easily copy a link to send your agent to others.
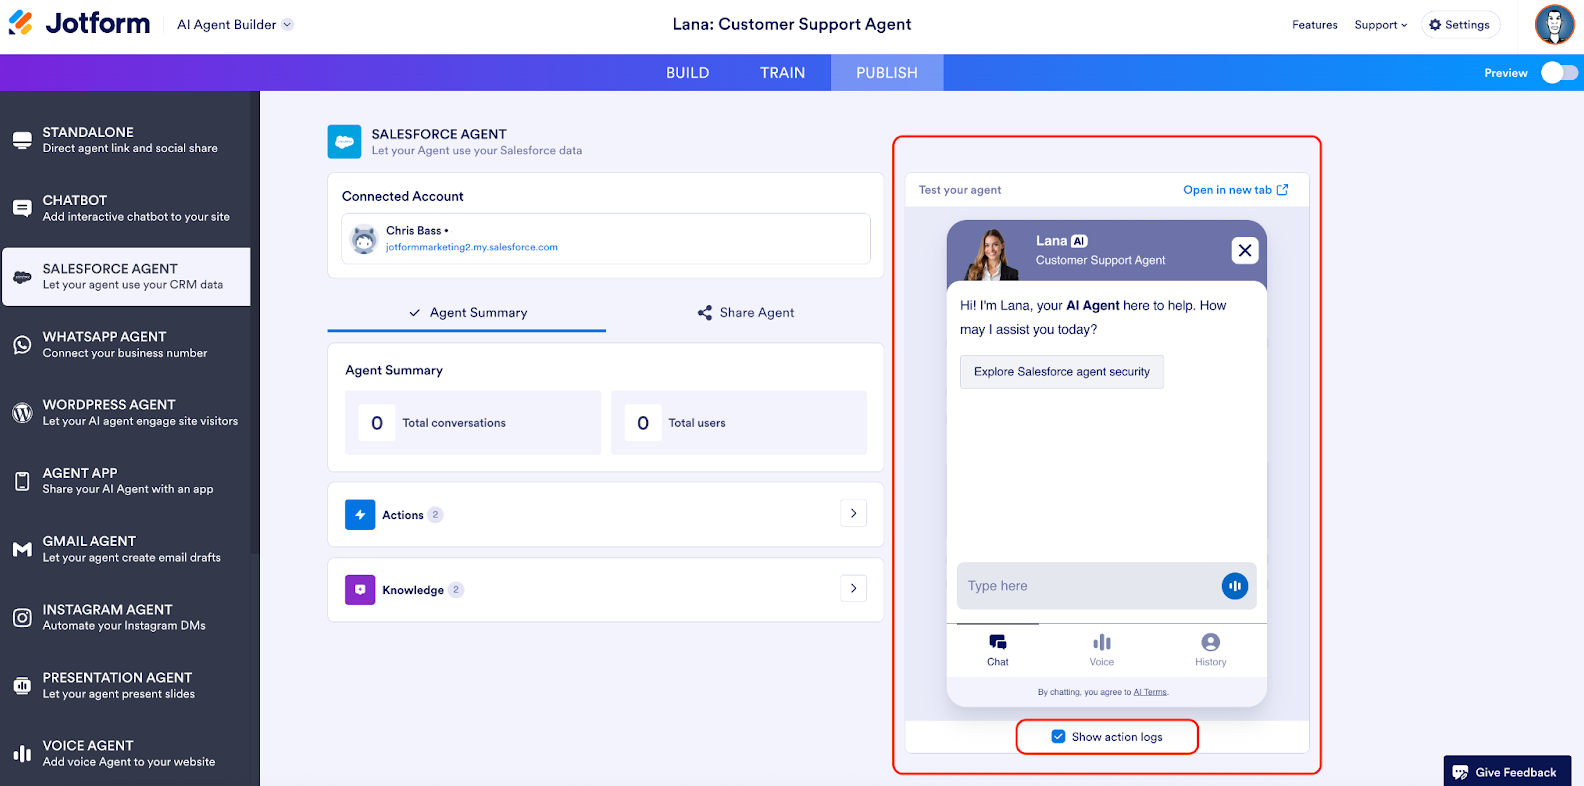
Preview
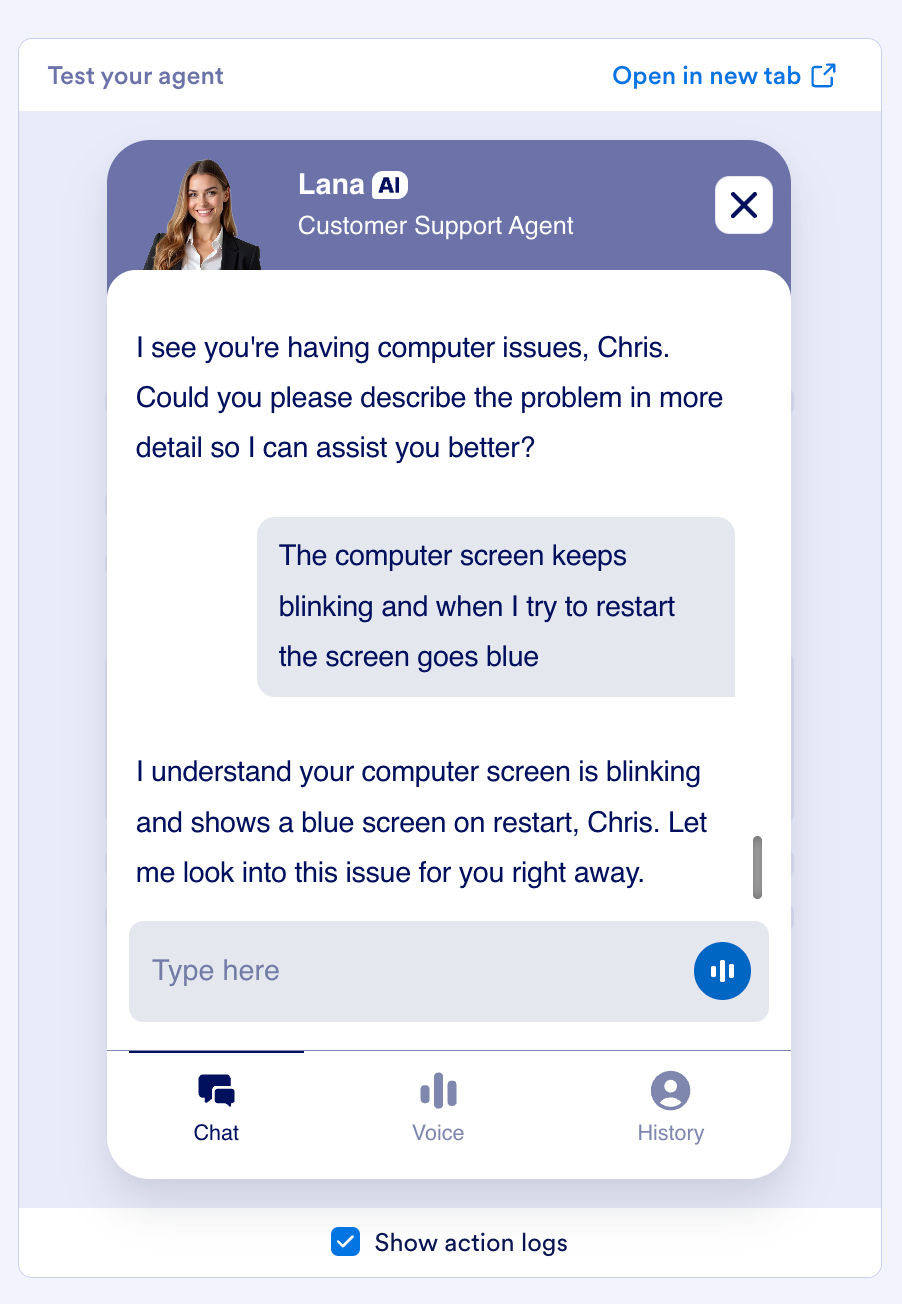
On the right of the screen is an area for you to test your agent. You can test it out in real time with sample customer queries. There’s also a checkbox that allows you to show the action logs of successfully triggered actions as well as any failures.
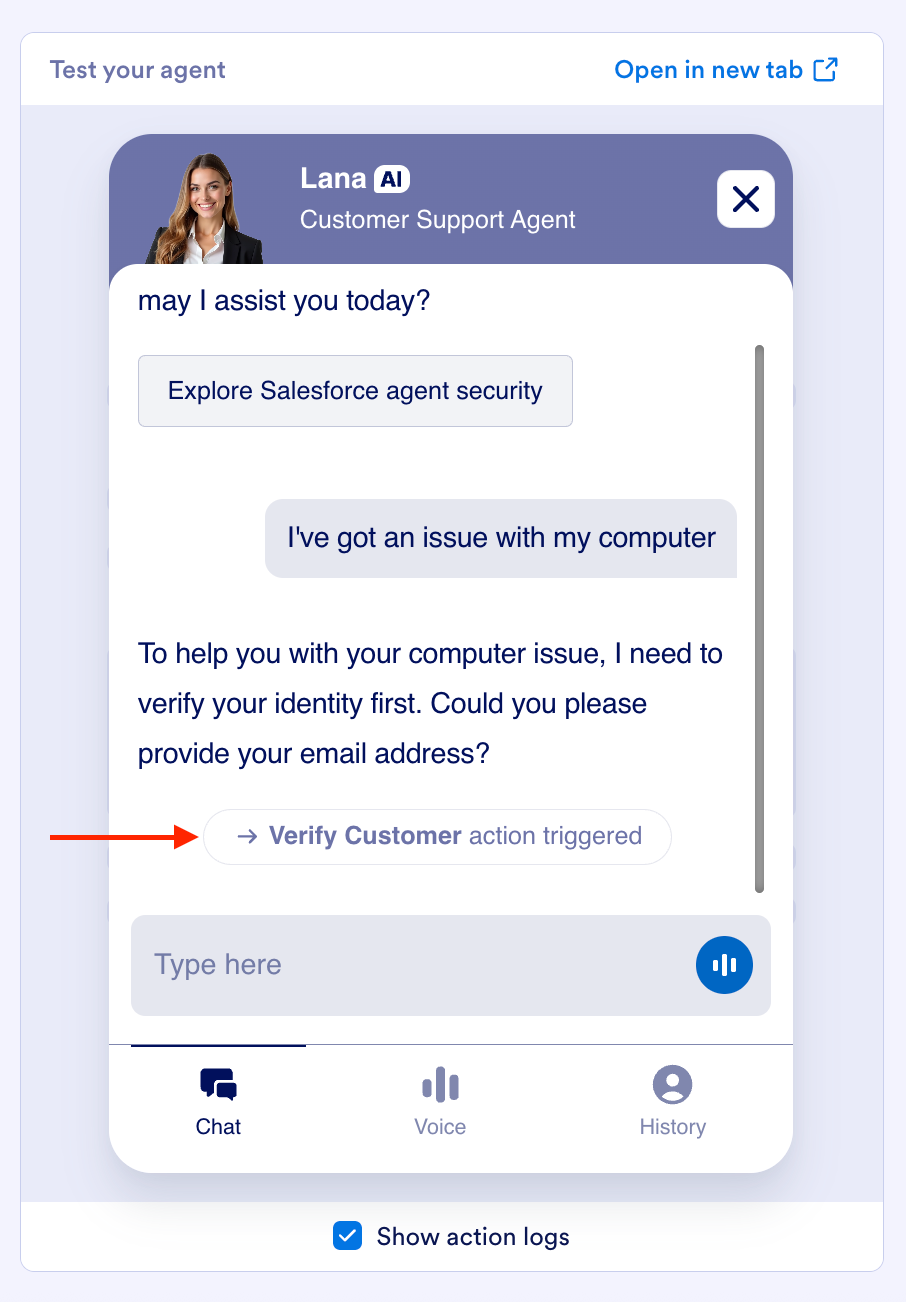
To test the agent before making it live, I’m going to enter a sample customer issue. Because the identity verification box is checked, my agent is asking for my email address. In addition, the Verify Customer action is triggered. This is visible to the agent creator only, for any potential agent error handling. It isn’t visible to the customer.
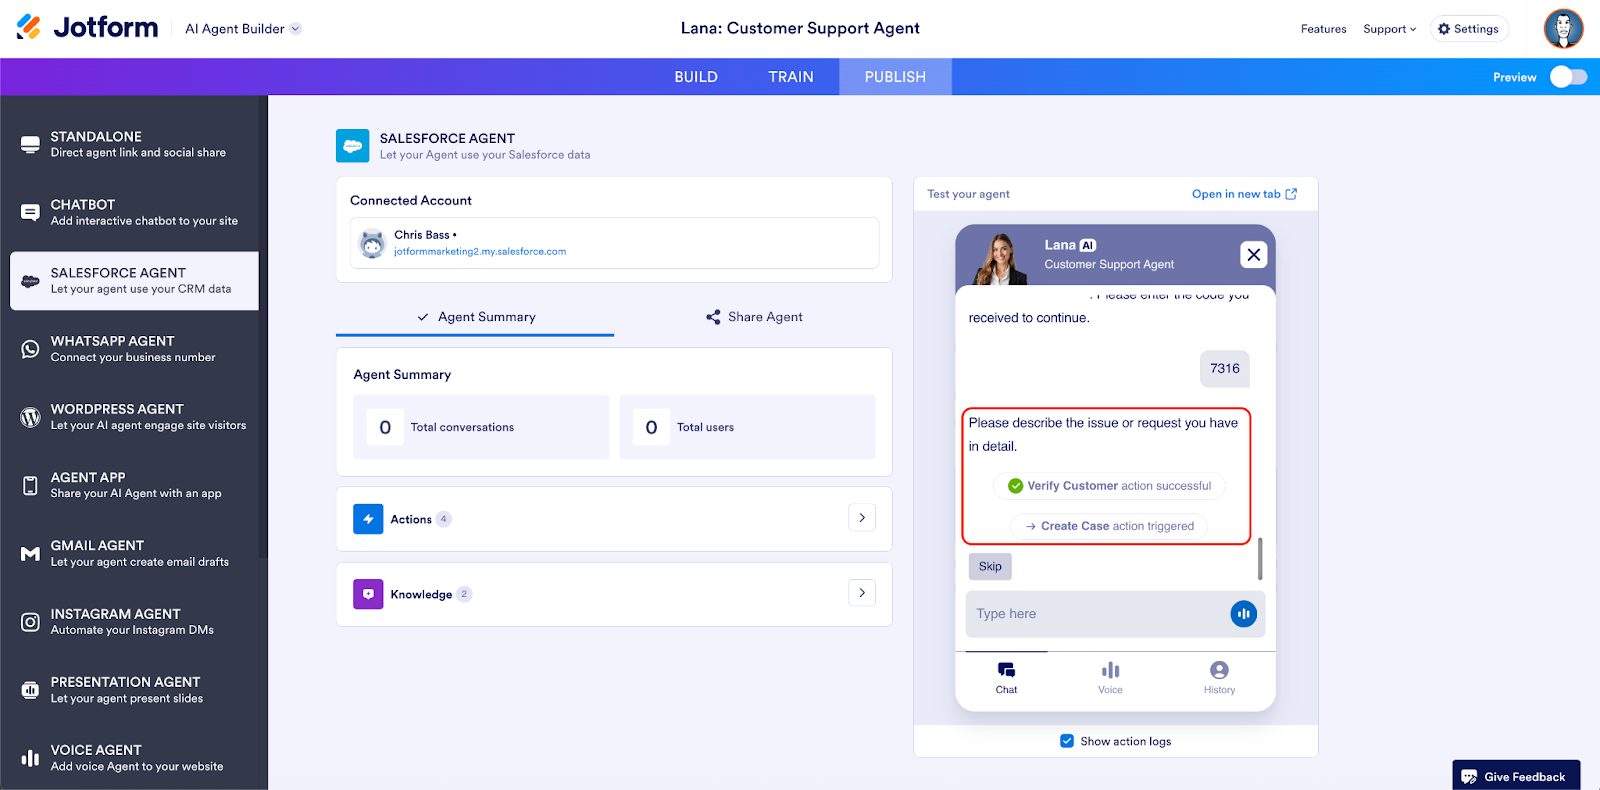
When I enter the customer email, a 2FA verification code is sent from Jotform. After I enter the requested code in the chat, it verifies me successfully and triggers the Create Case action.
Did you know?
The Verify Customer action can be used whenever a customer needs access to sensitive data. An email verification link is sent to confirm the customer’s identity before allowing them to access records or update information.
After being prompted to describe my issue, I enter it, and the agent tells me that they’re looking into it.
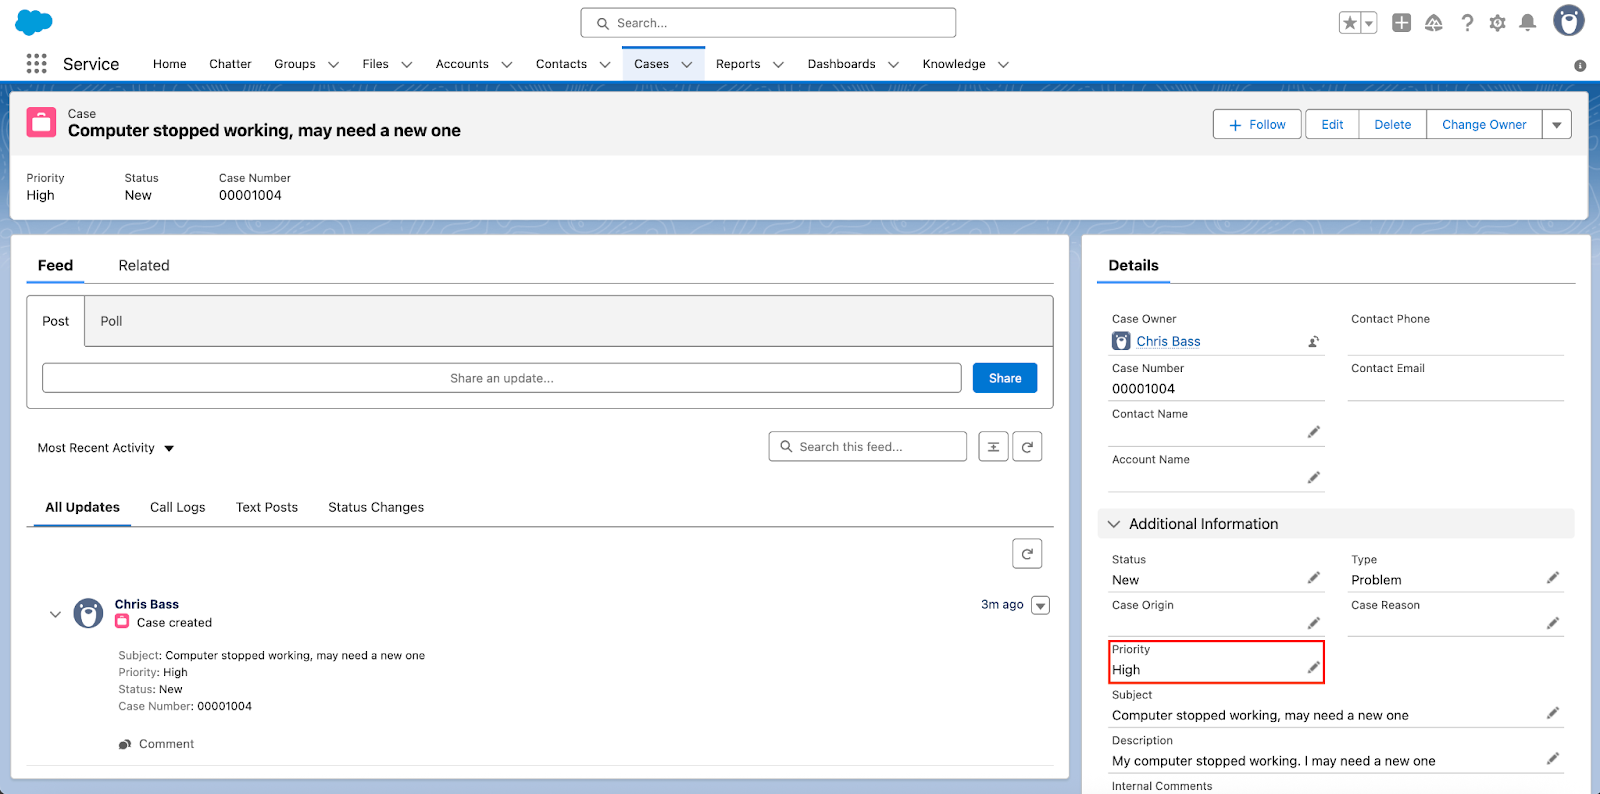
When I go into Salesforce to check my cases, the new case appears, and it’s created with a case number, along with the auto-generated fields from AI (priority, etc.) and, importantly, my contact details.
That’s it. Once you’re satisfied with your agent’s performance in the test environment, you can deploy it across your chosen channels.
Experience Cloud
If you’ve created branded sites, community forums, or portal experiences for partners or employees, you’ll be happy to know that your Salesforce Agent can be shared directly on Salesforce’s Experience Cloud.
Here’s how to add an AI chatbot to your Experience Cloud site. 🙌🏾
Before starting, please make sure you’ve completed the Experience Cloud setup in your Salesforce organization. Learn more about the setup.
To add an AI Chatbot to your Salesforce Experience Cloud site, you need to install the most recent version of Jotform from the AppExchange. This will enable you to use our custom lightning component, Jotform AI Chatbot.
Once the installation is complete, open the Experience Builder for the site you want to edit. Click the Components tab, and you’ll find Jotform AI Chatbot listed under Custom Components.
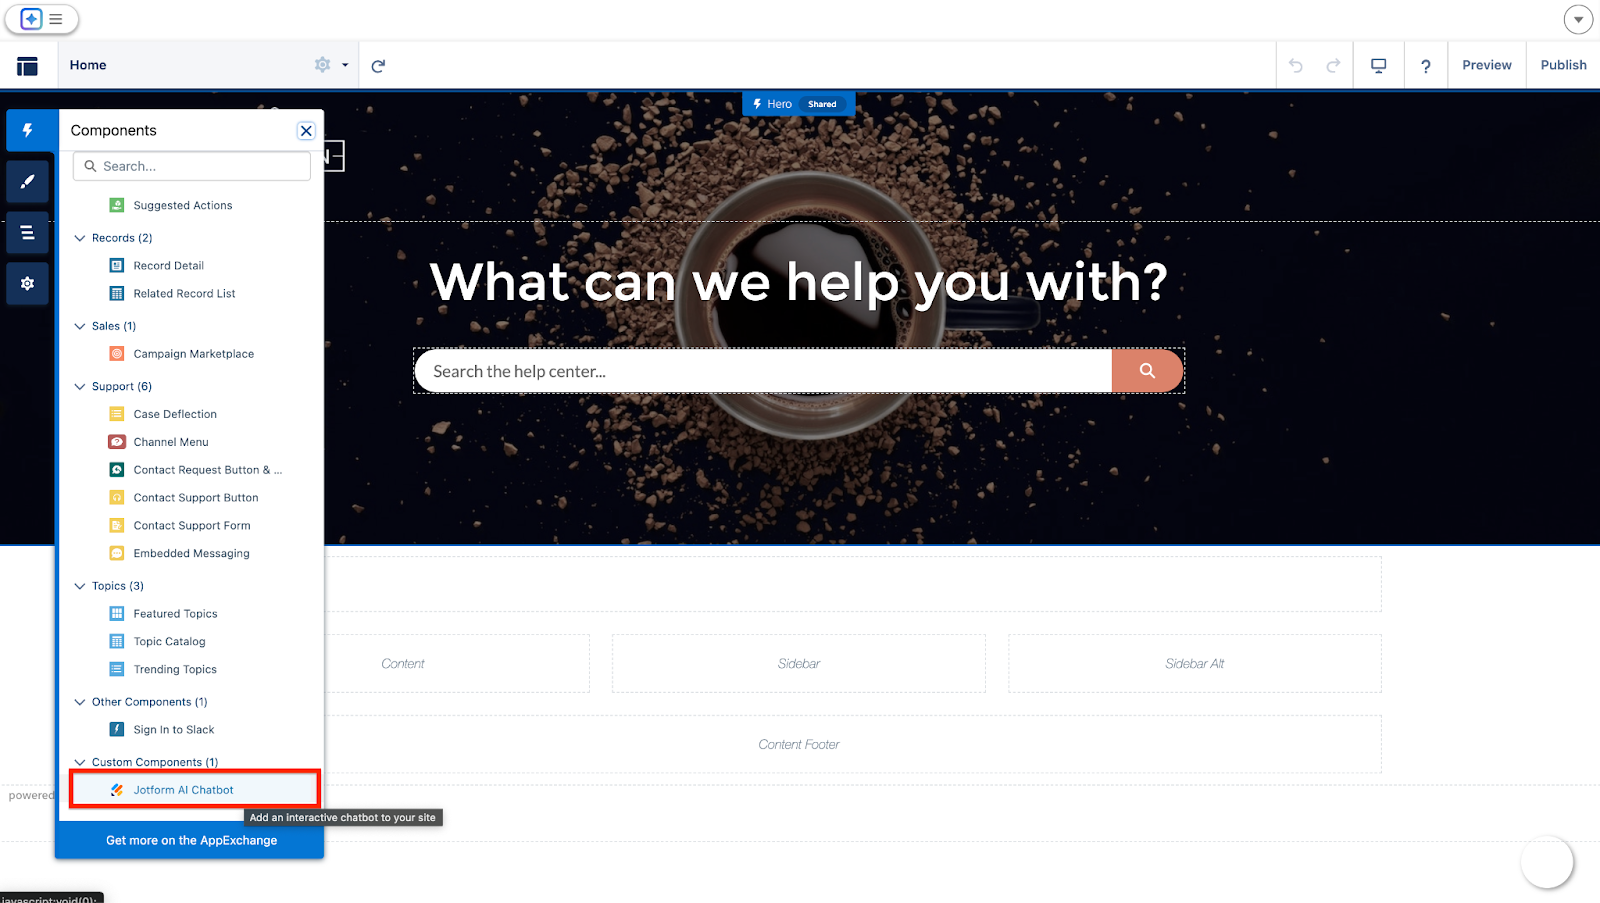
Drag and drop the Jotform AI Chatbot component to the page, and paste your agent’s share link into the settings panel. You can adjust your chatbot’s position and adjust other settings as well as publish the page.

The agent will empower you to provide 24-7 support and extend your brand reach across all of your brand’s stakeholders.
Jotform for Salesforce
Many of you know that Jotform has a native integration on Salesforce. Jotform for Salesforce has automation features like dynamic prefill, e-signatures, shareable apps, and more.
The agent creation flow is slightly different for users with this setup. Let’s take a closer look.
In the Jotform for Salesforce user interface, click the Create button. On the next page, you’ll see the option to create a Salesforce Agent next to the Salesforce Form option.
After selecting Salesforce Agent, you’ll see the prompt area and common use case options. Choose a use case, and click Create Agent to generate your Salesforce Agent.
This will take you to the Build tab in the AI Agent Builder, where you’ll find the Salesforce Agent Settings button. Click on it to go to the Publish tab. There, you can view the configured actions and crawled Salesforce knowledge.
Salesforce Agent pro tips
- Field mapping: Field mapping is always important, but especially when your AI agent is pulling/pushing data connected to your Salesforce instance. We recommend using Jotform’s Full Name and Address elements where possible for simpler mapping. Use the Short Text element for custom Salesforce fields.
- Lookup result fill method: Lookup result is an important fill method that can be used to connect one action to another via reference fields. For example, you can use the contact ID from a lookup result when creating a case, ensuring that the case is automatically attached to the correct contact.
- Duplicate rules: When mapping records, be mindful of Salesforce duplicate rules (which define what happens when a user starts creating a duplicate record). Salesforce provides standard duplicate rules for accounts, contacts, and leads. You can also customize those rules, but be aware how they might impact other functions.
- Integration logs: You can check action logs in the Jotform Conversations inbox to monitor the success, failure, or errors associated with your agent.
- Ask in chat: The phrase “Ask in chat” appears on the Salesforce fields associated with the actions you set up for your agent. The agent will ask for the information within the chat and try to get the answer from the user.
How teams can use the Salesforce Agent
Salesforce users have been integrating their accounts with Jotform for years. Over that time, we’ve gleaned the most popular user types that lean on both solutions to handle their workflows.
While almost any Jotform–Salesforce user can streamline their work with the Salesforce Agent, here’s a quick rundown of those who stand to get the most out of it.
- Sales teams: I mean, it’s in the name (Salesforce). Sales teams can qualify leads directly from their agent’s chat. They can also use their agent to answer simple FAQs and set up initial discovery appointments.
- Customer support/service teams: Customer support personnel can train their agents to automate case creation, escalations, and knowledge answers. In turn, they’ll spend less time on administrative duties and more on strategic direction.
- Marketing managers: Marketing managers are able to easily capture campaign leads and track engagement with the brand.
- Operations and service managers: The Salesforce Agent helps those in operations automate order tracking, scheduling (by syncing appointment tools), and day-to-day customer inquiries.
- HR teams: By streamlining employee requests and onboarding through an agent, HR Teams can be more efficient. With the time they save, they can analyze the logs on the back end to spot trends and make sure the agent is addressing the proper needs.
Conclusion
Salesforce Agent makes AI automation accessible, fast, and powerful.
This AI-powered chatbot connects directly to your Salesforce Clouds, allowing you to easily automate lead capture, case management, HR requests, and more, across all customer engagement channels, with 24-7 responsiveness to boot.
Plus, your agent can train on your Service Cloud knowledge and procedures to deliver answers that are on brand and reflect your organization’s best practices.
Have a particular question? Check out our Salesforce Agent FAQs!
Salesforce Agent is an elegant, easy-to-use, and powerful solution, especially when combined with Jotform’s lineup of best-in-class AI tools, integrations, and workflow solutions.
Other AI agent solutions require coding and extended setup processes, and they can be expensive. But Salesforce Agent boasts no-code simplicity and quick setup, and is free to use.
We’re excited for you to try Salesforce Agent and see how its many use cases can fit your team.
Also, if you’re planning to attend Dreamforce (Salesforce’s annual conference) in San Francisco from October 14–16, come see us! Drop by to say hi and learn more about the Salesforce Agent at booth 713.


Send Comment: