Over 150,000 organizations worldwide rely on Salesforce as their central platform to manage sales, service, and customer relationships. For many enterprise teams, Salesforce isn’t just a tool — it’s the foundation of their operations, data strategy, and customer experience.
Yet the daily work of maintaining and managing Salesforce often involves repetitive, manual tasks, from lead qualification to case routing and data entry. These time-consuming workflows slow down teams that could otherwise focus on strategic growth and service excellence.
That’s why we’re introducing the Jotform Salesforce Agent, an AI-powered chatbot that connects directly to Salesforce to help large organizations automate workflows, streamline customer interactions, and deliver faster, more consistent service — without writing a single line of code.
What is Salesforce Agent?
Salesforce Agent is
- An AI-powered chatbot that integrates directly with Salesforce Sales and Service Clouds, enabling enterprises to automate lead capture, case management, HR requests, IT support, and more in real time
- Equipped with predefined workflows, support for standard and custom objects, automatic knowledge retrieval, and omnichannel deployment (chat, web, and phone)
- Designed to eliminate manual data entry, ensure system-wide data accuracy, and provide 24-7 responsiveness to both internal and external stakeholders
- Built for rapid, no-code setup, empowering enterprises to scale automation quickly without complex integrations or costly customization
With our new Salesforce Agent, organizations gain accessible, enterprise-grade Salesforce automation that drives efficiency, compliance, and growth.
Additional Salesforce Agent features
The Salesforce Agent also offers
- Predefined agent skills for enterprise functions such as lead management, case management, HR support, and IT help desk automation
- AI-powered interactions that deliver natural, brand-aligned responses across internal and customer-facing use cases
- Tracking and visibility via integration logs, enabling admins to monitor every interaction and maintain system compliance
How to use your Salesforce Agent
Setting up your Salesforce Agent is straightforward and doesn’t take much time.
Create a new AI Agent
Before you can create an AI Agent in your Enterprise instance, an admin on your account must enable this functionality. Learn how to enable Jotform AI Agents in the Admin Console.
By default, the AI Agent and its related channels (like phone, SMS, and voice) are disabled on all servers. Admins can enable or disable the AI Agent through the AI Agent settings in the Admin Console.
In addition to enabling overall AI Agent creation, an admin will need to enable the Salesforce Agent. Turn the Salesforce Agent toggle on — it must be enabled in the Admin Console before you can get started.
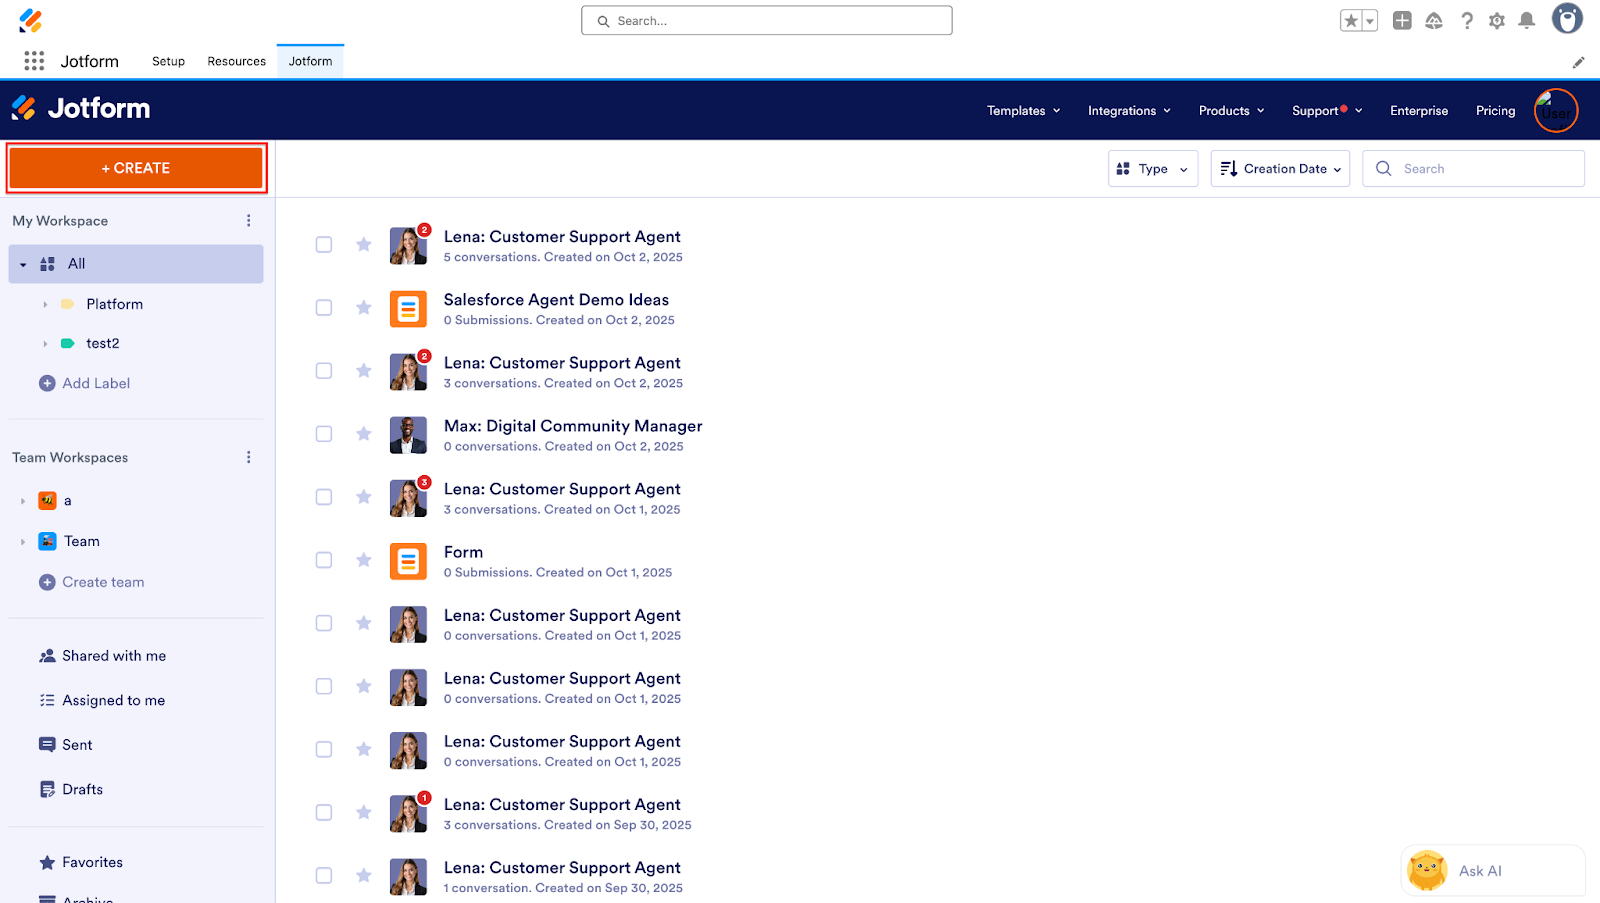
From your Jotform Workspace, click the Create button in the upper left corner. Then select AI Agent to get started.

Describe the kind of agent you’d like to create, or use one of the preset options available, such as Customer support or Feedback. Click the Create button.
Select the Salesforce channel
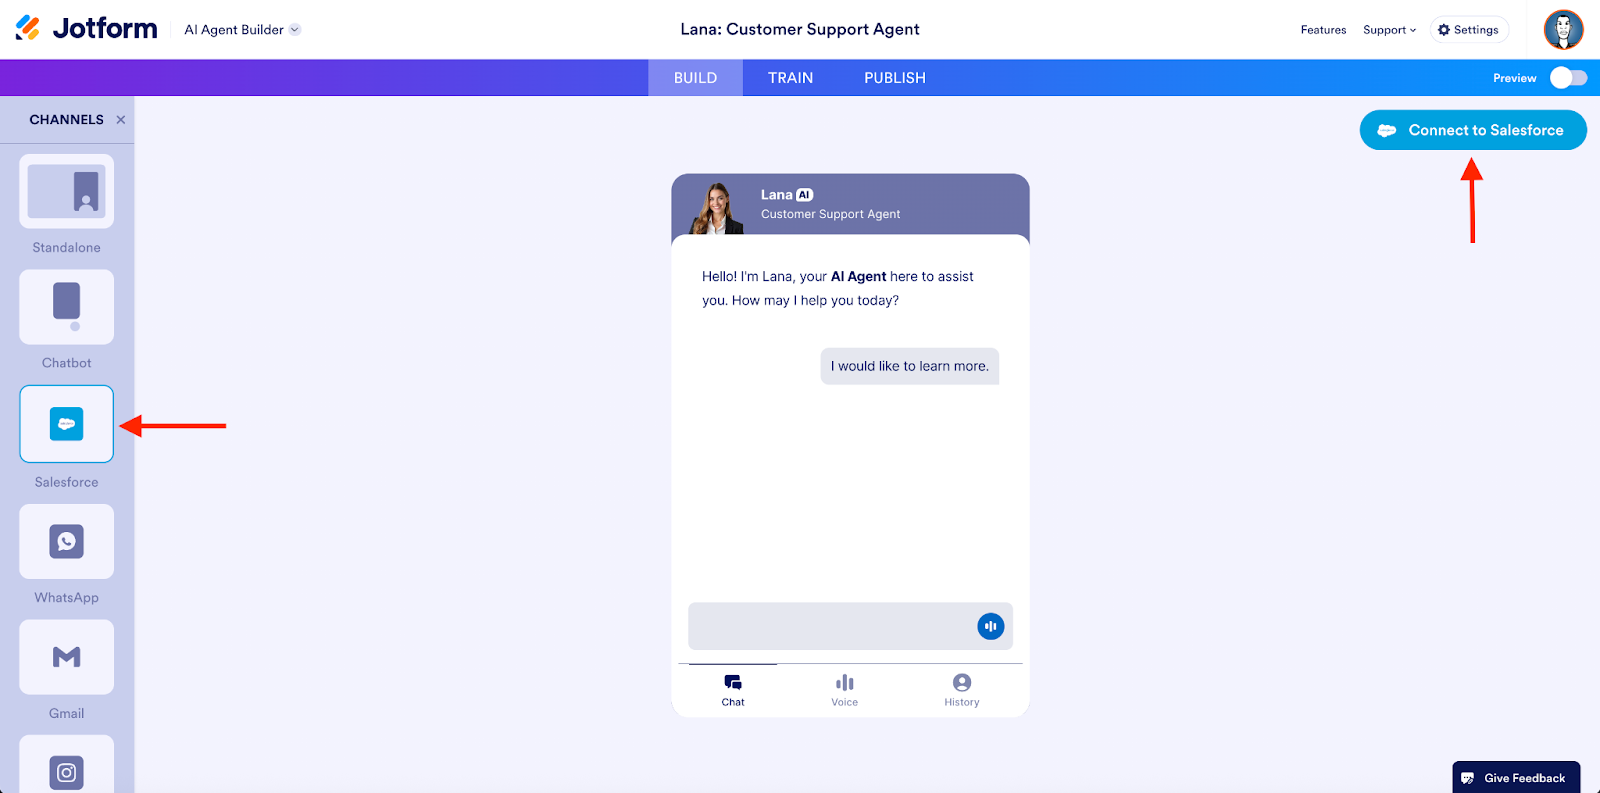
In the AI Agent Builder, select the Salesforce option in the left panel, then click Connect to Salesforce in the upper right of the screen.
On the next screen, select the Salesforce environment you want to connect to. You can choose Production or Sandbox.
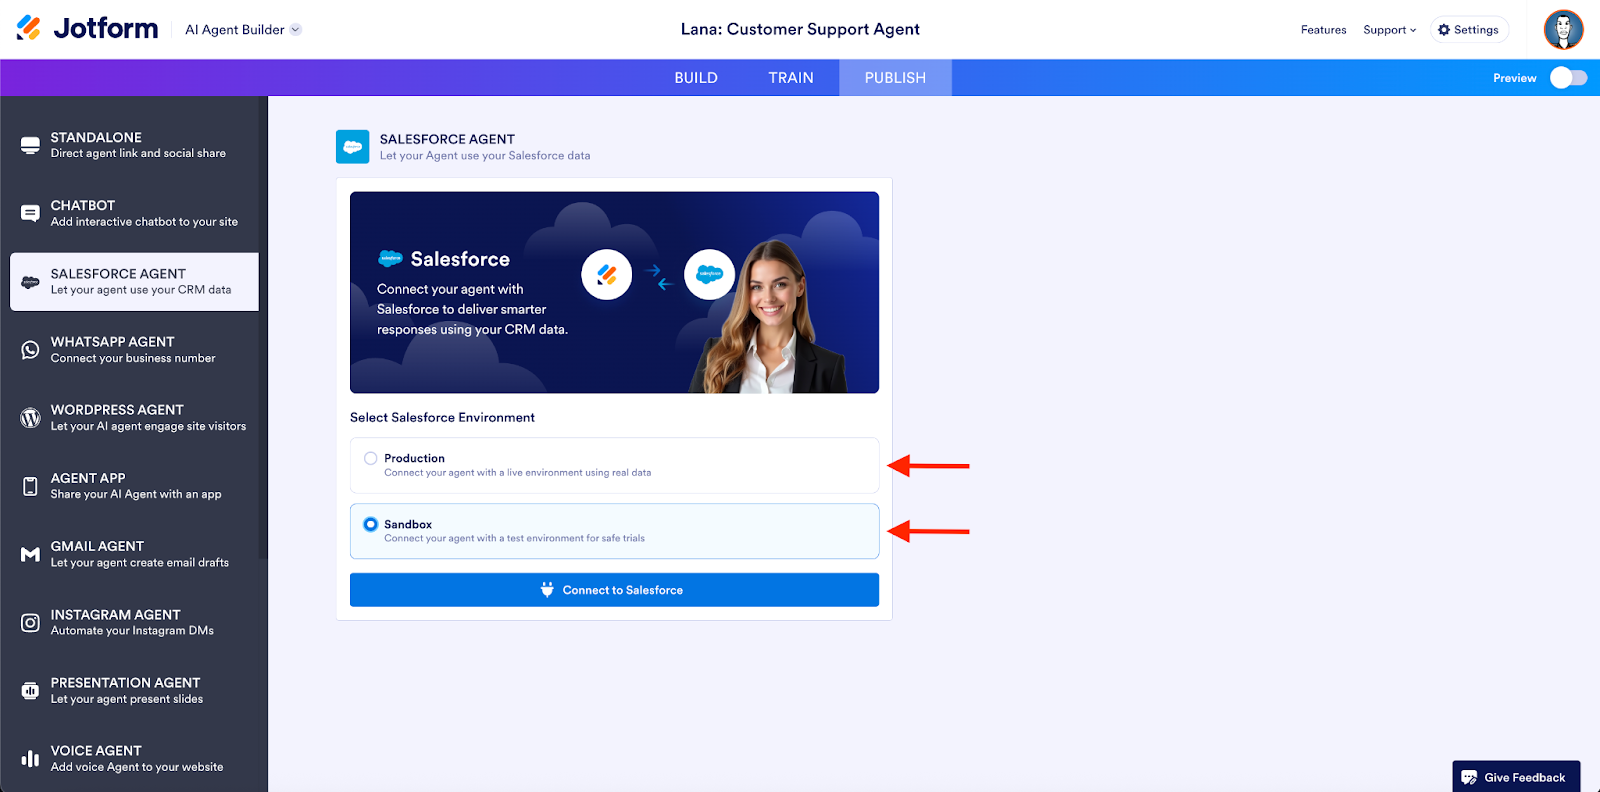
As an FYI, Sandbox is a copy of your production environment, typically used by admins and developers for testing and training so that live customer data isn’t impacted. It’s a best practice to test your agent in Sandbox mode before going live to be sure you catch any mapping or workflow issues.
Enter your Salesforce credentials to connect your account.
Select a use case
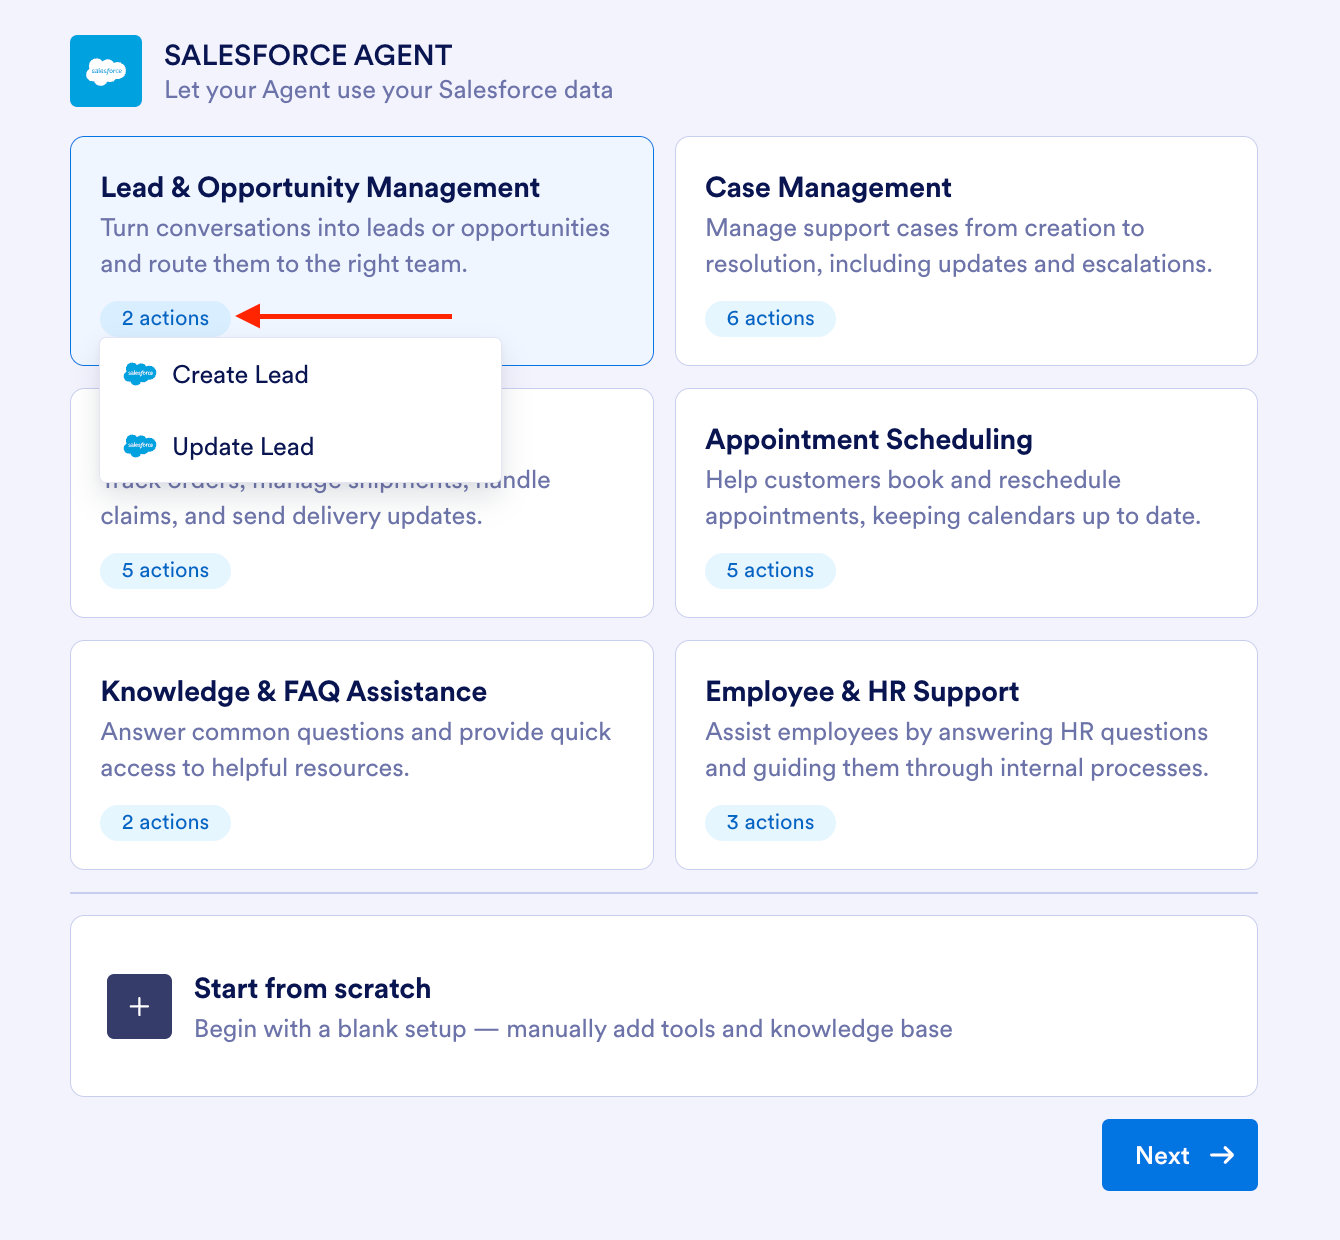
Once connected, you can select from a handful of predefined use case options for your agent, including lead management, order tracking, case management, appointment scheduling, HR support, and more. Or you can start from scratch to build your agent.
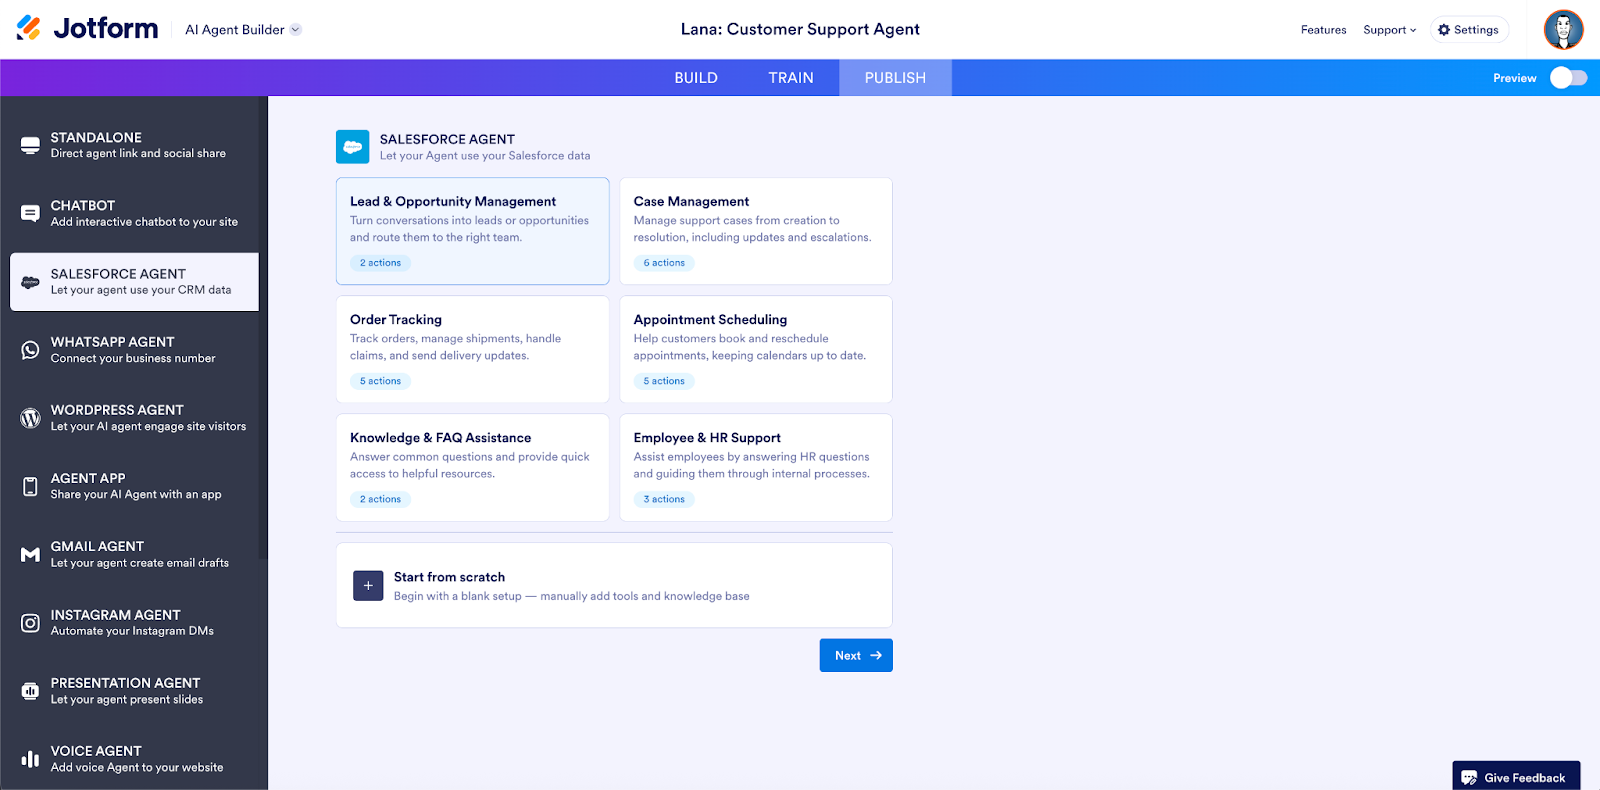
Under each option you’ll also see predefined objects and actions, such as Create Lead under Lead & Opportunity Management.
Conveniently, there are also resource articles available for some options. All the resources are based on the most popular scenarios for Jotform and Salesforce users.
Review & test
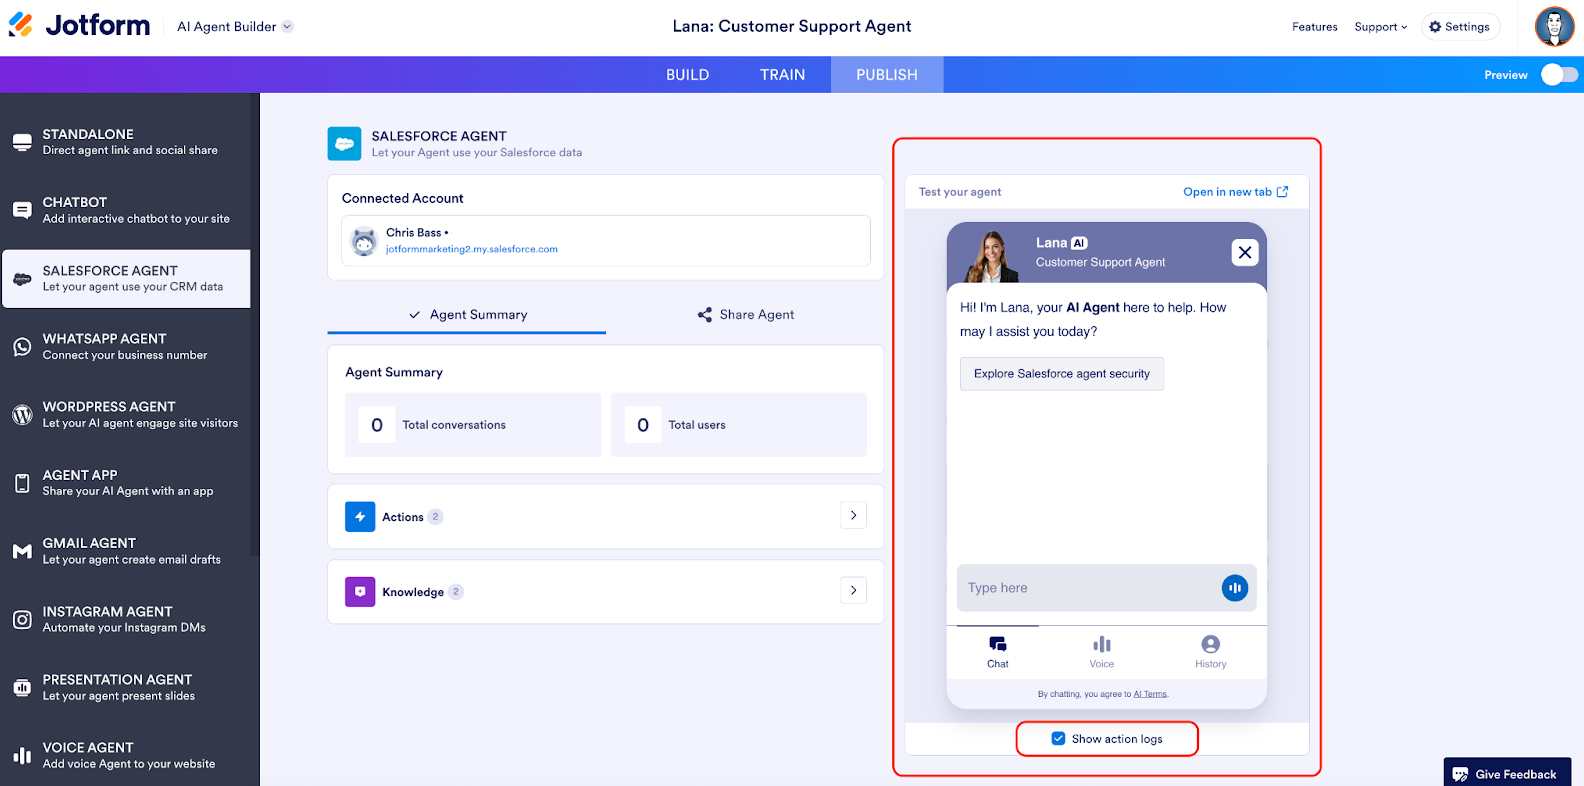
Once you’ve selected your use case, it’s time to review your configuration and test your agent. On this screen, you’ll see your connected account. When you click on it, you’ll be redirected to your Salesforce instance.
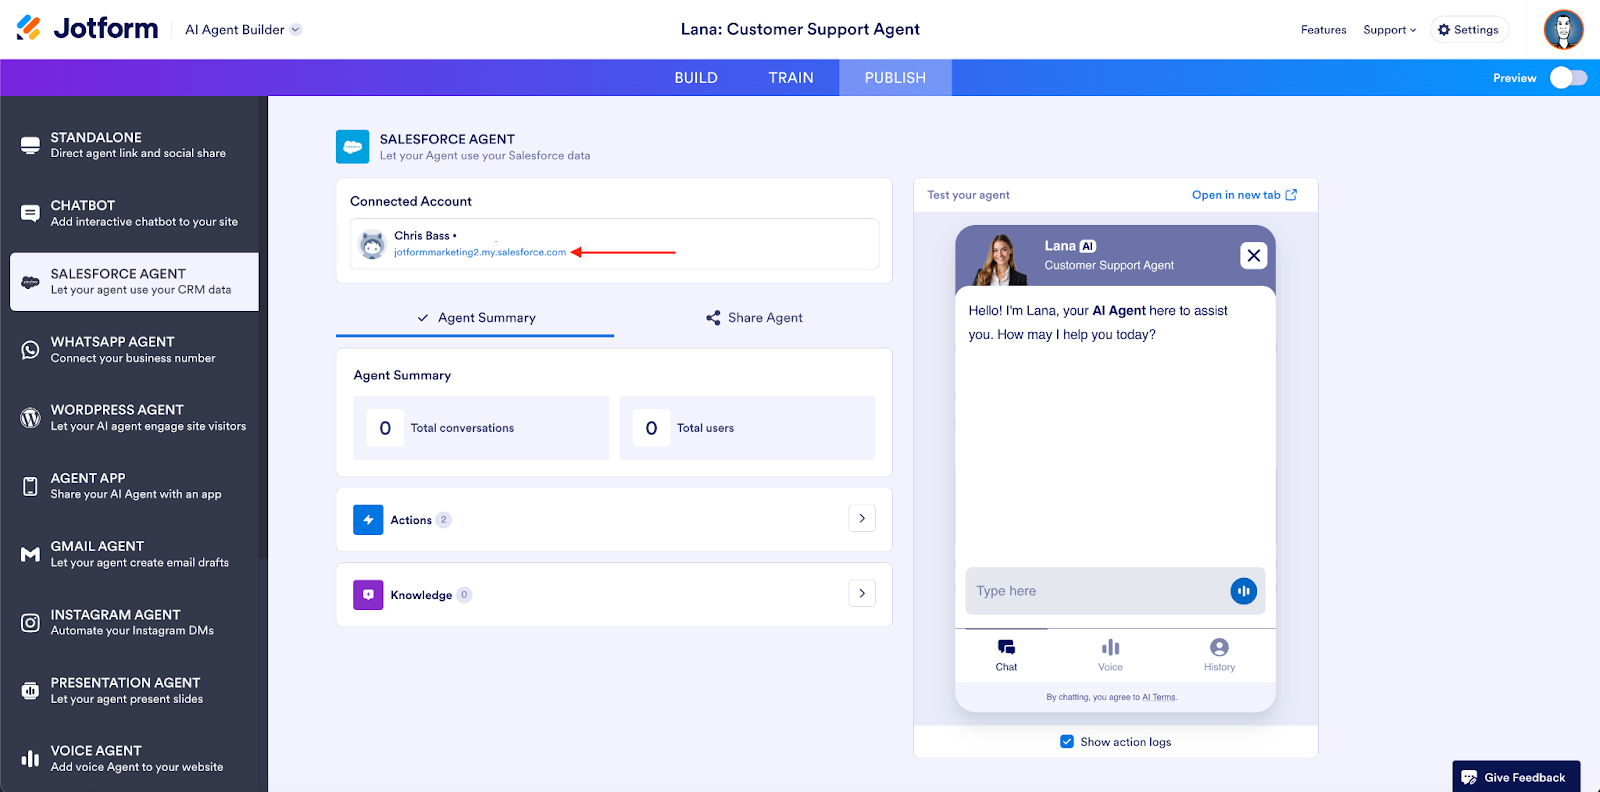
Under Agent Summary, you can see all the associated activity for your agent, including its conversations and users to date (I don’t have activity yet, which is why there are zeros). This screen also lists the actions and knowledge that have been linked to your agent.
Actions
To the right of your actions is an arrow icon. Click on the icon to edit your actions, add new ones, view the action’s logs, and more.

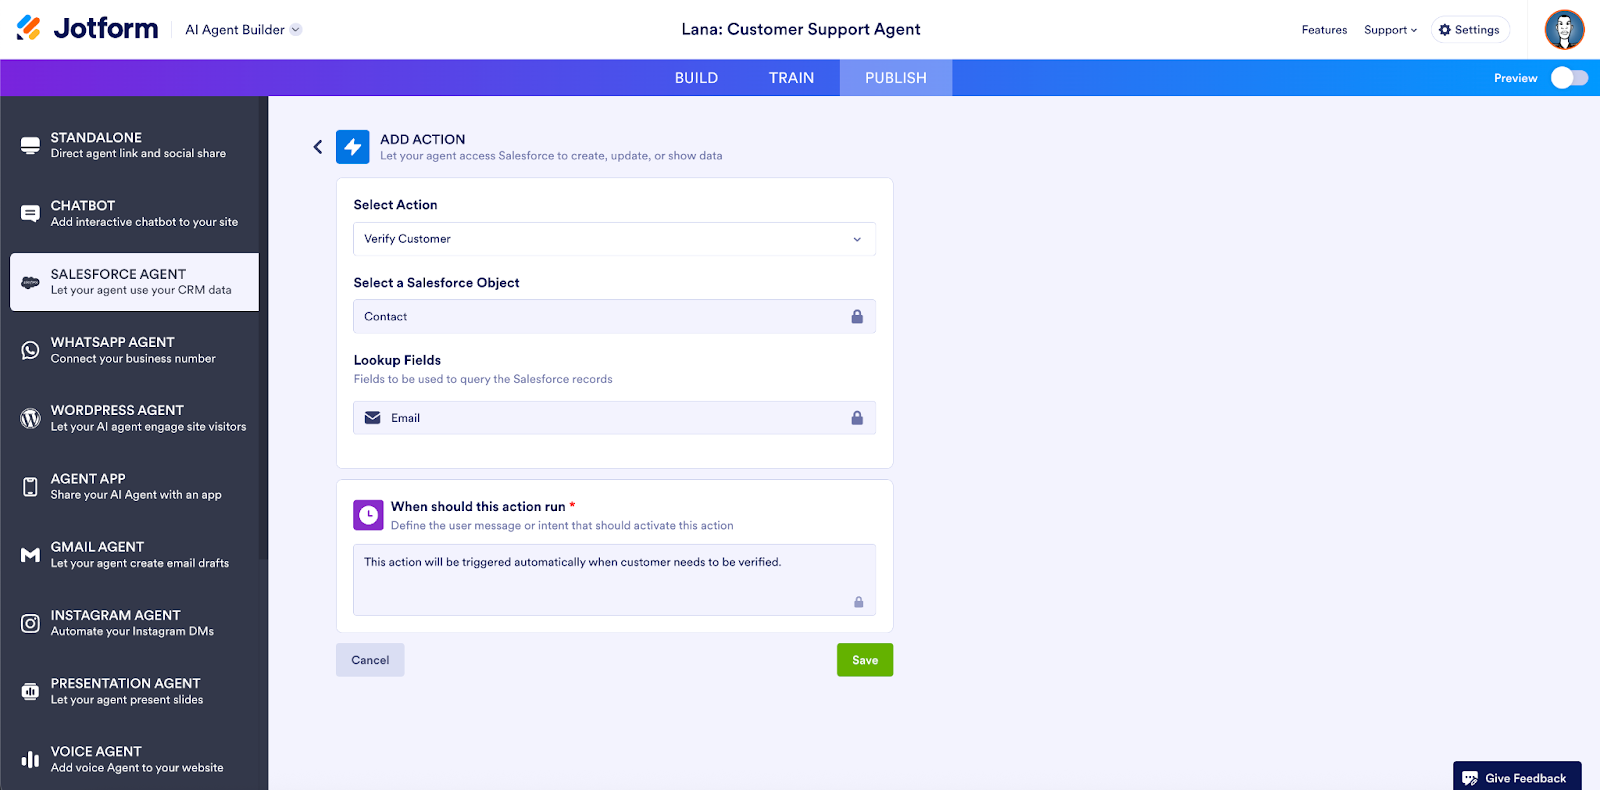
After clicking Add New Action, you’ll be able to set up your action’s trigger. The trigger defines the user message that will activate the action.
An example is an action that verifies the customer based on your Salesforce Object (Contact), with Email as the Lookup Field.
Did you know?
Your agent has a Conversations Inbox. To view it, just click on the ellipsis icon that appears when you hover over an action and select See Action Logs from the dropdown menu. Here, you can view the history of the chat and your integration’s details (record IDs, action successes/failures) on the right side of the screen.
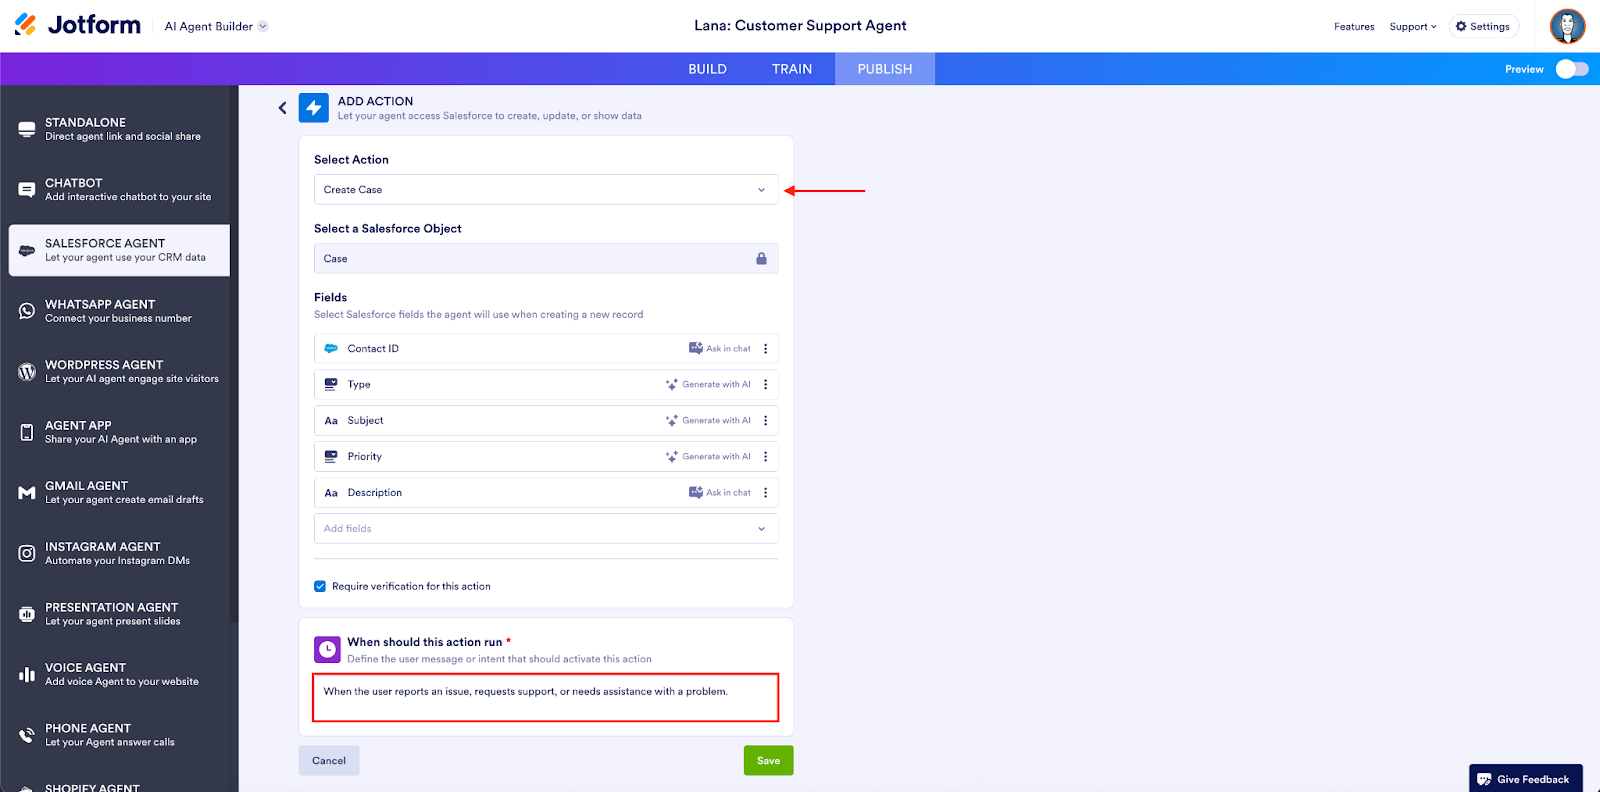
The flow is similar when editing a Create Case action, an excellent usage for customer service.
For example, your action trigger can be a prompt such as “When the user requests support or needs assistance.” You can set up your agent to create a case within Salesforce and choose which suggested fields your agent will use to create the new record.
Clicking the ellipsis icon for a given field allows you to access the field’s settings or remove the field. You can also customize fields based on your unique objects.
If you want your agent to ask the end user to provide the content a particular field asks for, select the Ask in chat fill method. This will trigger your agent to ask for that information inside the chat.

There are other fill methods for a given field, such as Generate with AI (the agent will infer the field based on subject or type of case; i.e., selecting high priority for angry customer language), Static value (based on Salesforce values), or Lookup result (connecting Salesforce objects to agent actions). You can mark all methods of learning for the field type as required if you choose.
We’ll go into more depth on the Lookup result method a little later.
At the bottom of the screen, you can opt to require customer verification for the action. This means your agent will verify the customer’s identity with a verification code sent to their email before fulfilling the task.
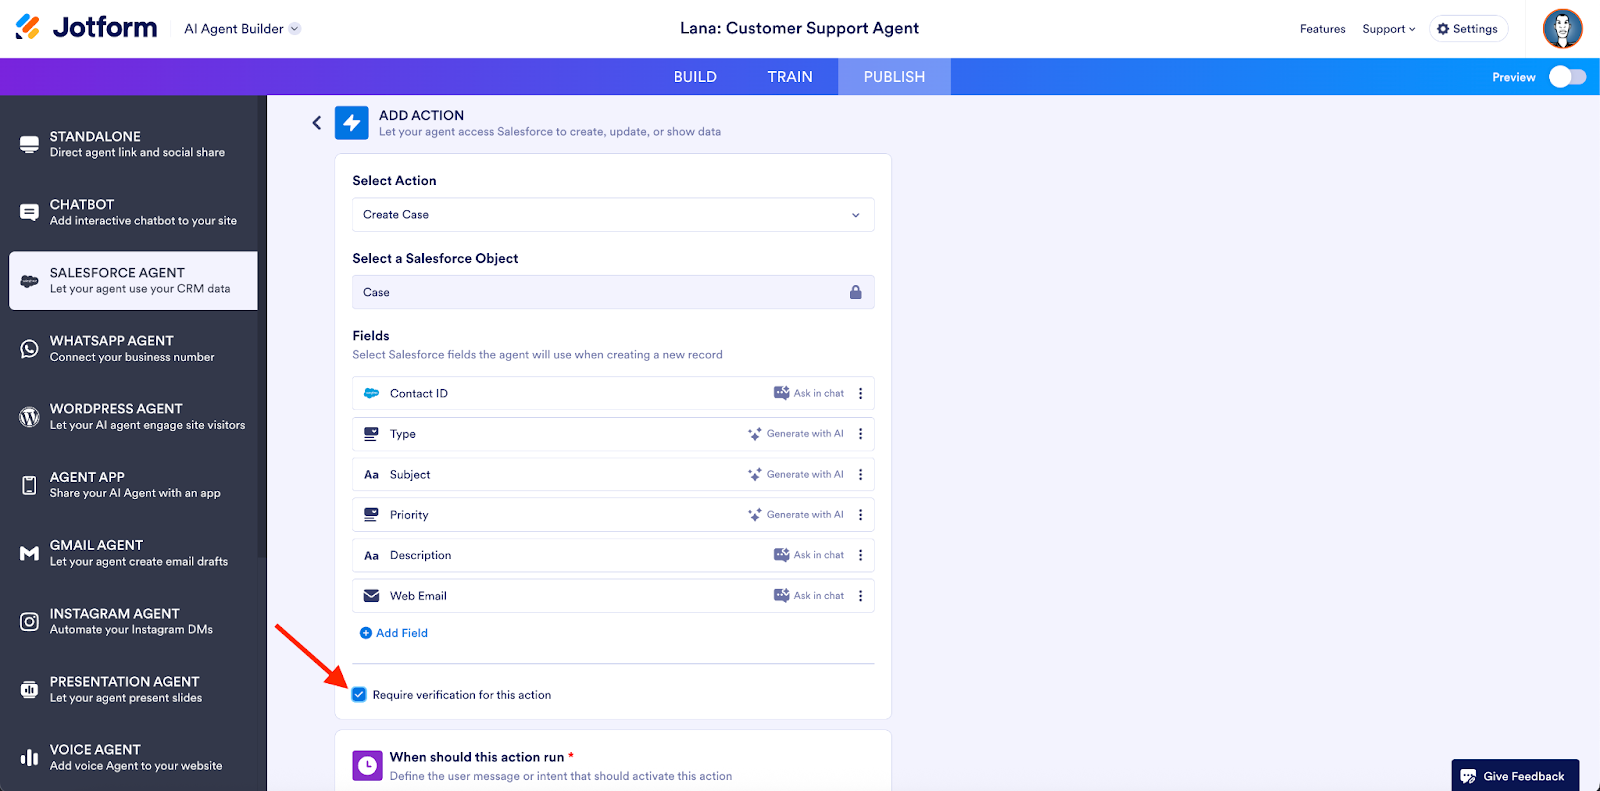
Unchecking this option means new records (leads, opportunities, etc.) will be created without verifying the customer’s identity. This is helpful in scenarios like a customer service manager creating cases for a new customer.
Did you know?
There are over 25 actions you can trigger with your Salesforce Agent. Create leads, cases, records, contacts, appointments, and order-related actions. Your agent is equipped to handle almost anything.
Knowledge & Share Agent
Click Knowledge under the Agent summary to view knowledge articles in your Salesforce organization. You can add new knowledge by clicking the arrow on the right.

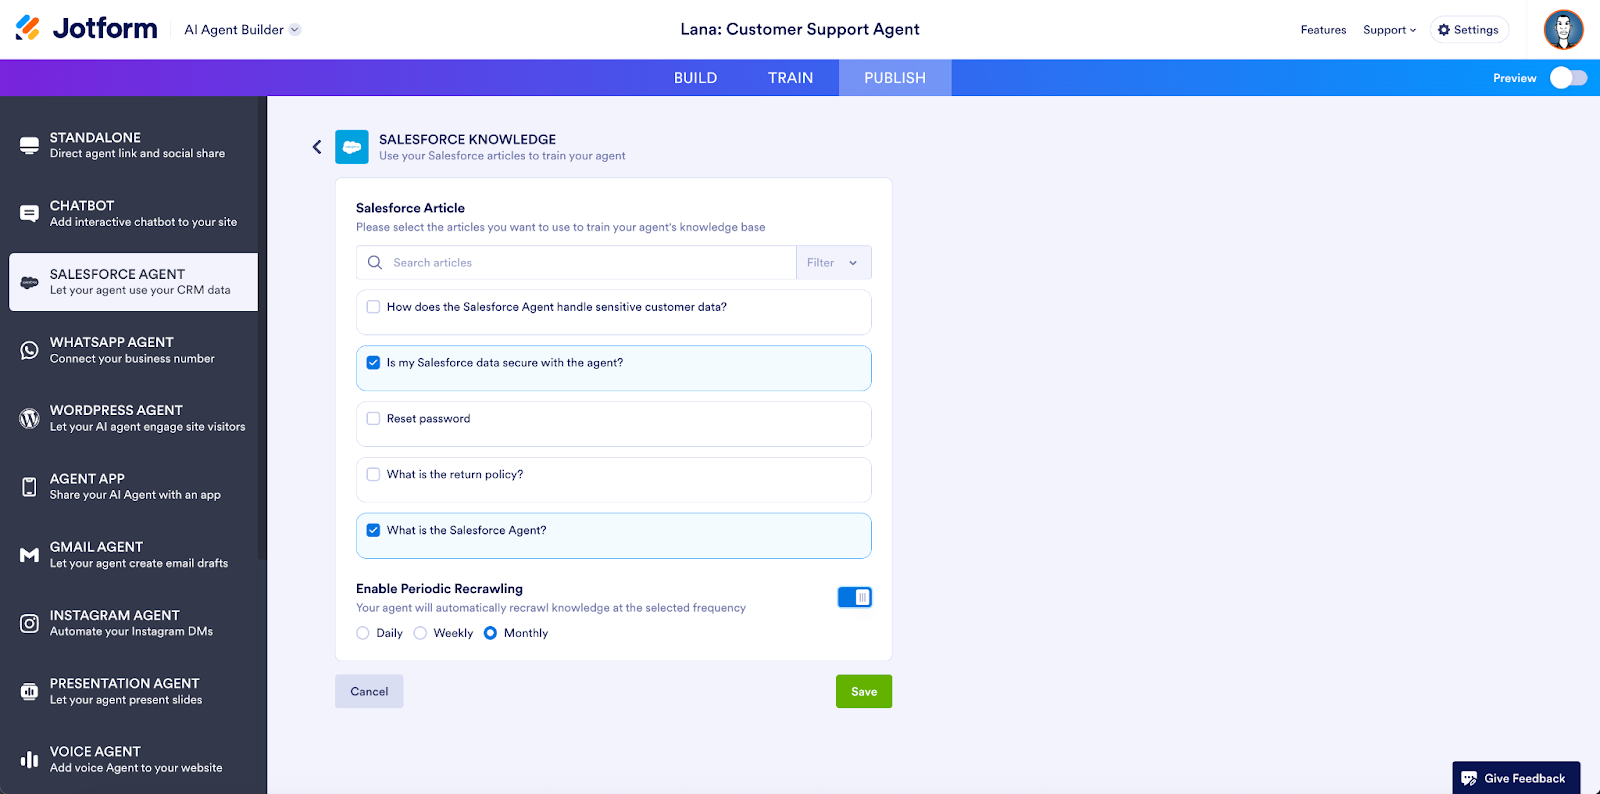
Once knowledge has been shared, your agent will have a number of predefined buttons the end user can choose from (i.e., “Review return policy” or “Reset a password”) in the chat interface. Your agent will draw upon these from the Knowledge Articles section of your Salesforce instance.

Next to the Agent Summary tab is Share Agent. Here you can easily copy a link to send your agent to others.
Preview
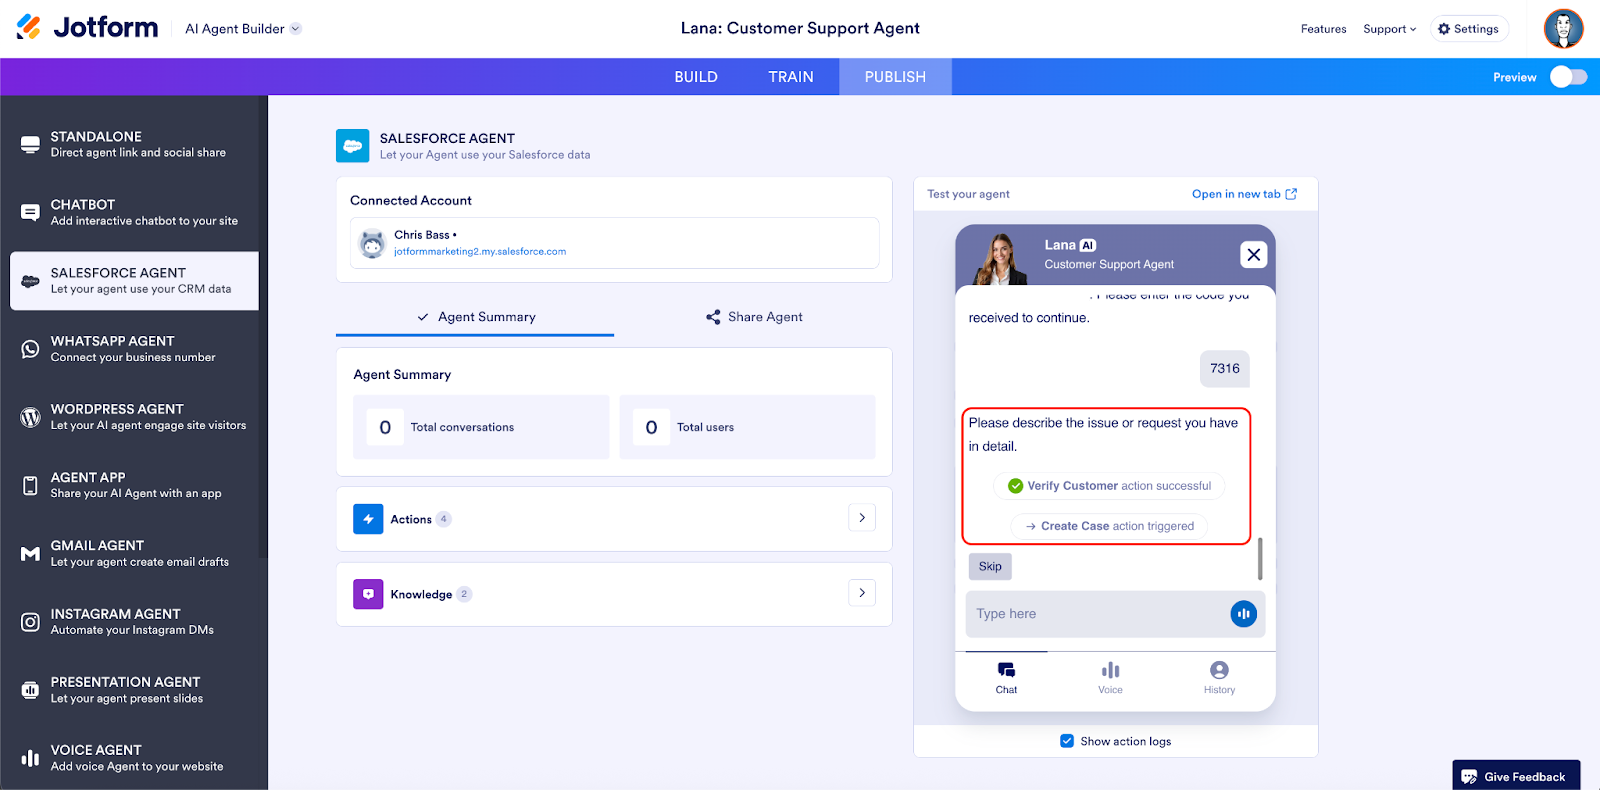
On the right of the screen is an area for you to test your agent. You can test it out in real time with sample customer queries. There’s also a checkbox that allows you to show the action logs of successfully triggered actions as well as any failures.
To test the agent before making it live, I’m going to enter a sample customer issue. Because the identity verification box is checked, my agent is asking for my email address. In addition, the Verify Customer action is triggered. This is visible to the agent creator only, for any potential agent error handling. It isn’t visible to the customer.
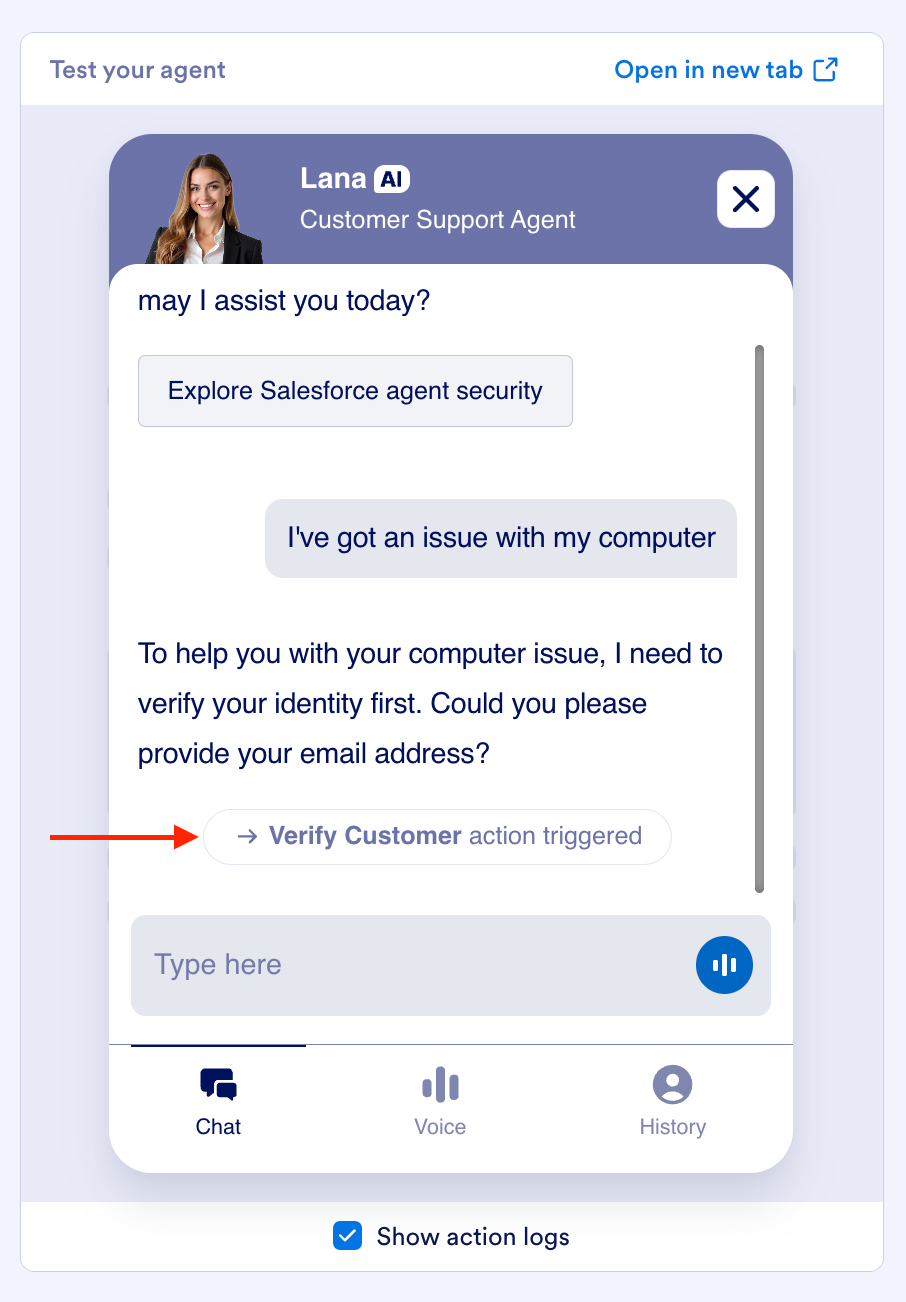
When I enter the customer email, a 2FA verification code is sent from Jotform. After I enter the requested code in the chat, it verifies me successfully and triggers the Create Case action.
Did you know?
The Verify Customer action can be used whenever a customer needs access to sensitive data. An email verification link is sent to confirm the customer’s identity before allowing them to access records or update information.
After being prompted to describe my issue, I enter it, and the agent tells me that they’re looking into it.
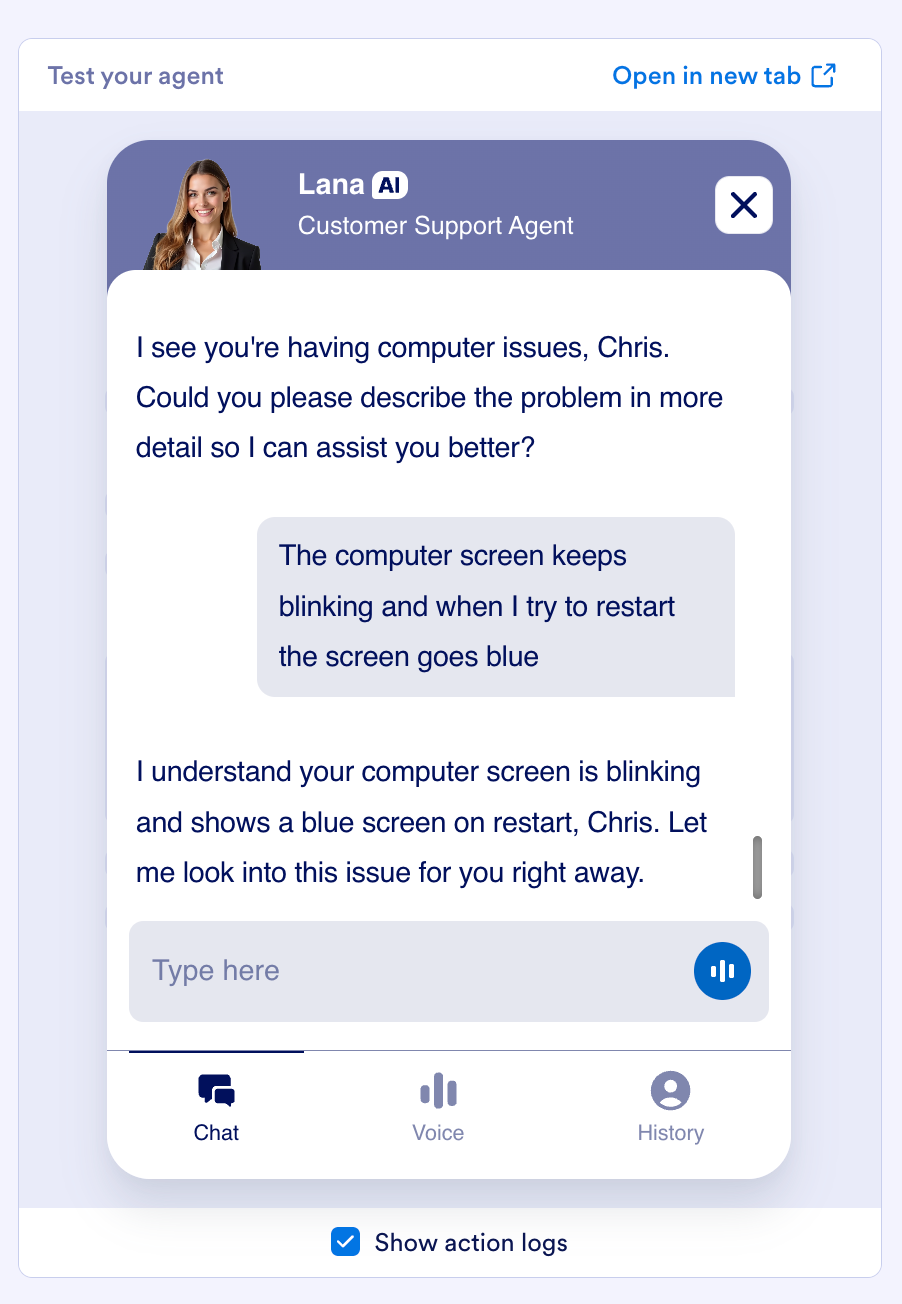
When I go into Salesforce to check my cases, the new case appears, and it’s created with a case number, along with the auto-generated fields from AI (priority, etc.) and, importantly, my contact details.

That’s it. Once you’re satisfied with your agent’s performance in the test environment, you can deploy it across your chosen channels.
Experience Cloud
If you’ve created branded sites, community forums, or portal experiences for partners or employees, you’ll be happy to know that your Salesforce Agent can be shared directly on Salesforce’s Experience Cloud.
Here’s how to add an AI chatbot to your Experience Cloud site.
Before starting, please make sure you’ve completed the Experience Cloud setup in your Salesforce organization. Learn more about the setup.
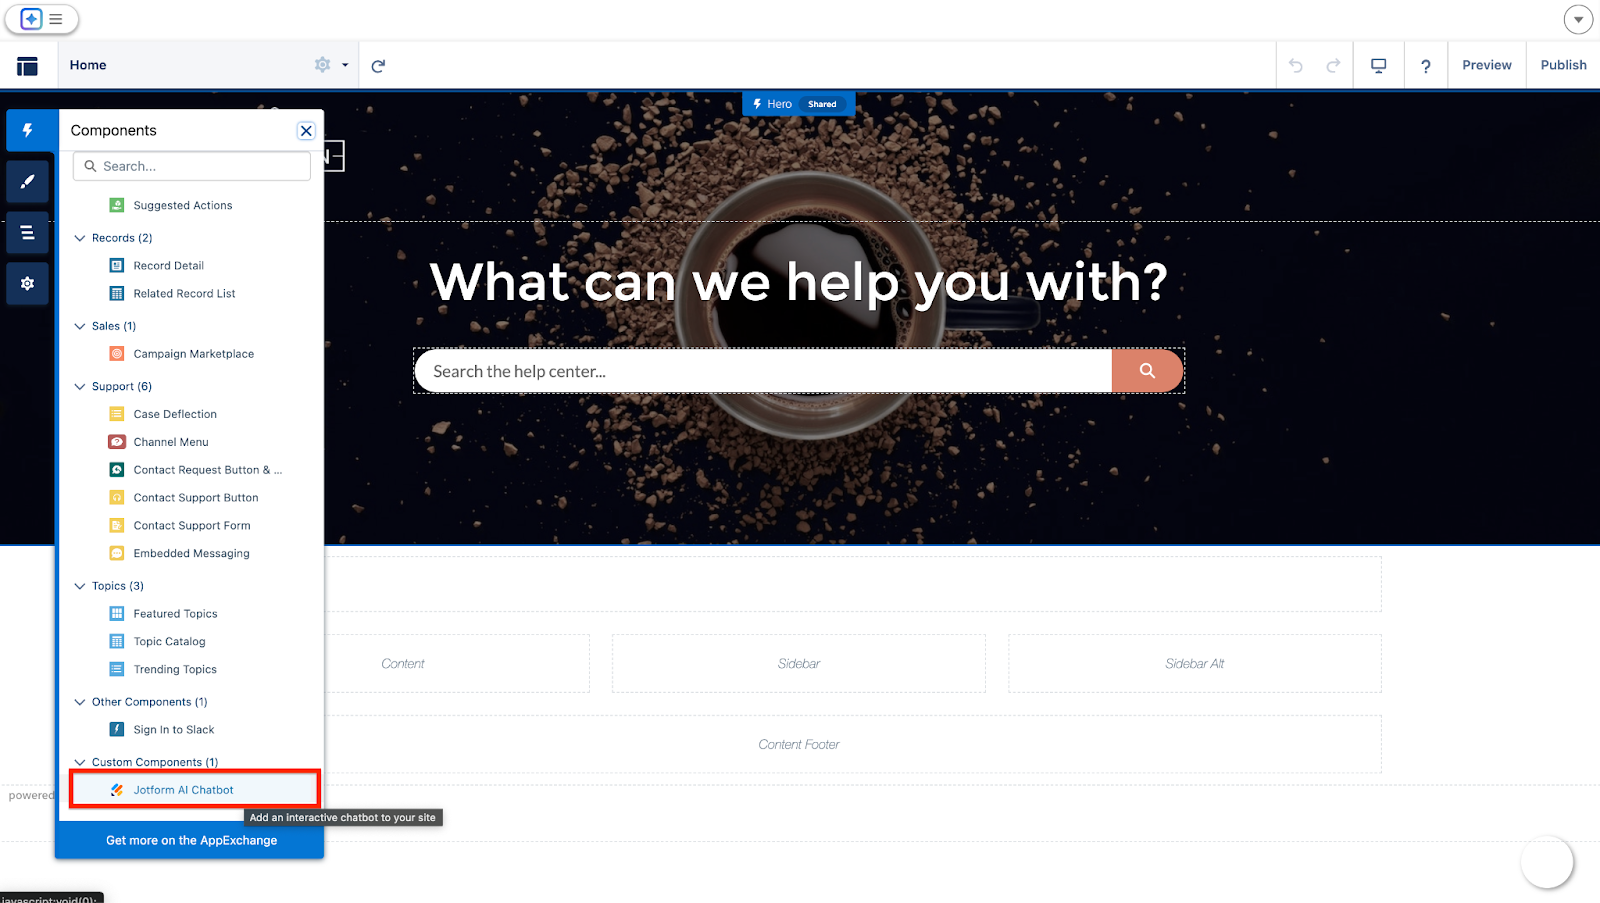
To add an AI Chatbot to your Salesforce Experience Cloud site, you need to install the most recent version of Jotform from the AppExchange. This will enable you to use our custom lightning component, Jotform AI Chatbot.
Once the installation is complete, open the Experience Builder for the site you want to edit. Click the Components tab, and you’ll find Jotform AI Chatbot listed under Custom Components.
Drag and drop the Jotform AI Chatbot component to the page, and paste your agent’s share link into the settings panel. You can adjust your chatbot’s position and adjust other settings as well as publish the page.
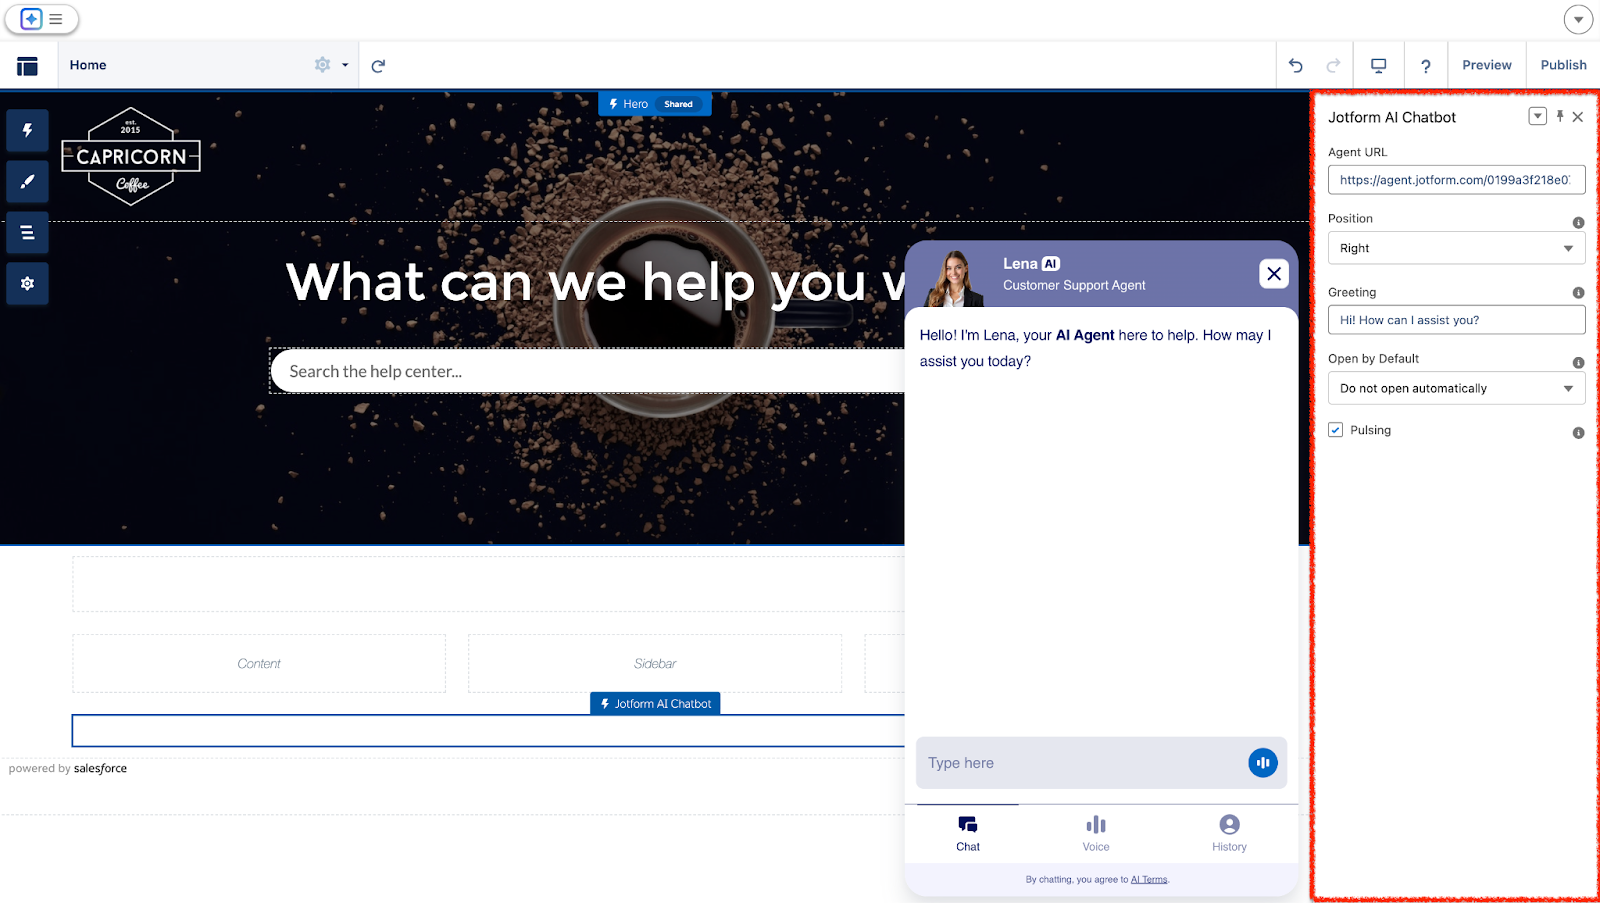
The agent will empower you to provide 24-7 support and extend your brand reach across all of your brand’s stakeholders.
Jotform Enterprise for Salesforce
Many of you know that Jotform has a native integration on Salesforce. Jotform for Salesforce has automation features like dynamic prefill, e-signatures, shareable apps, and more.
The agent creation flow is slightly different for users with this setup. Let’s take a closer look.
In the Jotform for Salesforce user interface, click the Create button. On the next page, you’ll see the option to create a Salesforce Agent next to the Salesforce Form option.
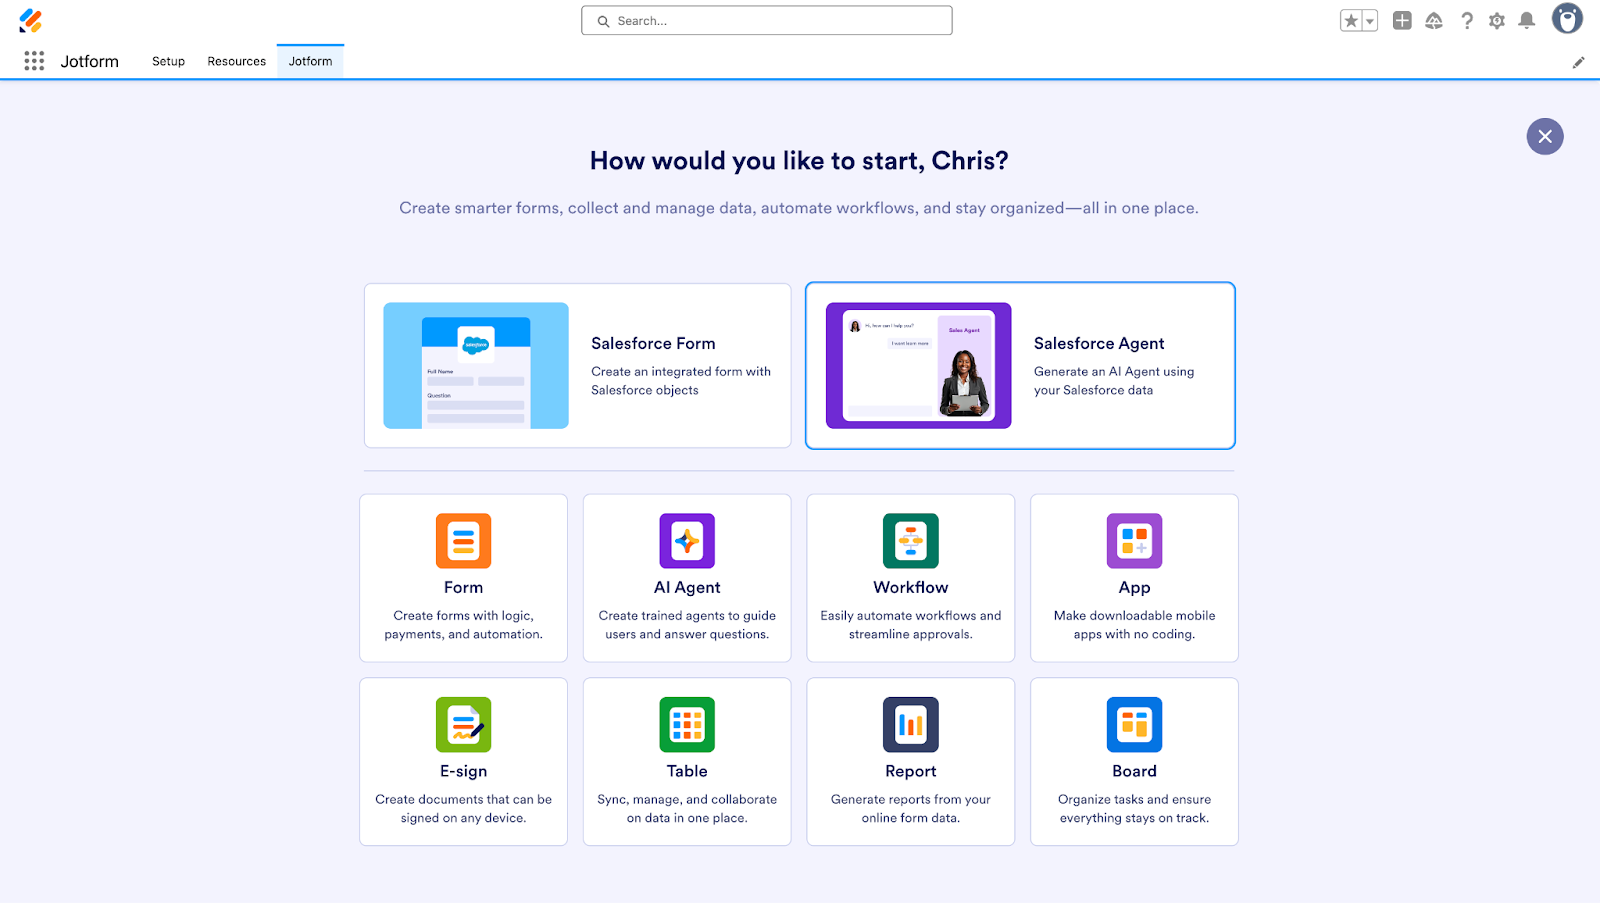
After selecting Salesforce Agent, you’ll see the prompt area and common use case options. Choose a use case, and click Create Agent to generate your Salesforce Agent.
Learn more about Jotform Enterprise for Salesforce!
Real-world enterprise use cases
A global healthcare network uses Jotform Salesforce Agent to manage patient support inquiries. The agent automatically verifies the patient’s identity, creates a case in Service Cloud, and routes it to the appropriate department, while ensuring data remains in a HIPAA-friendly environment.
A leading industrial manufacturer configured the Salesforce Agent to capture inbound partner requests from regional websites. Leads are automatically created and assigned to the correct territory manager in Salesforce, cutting response times from days to minutes.
A major university’s HR department uses the Salesforce Agent to handle employee onboarding questions, PTO requests, and IT password resets. With automated ticket creation and verification, the institution has reduced internal service response times by over 40 percent.
A financial services firm configured its Salesforce Agent to verify customers before sharing sensitive account details. The agent uses Salesforce’s verification process and Jotform’s secure data handling to ensure every interaction meets strict compliance standards.
While the Salesforce Agent can be tailored to virtually any workflow, the following enterprise teams often see the most immediate benefits:
- Sales operations: Automate lead intake from marketing campaigns, territory assignments, and CRM updates.
- Customer service: Streamline case creation, triage, and escalation with real-time data syncing to Salesforce Service Cloud.
- Marketing: Capture and qualify leads from campaigns and events, enabling instant follow-up within Salesforce.
- IT and HR departments: Automate internal service requests, onboarding, and ticket tracking for faster employee support.
- Operations management: Integrate the Agent into logistics, procurement, or order management workflows to reduce team friction.
Pro tips for enterprise teams
Field mapping: Standardize mapping across departments for consistent data accuracy. Use Jotform’s structured field elements for Salesforce objects like Contacts, Accounts, and Opportunities.
Lookup result method: Use lookup fields to connect one action to another, such as associating a case with a verified contact ID.
Compliance and audit logs: Use Jotform’s integration logs to track data activity for internal audits or regulatory reviews.
Access control: Set permissions to limit sensitive workflows (like financial transactions or HR records) to authorized users only.
Conclusion
The Jotform Salesforce Agent brings powerful, AI-driven automation to enterprise-scale Salesforce environments securely, efficiently, and without requiring any coding.
By connecting directly to Salesforce Sales and Service Clouds, enterprise teams can automate key workflows, accelerate response times, and maintain data integrity across global operations.
Along with Jotform Enterprise’s workflow suite, data collection, and AI tools, the Salesforce Agent helps organizations create seamless digital experiences for customers, partners, and employees.
We invite you to experience the Jotform Salesforce Agent and explore how it can transform your organization’s Salesforce workflows.
If you’re attending Dreamforce in San Francisco (Oct 14–16), stop by Booth #713 to see the Salesforce Agent in action and speak with the Jotform Enterprise team.
—
Ready to explore Jotform Salesforce Agent for your organization?
Book a personalized demo with our Enterprise Solutions team and see how your Salesforce workflows can be automated securely — at scale.


")


Send Comment: